Setup Guide
Page 2
...2001 The following paragraph does not apply to any obligation to you . References in any way it operates. Lexmark and Lexmark with RESTRICTED RIGHTS. A caution identifies something that could include technical inaccuracies or typographical errors. these available in all... with diamond design are inconsistent with other countries, contact your printer hardware or software. therefore, this product by the manufacturer, are the user's responsibility. Lexmark may not apply to Lexmark International Ltd., Marketing and Services Department, Westhorpe House, Westhorpe,...
...2001 The following paragraph does not apply to any obligation to you . References in any way it operates. Lexmark and Lexmark with RESTRICTED RIGHTS. A caution identifies something that could include technical inaccuracies or typographical errors. these available in all... with diamond design are inconsistent with other countries, contact your printer hardware or software. therefore, this product by the manufacturer, are the user's responsibility. Lexmark may not apply to Lexmark International Ltd., Marketing and Services Department, Westhorpe House, Westhorpe,...
Setup Guide
Page 3
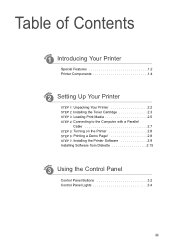
Table of Contents 1 Introducing Your Printer Special Features 1.2 Printer Components 1.4 2 Setting Up Your Printer STEP 1: Unpacking Your Printer 2.2 STEP 2: Installing the Toner Cartridge 2.3 STEP 3: Loading Print Media 2.5 STEP 4: Connecting to the Computer with a Parallel Cable 2.7 STEP 5: Turning on the Printer 2.8 STEP 6: Printing a Demo Page 2.8 STEP 7: Installing the Printer Software 2.9 Installing Software from Diskette 2.15 3 Using the Control Panel Control Panel Buttons 3.2 Control Panel Lights 3.4 iii
Table of Contents 1 Introducing Your Printer Special Features 1.2 Printer Components 1.4 2 Setting Up Your Printer STEP 1: Unpacking Your Printer 2.2 STEP 2: Installing the Toner Cartridge 2.3 STEP 3: Loading Print Media 2.5 STEP 4: Connecting to the Computer with a Parallel Cable 2.7 STEP 5: Turning on the Printer 2.8 STEP 6: Printing a Demo Page 2.8 STEP 7: Installing the Printer Software 2.9 Installing Software from Diskette 2.15 3 Using the Control Panel Control Panel Buttons 3.2 Control Panel Lights 3.4 iii

Setup Guide
Page 4
1chapter Introducing Your Printer Congratulations on the following topics: • Special Features • Printer Components This chapter provides information on your purchase of the LexmarkTM E210 printer!
1chapter Introducing Your Printer Congratulations on the following topics: • Special Features • Printer Components This chapter provides information on your purchase of the LexmarkTM E210 printer!

Setup Guide
Page 5
... conserves electricity by substantially reducing power consumption when not printing. • This product meets Energy Star guidelines for the most convenient access. Special Features Lexmark E210 is a versatile, productive printer equipped with excellent quality • You can : Print with special features that improve print quality, giving you a competitive edge. You can print at... of print media. • Two output locations: Select either the face-down output slot or the face-up output slot for energy efficiency. 1.2 INTRODUCING YOUR PRINTER
... conserves electricity by substantially reducing power consumption when not printing. • This product meets Energy Star guidelines for the most convenient access. Special Features Lexmark E210 is a versatile, productive printer equipped with excellent quality • You can : Print with special features that improve print quality, giving you a competitive edge. You can print at... of print media. • Two output locations: Select either the face-down output slot or the face-up output slot for energy efficiency. 1.2 INTRODUCING YOUR PRINTER

Setup Guide
Page 6
...; You can customize your document can be printed on plain paper. INTRODUCING YOUR PRINTER 1.3 Print in various environments • Your printer is compatible with Windows 95/98/Me/NT 4.0/2000. • Your printer is compatible with the Linux system. • Your printer comes with both Parallel and USB interfaces. See "Printing Posters" on page...
...; You can customize your document can be printed on plain paper. INTRODUCING YOUR PRINTER 1.3 Print in various environments • Your printer is compatible with Windows 95/98/Me/NT 4.0/2000. • Your printer is compatible with the Linux system. • Your printer comes with both Parallel and USB interfaces. See "Printing Posters" on page...
Setup Guide
Page 7
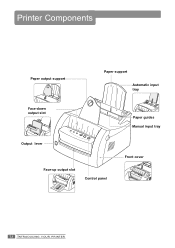
Printer Components Paper output support Paper support Automatic input tray Face-down output slot Output lever Face-up output slot Control panel Paper guides Manual input tray Front cover 1.4 INTRODUCING YOUR PRINTER
Printer Components Paper output support Paper support Automatic input tray Face-down output slot Output lever Face-up output slot Control panel Paper guides Manual input tray Front cover 1.4 INTRODUCING YOUR PRINTER
Setup Guide
Page 9
2chapter Setting Up Your Printer This chapter provides step-by-step information on the Printer • STEP 6: Printing a Demo Page! • STEP 7: Installing the Printer Software • Installing Software from Diskette Topics included are: • STEP 1: Unpacking Your Printer • STEP 2: Installing the Print Cartridge • STEP 3: Loading Print Media • STEP 4: Connecting to the Computer with a Parallel Cable • STEP 5: Turning on setting up your printer.
2chapter Setting Up Your Printer This chapter provides step-by-step information on the Printer • STEP 6: Printing a Demo Page! • STEP 7: Installing the Printer Software • Installing Software from Diskette Topics included are: • STEP 1: Unpacking Your Printer • STEP 2: Installing the Print Cartridge • STEP 3: Loading Print Media • STEP 4: Connecting to the Computer with a Parallel Cable • STEP 5: Turning on setting up your printer.
Setup Guide
Page 10
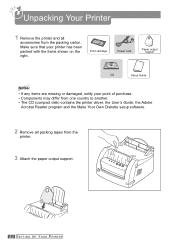
... the Adobe Acrobat Reader program and the Make Your Own Diskette setup software. 2 Remove all accessories from the printer. 3 Attach the paper output support. 2.2 SETTING UP YOUR PRINTER Print cartridge Power cord Paper output support CD Setup Guide Notes: • If any items are missing or ...damaged, notify your printer has been packed with the items shown on the right. Unpacking Your Printer 1 Remove the printer and all packing tapes from...
... the Adobe Acrobat Reader program and the Make Your Own Diskette setup software. 2 Remove all accessories from the printer. 3 Attach the paper output support. 2.2 SETTING UP YOUR PRINTER Print cartridge Power cord Paper output support CD Setup Guide Notes: • If any items are missing or ...damaged, notify your printer has been packed with the items shown on the right. Unpacking Your Printer 1 Remove the printer and all packing tapes from...

Setup Guide
Page 11
... completely. 3 Gently shake the cartridge from side to side to light for more than a few minutes. Hot water sets toner into fabric. SETTING UP YOUR PRINTER 2.3
... completely. 3 Gently shake the cartridge from side to side to light for more than a few minutes. Hot water sets toner into fabric. SETTING UP YOUR PRINTER 2.3
Setup Guide
Page 12
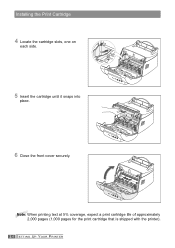
Installing the Print Cartridge 4 Locate the cartridge slots, one on each side. 5 Insert the cartridge until it snaps into place. 6 Close the front cover securely. Note: When printing text at 5% coverage, expect a print cartridge life of approximately 2,000 pages (1,000 pages for the print cartridge that is shipped with the printer). 2.4 SETTING UP YOUR PRINTER
Installing the Print Cartridge 4 Locate the cartridge slots, one on each side. 5 Insert the cartridge until it snaps into place. 6 Close the front cover securely. Note: When printing text at 5% coverage, expect a print cartridge life of approximately 2,000 pages (1,000 pages for the print cartridge that is shipped with the printer). 2.4 SETTING UP YOUR PRINTER
Setup Guide
Page 13
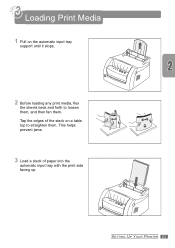
This helps prevent jams. 3 Load a stack of the stack on the automatic input tray support until it stops. 2 Before loading any print media, flex the sheets back and forth to straighten them . SETTING UP YOUR PRINTER 2.5 Tap the edges of paper into the automatic input tray with the print side facing up. Loading Print Media 1 Pull on a table top to loosen them, and then fan them .
This helps prevent jams. 3 Load a stack of the stack on the automatic input tray support until it stops. 2 Before loading any print media, flex the sheets back and forth to straighten them . SETTING UP YOUR PRINTER 2.5 Tap the edges of paper into the automatic input tray with the print side facing up. Loading Print Media 1 Pull on a table top to loosen them, and then fan them .
Setup Guide
Page 14
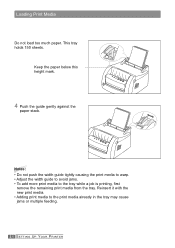
Reinsert it with the new print media. • Adding print media to the tray while a job is printing, first remove the remaining print media from the tray. This tray holds 150 sheets. Keep the paper below this height mark. 4 Push the guide gently against the paper stack. Notes: • Do not push the width guide tightly causing the print media to warp. • Adjust the width guide to avoid jams. • To add more print media to the print media already in the tray may cause jams or multiple feeding. 2.6 SETTING UP YOUR PRINTER Loading Print Media Do not load too much paper.
Reinsert it with the new print media. • Adding print media to the tray while a job is printing, first remove the remaining print media from the tray. This tray holds 150 sheets. Keep the paper below this height mark. 4 Push the guide gently against the paper stack. Notes: • Do not push the width guide tightly causing the print media to warp. • Adjust the width guide to avoid jams. • To add more print media to the print media already in the tray may cause jams or multiple feeding. 2.6 SETTING UP YOUR PRINTER Loading Print Media Do not load too much paper.
Setup Guide
Page 15
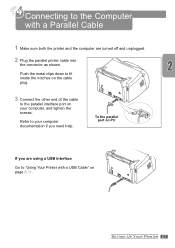
SETTING UP YOUR PRINTER 2.7 Push the metal clips down to fit inside the notches on the cable plug. 3 Connect the other end of the cable to the parallel interface port on your computer documentation if you are turned off and unplugged. 2 Plug the parallel printer cable into the connector as shown. Connecting to the Computer with a Parallel Cable 1 Make sure both the printer and the computer are using a USB interface Go to "Using Your Printer with a USB Cable" on page A.11. To the parallel port on PC If you need help. Refer to your computer, and tighten the screws.
SETTING UP YOUR PRINTER 2.7 Push the metal clips down to fit inside the notches on the cable plug. 3 Connect the other end of the cable to the parallel interface port on your computer documentation if you are turned off and unplugged. 2 Plug the parallel printer cable into the connector as shown. Connecting to the Computer with a Parallel Cable 1 Make sure both the printer and the computer are using a USB interface Go to "Using Your Printer with a USB Cable" on page A.11. To the parallel port on PC If you need help. Refer to your computer, and tighten the screws.
Setup Guide
Page 16
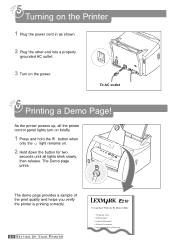
To AC outlet Printing a Demo Page! Turning on the Printer 1 Plug the power cord in as shown. 2 Plug the other end into a properly grounded AC outlet. 3 Turn on . 2 Hold down the button for the Home ... The demo page provides a sample of the print quality and helps you verify the printer is printing correctly. 2.8 SETTING UP YOUR PRINTER E210 Personal Laser Printer for two seconds until all lights blink slowly, then release. As the printer powers up, all the printer control panel lights turn on briefly. 1 Press and hold the button when only...
To AC outlet Printing a Demo Page! Turning on the Printer 1 Plug the power cord in as shown. 2 Plug the other end into a properly grounded AC outlet. 3 Turn on . 2 Hold down the button for the Home ... The demo page provides a sample of the print quality and helps you verify the printer is printing correctly. 2.8 SETTING UP YOUR PRINTER E210 Personal Laser Printer for two seconds until all lights blink slowly, then release. As the printer powers up, all the printer control panel lights turn on briefly. 1 Press and hold the button when only...

Setup Guide
Page 17
... are using Windows 95, Windows 98, Windows Me, Windows NT 4.0 or Windows 2000. If you must install a printer driver, which translates data from your application into data that is attached directly to the printer with your PC. • There is at least 50MB of the most popular Windows-based software applications. To... operate your printer, you are printing in Linux See "Linux Driver Installation" on page A.17, for some of free disk space on your PC. • All applications are ...
... are using Windows 95, Windows 98, Windows Me, Windows NT 4.0 or Windows 2000. If you must install a printer driver, which translates data from your application into data that is attached directly to the printer with your PC. • There is at least 50MB of the most popular Windows-based software applications. To... operate your printer, you are printing in Linux See "Linux Driver Installation" on page A.17, for some of free disk space on your PC. • All applications are ...

Setup Guide
Page 18
Note: If the New Hardware Found box appears during the installation procedure, click the x in the CD-ROM drive. Installing the Printer Software Installing the Printer Software from the Start menu, and type x:\cdsetup.exe in the Open box (where x is the drive letter for the CD-ROM drive), and click OK. Installation begins automatically. If the CD-ROM drive does not automatically run: Select Run from the CD LEXMARK E210 1 Place the CD in the upper right corner of the box, or click Cancel. 2.10 SETTING UP YOUR PRINTER
Note: If the New Hardware Found box appears during the installation procedure, click the x in the CD-ROM drive. Installing the Printer Software Installing the Printer Software from the Start menu, and type x:\cdsetup.exe in the Open box (where x is the drive letter for the CD-ROM drive), and click OK. Installation begins automatically. If the CD-ROM drive does not automatically run: Select Run from the CD LEXMARK E210 1 Place the CD in the upper right corner of the box, or click Cancel. 2.10 SETTING UP YOUR PRINTER
Setup Guide
Page 19
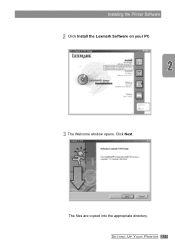
The files are copied into the appropriate directory. Installing the Printer Software 2 Click Install the Lexmark Software on your PC. 3 The Welcome window opens. Click Next. SETTING UP YOUR PRINTER 2.11
The files are copied into the appropriate directory. Installing the Printer Software 2 Click Install the Lexmark Software on your PC. 3 The Welcome window opens. Click Next. SETTING UP YOUR PRINTER 2.11
Setup Guide
Page 20
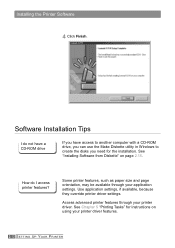
See "Installing Software from Diskette" on using your printer driver features. 2.12 SETTING UP YOUR PRINTER Use application settings, if available, because they override printer driver settings. Access advanced printer features through your printer driver. See Chapter 5 "Printing Tasks" for the installation. How do I do not ... to create the disks you need for instructions on page 2.15. Software Installation Tips I access printer features? Some printer features, such as paper size and page orientation, may be available through your application settings. Installing the...
See "Installing Software from Diskette" on using your printer driver features. 2.12 SETTING UP YOUR PRINTER Use application settings, if available, because they override printer driver settings. Access advanced printer features through your printer driver. See Chapter 5 "Printing Tasks" for the installation. How do I do not ... to create the disks you need for instructions on page 2.15. Software Installation Tips I access printer features? Some printer features, such as paper size and page orientation, may be available through your application settings. Installing the...

Setup Guide
Page 21
If you to uninstall the driver. 1 From the Start menu, select Programs. 2 Select Lexmark E210, and then Lexmark E210 Driver Maintenance. 3 When your computer confirms your installation fails, follow these instructions to select and remove any or all of the Lexmark E210 printing system components. In Windows, after installation, the Uninstall icon in the Lexmark E210 program group allows you are upgrading the printer driver, or if your selection, click OK. SETTING UP YOUR PRINTER 2.13 Installing the Printer Software How do I remove the printing software?
If you to uninstall the driver. 1 From the Start menu, select Programs. 2 Select Lexmark E210, and then Lexmark E210 Driver Maintenance. 3 When your computer confirms your installation fails, follow these instructions to select and remove any or all of the Lexmark E210 printing system components. In Windows, after installation, the Uninstall icon in the Lexmark E210 program group allows you are upgrading the printer driver, or if your selection, click OK. SETTING UP YOUR PRINTER 2.13 Installing the Printer Software How do I remove the printing software?

Setup Guide
Page 22
... A.17 for information on installing the Linux driver. 2.14 SETTING UP YOUR PRINTER Turn on your printer, and then turn off your computer and printer. Installing the Printer Software 4 The Lexmark E210 printer driver and all of its components are running on your computer. • Uninstall the printer software using the instruction above, and repeat the installation procedure.
... A.17 for information on installing the Linux driver. 2.14 SETTING UP YOUR PRINTER Turn on your printer, and then turn off your computer and printer. Installing the Printer Software 4 The Lexmark E210 printer driver and all of its components are running on your computer. • Uninstall the printer software using the instruction above, and repeat the installation procedure.


