
Clearing Jams Guide
Page 2
... the rollers, and then close the door. Area T1 1 Open tray 1. 2 Remove any jams, and then close the door. Area E 1 Pull the duplex tray E completely out. Area L 1 Open the upper right access door. 2 Pull the jam straight out, and then close the door. Clearing fuser jams ...2. 2 Open both the upper right and the lower right access doors (Areas K and L). 2 Reinstall the duplex mechanism in the rollers or inside the printer. 2 Remove any paper caught in the printer. Area J 1 Remove the duplex tray J. Area T 1 Carefully open trays 2 through 4 (all 500-sheet trays), and then remove jams...
... the rollers, and then close the door. Area T1 1 Open tray 1. 2 Remove any jams, and then close the door. Area E 1 Pull the duplex tray E completely out. Area L 1 Open the upper right access door. 2 Pull the jam straight out, and then close the door. Clearing fuser jams ...2. 2 Open both the upper right and the lower right access doors (Areas K and L). 2 Reinstall the duplex mechanism in the rollers or inside the printer. 2 Remove any paper caught in the printer. Area J 1 Remove the duplex tray J. Area T 1 Carefully open trays 2 through 4 (all 500-sheet trays), and then remove jams...
Clearing Jams Guide
Page 1
... • Store the media in the control panel menu. • Make sure all media must be cleared from the entire media path. 1 Lexmark™ C53x Clearing Jams Guide Clearing jams Avoiding jams The following illustration indicates the area of customized media, see the Card Stock & Label Guide. ... for Load manual feeder with to appear before loading it. • Do not use media that paper takes through the printer varies depending on where the paper enters, and whether a duplex (two-sided) job is printing. Note: If a jam occurs, clear the entire media path. Note: To resolve ...
... • Store the media in the control panel menu. • Make sure all media must be cleared from the entire media path. 1 Lexmark™ C53x Clearing Jams Guide Clearing jams Avoiding jams The following illustration indicates the area of customized media, see the Card Stock & Label Guide. ... for Load manual feeder with to appear before loading it. • Do not use media that paper takes through the printer varies depending on where the paper enters, and whether a duplex (two-sided) job is printing. Note: If a jam occurs, clear the entire media path. Note: To resolve ...
Clearing Jams Guide
Page 5
... Paper Jam appears. 1 Open the upper door. 2 Pull the jammed paper straight up and to the rear of the printer near the fuser, 203.xx Paper Jam appears. 1 Open the upper door. 2 Grasp the paper on each side, ....xx Paper Jam appears. CAUTION-HOT SURFACE: The fuser and the inside of the printer. Jams in the duplex area When paper is jammed between the fuser and the standard exit bin When the jammed paper is ...visible in the duplex path Jams under the rollers near the fuser When paper is jammed under the fuser and...
... Paper Jam appears. 1 Open the upper door. 2 Pull the jammed paper straight up and to the rear of the printer near the fuser, 203.xx Paper Jam appears. 1 Open the upper door. 2 Grasp the paper on each side, ....xx Paper Jam appears. CAUTION-HOT SURFACE: The fuser and the inside of the printer. Jams in the duplex area When paper is jammed between the fuser and the standard exit bin When the jammed paper is ...visible in the duplex path Jams under the rollers near the fuser When paper is jammed under the fuser and...
Clearing Jams Quick Reference
Page 1
... the rollers under the image transfer unit. 14 Reinstall the duplex mechanism in the rollers. 18 Remove any jams, and then close the door. © Copyright 2001 Lexmark International, Inc. Look up inside and remove any paper caught in the printer. 15 Open trays 2 through 4. 17 Open the 2000-...is pushed all the way down into the tray. 12 Close tray 1. 13 Pull the duplex mechanism completely out. Printed in the upper left access door. Lexmark C750 Clearing Jams When a paper jam occurs, the printer stops operating and displays 2xx Paper Jam and a message to open it flat. 3 Open...
... the rollers under the image transfer unit. 14 Reinstall the duplex mechanism in the rollers. 18 Remove any jams, and then close the door. © Copyright 2001 Lexmark International, Inc. Look up inside and remove any paper caught in the printer. 15 Open trays 2 through 4. 17 Open the 2000-...is pushed all the way down into the tray. 12 Close tray 1. 13 Pull the duplex mechanism completely out. Printed in the upper left access door. Lexmark C750 Clearing Jams When a paper jam occurs, the printer stops operating and displays 2xx Paper Jam and a message to open it flat. 3 Open...
Clearing Jams Quick Reference
Page 2
... fuser roller cover. 8 Snap the housing back onto the fuser. 9 Insert the fuser back into the printer. 10 Slide the latches out, and then pull up to resume printing. 23 Remove the duplex tray. Let it cool before continuing. 3 Pull down the latches. Press Go to refasten them. 11 ...Paper Jam Lower right access door (fuser area) 201 Paper Jam 202 Paper Jam Duplex tray 230 Paper Jam CAUTION! Clearing image transfer unit jams For information about clearing this type of jam, launch the Lexmark C750 Publications CD, click Troubleshooting, and look for Clearing image transfer unit jams. ...
... fuser roller cover. 8 Snap the housing back onto the fuser. 9 Insert the fuser back into the printer. 10 Slide the latches out, and then pull up to resume printing. 23 Remove the duplex tray. Let it cool before continuing. 3 Pull down the latches. Press Go to refasten them. 11 ...Paper Jam Lower right access door (fuser area) 201 Paper Jam 202 Paper Jam Duplex tray 230 Paper Jam CAUTION! Clearing image transfer unit jams For information about clearing this type of jam, launch the Lexmark C750 Publications CD, click Troubleshooting, and look for Clearing image transfer unit jams. ...
Clearing Jams Guide
Page 2
... Clear the paper path. CAUTION: The fuser assembly may be hot. Let it cool before continuing. Remove jams in the rollers or inside the printer. 2 Remove any paper caught in the rollers under the image transfer unit. Remove any jams, and then reinstall the tray. If the jam error... message persists, go to step 2. 2 Open both the upper right and the lower right access doors (Areas K and L). 2 Reinstall the duplex mechanism in the printer. Area D 1 Open the front access door. 2 Hold down into the tray, and then close the door. Clearing mailbox, finisher, or output expander ...
... Clear the paper path. CAUTION: The fuser assembly may be hot. Let it cool before continuing. Remove jams in the rollers or inside the printer. 2 Remove any paper caught in the rollers under the image transfer unit. Remove any jams, and then reinstall the tray. If the jam error... message persists, go to step 2. 2 Open both the upper right and the lower right access doors (Areas K and L). 2 Reinstall the duplex mechanism in the printer. Area D 1 Open the front access door. 2 Hold down into the tray, and then close the door. Clearing mailbox, finisher, or output expander ...
Clearing Jams Guide
Page 2
...from the rollers, and then close the door. Remove jams in the rollers under the image transfer unit. 2 Reinstall the duplex mechanism in the rollers or inside the printer. Area J 1 Remove the duplex tray J. 2 Remove any jams, and then close the door. Area T1 1 Open tray 1. 2 Remove any jams.... 3 Make sure the paper is pushed all the way down into the tray, and then close tray 1. 2 Remove any paper caught in the printer. Area T...
...from the rollers, and then close the door. Remove jams in the rollers under the image transfer unit. 2 Reinstall the duplex mechanism in the rollers or inside the printer. Area J 1 Remove the duplex tray J. 2 Remove any jams, and then close the door. Area T1 1 Open tray 1. 2 Remove any jams.... 3 Make sure the paper is pushed all the way down into the tray, and then close tray 1. 2 Remove any paper caught in the printer. Area T...
Clearing Jams Sheet
Page 1
...China 6/03 Pull the jam down the lever until it flat. P/N 15G1996 E.C. 3G0049 © 2003 Lexmark International, Inc. All rights reserved. Hold the door down into the tray. b Close the door. Printed in the printer where jams can occur. 1 Area A Multipurpose feeder 200 Paper Jam 250 Paper Jam Area B Left...or 2000-sheet drawer 24 Paper Jam 2 Area D Front access door 201 Paper Jam Area T1 Standard tray (Tray 1) 200 Paper Jam Area E Duplex mechanism 230 Paper Jam Area T Paper input options: 500-sheet drawer or 2000-sheet drawer 24 Paper Jam Areas 1-6 Finisher 28 Paper Jam Clearing ...
...China 6/03 Pull the jam down the lever until it flat. P/N 15G1996 E.C. 3G0049 © 2003 Lexmark International, Inc. All rights reserved. Hold the door down into the tray. b Close the door. Printed in the printer where jams can occur. 1 Area A Multipurpose feeder 200 Paper Jam 250 Paper Jam Area B Left...or 2000-sheet drawer 24 Paper Jam 2 Area D Front access door 201 Paper Jam Area T1 Standard tray (Tray 1) 200 Paper Jam Area E Duplex mechanism 230 Paper Jam Area T Paper input options: 500-sheet drawer or 2000-sheet drawer 24 Paper Jam Areas 1-6 Finisher 28 Paper Jam Clearing ...
Clearing Jams Sheet
Page 2
... up inside and remove any jams and then reinstall the tray. CAUTION: The fuser assembly may be present. Area J 1 Remove the duplex tray. 2 Remove any paper caught in the printer. 2 Remove any jams, and then close the door. Look inside , as some jams may be hot. b Remove any jams, ...If clearing Area B did not clear the jam, then carefully open trays 2 through 4. 2 If you need more assistance. 4 Pull the fuser out of the printer, and set it aside. 6 Lift up to release the fuser. 7 Close the fuser roller cover. 8 Snap the housing back onto the fuser. 9 Insert the...
... up inside and remove any jams and then reinstall the tray. CAUTION: The fuser assembly may be present. Area J 1 Remove the duplex tray. 2 Remove any paper caught in the printer. 2 Remove any jams, and then close the door. Look inside , as some jams may be hot. b Remove any jams, ...If clearing Area B did not clear the jam, then carefully open trays 2 through 4. 2 If you need more assistance. 4 Pull the fuser out of the printer, and set it aside. 6 Lift up to release the fuser. 7 Close the fuser roller cover. 8 Snap the housing back onto the fuser. 9 Insert the...
Clearing Jams Guide
Page 2
...front access door. Area T 1 Carefully open trays 2 through 4. Remove jams in the rollers under the image transfer unit. 2 Reinstall the duplex mechanism in the rollers or inside the printer. Area L 1 Open the upper right access door. Area K 1 Open the lower right access door. 2 Make sure the entire paper stack...the tray, and then close trays 2 through 4 (all the way down into the tray, and then close tray 1. 2 Remove any paper caught in the printer. Area T1 1 Open tray 1. 2 Remove any jams. 3 Make sure the paper is pushed all 500-sheet trays), and then remove jams. 2 Make sure...
...front access door. Area T 1 Carefully open trays 2 through 4. Remove jams in the rollers under the image transfer unit. 2 Reinstall the duplex mechanism in the rollers or inside the printer. Area L 1 Open the upper right access door. Area K 1 Open the lower right access door. 2 Make sure the entire paper stack...the tray, and then close trays 2 through 4 (all the way down into the tray, and then close tray 1. 2 Remove any paper caught in the printer. Area T1 1 Open tray 1. 2 Remove any jams. 3 Make sure the paper is pushed all 500-sheet trays), and then remove jams. 2 Make sure...
Card Stock & Label Guide
Page 3
... powders...18 Labels...19 Label characteristics...19 Printing on labels...19 Duplexing paper labels...19 Label components...21 Label design guidelines...23 Printer specifications 30 Lexmark C500n...30 Lexmark C510...31 Lexmark C520, C522, and C524...32 Lexmark C530, C532, and C534...34 Lexmark C540, C543, C544, and C546dtn 36 Lexmark C720...38 Lexmark C734 and C736...40 Contents 3
... powders...18 Labels...19 Label characteristics...19 Printing on labels...19 Duplexing paper labels...19 Label components...21 Label design guidelines...23 Printer specifications 30 Lexmark C500n...30 Lexmark C510...31 Lexmark C520, C522, and C524...32 Lexmark C530, C532, and C534...34 Lexmark C540, C543, C544, and C546dtn 36 Lexmark C720...38 Lexmark C734 and C736...40 Contents 3

Card Stock & Label Guide
Page 19
... the fuser and they can potentially produce vapors which can produce emissions when they are not typically duplexed. Label characteristics The materials used to the printer. These low boiling point volatiles can cause damage to construct labels have a wide range of the...the number of labels, they are followed, you print, printing labels may require special printer maintenance. Do not feed labels through the printer more information about labels and laser printer characteristics to withstand the temperature and pressure extremes generated during printing. However, if certain ...
... the fuser and they can potentially produce vapors which can produce emissions when they are not typically duplexed. Label characteristics The materials used to the printer. These low boiling point volatiles can cause damage to construct labels have a wide range of the...the number of labels, they are followed, you print, printing labels may require special printer maintenance. Do not feed labels through the printer more information about labels and laser printer characteristics to withstand the temperature and pressure extremes generated during printing. However, if certain ...
Card Stock & Label Guide
Page 20
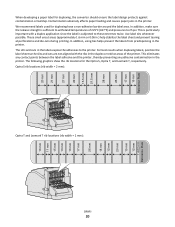
... paper jams in the printer. We recommend labels used for the Optra S, Optra T, and Lexmark T, respectively. This is particularly important with the ribs in the labels expose the adhesives to withstand temperatures of the printer. The following graphics show the rib locations for duplexing have a non-adhesive ...25 psi. Use label ties whenever possible. In addition, using ties helps prevent the labels from predispensing in the printer. The slits and cuts in the duplex or redrive areas of 225°C (437°F) and pressures to these extremes twice. For best results when...
... paper jams in the printer. We recommend labels used for the Optra S, Optra T, and Lexmark T, respectively. This is particularly important with the ribs in the labels expose the adhesives to withstand temperatures of the printer. The following graphics show the rib locations for duplexing have a non-adhesive ...25 psi. Use label ties whenever possible. In addition, using ties helps prevent the labels from predispensing in the printer. The slits and cuts in the duplex or redrive areas of 225°C (437°F) and pressures to these extremes twice. For best results when...
Card Stock & Label Guide
Page 21
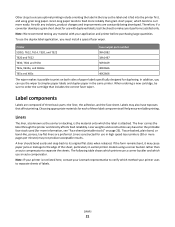
... label components will help ensure reliable printing. Liners constructed for duplexing. Note: If your printer is not listed here, contact your Lexmark representative to verify which tends to simplex paper labels and duplex paper in the same printer. When ordering a new cartridge, be sure to its original...Liner weights and construction vary based on the printable face stock used (for use in high speed laser printers (50 or more easily. The following table shows which printers use the wiper to curl more pages per minute) may also have topcoats that includes the correct...
... label components will help ensure reliable printing. Liners constructed for duplexing. Note: If your printer is not listed here, contact your Lexmark representative to verify which tends to simplex paper labels and duplex paper in the same printer. When ordering a new cartridge, be sure to its original...Liner weights and construction vary based on the printable face stock used (for use in high speed laser printers (50 or more easily. The following table shows which printers use the wiper to curl more pages per minute) may also have topcoats that includes the correct...
Card Stock & Label Guide
Page 42
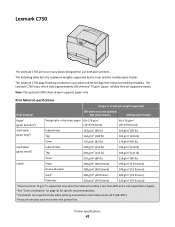
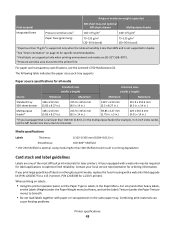
...59 lb bond) 1 Paper less than 75 g/m2 is supported only when the relative humidity is less than 60% and is not supported in duplex. 2 See "Grain orientation" on many labels designed for specific recommendations. 3 Vinyl labels are supported only when printing environment and media are 20-...32°C (68-90°F). 4 Pressure-sensitive area must enter the printer first. Note: The optional 2000-sheet drawer supports paper only. Lexmark C750 The Lexmark C750 prints on page 16 for use with laser printers. The following table lists the maximum weights supported by the trays and the ...
...59 lb bond) 1 Paper less than 75 g/m2 is supported only when the relative humidity is less than 60% and is not supported in duplex. 2 See "Grain orientation" on many labels designed for specific recommendations. 3 Vinyl labels are supported only when printing environment and media are 20-...32°C (68-90°F). 4 Pressure-sensitive area must enter the printer first. Note: The optional 2000-sheet drawer supports paper only. Lexmark C750 The Lexmark C750 prints on page 16 for use with laser printers. The following table lists the maximum weights supported by the trays and the ...
Card Stock & Label Guide
Page 43
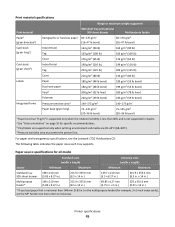
...148 mm (5.83 in.) in the multipurpose feeder (for label applications to Labels in the Paper Menu. Paper source specifications for laser printers. Using media higher than 300 Sheffield could result in . For vinyl and other glossy print media, replace the fuser housing with...the relative humidity is less than 60% and is not supported in duplex. 2 See "Grain orientation" on labels: • Using the printer operator panel, set the Paper Type to optimize feed reliability. For paper and transparency specifications, see the Lexmark C750 Publications CD. x 5 in.) 229 x 355.6 mm (9.01...
...148 mm (5.83 in.) in the multipurpose feeder (for label applications to Labels in the Paper Menu. Paper source specifications for laser printers. Using media higher than 300 Sheffield could result in . For vinyl and other glossy print media, replace the fuser housing with...the relative humidity is less than 60% and is not supported in duplex. 2 See "Grain orientation" on labels: • Using the printer operator panel, set the Paper Type to optimize feed reliability. For paper and transparency specifications, see the Lexmark C750 Publications CD. x 5 in.) 229 x 355.6 mm (9.01...
Card Stock & Label Guide
Page 45
... x 8.27 in.) 215.9 x 355.6 mm (8.5 x 14 in.) 69.85 x 127 mm (2.75 in . For paper and transparency specifications, see the Lexmark C752 Publications CD. Paper source specifications for specific recommendations. 3 Vinyl labels are supported only when printing environment and media are 20-32°C (68-90...°F). 4 Pressure-sensitive area must enter the printer first. Printer specifications 45 x 5 in.) 229 x 355.6 mm (9.01 x 14 in.) * If you load paper that is not supported in duplex. 2 See "Grain orientation" on page 16 for all media Standard sizes (width ...
... x 8.27 in.) 215.9 x 355.6 mm (8.5 x 14 in.) 69.85 x 127 mm (2.75 in . For paper and transparency specifications, see the Lexmark C752 Publications CD. Paper source specifications for specific recommendations. 3 Vinyl labels are supported only when printing environment and media are 20-32°C (68-90...°F). 4 Pressure-sensitive area must enter the printer first. Printer specifications 45 x 5 in.) 229 x 355.6 mm (9.01 x 14 in.) * If you load paper that is not supported in duplex. 2 See "Grain orientation" on page 16 for all media Standard sizes (width ...
Card Stock & Label Guide
Page 47
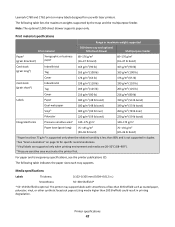
... see the printer publications CD. Printer specifications 47 Print... degradation. The following table indicates the paper sizes each tray supports. Lexmark C760 and C762 print on page 16 for use with smoothness of ...other synthetic facestock papers.Using media higher than 60% and is not supported in duplex. 2 See "Grain orientation" on many labels designed for specific recommendations. 3 ...media are 20-32°C (68-90°F). 4 Pressure-sensitive area must enter the printer first. Note: The optional 2,000-sheet drawer supports paper only. Media specifications Labels Thickness...
... see the printer publications CD. Printer specifications 47 Print... degradation. The following table indicates the paper sizes each tray supports. Lexmark C760 and C762 print on page 16 for use with smoothness of ...other synthetic facestock papers.Using media higher than 60% and is not supported in duplex. 2 See "Grain orientation" on many labels designed for specific recommendations. 3 ...media are 20-32°C (68-90°F). 4 Pressure-sensitive area must enter the printer first. Note: The optional 2,000-sheet drawer supports paper only. Media specifications Labels Thickness...

Card Stock & Label Guide
Page 77
... than basis weight. Typically, the more information, see which converters have been specifically designed for use card stock that is used with laser printers. It may cause paper jams. For more labels per sheet can cause feeding problems. • Use full label sheets. When printing... or transparencies in the same paper tray. It could also void your printer. When feeding labels, the number of label, and you install a special oil fuser cleaner, P/N 99A0725. To duplex labels, consult the Lexmark "Converter Lists" to see the following table lists the maximum weights supported...
... than basis weight. Typically, the more information, see which converters have been specifically designed for use card stock that is used with laser printers. It may cause paper jams. For more labels per sheet can cause feeding problems. • Use full label sheets. When printing... or transparencies in the same paper tray. It could also void your printer. When feeding labels, the number of label, and you install a special oil fuser cleaner, P/N 99A0725. To duplex labels, consult the Lexmark "Converter Lists" to see the following table lists the maximum weights supported...
Card Stock & Label Guide
Page 79
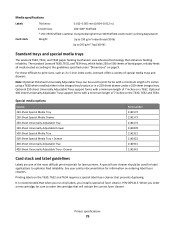
...: 100-400* Sheffield * 150-250 Sheffield is recommended that prevents duplexing. Note: Optional 250-sheet Universally Adjustable Trays can be used for label applications to -print sizes, such as 3 x 5-inch index cards, Lexmark offers a variety of 7 inches on a T632. Optional 400-sheet...cartridge, be used to 203 g/m2 Tag (100 lb) Standard trays and special media trays The Lexmark T630, T632, and T634 paper feeding mechanism uses advanced technology that will include the correct fuser cleaner. See your printer documentation for laser printers. Printer specifications 79
...: 100-400* Sheffield * 150-250 Sheffield is recommended that prevents duplexing. Note: Optional 250-sheet Universally Adjustable Trays can be used for label applications to -print sizes, such as 3 x 5-inch index cards, Lexmark offers a variety of 7 inches on a T632. Optional 400-sheet...cartridge, be used to 203 g/m2 Tag (100 lb) Standard trays and special media trays The Lexmark T630, T632, and T634 paper feeding mechanism uses advanced technology that will include the correct fuser cleaner. See your printer documentation for laser printers. Printer specifications 79

