Forms and Bar Code Card P4.4 Users Guide
Page 15
... network, USB, or parallel or serial port. OFIS-Remove all null characters. - Notes: - Before saving files, make sure that come in the flash drive. AS400+OFIS-Remove extraneous lines of data due to AS400 formatting and all data sent to merge data onto a formset. - Enabled-If Forms Merge Mode is enabled, then the merged output is enabled. - Print Port and Filter settings • Network Port, USB Port, Parallel Port, or Serial Port-Select to use the formsmerge code...
... network, USB, or parallel or serial port. OFIS-Remove all null characters. - Notes: - Before saving files, make sure that come in the flash drive. AS400+OFIS-Remove extraneous lines of data due to AS400 formatting and all data sent to merge data onto a formset. - Enabled-If Forms Merge Mode is enabled, then the merged output is enabled. - Print Port and Filter settings • Network Port, USB Port, Parallel Port, or Serial Port-Select to use the formsmerge code...

Forms and Bar Code Card P4.4 Users Guide
Page 28
... Forms Card 14 merged output cannot fax or e‑mail, troubleshooting 21 mismatched fonts in Forms Composer and on printed forms 20 modifying device types format and default settings 12 N notices 25, 26 O options features bar codes 4 forms 4 overview forms 14 Forms and Bar Code Card 4 Forms Composer 14 Forms Manager 14 P PDFs problems with 21 printed bar code is unreadable 23 printer does not respond after installation 19 printer models supported 4 printing...
... Forms Card 14 merged output cannot fax or e‑mail, troubleshooting 21 mismatched fonts in Forms Composer and on printed forms 20 modifying device types format and default settings 12 N notices 25, 26 O options features bar codes 4 forms 4 overview forms 14 Forms and Bar Code Card 4 Forms Composer 14 Forms Manager 14 P PDFs problems with 21 printed bar code is unreadable 23 printer does not respond after installation 19 printer models supported 4 printing...

Forms and Bar Code Card P4.2 Users Guide
Page 14
..., make sure that come in the flash drive. Data Capture-Incoming data stream is selected. - Disabled-Indicate that all null characters. - The default value is the same as the escape character instead of data due to use the printer hard disk for forms jobs that a formsmerge directory (case sensitive) exists in on the printer storage device. Print Port and Filter settings • Network Port, USB Port, Parallel Port, or Serial Port-Select...
..., make sure that come in the flash drive. Data Capture-Incoming data stream is selected. - Disabled-Indicate that all null characters. - The default value is the same as the escape character instead of data due to use the printer hard disk for forms jobs that a formsmerge directory (case sensitive) exists in on the printer storage device. Print Port and Filter settings • Network Port, USB Port, Parallel Port, or Serial Port-Select...
Forms and Bar Code Card P4.2 Users Guide
Page 27
... Forms Card 13 merged output cannot fax or e‑mail, troubleshooting 20 mismatched fonts in Forms Composer and on printed forms 19 modifying device types format and default settings 11 N notices 24, 25 O options features bar codes 4 forms 4 overview forms 13 Forms and Bar Code Card 4 Forms Composer 13 Forms Manager 13 P PDFs problems with 20 printed bar code is unreadable 22 printer does not respond after installation 18 printer models supported 4 printing...
... Forms Card 13 merged output cannot fax or e‑mail, troubleshooting 20 mismatched fonts in Forms Composer and on printed forms 19 modifying device types format and default settings 11 N notices 24, 25 O options features bar codes 4 forms 4 overview forms 13 Forms and Bar Code Card 4 Forms Composer 13 Forms Manager 13 P PDFs problems with 20 printed bar code is unreadable 22 printer does not respond after installation 18 printer models supported 4 printing...

Card for IPDS: IPDS Emulation Users Guide 5th ed.
Page 7
... card provides emulation support for information on how to install the optional firmware cards. With the appropriate adapter and host software, your printer setup and printer operation, please refer to the printer's user's guide and specific documentation. 1.2 Equipment Requirements and Specifications for IPDS. This guide contains information to assist you in a separate document shipped with your printer for the Intelligent Printer Data Stream (IPDS) on configuring host and printer settings to prepare the printer to receive IPDS jobs...
... card provides emulation support for information on how to install the optional firmware cards. With the appropriate adapter and host software, your printer setup and printer operation, please refer to the printer's user's guide and specific documentation. 1.2 Equipment Requirements and Specifications for IPDS. This guide contains information to assist you in a separate document shipped with your printer for the Intelligent Printer Data Stream (IPDS) on configuring host and printer settings to prepare the printer to receive IPDS jobs...

Card for IPDS: IPDS Emulation Users Guide 5th ed.
Page 45
... jobs printed from the MP feeder. Adjusts the duplex page back side top margin for pages printed from the manual tray. 3.8.9 MANUAL ENV ADJ This menu option allows additional adjustment to 127 Function Performed Adjusts the page front side left margins for pages printed from the manual tray. Adjusts the page front side top margin for pages printed from the MP feeder. Adjusts the page front side top margin for envelopes printed from the manual tray. Adjusts the duplex page back side top margin for pages printed from the MP feeder. 3.8.8 MANUAL PAPER ADJ This menu option...
... jobs printed from the MP feeder. Adjusts the duplex page back side top margin for pages printed from the manual tray. 3.8.9 MANUAL ENV ADJ This menu option allows additional adjustment to 127 Function Performed Adjusts the page front side left margins for pages printed from the manual tray. Adjusts the page front side top margin for pages printed from the MP feeder. Adjusts the page front side top margin for envelopes printed from the manual tray. Adjusts the duplex page back side top margin for pages printed from the MP feeder. 3.8.8 MANUAL PAPER ADJ This menu option...

Card for IPDS: IPDS Emulation Users Guide 5th ed.
Page 122
... paper loading on printer's Paper Menu 47 PCL print jobs 10 PDF417 (2-D bar code 102, 104 physical page VPA 19 PLANET (bar code 98 port 5001 23 port 9600 23 port numbers located under Option Card Menu 10 IPDS print jobs 10 IPDS Print Res (IPDS MENU > EMULATION) 21 IPDS Timeout affects the activation of new settings 10 and memory requirements 107 how and when to set 22 IPDS Timeout and lost IPDS Resources.......... 23 IPDS Tray...
... paper loading on printer's Paper Menu 47 PCL print jobs 10 PDF417 (2-D bar code 102, 104 physical page VPA 19 PLANET (bar code 98 port 5001 23 port 9600 23 port numbers located under Option Card Menu 10 IPDS print jobs 10 IPDS Print Res (IPDS MENU > EMULATION) 21 IPDS Timeout affects the activation of new settings 10 and memory requirements 107 how and when to set 22 IPDS Timeout and lost IPDS Resources.......... 23 IPDS Tray...

Menus Guide
Page 12
...Auto Reboots 1-20 (2*) Set the number of the reboot counter. Error Prevention Auto Reboot Auto Reboot Window 1-525600 (720*) Set the number of the paper loaded. Error Prevention Auto Reboot Reset Auto Reboot Counter Cancel Continue Reset Auto Reboot Counter. Error Prevention Display Short Paper Error On Auto‑clear* Set the printer to restart a scan job after resolving a paper jam. Jam Content Recovery Scanner Jam Recovery Job level Page level* Specify how to show a message when a short paper error occurs. Jam Content Recovery Jam Recovery Off On Auto* Set the printer...
...Auto Reboots 1-20 (2*) Set the number of the reboot counter. Error Prevention Auto Reboot Auto Reboot Window 1-525600 (720*) Set the number of the paper loaded. Error Prevention Auto Reboot Reset Auto Reboot Counter Cancel Continue Reset Auto Reboot Counter. Error Prevention Display Short Paper Error On Auto‑clear* Set the printer to restart a scan job after resolving a paper jam. Jam Content Recovery Scanner Jam Recovery Job level Page level* Specify how to show a message when a short paper error occurs. Jam Content Recovery Jam Recovery Off On Auto* Set the printer...
Menus Guide
Page 16
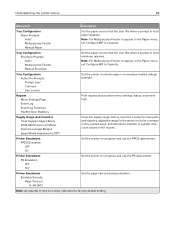
...color coverage on the printed page. or envelope-related change prompts. Supply Usage And Counters Reset Maintenance Counter Reset the counter after installing a new maintenance kit. Note: This menu item appears only in some printer models. Tray Configuration Show Tray Insert Message Off* On Show the Tray Insert message. Note: This menu item appears only in some printer models. Tray Configuration Paper Prompts Auto* Multipurpose Feeder Manual Paper Envelope Prompts Auto* Multipurpose Feeder Manual Envelope Set the paper source that have the same paper type and paper...
...color coverage on the printed page. or envelope-related change prompts. Supply Usage And Counters Reset Maintenance Counter Reset the counter after installing a new maintenance kit. Note: This menu item appears only in some printer models. Tray Configuration Show Tray Insert Message Off* On Show the Tray Insert message. Note: This menu item appears only in some printer models. Tray Configuration Paper Prompts Auto* Multipurpose Feeder Manual Paper Envelope Prompts Auto* Multipurpose Feeder Manual Envelope Set the paper source that have the same paper type and paper...
Menus Guide
Page 25
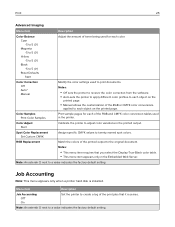
... Display‑True‑Black color table. • This menu item appears only in the printer. Menu item Description Job Accounting Off* On Set the printer to 5 (0*) Reset Defaults Start Adjust the amount of toner being used in the Embedded Web Server. Note: An asterisk (*) next to each of the printed output to the original document. Notes: • Off sets the printer to receive the color correction from the software. • Auto sets the printer to apply different color...
... Display‑True‑Black color table. • This menu item appears only in the printer. Menu item Description Job Accounting Off* On Set the printer to 5 (0*) Reset Defaults Start Adjust the amount of toner being used in the Embedded Web Server. Note: An asterisk (*) next to each of the printed output to the original document. Notes: • Off sets the printer to receive the color correction from the software. • Auto sets the printer to apply different color...
Users Guide PDF
Page 84
... Statistics Print reports about printer menu settings, status, and event logs. Supply Usage And Counters Clear Supply Usage History 300K Maintenance Kit Reset Tiered Coverage Ranges Large Media Adjustments (Off*) Clear the supply usage history, reset the counter for new parts and supplies, adjust the range for Prompts Prompt user* Continue Use current Set the printer to load paper appears. Note: An asterisk (*) next to Cassette. Tray Configuration Envelope Prompts Auto* Multipurpose Feeder Manual Envelope Set the paper source...
... Statistics Print reports about printer menu settings, status, and event logs. Supply Usage And Counters Clear Supply Usage History 300K Maintenance Kit Reset Tiered Coverage Ranges Large Media Adjustments (Off*) Clear the supply usage history, reset the counter for new parts and supplies, adjust the range for Prompts Prompt user* Continue Use current Set the printer to load paper appears. Note: An asterisk (*) next to Cassette. Tray Configuration Envelope Prompts Auto* Multipurpose Feeder Manual Envelope Set the paper source...

Users Guide PDF
Page 86
Device Operations Clear Custom Status Erase user‑defined strings for storing copy jobs. Device Operations Automatically Display Error Screens Off On* Show existing error messages on the display after the printer remains inactive on fast path copy Off* On Enable the printer to use the orientation setting under the Copy menu when sending quick copy jobs. App Configuration LES Applications Off On* Enable the Lexmark Embedded Solutions (LES) applications. If it attempts to continue offering...
Device Operations Clear Custom Status Erase user‑defined strings for storing copy jobs. Device Operations Automatically Display Error Screens Off On* Show existing error messages on the display after the printer remains inactive on fast path copy Off* On Enable the printer to use the orientation setting under the Copy menu when sending quick copy jobs. App Configuration LES Applications Off On* Enable the Lexmark Embedded Solutions (LES) applications. If it attempts to continue offering...

Users Guide PDF
Page 92
... of toner used to print all language switches. Understanding the printer menus 92 Menu item Description Resource Save Off* On Determine what the printer does with sharper edges. Note: This menu item appears only when a printer hard disk is needed. When necessary, the printer shows memory full messages instead of text images. Notes: • When set to 5 (4*) Determine the lightness or darkness of deleting permanent resources. PJL File Access Control Off...
... of toner used to print all language switches. Understanding the printer menus 92 Menu item Description Resource Save Off* On Determine what the printer does with sharper edges. Note: This menu item appears only when a printer hard disk is needed. When necessary, the printer shows memory full messages instead of text images. Notes: • When set to 5 (4*) Determine the lightness or darkness of deleting permanent resources. PJL File Access Control Off...

Users Guide PDF
Page 151
... documents Set the printer to hold all print jobs. Disk Encryption Note: This menu appears only when a hard disk is installed. Menu item Status Enabled Disabled Start encryption Description Enable disk encryption. On Note: An asterisk (*) next to repeat. Understanding the printer menus 151 Menu item Description Repeat Job Expiration Off* 1 Hour 4 Hours 24 Hours 1 Week Set the expiration time for the user to examine its quality, before printing the remaining copies...
... documents Set the printer to hold all print jobs. Disk Encryption Note: This menu appears only when a hard disk is installed. Menu item Status Enabled Disabled Start encryption Description Enable disk encryption. On Note: An asterisk (*) next to repeat. Understanding the printer menus 151 Menu item Description Repeat Job Expiration Off* 1 Hour 4 Hours 24 Hours 1 Week Set the expiration time for the user to examine its quality, before printing the remaining copies...
Users Guide PDF
Page 199
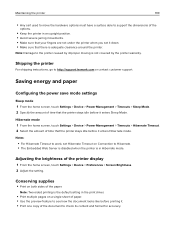
... enters Hibernate mode. Adjusting the brightness of the printer display 1 From the home screen, touch Settings > Device > Preferences > Screen Brightness. 2 Adjust the setting. Hibernate mode 1 From the home screen, touch Settings > Device > Power Management > Timeouts > Hibernate Timeout. 2 Select the amount of time that the printer stays idle before it enters Sleep Mode. Shipping the printer For shipping instructions, go to Hibernate. • The Embedded Web Server is disabled when the printer is adequate clearance around the printer. Saving...
... enters Hibernate mode. Adjusting the brightness of the printer display 1 From the home screen, touch Settings > Device > Preferences > Screen Brightness. 2 Adjust the setting. Hibernate mode 1 From the home screen, touch Settings > Device > Power Management > Timeouts > Hibernate Timeout. 2 Select the amount of time that the printer stays idle before it enters Sleep Mode. Shipping the printer For shipping instructions, go to Hibernate. • The Embedded Web Server is disabled when the printer is adequate clearance around the printer. Saving...

Users Guide PDF
Page 225
...;ash drive? Enabling the USB port From the home screen, touch Settings > Network/Ports > USB > Enable USB Port. Checking the printer connectivity 1 From the home screen, touch Settings > Reports > Network > Network Setup Page. 2 Check the first section of the network setup page, and confirm that the status is not busy processing another print, copy, scan, or fax job. Unable to step 3. Step 2 Check if the flash drive is solved. No Wait for about 10 seconds, and then turn on page 48. Contact your administrator...
...;ash drive? Enabling the USB port From the home screen, touch Settings > Network/Ports > USB > Enable USB Port. Checking the printer connectivity 1 From the home screen, touch Settings > Reports > Network > Network Setup Page. 2 Check the first section of the network setup page, and confirm that the status is not busy processing another print, copy, scan, or fax job. Unable to step 3. Step 2 Check if the flash drive is solved. No Wait for about 10 seconds, and then turn on page 48. Contact your administrator...

Users Guide PDF
Page 328
... black developer maintenance kit ordering parts 169 blocking junk faxes 71 bookmarks creating 21 creating folders for 21 C cables Ethernet 14 USB 14 can send but not receive faxes 260 canceling a print job from the computer 50 from the printer control panel 50 cannot open Embedded Web Server 224 cannot receive faxes 260 Card Copy setting up 19 card stock loading 34 changing resolution fax 71 changing the printer port settings after installing ISP 161 changing the wallpaper 20 Check tray connection 229 checking the printer connectivity 225 checking the status of parts...
... black developer maintenance kit ordering parts 169 blocking junk faxes 71 bookmarks creating 21 creating folders for 21 C cables Ethernet 14 USB 14 can send but not receive faxes 260 canceling a print job from the computer 50 from the printer control panel 50 cannot open Embedded Web Server 224 cannot receive faxes 260 Card Copy setting up 19 card stock loading 34 changing resolution fax 71 changing the printer port settings after installing ISP 161 changing the wallpaper 20 Check tray connection 229 checking the printer connectivity 225 checking the status of parts...

Users Guide PDF
Page 329
... receive faxes 258 poor print quality 261 faxing setting the date and time 69 using the automatic document feeder (ADF) 69 using the scanner glass 69 finding more information about the printer 10 firmware card 266 firmware, updating 312 flash drive printing from 47 scanning to 73 font sample list printing 50 FTP address creating shortcut 72 FTP server, scanning to using the control panel 72 fully configured printer 12 fuser maintenance kit ordering parts...
... receive faxes 258 poor print quality 261 faxing setting the date and time 69 using the automatic document feeder (ADF) 69 using the scanner glass 69 finding more information about the printer 10 firmware card 266 firmware, updating 312 flash drive printing from 47 scanning to 73 font sample list printing 50 FTP address creating shortcut 72 FTP server, scanning to using the control panel 72 fully configured printer 12 fuser maintenance kit ordering parts...

Users Guide PDF
Page 331
...;nisher 216 paper jams avoiding 201 paper size setting 27 paper type setting 27 parts status checking 168 personal identification number method 160 personal identification numbers enabling 25 phone splitter 62 photoconductor unit ordering 169 replacing 174 photos copying 51 placing separator sheets between copies copying 52 poor fax print quality 261 power button light understanding the status 17 power cord socket 14 power save modes configuring 199 print appears tinted 257 print driver hardware options, adding 312 print job canceling from the...
...;nisher 216 paper jams avoiding 201 paper size setting 27 paper type setting 27 parts status checking 168 personal identification number method 160 personal identification numbers enabling 25 phone splitter 62 photoconductor unit ordering 169 replacing 174 photos copying 51 placing separator sheets between copies copying 52 poor fax print quality 261 power button light understanding the status 17 power cord socket 14 power save modes configuring 199 print appears tinted 257 print driver hardware options, adding 312 print job canceling from the...
Quick Reference
Page 1
...document. Copying on both sides of copies. Using the computer Note: Make sure that you are trying to print, open the Print dialog. 2 If necessary, adjust the settings. 3 Print the document. Faxing Sending a fax Using the control panel 1 Load the original document into the ADF tray or on the scanner glass. 2 From the home screen, touch Copy > Pages per Side. 3 Adjust the settings. 4 Copy the document. For Windows users 1 With a document open, click File > Print. 2 Select the printer, and then click Properties, Preferences, Options, or Setup. 3 Click Fax > Enable fax, and then enter...
...document. Copying on both sides of copies. Using the computer Note: Make sure that you are trying to print, open the Print dialog. 2 If necessary, adjust the settings. 3 Print the document. Faxing Sending a fax Using the control panel 1 Load the original document into the ADF tray or on the scanner glass. 2 From the home screen, touch Copy > Pages per Side. 3 Adjust the settings. 4 Copy the document. For Windows users 1 With a document open, click File > Print. 2 Select the printer, and then click Properties, Preferences, Options, or Setup. 3 Click Fax > Enable fax, and then enter...


