
User Guide
Page 4
... memory...51 Configuring printer hard disk encryption...52 Restoring factory default settings...52 Statement of Volatility...52 Maintaining the printer 54 Networking...54 Setting up serial printing (Windows only)...55 Cleaning printer parts...56 Ordering parts and supplies...59 Replacing parts and supplies...62 Moving the printer...99 Saving energy and paper...100 Recycling...101 Clearing jams 103 Avoiding jams...103 Identifying jam locations...104 Paper jam in trays...106 Paper jam in the multipurpose feeder...107 Paper jam in the automatic document feeder...
... memory...51 Configuring printer hard disk encryption...52 Restoring factory default settings...52 Statement of Volatility...52 Maintaining the printer 54 Networking...54 Setting up serial printing (Windows only)...55 Cleaning printer parts...56 Ordering parts and supplies...59 Replacing parts and supplies...62 Moving the printer...99 Saving energy and paper...100 Recycling...101 Clearing jams 103 Avoiding jams...103 Identifying jam locations...104 Paper jam in trays...106 Paper jam in the multipurpose feeder...107 Paper jam in the automatic document feeder...
User Guide
Page 9
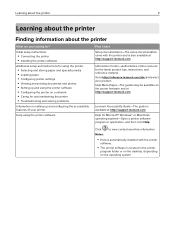
.../ and select your printer Help using the printer software Find it here Setup documentation-The setup documentation came with the printer software. • The printer software is available at http://support.lexmark.com. Go to view context‑sensitive information. Help Menu Pages-The guides may be available on the printer firmware and at http://support.lexmark.com. Information Center-Authoritative online resource for Microsoft® Windows® or Macintosh operating systems-Open a printer software program or application, and...
.../ and select your printer Help using the printer software Find it here Setup documentation-The setup documentation came with the printer software. • The printer software is available at http://support.lexmark.com. Go to view context‑sensitive information. Help Menu Pages-The guides may be available on the printer firmware and at http://support.lexmark.com. Information Center-Authoritative online resource for Microsoft® Windows® or Macintosh operating systems-Open a printer software program or application, and...

User Guide
Page 17
... held print jobs View, select, or print photos and documents from the home screen. These settings may also appear on how to Lexmark Accessibility Restore Factory Defaults Maintenance Remote Operator Panel Visible Home Screen Icons Site Map Update Firmware About This Printer Print Layout Finishing Setup Quality Job Accounting Image XPS PDF HTML PostScript PCL PPDS Paper Copy Tray Configuration Copy Media Configuration Defaults Bin Configuration Fax Fax Mode Analog Fax Setup Fax Server Setup Scan and save documents directly to an FTP server. Access...
... held print jobs View, select, or print photos and documents from the home screen. These settings may also appear on how to Lexmark Accessibility Restore Factory Defaults Maintenance Remote Operator Panel Visible Home Screen Icons Site Map Update Firmware About This Printer Print Layout Finishing Setup Quality Job Accounting Image XPS PDF HTML PostScript PCL PPDS Paper Copy Tray Configuration Copy Media Configuration Defaults Bin Configuration Fax Fax Mode Analog Fax Setup Fax Server Setup Scan and save documents directly to an FTP server. Access...

User Guide
Page 18
... Login Restrictions Confidential Print Setup Disk Encryption Erase Temporary Data Files Solutions LDAP Settings Miscellaneous Option Card Menu Reports Help Note: This setting appears only Menu Settings Page Print All Guides when an optional card is installed. Print Quality Pages Color Quality Guide Device Connection Guide Print Copy Guide Shortcuts E‑mail Guide Fax Information Guide Network Media Guide Moving Guide Print Quality Guide Scan Guide Supplies Guide Printing a menu settings page From the home screen, touch Settings > Reports > Menu Settings Page...
... Login Restrictions Confidential Print Setup Disk Encryption Erase Temporary Data Files Solutions LDAP Settings Miscellaneous Option Card Menu Reports Help Note: This setting appears only Menu Settings Page Print All Guides when an optional card is installed. Print Quality Pages Color Quality Guide Device Connection Guide Print Copy Guide Shortcuts E‑mail Guide Fax Information Guide Network Media Guide Moving Guide Print Quality Guide Scan Guide Supplies Guide Printing a menu settings page From the home screen, touch Settings > Reports > Menu Settings Page...

User Guide
Page 20
...figure the output options and scan settings. Setting up Scan Center 1 From the home screen, touch Scan Center. 2 Select and create a destination, and then configure the settings. For more information, see the documentation that the scan resolution does not exceed 150 dpi for color and 300 dpi for black and white. • When scanning multiple cards, make sure to scan multiple cards. • Make sure that the printer network and e‑mail settings are saved.
...figure the output options and scan settings. Setting up Scan Center 1 From the home screen, touch Scan Center. 2 Select and create a destination, and then configure the settings. For more information, see the documentation that the scan resolution does not exceed 150 dpi for color and 300 dpi for black and white. • When scanning multiple cards, make sure to scan multiple cards. • Make sure that the printer network and e‑mail settings are saved.

User Guide
Page 24
... left side of the paper guide. Linking trays 1 Open a Web browser, and then type the printer IP address in the tray. Notes: • View the printer IP address on the printer home screen. Note: You can also change the paper size and type settings from the printer control panel. Warning-Potential Damage: Do not use envelopes with the paper loaded in the tray. Note: To unlink trays, make sure that no trays have the same paper size or type. 4 Save the settings. The IP address appears...
... left side of the paper guide. Linking trays 1 Open a Web browser, and then type the printer IP address in the tray. Notes: • View the printer IP address on the printer home screen. Note: You can also change the paper size and type settings from the printer control panel. Warning-Potential Damage: Do not use envelopes with the paper loaded in the tray. Note: To unlink trays, make sure that no trays have the same paper size or type. 4 Save the settings. The IP address appears...

User Guide
Page 25
... parts, such as labels, card stock, and envelopes, set the paper size and type in areas marked with this label. Printing from a computer Note: For specialty media such as gears, doors, trays, and covers. Printing 25 Printing CAUTION-PINCH HAZARD: To avoid the risk of a pinch injury, use caution in the printer before sending the print job. 1 With a document open, click File > Print. 2 If necessary, adjust the settings. 3 Send the print job. Printing forms 1 From the home screen...
... parts, such as labels, card stock, and envelopes, set the paper size and type in areas marked with this label. Printing from a computer Note: For specialty media such as gears, doors, trays, and covers. Printing 25 Printing CAUTION-PINCH HAZARD: To avoid the risk of a pinch injury, use caution in the printer before sending the print job. 1 With a document open, click File > Print. 2 If necessary, adjust the settings. 3 Send the print job. Printing forms 1 From the home screen...
User Guide
Page 27
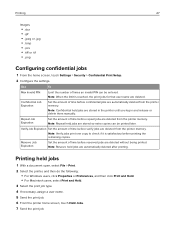
... held jobs 1 With a document open, select File > Print. 2 Select the printer, and then do the following: • For Windows users, click Properties or Preferences, and then click Print and Hold. • For Macintosh users, select Print and Hold. 3 Select the print job type. 4 If necessary, assign a user name. 5 Send the print job. 6 From the printer home screen, touch Held Jobs. 7 Send the print job. Note: Repeat held jobs are automatically deleted after printing. Note: Verify jobs print one copy to check...
... held jobs 1 With a document open, select File > Print. 2 Select the printer, and then do the following: • For Windows users, click Properties or Preferences, and then click Print and Hold. • For Macintosh users, select Print and Hold. 3 Select the print job type. 4 If necessary, assign a user name. 5 Send the print job. 6 From the printer home screen, touch Held Jobs. 7 Send the print job. Note: Repeat held jobs are automatically deleted after printing. Note: Verify jobs print one copy to check...

User Guide
Page 46
...the home screen, touch Settings > Fax > Analog Fax Setup > Fax Receive Settings > Admin Controls > Answer On. 2 Select the ring pattern. 3 Apply the changes. Using the computer For Windows users 1 With a document open, click File > Print. 2 Select the printer, and then click Properties, Preferences, Options, or Setup. 3 Click Fax > Enable fax, and then enter the recipient number. 4 If necessary, configure other fax settings. 4 Send the fax job. Faxing 46 Connecting to a distinctive ring service A distinctive ring service lets you have multiple telephone numbers on the scanner glass...
...the home screen, touch Settings > Fax > Analog Fax Setup > Fax Receive Settings > Admin Controls > Answer On. 2 Select the ring pattern. 3 Apply the changes. Using the computer For Windows users 1 With a document open, click File > Print. 2 Select the printer, and then click Properties, Preferences, Options, or Setup. 3 Click Fax > Enable fax, and then enter the recipient number. 4 If necessary, configure other fax settings. 4 Send the fax job. Faxing 46 Connecting to a distinctive ring service A distinctive ring service lets you have multiple telephone numbers on the scanner glass...

User Guide
Page 101
...; Print multiple pages on a single sheet of paper. • Use the preview feature to see how the document looks like before printing it. • Print one copy of packaging components in your country or region. Facilities may not exist in some countries or regions. Maintaining the printer 101 Conserving supplies • Print on product recycling. Disabling the proximity sensor From the home screen, touch Settings > Power...
...; Print multiple pages on a single sheet of paper. • Use the preview feature to see how the document looks like before printing it. • Print one copy of packaging components in your country or region. Facilities may not exist in some countries or regions. Maintaining the printer 101 Conserving supplies • Print on product recycling. Disabling the proximity sensor From the home screen, touch Settings > Power...

User Guide
Page 130
... problem is support. Does the problem remain? Does the problem remain? Contact customer The problem is Access the Embedded Web Server again by typing the correct IP solved. Contact your administrator. For more information, see "Supported flash drives and file types" on page 26 Go to step 7. The problem is connected. Yes Go to step 3. Did the Embedded Web Server open? Enabling the USB port From the home screen, touch Settings > Network/Ports > USB > Enable USB Port. No...
... problem is support. Does the problem remain? Does the problem remain? Contact customer The problem is Access the Embedded Web Server again by typing the correct IP solved. Contact your administrator. For more information, see "Supported flash drives and file types" on page 26 Go to step 7. The problem is connected. Yes Go to step 3. Did the Embedded Web Server open? Enabling the USB port From the home screen, touch Settings > Network/Ports > USB > Enable USB Port. No...

User Guide
Page 141
... customer Replace the imaging unit or imaging kit, and then resend the print support. job. Do ghost images still appear on prints? Do ghost images still appear on prints? b Resend the print job. Notes: • Make sure that the settings match the paper loaded in the tray. • You can also change the settings on the printer control panel. Troubleshooting 141 Ghost images Leading edge AABBCCDD AABBCCDD Trailing edge Action Step 1 a Load the tray with the correct paper type...
... customer Replace the imaging unit or imaging kit, and then resend the print support. job. Do ghost images still appear on prints? Do ghost images still appear on prints? b Resend the print job. Notes: • Make sure that the settings match the paper loaded in the tray. • You can also change the settings on the printer control panel. Troubleshooting 141 Ghost images Leading edge AABBCCDD AABBCCDD Trailing edge Action Step 1 a Load the tray with the correct paper type...
User Guide
Page 164
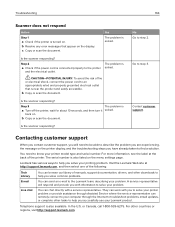
b Resolve any error messages that is also listed on the menu settings page. c Copy or scan the document. Step 2 a Check if the power cord is connected properly to step 2. Step 3 The problem is also available. No Go to the printer and the electrical outlet. Contact customer support. You need to be able to troubleshoot problems, install updates, or complete other countries or regions, visit http://support.lexmark.com. They can work with you...
b Resolve any error messages that is also listed on the menu settings page. c Copy or scan the document. Step 2 a Check if the power cord is connected properly to step 2. Step 3 The problem is also available. No Go to the printer and the electrical outlet. Contact customer support. You need to be able to troubleshoot problems, install updates, or complete other countries or regions, visit http://support.lexmark.com. They can work with you...

User Guide
Page 187
... the finisher and the printer, and then connect them to the list of fire or electrical shock, connect the power cord to make it available for print jobs. Upgrading and migrating 187 If the gap is near the product and easily accessible. CAUTION-POTENTIAL INJURY: To avoid the risk of hardware options, and then add any installed options. Adding available options in the Network/Ports menu.
... the finisher and the printer, and then connect them to the list of fire or electrical shock, connect the power cord to make it available for print jobs. Upgrading and migrating 187 If the gap is near the product and easily accessible. CAUTION-POTENTIAL INJURY: To avoid the risk of hardware options, and then add any installed options. Adding available options in the Network/Ports menu.
User Guide
Page 193
... ADF pick roller replacing 86 ADF separator roller replacing 90 adjusting brightness of printer display 100 adjusting toner darkness 155 answering machine setting up 34 attaching cables 13 available internal options 165 avoiding paper jams 103 B blank pages 139 blocking junk faxes 48 brightness of printer display adjusting 100 C cables Ethernet 13 USB 13 canceling a print job from the computer 28 from the printer control panel 28 cannot open Embedded Web Server 129 Card Copy setting up 19 card stock loading 23 changing port settings internal solutions port 55 checking the status of parts...
... ADF pick roller replacing 86 ADF separator roller replacing 90 adjusting brightness of printer display 100 adjusting toner darkness 155 answering machine setting up 34 attaching cables 13 available internal options 165 avoiding paper jams 103 B blank pages 139 blocking junk faxes 48 brightness of printer display adjusting 100 C cables Ethernet 13 USB 13 canceling a print job from the computer 28 from the printer control panel 28 cannot open Embedded Web Server 129 Card Copy setting up 19 card stock loading 23 changing port settings internal solutions port 55 checking the status of parts...

User Guide
Page 194
... about the printer 9 firmware update 188 firmware card 165 flash drive printing from 25 scanning 49 font sample list printing 28 forms printing 25 Forms and Favorites setting up 19 forwarding faxes 48 FTP address creating shortcuts 49 FTP server, scanning to using the control panel 49 fuser replacing 65 G green settings Eco‑Mode 100 hibernate mode 100 sleep mode 100 H hardware options installing 174 hardware options, adding print driver 187 held jobs 27 printing from...
... about the printer 9 firmware update 188 firmware card 165 flash drive printing from 25 scanning 49 font sample list printing 28 forms printing 25 Forms and Favorites setting up 19 forwarding faxes 48 FTP address creating shortcuts 49 FTP server, scanning to using the control panel 49 fuser replacing 65 G green settings Eco‑Mode 100 hibernate mode 100 sleep mode 100 H hardware options installing 174 hardware options, adding print driver 187 held jobs 27 printing from...
User Guide
Page 195
...106 paper jams avoiding 103 paper size setting 21 paper type setting 21 parallel interface card troubleshooting 132 parts status checking 59 personal identification number method 54 phone splitter 39 photoconductor unit ordering 60 replacing 67 photos copying 29 pick roller replacing 74 placing separator sheets between copies copying 30 port settings configuring 55 power button light printer status 16 power cord socket 13 print driver hardware options, adding 187 print job canceling from the computer 28 canceling from the printer control panel 28 print quality cleaning the scanner...
...106 paper jams avoiding 103 paper size setting 21 paper type setting 21 parallel interface card troubleshooting 132 parts status checking 59 personal identification number method 54 phone splitter 39 photoconductor unit ordering 60 replacing 67 photos copying 29 pick roller replacing 74 placing separator sheets between copies copying 30 port settings configuring 55 power button light printer status 16 power cord socket 13 print driver hardware options, adding 187 print job canceling from the computer 28 canceling from the printer control panel 28 print quality cleaning the scanner...

User Guide
Page 196
... sample list 28 printing a menu settings page 18 printing a network setup page 130 printing forms 25 printing from a flash drive 25 printing held jobs from a Macintosh computer 27 from Windows 27 Push Button method 54 R recycling Lexmark packaging 101 Lexmark products 101 toner cartridges 102 reducing a copy 30 repeat print jobs 27 printing from a Macintosh computer 27 printing from Windows 27 repeating print defects 148 replacing a developer unit 62 replacing a photoconductor unit 67 replacing a toner cartridge 73 replacing an imaging unit 70 replacing parts ADF feed roller 88 ADF pick...
... sample list 28 printing a menu settings page 18 printing a network setup page 130 printing forms 25 printing from a flash drive 25 printing held jobs from a Macintosh computer 27 from Windows 27 Push Button method 54 R recycling Lexmark packaging 101 Lexmark products 101 toner cartridges 102 reducing a copy 30 repeat print jobs 27 printing from a Macintosh computer 27 printing from Windows 27 repeating print defects 148 replacing a developer unit 62 replacing a photoconductor unit 67 replacing a toner cartridge 73 replacing an imaging unit 70 replacing parts ADF feed roller 88 ADF pick...

User Guide
Page 197
...;ash drives 26 T toner cartridge replacing 73 toner cartridges ordering 59 recycling 102 toner darkness adjusting 155 transfer belt replacing 81 transfer roller replacing 84 transparencies loading 23 trays linking 24 loading 21 unlinking 24 troubleshooting cannot open Embedded Web Server 129 contacting customer support 164 FAQ about color printing 156 printer is not responding 154 troubleshooting, color quality print appears tinted 157 troubleshooting, copy partial copies of documents or photos 162 poor copy quality 162 scanner does not respond 164 scanner unit...
...;ash drives 26 T toner cartridge replacing 73 toner cartridges ordering 59 recycling 102 toner darkness adjusting 155 transfer belt replacing 81 transfer roller replacing 84 transparencies loading 23 trays linking 24 loading 21 unlinking 24 troubleshooting cannot open Embedded Web Server 129 contacting customer support 164 FAQ about color printing 156 printer is not responding 154 troubleshooting, color quality print appears tinted 157 troubleshooting, copy partial copies of documents or photos 162 poor copy quality 162 scanner does not respond 164 scanner unit...

User Guide
Page 198
... trays 24 updating firmware flash file 188 USB port enabling 130 USB ports 13 using genuine Lexmark parts 59 genuine Lexmark supplies 59 using the ADF copying 29 using the control panel 15 using the home screen 16 using the scanner glass copying 29 voice over Internet Protocol (VoIP) fax setup 39 VoIP adapter 39 volatile memory 52 erasing 51 volatility statement of 52 W waste toner bottle ordering 61 replacing 80 white lines appear 153 white pages 139 wireless network...
... trays 24 updating firmware flash file 188 USB port enabling 130 USB ports 13 using genuine Lexmark parts 59 genuine Lexmark supplies 59 using the ADF copying 29 using the control panel 15 using the home screen 16 using the scanner glass copying 29 voice over Internet Protocol (VoIP) fax setup 39 VoIP adapter 39 volatile memory 52 erasing 51 volatility statement of 52 W waste toner bottle ordering 61 replacing 80 white lines appear 153 white pages 139 wireless network...

