
Setup Guide
Page 49
... network support person, and then print another network setup page to verify that you see Print Menus, and then press Select to print the page. If an option you installed is not listed, turn the printer off, unplug the power cord, and reinstall the option. 4 Verify the amount of paper you installed are configured for the sizes and types of memory installed is "Connected." Printing a menu Print the menu settings page to review the default printer settings and settings page to verify that Status is correctly listed...
... network support person, and then print another network setup page to verify that you see Print Menus, and then press Select to print the page. If an option you installed is not listed, turn the printer off, unplug the power cord, and reinstall the option. 4 Verify the amount of paper you installed are configured for the sizes and types of memory installed is "Connected." Printing a menu Print the menu settings page to review the default printer settings and settings page to verify that Status is correctly listed...

User's Guide
Page 44
... to Lexmark's Web site for the standard parallel port. We recommend Lexmark part number 1329605 (10 ft) or 1427498 (20 ft) for information. Tray linking does not Tray linking is too complex. A formatting error has occurred. Delete the job. Set Page Protect to the Setup Guide for network printing. To configure the linked trays: • Make sure the Tray x Type value in the Paper Type menu item in the Paper Menu is in the printer driver are using a recommended interface cable. Verify...
... to Lexmark's Web site for the standard parallel port. We recommend Lexmark part number 1329605 (10 ft) or 1427498 (20 ft) for information. Tray linking does not Tray linking is too complex. A formatting error has occurred. Delete the job. Set Page Protect to the Setup Guide for network printing. To configure the linked trays: • Make sure the Tray x Type value in the Paper Type menu item in the Paper Menu is in the printer driver are using a recommended interface cable. Verify...

User's Guide
Page 73
... Test Power Saver 71 Printer Calibrating Print Jobs on Disk Printing Alignment Page Printing Directory List Printing Font List Printing Job Accounting Stat Printing Menu Settings Prog Engine Code Prog System Code Program Flash Programming Disk Programming Error P Q Queuing and Deleting Jobs Queuing Jobs R Ready Ready Hex Reattach Remove Paper Resetting Active Bin Resetting Fuser Cnt Value Resetting the Printer Restore Held Jobs. Retry? Clearing Job Accounting Stat Close Door Close Finisher Door Close Tray X Door Copying D Defragmenting Delete All Jobs Deleting Jobs Disabling Menus Disk...
... Test Power Saver 71 Printer Calibrating Print Jobs on Disk Printing Alignment Page Printing Directory List Printing Font List Printing Job Accounting Stat Printing Menu Settings Prog Engine Code Prog System Code Program Flash Programming Disk Programming Error P Q Queuing and Deleting Jobs Queuing Jobs R Ready Ready Hex Reattach Remove Paper Resetting Active Bin Resetting Fuser Cnt Value Resetting the Printer Restore Held Jobs. Retry? Clearing Job Accounting Stat Close Door Close Finisher Door Close Tray X Door Copying D Defragmenting Delete All Jobs Deleting Jobs Disabling Menus Disk...

User's Guide
Page 211
... Manual Color 142 Print Mode 143 Print Resolution 143 Toner Darkness 143 Color Samples (Utilities Menu) 144 Toner (Supplies Menu) 151 toner status 151 complex page errors 157 Confidential Job (Job Menu) 127 Configure Bins (Paper Menu) 182 Configure MP (Paper Menu) 183 Copies (Finishing Menu) 135 copies, specifying number 135 current menu settings 68 Custom Types (Paper Menu) 183 D Data Bits (Serial Menu) 163 Defragment Flash (Utilities Menu) 145 disabling 48 auto size sensing 48 operator panel menus 65 Power Saver 66 disk See hard disk Display Language (Setup Menu) 154 Download Target (Setup...
... Manual Color 142 Print Mode 143 Print Resolution 143 Toner Darkness 143 Color Samples (Utilities Menu) 144 Toner (Supplies Menu) 151 toner status 151 complex page errors 157 Confidential Job (Job Menu) 127 Configure Bins (Paper Menu) 182 Configure MP (Paper Menu) 183 Copies (Finishing Menu) 135 copies, specifying number 135 current menu settings 68 Custom Types (Paper Menu) 183 D Data Bits (Serial Menu) 163 Defragment Flash (Utilities Menu) 145 disabling 48 auto size sensing 48 operator panel menus 65 Power Saver 66 disk See hard disk Display Language (Setup Menu) 154 Download Target (Setup...

User's Guide
Page 213
... Network Code 84 Invalid Standard Network Code 84 ITU/Fuser Maint 85 Load Manual 85 Load Staples 85 Load Tray 86 LocalTalk 86 Menus Disabled 86 Network 87 Network , 87 Network Card Busy 87 No DRAM Installed 87 No Jobs Found. numerical values 7 messages in . Go/Stop? 96 Restoring Factory Defaults 96 Restoring Held Job xxx/yyy 97 Restoring Held Jobs 97 Serial 97 Setup Required 98 Staples Low 98 Std Bin Full 98 Supplies 99 Tray Empty 99 Tray Low 99 Tray Missing...
... Network Code 84 Invalid Standard Network Code 84 ITU/Fuser Maint 85 Load Manual 85 Load Staples 85 Load Tray 86 LocalTalk 86 Menus Disabled 86 Network 87 Network , 87 Network Card Busy 87 No DRAM Installed 87 No Jobs Found. numerical values 7 messages in . Go/Stop? 96 Restoring Factory Defaults 96 Restoring Held Job xxx/yyy 97 Restoring Held Jobs 97 Serial 97 Setup Required 98 Staples Low 98 Std Bin Full 98 Supplies 99 Tray Empty 99 Tray Low 99 Tray Missing...

User's Guide
Page 214
...7 buttons 7 numbers 8 options verifying installation with menu settings page 68 ordering 49 fuser assembly 49 image transfer unit 49 print cartridge 49 transfer roller 49 ordering supplies 49 Orientation (PCL Emul Menu) 174 Output Bin (Paper Menu) 183 output bins linking 26 Overflow Bin (Paper Menu) 184 P Page Protect (Setup Menu) 157 paper storing 27 paper jams reprinting jammed pages 155 Paper Loading (Paper Menu) 184 Paper Menu 181 Assign Type/Bin 182 Configure Bins 182 Configure MP 183 Custom Types 183 Output Bin 183 Overflow Bin 184 Paper Loading 184 Paper Size 185 Paper Source 185 Paper...
...7 buttons 7 numbers 8 options verifying installation with menu settings page 68 ordering 49 fuser assembly 49 image transfer unit 49 print cartridge 49 transfer roller 49 ordering supplies 49 Orientation (PCL Emul Menu) 174 Output Bin (Paper Menu) 183 output bins linking 26 Overflow Bin (Paper Menu) 184 P Page Protect (Setup Menu) 157 paper storing 27 paper jams reprinting jammed pages 155 Paper Loading (Paper Menu) 184 Paper Menu 181 Assign Type/Bin 182 Configure Bins 182 Configure MP 183 Custom Types 183 Output Bin 183 Overflow Bin 184 Paper Loading 184 Paper Size 185 Paper Source 185 Paper...

User's Guide
Page 215
...63 printer testing Hex Trace mode 146 print defaults 147 print hardware statistics 147 Printer Usage (Setup Menu) 159 printing font samples 69 menu settings page 68 problem solving clearing operator panel error messages 7 stopping printer 8 problems calling for service 44 cannot print with Stop button 8 Printer Language (Setup Menu) 159 printer memory option, removing 60 printer menu settings, changing 67 printer menus disabling 65 enabling 65 locking operator panel 65 printer messages Enter PIN 16 No Jobs Found. PCL SmartSwitch (Serial Menu) 165 PCL SmartSwitch (USB Menu) 149 PCL SmartSwitch...
...63 printer testing Hex Trace mode 146 print defaults 147 print hardware statistics 147 Printer Usage (Setup Menu) 159 printing font samples 69 menu settings page 68 problem solving clearing operator panel error messages 7 stopping printer 8 problems calling for service 44 cannot print with Stop button 8 Printer Language (Setup Menu) 159 printer memory option, removing 60 printer menu settings, changing 67 printer menus disabling 65 enabling 65 locking operator panel 65 printer messages Enter PIN 16 No Jobs Found. PCL SmartSwitch (Serial Menu) 165 PCL SmartSwitch (USB Menu) 149 PCL SmartSwitch...

User's Guide
Page 216
... Symbol Set (PCL Emul Menu) 175 symbol set support 69 symbol sets, definition 199 T taking printer offline 8 with Menu button 7 with Stop button 8 test printing Hex Trace mode 146 menus page 147 timeout print 158 wait 161 toner alarm 160 status 151 Toner Alarm (Setup Menu) 160 Toner Darkness (Color Menu) 143 transfer roller ordering 49 Transmit Delay (Infrared Menu) 133 transparencies 17 tray linking 25 Tray Renumber (PCL Emul Menu) 175 Tri-Port Adapter 37 U Universal Setup (Paper Menu) 189 unlocking menus 65 USB Buffer (USB Menu) 150 USB Menu 148 Job...
... Symbol Set (PCL Emul Menu) 175 symbol set support 69 symbol sets, definition 199 T taking printer offline 8 with Menu button 7 with Stop button 8 test printing Hex Trace mode 146 menus page 147 timeout print 158 wait 161 toner alarm 160 status 151 Toner Alarm (Setup Menu) 160 Toner Darkness (Color Menu) 143 transfer roller ordering 49 Transmit Delay (Infrared Menu) 133 transparencies 17 tray linking 25 Tray Renumber (PCL Emul Menu) 175 Tri-Port Adapter 37 U Universal Setup (Paper Menu) 189 unlocking menus 65 USB Buffer (USB Menu) 150 USB Menu 148 Job...

Printer Quick Reference Guide
Page 2
... The image transfer unit and fuser require maintenance. Replace the image transfer unit and the fuser. Refer to the Lexmark C750 Clearing Jams reference card for detailed instructions. Replace the web oiler. If you need more information • Refer to a shared network printer, it remains in the printer memory until you print it has started printing: 1 Press Menu until you see Job Menu, and then press Select. 2 Press Menu until you see it lightly touches the side of the paper trays. • Cancel...
... The image transfer unit and fuser require maintenance. Replace the image transfer unit and the fuser. Refer to the Lexmark C750 Clearing Jams reference card for detailed instructions. Replace the web oiler. If you need more information • Refer to a shared network printer, it remains in the printer memory until you print it has started printing: 1 Press Menu until you see Job Menu, and then press Select. 2 Press Menu until you see it lightly touches the side of the paper trays. • Cancel...
Service Manual
Page 24
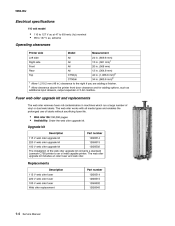
... web oiler works with all media types and enables the prolonged use of vinyl or dual web labels. Fuser web oiler upgrade kit and replacements The web oiler removes fuser roll contamination in .) clearance to an oil web capable printer. Upgrade kit Description 115 V web oiler upgrade kit 220 V web oiler upgrade kit 100 V web oiler upgrade kit Part number 12G6514 12G6515 12G6502 The installation of the web oiler upgrade kit converts a standard Lexmark C750 printer to the right if you are adding a finisher. The web oiler upgrade kit includes an oiler fuser...
... web oiler works with all media types and enables the prolonged use of vinyl or dual web labels. Fuser web oiler upgrade kit and replacements The web oiler removes fuser roll contamination in .) clearance to an oil web capable printer. Upgrade kit Description 115 V web oiler upgrade kit 220 V web oiler upgrade kit 100 V web oiler upgrade kit Part number 12G6514 12G6515 12G6502 The installation of the web oiler upgrade kit converts a standard Lexmark C750 printer to the right if you are adding a finisher. The web oiler upgrade kit includes an oiler fuser...

Service Manual
Page 37
.... Replace the operator panel. Replace the black print cartridge. Print quality: magenta, cyan, or yellow lines Print quality: colored lines, streaks, or smudges Print quality: light lines or streaks appear on page 2-142. Go to "Blank page (no image) Print quality: evenly spaced horizontal marks or lines on the printed page Print quality: black line Go to "Vertical lines or streaks" on page 2-138 or "Horizontal lines or streaks" on page 2-139. Operator panel: One or more buttons do not work . Go to "AC and DC power service check" on page 2-142. Go to "927 Error code...
.... Replace the operator panel. Replace the black print cartridge. Print quality: magenta, cyan, or yellow lines Print quality: colored lines, streaks, or smudges Print quality: light lines or streaks appear on page 2-142. Go to "Blank page (no image) Print quality: evenly spaced horizontal marks or lines on the printed page Print quality: black line Go to "Vertical lines or streaks" on page 2-138 or "Horizontal lines or streaks" on page 2-139. Operator panel: One or more buttons do not work . Go to "AC and DC power service check" on page 2-142. Go to "927 Error code...

Service Manual
Page 55
... Menu Infrared Port PCL SmartSwitch PS SmartSwitch NPA Mode Infrared Buffer Job Buffering Window Size Transmit Delay Max Baud Rate Paper Menu Paper Source Paper Size Paper Type Custom Types Output Bin Configure Bins Overflow Bin Assign Type/Bin Substitute Size Configure MP Paper Texture Paper Weight Paper Loading Universal Setup PCL Emul Menu Font Source Font Name Point Size Pitch Symbol Set Orientation Lines per Page A4 Width Auto CR after LF Auto LF after the Change message appears. Select Press Select to Not Ready. Save the displayed menu item as Copies, press and hold Menu...
... Menu Infrared Port PCL SmartSwitch PS SmartSwitch NPA Mode Infrared Buffer Job Buffering Window Size Transmit Delay Max Baud Rate Paper Menu Paper Source Paper Size Paper Type Custom Types Output Bin Configure Bins Overflow Bin Assign Type/Bin Substitute Size Configure MP Paper Texture Paper Weight Paper Loading Universal Setup PCL Emul Menu Font Source Font Name Point Size Pitch Symbol Set Orientation Lines per Page A4 Width Auto CR after LF Auto LF after the Change message appears. Select Press Select to Not Ready. Save the displayed menu item as Copies, press and hold Menu...

Service Manual
Page 57
... Parallel Menu, Serial Menu, Network Menu, Infrared Menu, LocalTalk Menu, and USB Menu. • All downloaded resources (fonts, macros, and symbol sets) in printer memory (RAM) are deleted. (Resources residing in flash memory to the factory default values except: - An arrow symbol ( V ) indicates a user default value. Restore Yes Printer transfers all resources stored in flash memory or on the hard disk are deleted from flash memory. Provides high quality output for detailed line art or images. No Factory Defaults To return your printer settings to conserve toner...
... Parallel Menu, Serial Menu, Network Menu, Infrared Menu, LocalTalk Menu, and USB Menu. • All downloaded resources (fonts, macros, and symbol sets) in printer memory (RAM) are deleted. (Resources residing in flash memory to the factory default values except: - An arrow symbol ( V ) indicates a user default value. Restore Yes Printer transfers all resources stored in flash memory or on the hard disk are deleted from flash memory. Provides high quality output for detailed line art or images. No Factory Defaults To return your printer settings to conserve toner...

Service Manual
Page 91
.... Replace the engine board. Manually turn the motor. Do the gears turn freely. If this does not fix the problem, replace the ITU drive motor. 5060-00x 148 Error code Step 1 Action and questions Connector J64 on the engine board-check for continuity between pin 4 of CON1 on the motor drive card and the remaining pins in the ITU motor assembly, the second transfer...
.... Replace the engine board. Manually turn the motor. Do the gears turn freely. If this does not fix the problem, replace the ITU drive motor. 5060-00x 148 Error code Step 1 Action and questions Connector J64 on the engine board-check for continuity between pin 4 of CON1 on the motor drive card and the remaining pins in the ITU motor assembly, the second transfer...

Service Manual
Page 95
... does not fix the problem, replace the ITU drive motor. Manually turn freely? Contact your next level support Go to step 5 Are the voltages correct? 5 ITU motor drive assembly-remove the ITU assembly. 5060-00x 154 Error code ITU belt motor Step 1 Action and questions Connector J64 on the engine board-check for continuity between pin 4 of CON1 on the motor drive card and...
... does not fix the problem, replace the ITU drive motor. Manually turn freely? Contact your next level support Go to step 5 Are the voltages correct? 5 ITU motor drive assembly-remove the ITU assembly. 5060-00x 154 Error code ITU belt motor Step 1 Action and questions Connector J64 on the engine board-check for continuity between pin 4 of CON1 on the motor drive card and...

Service Manual
Page 122
... punch timing sensor. Does the error remain? 4 Turn the printer off . Turn the printer on ), software issue, or a hardware problem with the controller board/INA. If the printer works correctly while disconnected, have the user or their network administrator verify that there are no jobs in place. Determine if the problem is pressed firmly in the queue which option is turned on . Print one of the issue. Remove any parallel, USB, or network connections. Does...
... punch timing sensor. Does the error remain? 4 Turn the printer off . Turn the printer on ), software issue, or a hardware problem with the controller board/INA. If the printer works correctly while disconnected, have the user or their network administrator verify that there are no jobs in place. Determine if the problem is pressed firmly in the queue which option is turned on . Print one of the issue. Remove any parallel, USB, or network connections. Does...

Service Manual
Page 144
... Run tray x sensor test from the Diagnostics Menu. Does the test pass for sensor L1? 2 Check the cable connection for the paper level sensing assembly to step 4 Install the cable correctly 2-110 Service Manual Does the transparency material meet specification Install the transparency assembly correctly 2 Check the transparency sensing assembly for correct installation. Is the paper level sensing assembly installed correctly? 4 Check continuity of the tray? Do you measure continuity? 5 Check the paper level...
... Run tray x sensor test from the Diagnostics Menu. Does the test pass for sensor L1? 2 Check the cable connection for the paper level sensing assembly to step 4 Install the cable correctly 2-110 Service Manual Does the transparency material meet specification Install the transparency assembly correctly 2 Check the transparency sensing assembly for correct installation. Is the paper level sensing assembly installed correctly? 4 Check continuity of the tray? Do you measure continuity? 5 Check the paper level...

Service Manual
Page 170
... print cartridge. 2-136 Service Manual Use Tray 1 (internal tray) to check the output bin sensor for correct operation, binds, broken parts, or interference from the sensor cable. Reinstall the output expander option and check the voltages at J1A and J1B on page 4-29. Check the following before proceeding with the sensor flag? 2 Output bin sensor-run the sensor test to test the print quality of the print quality service checks. Output Bin x displays, POST is installed correctly. Does the sensor operate correctly? If this sets all the printer defaults to...
... print cartridge. 2-136 Service Manual Use Tray 1 (internal tray) to check the output bin sensor for correct operation, binds, broken parts, or interference from the sensor cable. Reinstall the output expander option and check the voltages at J1A and J1B on page 4-29. Check the following before proceeding with the sensor flag? 2 Output bin sensor-run the sensor test to test the print quality of the print quality service checks. Output Bin x displays, POST is installed correctly. Does the sensor operate correctly? If this sets all the printer defaults to...

Service Manual
Page 177
... the cartridge. Does this fix the problem? Make sure the print cartridge is seated correctly. See "Cartridge contact assembly pin locations" on page 5-4 to step 4 Replace the cartridge contact block. Run toner density calibration from the user's menu. • If only one color has a problem, go to "Step A." • If all colors have a low image density problem set the Print Darkness to High from the Utility menu. Change or switch the cartridge. 5060-00x One color has light print...
... the cartridge. Does this fix the problem? Make sure the print cartridge is seated correctly. See "Cartridge contact assembly pin locations" on page 5-4 to step 4 Replace the cartridge contact block. Run toner density calibration from the user's menu. • If only one color has a problem, go to "Step A." • If all colors have a low image density problem set the Print Darkness to High from the Utility menu. Change or switch the cartridge. 5060-00x One color has light print...

Service Manual
Page 179
... a new toner cartridge fix the problem? Step 1 Action and questions Media settings - Check to the ITU belt in the CE menu. Fuser settings - The most likely cause for light paper. Is the cartridge seated correctly? 2 Cartridge check - Set the fuser to "Horizontal lines or streaks" on page 4-31 Diagnostic information 2-145 If only one color has a residual image problem, go to High in the ITU assembly. Uneven printing • If all packing material has been removed...
... a new toner cartridge fix the problem? Step 1 Action and questions Media settings - Check to the ITU belt in the CE menu. Fuser settings - The most likely cause for light paper. Is the cartridge seated correctly? 2 Cartridge check - Set the fuser to "Horizontal lines or streaks" on page 4-31 Diagnostic information 2-145 If only one color has a residual image problem, go to High in the ITU assembly. Uneven printing • If all packing material has been removed...


