Wireless Setup Guide
Page 8
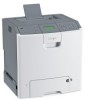
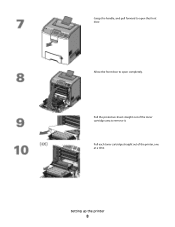
Setting up the printer 8 Allow the front door to open the front door. Pull each toner cartridge straight out of the toner cartridge area to remove it. Pull the protective sheet straight out of the printer, one at a time. Grasp the handle, and pull forward to open completely.
Setting up the printer 8 Allow the front door to open the front door. Pull each toner cartridge straight out of the toner cartridge area to remove it. Pull the protective sheet straight out of the printer, one at a time. Grasp the handle, and pull forward to open completely.
Wireless Setup Guide
Page 9
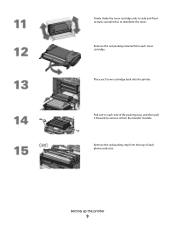
Place each side of each toner cartridge. Remove the red packing material from the top of the packing strip, and then pull it forward to distribute the toner. Remove the red packing strip from each photoconductor. Pull out on each toner cartridge back into the printer. Setting up the printer 9 Firmly shake the toner cartridge side-to-side and frontto-back several times to remove it from the transfer module.
Place each side of each toner cartridge. Remove the red packing material from the top of the packing strip, and then pull it forward to distribute the toner. Remove the red packing strip from each photoconductor. Pull out on each toner cartridge back into the printer. Setting up the printer 9 Firmly shake the toner cartridge side-to-side and frontto-back several times to remove it from the transfer module.
Quick Reference
Page 1
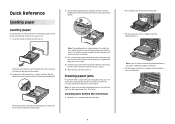
... once a length has been selected, slide the button back to remove the jammed paper. • Pull the paper forward if it . Clearing jams behind the toner cartridge area. Notice the size indicators on the printer control panel. Doing so may need to remove the photoconductors if the paper is lodged too tightly...
... once a length has been selected, slide the button back to remove the jammed paper. • Pull the paper forward if it . Clearing jams behind the toner cartridge area. Notice the size indicators on the printer control panel. Doing so may need to remove the photoconductors if the paper is lodged too tightly...
Print Defects
Page 1
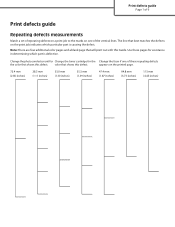
Note: There are four additional color pages and a blank page that shows this defect. Change the photoconductor unit for Change the toner cartridge for assistance in determining which particular part is defective. Use these pages for the Change the fuser if one of these repeating defects the color ...
Note: There are four additional color pages and a blank page that shows this defect. Change the photoconductor unit for Change the toner cartridge for assistance in determining which particular part is defective. Use these pages for the Change the fuser if one of these repeating defects the color ...

Print Quality
Page 1
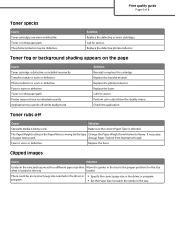
... Quality Pgs appears, and then press . Resetting the Printer appears briefly, followed by replacing a supply or maintenance item that does not meet the printer specifications. A toner cartridge, the transfer module, or the fuser is approaching the end of its intended life. Load paper from a fresh package into the paper tray. Avoid textured... using . Print quality guide Page 1 of 8 Print quality guide Many print quality problems can be solved by a clock, and then Ready appears. Replace the print cartridge, the transfer module, or the fuser.
... Quality Pgs appears, and then press . Resetting the Printer appears briefly, followed by replacing a supply or maintenance item that does not meet the printer specifications. A toner cartridge, the transfer module, or the fuser is approaching the end of its intended life. Load paper from a fresh package into the paper tray. Avoid textured... using . Print quality guide Page 1 of 8 Print quality guide Many print quality problems can be solved by a clock, and then Ready appears. Replace the print cartridge, the transfer module, or the fuser.
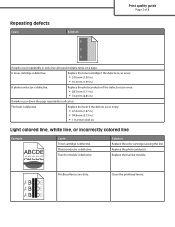
Print Quality
Page 2
...in.) • 113.0 mm (4.45 in.) Light colored line, white line, or incorrectly colored line Example ABCDE ABCDE Cause Toner cartridge is defective. Clean the printhead lenses. Photoconductor is defective. Replace the photoconductor. Replace the transfer module. ABCDE ABCDE ABCDE Printhead lenses... are dirty. Replace the toner cartridge if the defects occur every: • 33.0 mm (1.30 in.) • 35.3 mm (1.39 in all colors...
...in.) • 113.0 mm (4.45 in.) Light colored line, white line, or incorrectly colored line Example ABCDE ABCDE Cause Toner cartridge is defective. Clean the printhead lenses. Photoconductor is defective. Replace the photoconductor. Replace the transfer module. ABCDE ABCDE ABCDE Printhead lenses... are dirty. Replace the toner cartridge if the defects occur every: • 33.0 mm (1.30 in.) • 35.3 mm (1.39 in all colors...
Print Quality
Page 4
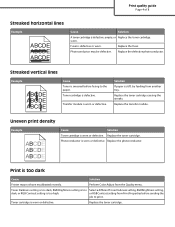
...setting from another tray. Replace the fuser. Replace the toner cartridge causing the streaks. Replace the toner cartridge. Toner cartridge is defective. Photoconductor may not have recalibrated recently. Replace the defective photoconductor. Toner cartridge is worn or defective. Solution If paper is too ... Page 4 of 8 Streaked horizontal lines Example ABCDE ABCDE ABCDE Cause Solution A toner cartridge is defective or worn. Fuser is defective, empty, or Replace the toner cartridge. Replace the transfer module. Replace the photoconductor. Print is stiff, try feeding from...
...setting from another tray. Replace the fuser. Replace the toner cartridge causing the streaks. Replace the toner cartridge. Toner cartridge is defective. Photoconductor may not have recalibrated recently. Replace the defective photoconductor. Toner cartridge is worn or defective. Solution If paper is too ... Page 4 of 8 Streaked horizontal lines Example ABCDE ABCDE ABCDE Cause Solution A toner cartridge is defective or worn. Fuser is defective, empty, or Replace the toner cartridge. Replace the transfer module. Replace the photoconductor. Print is stiff, try feeding from...
Print Quality
Page 5
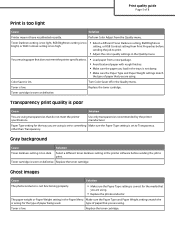
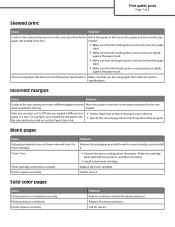
.... • Avoid textured paper with rough finishes. • Make sure the paper you are using is set to print. Replace the toner cartridge. Toner Darkness setting is too light, RGB Brightness setting is too bright, or RGB Contrast setting is correct for the media that you are using... . Toner cartridge is poor Cause Solution You are using transparencies that you are using . Perform Color Adjust from Print Properties before sending the job ...
.... • Avoid textured paper with rough finishes. • Make sure the paper you are using is set to print. Replace the toner cartridge. Toner Darkness setting is too light, RGB Brightness setting is too bright, or RGB Contrast setting is correct for the media that you are using... . Toner cartridge is poor Cause Solution You are using transparencies that you are using . Perform Color Adjust from Print Properties before sending the job ...
Print Quality
Page 6
... off -white background. change Paper Texture from the Quality menu. Replace the photoconductor. loaded. There could be defective. If necessary, of 8 Toner specks Cause Toner cartridges are set for a different paper size than Move the guides in the tray to the proper positions for the type Change the Paper Weight from ...
... off -white background. change Paper Texture from the Quality menu. Replace the photoconductor. loaded. There could be defective. If necessary, of 8 Toner specks Cause Toner cartridges are set for a different paper size than Move the guides in the tray to the proper positions for the type Change the Paper Weight from ...
Print Quality
Page 7
...paper size than Move the guides in the tray to the proper positions for the size what is not too far from the toner cartridge. For example, you loaded a different size paper in Print Properties or the program. Blank pages Cause Packaging materials have not been...• Make sure that the length guide is loaded in the tray. Solution Remove the packaging materials from the toner cartridge, and reinstall it . • Install a new toner cartridge. Printer requires servicing. Replace the photoconductor. Make sure that you are using paper that meets the printer specifications. ...
...paper size than Move the guides in the tray to the proper positions for the size what is not too far from the toner cartridge. For example, you loaded a different size paper in Print Properties or the program. Blank pages Cause Packaging materials have not been...• Make sure that the length guide is loaded in the tray. Solution Remove the packaging materials from the toner cartridge, and reinstall it . • Install a new toner cartridge. Printer requires servicing. Replace the photoconductor. Make sure that you are using paper that meets the printer specifications. ...
Supplies Guide
Page 1
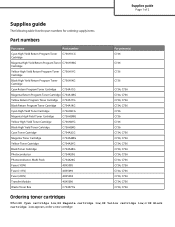
... Return Program Toner C736H1YG Cartridge Black High Yield Return Program Toner C736H1KG Cartridge Cyan Return Program Toner Cartridge C734A1CG Magenta Return Program Toner Cartridge C734A1MG Yellow Return Program Toner Cartridge C734A1YG Black Return Program Toner Cartridge C734A1KG Cyan High Yield Toner Cartridge C736H2CG Magenta High Yield Toner Cartridge C736H2MG Yellow High Yield Toner Cartridge C736H2YG Black High Yield Toner Cartridge C736H2KG Cyan Toner Cartridge C734A2CG Magenta Toner Cartridge C734A2MG Yellow Toner Cartridge C734A2YG Black Toner Cartridge C734A2KG...
... Return Program Toner C736H1YG Cartridge Black High Yield Return Program Toner C736H1KG Cartridge Cyan Return Program Toner Cartridge C734A1CG Magenta Return Program Toner Cartridge C734A1MG Yellow Return Program Toner Cartridge C734A1YG Black Return Program Toner Cartridge C734A1KG Cyan High Yield Toner Cartridge C736H2CG Magenta High Yield Toner Cartridge C736H2MG Yellow High Yield Toner Cartridge C736H2YG Black High Yield Toner Cartridge C736H2KG Cyan Toner Cartridge C734A2CG Magenta Toner Cartridge C734A2MG Yellow Toner Cartridge C734A2YG Black Toner Cartridge C734A2KG...

User's Guide
Page 53
One hundred percent of the Lexmark Web site at www.lexmark.com/environment • The Lexmark recycling program at www.lexmark.com/recycle Recycling Lexmark products To return Lexmark products to Lexmark for recycling: 1 Visit our Web site at www.lexmark.com/recycle. 2 From the Toner Cartridges section, select your country from the list. 3 Follow the instructions on the computer screen...
One hundred percent of the Lexmark Web site at www.lexmark.com/environment • The Lexmark recycling program at www.lexmark.com/recycle Recycling Lexmark products To return Lexmark products to Lexmark for recycling: 1 Visit our Web site at www.lexmark.com/recycle. 2 From the Toner Cartridges section, select your country from the list. 3 Follow the instructions on the computer screen...

User's Guide
Page 77
... Usage list, select Max Speed or Max Yield. 6 Click Submit. Prints in black and white To print all text and graphics using only the black toner cartridge, set the printer to color mode based on the color content found on each page. Note: The printer driver is selected. • Max Yield-Switches...
... Usage list, select Max Speed or Max Yield. 6 Click Submit. Prints in black and white To print all text and graphics using only the black toner cartridge, set the printer to color mode based on the color content found on each page. Note: The printer driver is selected. • Max Yield-Switches...
User's Guide
Page 79
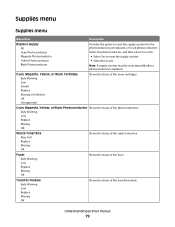
...the supply counter. • Select No to exit. Cyan, Magenta, Yellow, or Black Cartridge Early Warning Low Invalid Replace Missing or Defective OK Unsupported Shows the status of the toner cartridges Cyan, Magenta, Yellow, or Black Photoconductor Shows the status of the photoconductors Early Warning Low... Replace Missing OK Waste Toner Box Near Full Replace Missing OK Shows the status of the waste toner box Fuser Early Warning Low ...
...the supply counter. • Select No to exit. Cyan, Magenta, Yellow, or Black Cartridge Early Warning Low Invalid Replace Missing or Defective OK Unsupported Shows the status of the toner cartridges Cyan, Magenta, Yellow, or Black Photoconductor Shows the status of the photoconductors Early Warning Low... Replace Missing OK Waste Toner Box Near Full Replace Missing OK Shows the status of the waste toner box Fuser Early Warning Low ...

User's Guide
Page 114
...and/or options are not deleted if the printer loses power. This setting has no effect on pages printed using only the black toner cartridge. Sets the printer to print text and graphics using the PCL XL or PostScript interpreter. They are stored in the non-printable ... Only Mode Off On Description Sets the default printer language Notes: • PCL emulation uses a PCL interpreter for a faster print speed or a higher toner yield. PostScript emulation uses a PS interpreter for processing print jobs. • PCL is the factory default printer language. • Setting a printer language...
...and/or options are not deleted if the printer loses power. This setting has no effect on pages printed using only the black toner cartridge. Sets the printer to print text and graphics using the PCL XL or PostScript interpreter. They are stored in the non-printable ... Only Mode Off On Description Sets the default printer language Notes: • PCL emulation uses a PCL interpreter for a faster print speed or a higher toner yield. PostScript emulation uses a PS interpreter for processing print jobs. • PCL is the factory default printer language. • Setting a printer language...

User's Guide
Page 133
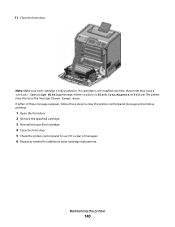
Warning-Potential Damage: To avoid overexposing the photoconductor units, do not leave the front door open for this procedure. 3 Locate the four printhead lenses. 4 Clean the lenses using a can of compressed air. Maintaining the printer 133 Warning-Potential Damage: Do not touch the printhead lenses. 5 Reinstall the four toner cartridges. Do not remove the photoconductor units for more than 10 minutes. 2 Remove all four toner cartridges.
Warning-Potential Damage: To avoid overexposing the photoconductor units, do not leave the front door open for this procedure. 3 Locate the four printhead lenses. 4 Clean the lenses using a can of compressed air. Maintaining the printer 133 Warning-Potential Damage: Do not touch the printhead lenses. 5 Reinstall the four toner cartridges. Do not remove the photoconductor units for more than 10 minutes. 2 Remove all four toner cartridges.

User's Guide
Page 135
In other countries or regions, visit the Lexmark Web Site at 1-800-539-6275 for information about 5% coverage per color). Ordering toner cartridges When 88 Cyan cartridge low, 88 Magenta cartridge low, 88 Yellow cartridge low, or 88 Black cartridge low appears, order a new cartridge. Ordering photoconductors When , 84 photoconductor low, or 84 photoconductor nearly low appears, order a replacement...
In other countries or regions, visit the Lexmark Web Site at 1-800-539-6275 for information about 5% coverage per color). Ordering toner cartridges When 88 Cyan cartridge low, 88 Magenta cartridge low, 88 Yellow cartridge low, or 88 Black cartridge low appears, order a new cartridge. Ordering photoconductors When , 84 photoconductor low, or 84 photoconductor nearly low appears, order a replacement...
User's Guide
Page 136
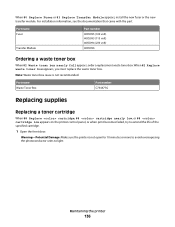
... avoid overexposing the photoconductor units to extend the life of the specified cartridge. 1 Open the front door. Maintaining the printer 136 Part name Waste Toner Box Part number C734X77G Replacing supplies Replacing a toner cartridge When 88 Replace cartridge, 88 cartridge nearly low, or 88 cartridge low appears on the printer control panel, or when print becomes faded...
... avoid overexposing the photoconductor units to extend the life of the specified cartridge. 1 Open the front door. Maintaining the printer 136 Part name Waste Toner Box Part number C734X77G Replacing supplies Replacing a toner cartridge When 88 Replace cartridge, 88 cartridge nearly low, or 88 cartridge low appears on the printer control panel, or when print becomes faded...
User's Guide
Page 140
...not installed correctly, the printer may also issue the message Close front door. Maintaining the printer 140 Note: Make sure each cartridge is Black, Cyan, Magenta, or Yellow. If either of these messages appears, follow these steps to clear the printer control...1 Open the front door. 2 Remove the specified cartridge. 3 Reinstall the specified cartridge. 4 Close the front door. 5 Check the printer control panel to see if it is clear of messages. 6 Repeat as needed for additional toner cartridge replacement. The printer may issue a Cartridge Missing message, where is fully pushed in.
...not installed correctly, the printer may also issue the message Close front door. Maintaining the printer 140 Note: Make sure each cartridge is Black, Cyan, Magenta, or Yellow. If either of these messages appears, follow these steps to clear the printer control...1 Open the front door. 2 Remove the specified cartridge. 3 Reinstall the specified cartridge. 4 Close the front door. 5 Check the printer control panel to see if it is clear of messages. 6 Repeat as needed for additional toner cartridge replacement. The printer may issue a Cartridge Missing message, where is fully pushed in.

User's Guide
Page 148
...148 Administrative support Finding advanced networking and administrator information For more advanced system support tasks, see paper tray settings, the level of toner in the toner cartridge, the percentage of life remaining in the photoconductor kit, and capacity measurements of certain printer parts. 1 Type the printer IP..., or view a report. Checking the virtual display The virtual display works as an actual display would work on the Lexmark Web site at http://support.lexmark.com. To access the Embedded Web Server, type the printer IP address into the address field of your Web browser....
...148 Administrative support Finding advanced networking and administrator information For more advanced system support tasks, see paper tray settings, the level of toner in the toner cartridge, the percentage of life remaining in the photoconductor kit, and capacity measurements of certain printer parts. 1 Type the printer IP..., or view a report. Checking the virtual display The virtual display works as an actual display would work on the Lexmark Web site at http://support.lexmark.com. To access the Embedded Web Server, type the printer IP address into the address field of your Web browser....


