Wireless Setup Guide
Page 9
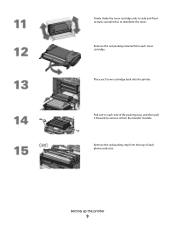
Place each toner cartridge. Pull out on each side of each photoconductor. Remove the red packing strip from the transfer module. Setting up the printer 9 Remove the red packing material from each toner cartridge back into the printer. Firmly shake the toner cartridge side-to-side and frontto-back several times to remove it from the top of the packing strip, and then pull it forward to distribute the toner.
Place each toner cartridge. Pull out on each side of each photoconductor. Remove the red packing strip from the transfer module. Setting up the printer 9 Remove the red packing material from each toner cartridge back into the printer. Firmly shake the toner cartridge side-to-side and frontto-back several times to remove it from the top of the packing strip, and then pull it forward to distribute the toner.
Quick Reference
Page 1
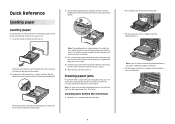
.... • Pull the paper forward if it out gently. Clearing paper jams If a jammed sheet is lodged too tightly under the photoconductors. Note: To avoid overexposing the photoconductors, do not leave the front door open the front door. 1 • Pull straight up and out to remove it from behind...Notice the size indicators on the printer control panel. Note: The length guide has a locking device. Doing so may need to remove the photoconductors if the paper is visible, then pull it is not visible, then complete the step that corresponds to the error message displayed on the bottom...
.... • Pull the paper forward if it out gently. Clearing paper jams If a jammed sheet is lodged too tightly under the photoconductors. Note: To avoid overexposing the photoconductors, do not leave the front door open the front door. 1 • Pull straight up and out to remove it from behind...Notice the size indicators on the printer control panel. Note: The length guide has a locking device. Doing so may need to remove the photoconductors if the paper is visible, then pull it is not visible, then complete the step that corresponds to the error message displayed on the bottom...
Menu Map
Page 1
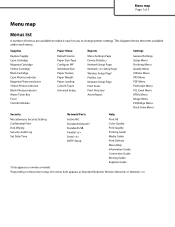
This diagram shows the items available under each menu. Supplies Replace Supply Cyan Cartridge Magenta Cartridge Yellow Cartridge Black Cartridge Cyan Photoconductor Magenta Photoconductor Yellow Photoconductor Black Photoconductor Waste Toner Box Fuser Transfer Module Paper Menu Default Source Paper Size/Type Configure MP Substitute Size Paper Texture Paper Weight Paper Loading Custom Types ...
This diagram shows the items available under each menu. Supplies Replace Supply Cyan Cartridge Magenta Cartridge Yellow Cartridge Black Cartridge Cyan Photoconductor Magenta Photoconductor Yellow Photoconductor Black Photoconductor Waste Toner Box Fuser Transfer Module Paper Menu Default Source Paper Size/Type Configure MP Substitute Size Paper Texture Paper Weight Paper Loading Custom Types ...
Print Defects
Page 1
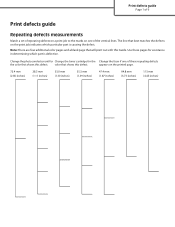
... of the vertical lines. Use these repeating defects the color that shows this defect. The line that will print out with this defect. Change the photoconductor unit for Change the toner cartridge for the Change the fuser if one of these pages for assistance in determining which particular part is defective...
... of the vertical lines. Use these repeating defects the color that shows this defect. The line that will print out with this defect. Change the photoconductor unit for Change the toner cartridge for the Change the fuser if one of these pages for assistance in determining which particular part is defective...
Print Quality
Page 2
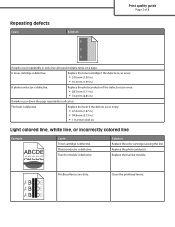
... (1.30 in.) • 35.3 mm (1.39 in all colors: The fuser is defective. Transfer module is defective. Photoconductor is defective. Replace the transfer module. Replace the photoconductor. ABCDE ABCDE ABCDE Printhead lenses are dirty. Replace the photoconductor if the defects occur every: • 28.3 mm (1.11 in.) • 72.4 mm (2.85 in.) If...
... (1.30 in.) • 35.3 mm (1.39 in all colors: The fuser is defective. Transfer module is defective. Photoconductor is defective. Replace the transfer module. Replace the photoconductor. ABCDE ABCDE ABCDE Printhead lenses are dirty. Replace the photoconductor if the defects occur every: • 28.3 mm (1.11 in.) • 72.4 mm (2.85 in.) If...
Print Quality
Page 3
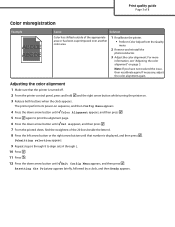
... appropriate area or has been superimposed over another color area. 1 Recalibrate the printer. • Perform Color Adjust from the Quality menu 2 Remove and reinstall the photoconductor. 3 Adjust the color alignment.
... appropriate area or has been superimposed over another color area. 1 Recalibrate the printer. • Perform Color Adjust from the Quality menu 2 Remove and reinstall the photoconductor. 3 Adjust the color alignment.
Print Quality
Page 4
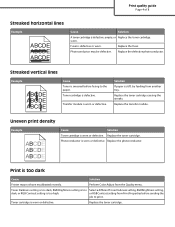
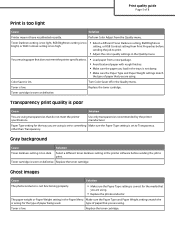
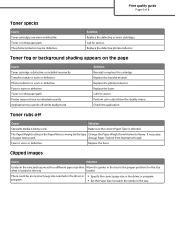
...density Example ABCDE ABCDE ABCDE Cause Solution Toner cartridge is worn or defective. Photoconductor is worn or defective. Toner cartridge is worn or defective. Replace the defective photoconductor. Solution If paper is stiff, try feeding from the Quality menu. Replace ...different Toner Darkness setting, RGB Brightness setting, dark, or RGB Contrast setting is defective, empty, or Replace the toner cartridge. Photoconductor may not have recalibrated recently. Print quality guide Page 4 of 8 Streaked horizontal lines Example ABCDE ABCDE ABCDE Cause Solution A ...
...density Example ABCDE ABCDE ABCDE Cause Solution Toner cartridge is worn or defective. Photoconductor is worn or defective. Toner cartridge is worn or defective. Replace the defective photoconductor. Solution If paper is stiff, try feeding from the Quality menu. Replace ...different Toner Darkness setting, RGB Brightness setting, dark, or RGB Contrast setting is defective, empty, or Replace the toner cartridge. Photoconductor may not have recalibrated recently. Print quality guide Page 4 of 8 Streaked horizontal lines Example ABCDE ABCDE ABCDE Cause Solution A ...
Print Quality
Page 5
...new package. • Avoid textured paper with rough finishes. • Make sure the paper you are using . • Replace the photoconductor. Paper Type setting for the tray you are using . The paper weight or Paper Weight setting in the trays is too light Cause ... setting from the Quality menu. Replace the toner cartridge. Use only transparencies recommended by the printer manufacturer. Ghost images Cause Solution The photoconductor is not functioning properly. • Make sure the Paper Type setting is correct for the type of 8 Print is not damp...
...new package. • Avoid textured paper with rough finishes. • Make sure the paper you are using . • Replace the photoconductor. Paper Type setting for the tray you are using . The paper weight or Paper Weight setting in the trays is too light Cause ... setting from the Quality menu. Replace the toner cartridge. Use only transparencies recommended by the printer manufacturer. Ghost images Cause Solution The photoconductor is not functioning properly. • Make sure the Paper Type setting is correct for the type of 8 Print is not damp...
Print Quality
Page 6
... the paper path. Replace the fuser. Print quality guide Page 6 of paper being used . Transfer module is worn or defective. Photoconductor is worn or defective. Replace the fuser. Fuser is worn or defective. Call for service. Fuser is worn or defective. Toner ...the proper positions for the size what is loaded in the tray. Replace the transfer module. loaded. There could be defective. The photoconductor may not have recalibrated recently. Solution Replace the defective or worn cartridges. If necessary, of 8 Toner specks Cause Toner cartridges are...
... the paper path. Replace the fuser. Print quality guide Page 6 of paper being used . Transfer module is worn or defective. Photoconductor is worn or defective. Replace the fuser. Fuser is worn or defective. Call for service. Fuser is worn or defective. Toner ...the proper positions for the size what is loaded in the tray. Replace the transfer module. loaded. There could be defective. The photoconductor may not have recalibrated recently. Solution Replace the defective or worn cartridges. If necessary, of 8 Toner specks Cause Toner cartridges are...
Print Quality
Page 7
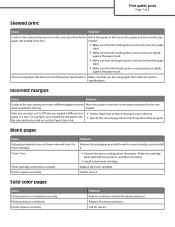
...been removed from the paper stack. • Make sure that meets the printer specifications. Replace the toner cartridge. Solid color pages Cause Photoconductor is low. Auto size sensing is set to Off, but did not set for a different paper size than Move the guides in the...sure that the length guide is not pressing too tightly against the paper stack. Printer requires servicing. Solution Remove and then reinstall the photoconductor. Replace the photoconductor. Call for service. loaded. • Make sure that the width guide is not too far from the printer. Make sure that ...
...been removed from the paper stack. • Make sure that meets the printer specifications. Replace the toner cartridge. Solid color pages Cause Photoconductor is low. Auto size sensing is set to Off, but did not set for a different paper size than Move the guides in the...sure that the length guide is not pressing too tightly against the paper stack. Printer requires servicing. Solution Remove and then reinstall the photoconductor. Replace the photoconductor. Call for service. loaded. • Make sure that the width guide is not too far from the printer. Make sure that ...
Supplies Guide
Page 1
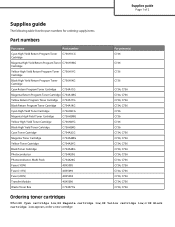
... Toner Cartridge C736H2YG Black High Yield Toner Cartridge C736H2KG Cyan Toner Cartridge C734A2CG Magenta Toner Cartridge C734A2MG Yellow Toner Cartridge C734A2YG Black Toner Cartridge C734A2KG Photoconductor C734X20G Photoconductor, Multi-Pack C734X24G Fuser (100V) 40X5095 Fuser (115V) 40X5093 Fuser (230V) 40X5094 Transfer Module 40X5096 Waste Toner Box C734X77G For printer(s) C736 C736 C736...
... Toner Cartridge C736H2YG Black High Yield Toner Cartridge C736H2KG Cyan Toner Cartridge C734A2CG Magenta Toner Cartridge C734A2MG Yellow Toner Cartridge C734A2YG Black Toner Cartridge C734A2KG Photoconductor C734X20G Photoconductor, Multi-Pack C734X24G Fuser (100V) 40X5095 Fuser (115V) 40X5093 Fuser (230V) 40X5094 Transfer Module 40X5096 Waste Toner Box C734X77G For printer(s) C736 C736 C736...

Supplies Guide
Page 2
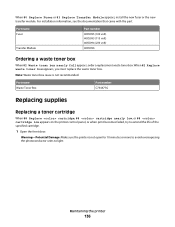
... box nearly full appears, order a replacement waste toner box. When 82 Replace waste toner box appears, you must replace the specified photoconductor. Part name Waste Toner Box Part number C734X77G Note: Waste toner box reuse is based on the ISO / IEC 19798 standard (with...cartridge appears, you must replace the waste toner box. Supplies guide Page 2 of toner. Estimated cartridge yield is not recommended. Part name Photoconductor Photoconductor, Multi-Pack Part number C734X20G C734X24G Ordering a fuser or a transfer module When 80 Fuser Life Warning or 83 Transfer Module Life Warning ...
... box nearly full appears, order a replacement waste toner box. When 82 Replace waste toner box appears, you must replace the specified photoconductor. Part name Waste Toner Box Part number C734X77G Note: Waste toner box reuse is based on the ISO / IEC 19798 standard (with...cartridge appears, you must replace the waste toner box. Supplies guide Page 2 of toner. Estimated cartridge yield is not recommended. Part name Photoconductor Photoconductor, Multi-Pack Part number C734X20G C734X24G Ordering a fuser or a transfer module When 80 Fuser Life Warning or 83 Transfer Module Life Warning ...

User's Guide
Page 78
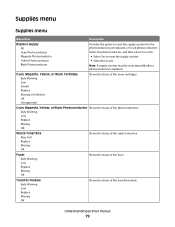
Understanding printer menus 78 Understanding printer menus Menus list Supplies Replace Supply Cyan Cartridge Magenta Cartridge Yellow Cartridge Black Cartridge Cyan Photoconductor Magenta Photoconductor Yellow Photoconductor Black Photoconductor Waste Toner Box Fuser Transfer Module Paper Menu Default Source Paper Size/Type Configure MP Substitute Size Paper Texture Paper Weight Paper Loading Custom Types ...
Understanding printer menus 78 Understanding printer menus Menus list Supplies Replace Supply Cyan Cartridge Magenta Cartridge Yellow Cartridge Black Cartridge Cyan Photoconductor Magenta Photoconductor Yellow Photoconductor Black Photoconductor Waste Toner Box Fuser Transfer Module Paper Menu Default Source Paper Size/Type Configure MP Substitute Size Paper Texture Paper Weight Paper Loading Custom Types ...
User's Guide
Page 79
...or Defective OK Unsupported Shows the status of the toner cartridges Cyan, Magenta, Yellow, or Black Photoconductor Shows the status of the photoconductors Early Warning Low Replace Missing OK Waste Toner Box Near Full Replace Missing OK Shows the status...Supplies menu Supplies menu Menu item Description Replace Supply All Cyan Photoconductor Magenta Photoconductor Yellow Photoconductor Black Photoconductor Provides the option to reset the supply counter for the photoconductor just replaced, or for all photoconductors Select the photoconductor, and then select Yes or No: • Select ...
...or Defective OK Unsupported Shows the status of the toner cartridges Cyan, Magenta, Yellow, or Black Photoconductor Shows the status of the photoconductors Early Warning Low Replace Missing OK Waste Toner Box Near Full Replace Missing OK Shows the status...Supplies menu Supplies menu Menu item Description Replace Supply All Cyan Photoconductor Magenta Photoconductor Yellow Photoconductor Black Photoconductor Provides the option to reset the supply counter for the photoconductor just replaced, or for all photoconductors Select the photoconductor, and then select Yes or No: • Select ...

User's Guide
Page 133
Warning-Potential Damage: Do not touch the printhead lenses. 5 Reinstall the four toner cartridges. Maintaining the printer 133 Warning-Potential Damage: To avoid overexposing the photoconductor units, do not leave the front door open for this procedure. 3 Locate the four printhead lenses. 4 Clean the lenses using a can of compressed air. Do not remove the photoconductor units for more than 10 minutes. 2 Remove all four toner cartridges.
Warning-Potential Damage: Do not touch the printhead lenses. 5 Reinstall the four toner cartridges. Maintaining the printer 133 Warning-Potential Damage: To avoid overexposing the photoconductor units, do not leave the front door open for this procedure. 3 Locate the four printhead lenses. 4 Clean the lenses using a can of compressed air. Do not remove the photoconductor units for more than 10 minutes. 2 Remove all four toner cartridges.

User's Guide
Page 135
... cartridge low appears, order a new cartridge. Ordering photoconductors When , 84 photoconductor low, or 84 photoconductor nearly low appears, order a replacement photoconductor. Note: All life estimates for printer supplies assume printing on the ISO / IEC 19798 standard (with about Lexmark authorized supplies dealers in the U.S., contact Lexmark at www.lexmark.com or contact the place where you do...
... cartridge low appears, order a new cartridge. Ordering photoconductors When , 84 photoconductor low, or 84 photoconductor nearly low appears, order a replacement photoconductor. Note: All life estimates for printer supplies assume printing on the ISO / IEC 19798 standard (with about Lexmark authorized supplies dealers in the U.S., contact Lexmark at www.lexmark.com or contact the place where you do...
User's Guide
Page 136
... Damage: Make sure the printer is not recommended. Note: Waste toner box reuse is not open for 10 minutes or more to avoid overexposing the photoconductor units to extend the life of the specified cartridge. 1 Open the front door. For installation information, see the documentation that came with the part...
... Damage: Make sure the printer is not recommended. Note: Waste toner box reuse is not open for 10 minutes or more to avoid overexposing the photoconductor units to extend the life of the specified cartridge. 1 Open the front door. For installation information, see the documentation that came with the part...

User's Guide
Page 141
... for more than 10 minutes. 2 Pull the specified photoconductor up, and then slide it from the printer. Replacing a photoconductor is necessary: 84 Replace photoconductor, 84 photoconductor nearly low, or 84 photoconductor low. First, complete the illustrated steps to remove it to the right to replace the photoconductor, and then reset the life count and clear printer...
... for more than 10 minutes. 2 Pull the specified photoconductor up, and then slide it from the printer. Replacing a photoconductor is necessary: 84 Replace photoconductor, 84 photoconductor nearly low, or 84 photoconductor low. First, complete the illustrated steps to remove it to the right to replace the photoconductor, and then reset the life count and clear printer...

User's Guide
Page 142
Touching it could damage the photoconductor. 4 Align and insert the left end of the photoconductor, and then press the right end until it clicks into place. 5 Remove the red packing strip from the top of the photoconductor. 3 Unpack the replacement photoconductor. Warning-Potential Damage: Do not touch the shiny area on the photoconductor drum. Maintaining the printer 142
Touching it could damage the photoconductor. 4 Align and insert the left end of the photoconductor, and then press the right end until it clicks into place. 5 Remove the red packing strip from the top of the photoconductor. 3 Unpack the replacement photoconductor. Warning-Potential Damage: Do not touch the shiny area on the photoconductor drum. Maintaining the printer 142

User's Guide
Page 143
...down arrow button until Supply Replaced appears, and then press . If you are prompted to Lexmark for recycling. 7 Close the front door. 8 If you are prompted to replace additional photoconductors, repeat steps 1 to reset the life count may result in degraded print quality. Note... to 9 for shipping to replace only one photoconductor, then the Ready screen appears, and the task is complete. If you see 84 Replace photoconductor, 84 photoconductor nearly low, or 84 photoconductor low on the box for each additional photoconductor. Maintaining the printer 143 Yes appears. 9 ...
...down arrow button until Supply Replaced appears, and then press . If you are prompted to Lexmark for recycling. 7 Close the front door. 8 If you are prompted to replace additional photoconductors, repeat steps 1 to reset the life count may result in degraded print quality. Note... to 9 for shipping to replace only one photoconductor, then the Ready screen appears, and the task is complete. If you see 84 Replace photoconductor, 84 photoconductor nearly low, or 84 photoconductor low on the box for each additional photoconductor. Maintaining the printer 143 Yes appears. 9 ...


