Quick Reference Guide
Page 1
SUPPLIES MENU Toner Tray 1 Status Tray 2 Status Tray 3 Status Coating Roll Transfer Belt COLOR MENU Color Correction Print Resolution Image Enhancement PAPER MENU Paper Source PAPER SIZE PAPER TYPE PAPER WEIGHT CUSTOM TYPES Substitute Size Configure ...-422 RS-422 Polarity Serial Protocol Robust XON Baud Data Bits Parity Honor DSR Capitalized menu items (for example, PAPER SIZE) have submenus. Quick Reference Lexmark Optra C710 Color Laser Printer Operator Panel Ready 1 Menu 2 Select 3 Return 4 Go 5 Stop 6 Press to: • Enter the menus from the ready state • Scroll through...
SUPPLIES MENU Toner Tray 1 Status Tray 2 Status Tray 3 Status Coating Roll Transfer Belt COLOR MENU Color Correction Print Resolution Image Enhancement PAPER MENU Paper Source PAPER SIZE PAPER TYPE PAPER WEIGHT CUSTOM TYPES Substitute Size Configure ...-422 RS-422 Polarity Serial Protocol Robust XON Baud Data Bits Parity Honor DSR Capitalized menu items (for example, PAPER SIZE) have submenus. Quick Reference Lexmark Optra C710 Color Laser Printer Operator Panel Ready 1 Menu 2 Select 3 Return 4 Go 5 Stop 6 Press to: • Enter the menus from the ready state • Scroll through...

Quick Reference Guide
Page 2
... of the fuser. Adjust Guides Flex Paper Clearing Printer Paper Jams Printer Paper Path Top output bin Message 202 Paper Jam 201 Paper Jam 250 Paper Jam 24x Paper Jam Location Fuser and output rollers Transfer belt and fuser Multipurpose feeder Paper tray 202 Paper Jam...any jammed paper. 3 Close the front cover. Transfer Belt and Fuser 1 Open the front cover. 2 Carefully remove any jammed paper. 3 Place the tray inside duplex unit base). 3 Insert duplex unit inverter tray into duplex unit. © Copyright Lexmark International, Inc. 1999. Clearing Duplex Unit Paper ...
... of the fuser. Adjust Guides Flex Paper Clearing Printer Paper Jams Printer Paper Path Top output bin Message 202 Paper Jam 201 Paper Jam 250 Paper Jam 24x Paper Jam Location Fuser and output rollers Transfer belt and fuser Multipurpose feeder Paper tray 202 Paper Jam...any jammed paper. 3 Close the front cover. Transfer Belt and Fuser 1 Open the front cover. 2 Carefully remove any jammed paper. 3 Place the tray inside duplex unit base). 3 Insert duplex unit inverter tray into duplex unit. © Copyright Lexmark International, Inc. 1999. Clearing Duplex Unit Paper ...

User's Guide
Page 16
... at up to a maximum of 384MB. The modular design of your many printing needs. This includes replacing the photoconductor, transfer belt, coating roll, fuser, and all four color print cartridges. Print speed Your printer can install an optional hard disk for storing downloaded resources, job statistics, and for fast, efficient processing of images and...
... at up to a maximum of 384MB. The modular design of your many printing needs. This includes replacing the photoconductor, transfer belt, coating roll, fuser, and all four color print cartridges. Print speed Your printer can install an optional hard disk for storing downloaded resources, job statistics, and for fast, efficient processing of images and...

User's Guide
Page 30
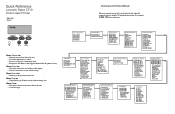
...each menu item. SUPPLIES MENU (page 17) Toner Tray 1 Status Tray 2 Status Tray 3 Status Coating Roll Transfer Belt JOB MENU (page 35) COLOR MENU (page 19) Color Correction Image Enhancement Print Resolution PAPER MENU (page 20) Paper Source PAPER SIZE PAPER TYPE PAPER WEIGHT Custom Types ... Separator Sheets Separator Source Multipage Print Multipage Order Multipage View Multipage Border Cancel Job Reset Printer Print Buffer CONFIDENTIAL JOB HELD JOBS SETUP MENU (page 38) Printer Language Power Saver Resource Save Download Target Print Timeout Auto Continue Wait Timeout Jam Recovery ...
...each menu item. SUPPLIES MENU (page 17) Toner Tray 1 Status Tray 2 Status Tray 3 Status Coating Roll Transfer Belt JOB MENU (page 35) COLOR MENU (page 19) Color Correction Image Enhancement Print Resolution PAPER MENU (page 20) Paper Source PAPER SIZE PAPER TYPE PAPER WEIGHT Custom Types ... Separator Sheets Separator Source Multipage Print Multipage Order Multipage View Multipage Border Cancel Job Reset Printer Print Buffer CONFIDENTIAL JOB HELD JOBS SETUP MENU (page 38) Printer Language Power Saver Resource Save Download Target Print Timeout Auto Continue Wait Timeout Jam Recovery ...

User's Guide
Page 32
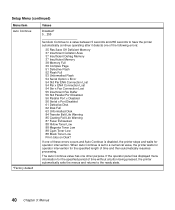
...on page 138 for more information. The printer displays 84 Transfer Belt Life Warning on the operator panel. When the transfer belt is full. The printer displays 87 Fuser Exhausted on the operator panel. You must replace the transfer belt to clear the error message, however the...more information. 18 Chapter 3: Menus See "Installing the Transfer Belt" in the printer. Supplies Menu (continued) Menu item Transfer Belt Values Missing Life Warning Exhausted Fuser When the transfer belt is nearing its life end, the printer identifies the fuser as close to being exhausted. You can...
...on page 138 for more information. The printer displays 84 Transfer Belt Life Warning on the operator panel. When the transfer belt is full. The printer displays 87 Fuser Exhausted on the operator panel. You must replace the transfer belt to clear the error message, however the...more information. 18 Chapter 3: Menus See "Installing the Transfer Belt" in the printer. Supplies Menu (continued) Menu item Transfer Belt Values Missing Life Warning Exhausted Fuser When the transfer belt is nearing its life end, the printer identifies the fuser as close to being exhausted. You can...
User's Guide
Page 54
...Std Parallel Port Disabled 56 Parallel Port x Disabled 56 Serial x Port Disabled 61 Defective Disk 62 Disk Full 63 Unformatted Disk 84 Transfer Belt Life Warning 85 Coating Roll Life Warning 87 Fuser Exhausted 88 Yellow Toner Low 88 Magenta Toner Low 88 Cyan Toner Low 88 Black...the specified length of time without a button being pressed, the printer automatically exits the menus and returns to have the printer automatically continue operating after it detects one other purpose. When Auto Continue is disabled, the printer stops and waits for the specified period of time and then ...
...Std Parallel Port Disabled 56 Parallel Port x Disabled 56 Serial x Port Disabled 61 Defective Disk 62 Disk Full 63 Unformatted Disk 84 Transfer Belt Life Warning 85 Coating Roll Life Warning 87 Fuser Exhausted 88 Yellow Toner Low 88 Magenta Toner Low 88 Cyan Toner Low 88 Black...the specified length of time without a button being pressed, the printer automatically exits the menus and returns to have the printer automatically continue operating after it detects one other purpose. When Auto Continue is disabled, the printer stops and waits for the specified period of time and then ...

User's Guide
Page 100
...quality problems To prevent print quality problems, do not touch the print cartridge photoconductors, the transfer belt, or the fuser rollers. Scratches or fingerprints on transparencies, we recommend using only two colors of toner instead of toner you use media that may find the print quality unacceptable. ...on the type of any of these surfaces can select 2-Color Draft to replace certain printer supplies. If you use , some parts or supplies may result in a wide range of toner by using the following Lexmark transparencies. Depending on page 116 for an indication of jobs ...
...quality problems To prevent print quality problems, do not touch the print cartridge photoconductors, the transfer belt, or the fuser rollers. Scratches or fingerprints on transparencies, we recommend using only two colors of toner instead of toner you use media that may find the print quality unacceptable. ...on the type of any of these surfaces can select 2-Color Draft to replace certain printer supplies. If you use , some parts or supplies may result in a wide range of toner by using the following Lexmark transparencies. Depending on page 116 for an indication of jobs ...

User's Guide
Page 127
... Coating roll 15,000 continuous pages 10E0045 Transfer kit contains: transfer belt and transfer roller 100,000 images 10E0049 Fuser kit (low voltage) 100,000 pages 10E0059 Fuser kit (high voltage) 100,000 pages Note: Each fuser kit contains a fuser unit and an air filter. Replacing 7 supplies Your printer has been designed to let you...
... Coating roll 15,000 continuous pages 10E0045 Transfer kit contains: transfer belt and transfer roller 100,000 images 10E0049 Fuser kit (low voltage) 100,000 pages 10E0059 Fuser kit (high voltage) 100,000 pages Note: Each fuser kit contains a fuser unit and an air filter. Replacing 7 supplies Your printer has been designed to let you...

User's Guide
Page 133
... send the used supplies Lexmark's Operation ReSourceSM program lets you want to photocopy, set Color Correction to print your used print cartridges, fuser, or transfer belt in shades of a color document, or you're printing a color document that you participate in 2-Color Draft mode or black and white. 2-Color Draft When you bought your printer supplies and reduce overall...
... send the used supplies Lexmark's Operation ReSourceSM program lets you want to photocopy, set Color Correction to print your used print cartridges, fuser, or transfer belt in shades of a color document, or you're printing a color document that you participate in 2-Color Draft mode or black and white. 2-Color Draft When you bought your printer supplies and reduce overall...

User's Guide
Page 134
... 5 Stop 6 The printer calculates and stores information on the number of images that need attention. You can press Go to remind you do not have been printed. This saves the toner in the magenta, cyan, and yellow print cartridges. Replacement of your print cartridges, coating roll, fuser and transfer belt life. If you...
... 5 Stop 6 The printer calculates and stores information on the number of images that need attention. You can press Go to remind you do not have been printed. This saves the toner in the magenta, cyan, and yellow print cartridges. Replacement of your print cartridges, coating roll, fuser and transfer belt life. If you...

User's Guide
Page 152
Replacing the transfer kit Your printer monitors the life of the transfer belt and transfer roller. To replace the transfer belt: 1 Place the printer power switch to replace the transfer kit. The transfer kit consists of your printer is time for you to off (O). 2 Unplug the printer or optional device power cord from the outlet. 3 Open the multipurpose feeder. 4 Lift the release lever...
Replacing the transfer kit Your printer monitors the life of the transfer belt and transfer roller. To replace the transfer belt: 1 Place the printer power switch to replace the transfer kit. The transfer kit consists of your printer is time for you to off (O). 2 Unplug the printer or optional device power cord from the outlet. 3 Open the multipurpose feeder. 4 Lift the release lever...

User's Guide
Page 153
The inside of the transfer belt. Caution! Green tabs Orange tabs Green tabs 7 Remove the new transfer belt from its package. 8 Remove the orange tabs and any internal components. 6 Pull the transfer belt from the printer. To remove the transfer belt, use the green tabs. Lift and pull the orange tab trom the top of the printer may be hot. Chapter 7: Replacing the transfer kit 139 Pull the two bottom orange tabs away from the transfer belt. Allow the printer to cool before touching any packing material or tape from the transfer belt.
The inside of the transfer belt. Caution! Green tabs Orange tabs Green tabs 7 Remove the new transfer belt from its package. 8 Remove the orange tabs and any internal components. 6 Pull the transfer belt from the printer. To remove the transfer belt, use the green tabs. Lift and pull the orange tab trom the top of the printer may be hot. Chapter 7: Replacing the transfer kit 139 Pull the two bottom orange tabs away from the transfer belt. Allow the printer to cool before touching any packing material or tape from the transfer belt.

User's Guide
Page 154
To install the transfer belt, hold it by the green tabs. 10 Push the transfer belt into the printer until it is firmly seated. When you squeeze the two snap locks, the springs under the transfer roller will cause the transfer roller to raise up. 140 Chapter 7: Replacing the transfer kit To replace the transfer roller: 1 Squeeze the two green snap locks on each side of the transfer belt with rails inside the printer. 9 Align the bottom of the transfer roller.
To install the transfer belt, hold it by the green tabs. 10 Push the transfer belt into the printer until it is firmly seated. When you squeeze the two snap locks, the springs under the transfer roller will cause the transfer roller to raise up. 140 Chapter 7: Replacing the transfer kit To replace the transfer roller: 1 Squeeze the two green snap locks on each side of the transfer belt with rails inside the printer. 9 Align the bottom of the transfer roller.

User's Guide
Page 160
The photocondutor becomes electrically charged by Lexmark provides the best print quality. 146 Chapter 8: Theory of operation The transfer belt has a uniformly negative charge on the transfer belt is pulled from the toner reservoir inside the print ...transfer roller. The media recommended by the laser signal. By understanding how your printer operates, you send to your printer work, however, the carousel, print cartridge, transfer belt, second transfer roller, and fuser will help you want. As the carousel rotates, the photoconductor meets the transfer belt. As the transfer belt...
The photocondutor becomes electrically charged by Lexmark provides the best print quality. 146 Chapter 8: Theory of operation The transfer belt has a uniformly negative charge on the transfer belt is pulled from the toner reservoir inside the print ...transfer roller. The media recommended by the laser signal. By understanding how your printer operates, you send to your printer work, however, the carousel, print cartridge, transfer belt, second transfer roller, and fuser will help you want. As the carousel rotates, the photoconductor meets the transfer belt. As the transfer belt...
User's Guide
Page 170
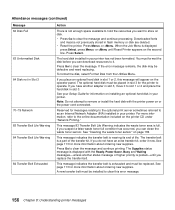
Downloaded fonts and macros not previously stored in Slot 3 70-79 Network 83 Transfer Belt Life Warning 84 Transfer Belt Life Warning 84 Transfer Belt Exhausted Action There is not enough space available to hold the resources you want to store on disk. • Press Go to clear the message and continue processing. Attendance messages (continued) Message 62 Disk Full 63 Unformatted Disk 64 Disk not in flash memory or disk are deleted. • Reset the printer. Press Menu> or or
Downloaded fonts and macros not previously stored in Slot 3 70-79 Network 83 Transfer Belt Life Warning 84 Transfer Belt Life Warning 84 Transfer Belt Exhausted Action There is not enough space available to hold the resources you want to store on disk. • Press Go to clear the message and continue processing. Attendance messages (continued) Message 62 Disk Full 63 Unformatted Disk 64 Disk not in flash memory or disk are deleted. • Reset the printer. Press Menu> or or

User's Guide
Page 171
...not have the fuser kit on hand, order it now. To reset the fuser counter place the printer power off (O). Press Go to clear the message and continue printing. Insert the transfer belt and close the front cover to clear the message. If you do not have an extra coating ...roll, order it turned on. Attendance messages (continued) Message 85 Coating Roll Life Warning 86 Transfer Belt Missing 87 Fuser Exhausted 88 Color Low 88 Color Cartridge Empty 20x Paper Jam Action This message indicates the coating roll is installed, you must be replaced prior to the...
...not have the fuser kit on hand, order it now. To reset the fuser counter place the printer power off (O). Press Go to clear the message and continue printing. Insert the transfer belt and close the front cover to clear the message. If you do not have an extra coating ...roll, order it turned on. Attendance messages (continued) Message 85 Coating Roll Life Warning 86 Transfer Belt Missing 87 Fuser Exhausted 88 Color Low 88 Color Cartridge Empty 20x Paper Jam Action This message indicates the coating roll is installed, you must be replaced prior to the...

User's Guide
Page 172
...is required to correct this error occurs. Service messages Message 900 Service RIP Software 910-912 Service Engine Motor 917 Service Transfer Belt Action An unrecoverable printer software error has occurred. A service technician is sounded if this condition. See page 175 for additional instructions on clearing...the entire duplex unit paper path. Replacing the transfer belt usually solves this condition. Attendance messages (continued) Message 23x Paper Jam Check Duplex 24x Paper Jam Check Tray x 25x Paper Jam MP Feeder Action The printer has detected a paper jam in the duplex ...
...is required to correct this error occurs. Service messages Message 900 Service RIP Software 910-912 Service Engine Motor 917 Service Transfer Belt Action An unrecoverable printer software error has occurred. A service technician is sounded if this condition. See page 175 for additional instructions on clearing...the entire duplex unit paper path. Replacing the transfer belt usually solves this condition. Attendance messages (continued) Message 23x Paper Jam Check Duplex 24x Paper Jam Check Tray x 25x Paper Jam MP Feeder Action The printer has detected a paper jam in the duplex ...
User's Guide
Page 185
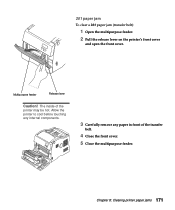
201 paper jam To clear a 201 paper jam (transfer belt): 1 Open the multipurpose feeder. 2 Pull the release lever on the printer's front cover and open the front cover. Chapter 8: Clearing printer paper jams 171 Multipurpose feeder Release lever Caution! The inside of the transfer belt. 4 Close the front cover. 5 Close the multipurpose feeder. Allow the printer to cool before touching any internal components. 3 Carefully remove any paper in front of the printer may be hot.
201 paper jam To clear a 201 paper jam (transfer belt): 1 Open the multipurpose feeder. 2 Pull the release lever on the printer's front cover and open the front cover. Chapter 8: Clearing printer paper jams 171 Multipurpose feeder Release lever Caution! The inside of the transfer belt. 4 Close the front cover. 5 Close the multipurpose feeder. Allow the printer to cool before touching any internal components. 3 Carefully remove any paper in front of the printer may be hot.

User's Guide
Page 186
Release lever 3 Carefully remove any paper in front of the transfer belt. 4 Close the front cover. 5 Place the paper in multipurpose feeder. 172 Chapter 8: Clearing printer paper jams 250 paper jam To clear a 250 paper jam (multipurpose feeder): 1 Remove the paper from multipurpose feeder. 2 Pull the release lever on the printer's front cover and open the front cover.
Release lever 3 Carefully remove any paper in front of the transfer belt. 4 Close the front cover. 5 Place the paper in multipurpose feeder. 172 Chapter 8: Clearing printer paper jams 250 paper jam To clear a 250 paper jam (multipurpose feeder): 1 Remove the paper from multipurpose feeder. 2 Pull the release lever on the printer's front cover and open the front cover.

User's Guide
Page 188
Multipurpose feeder Release lever 6 Carefully remove any paper in front of the transfer belt. 7 Close the front cover. 8 Close the multipurpose feeder. 174 Chapter 8: Clearing printer paper jams 4 Open the multipurpose feeder. 5 Pull the release lever on the printer's front cover and open the front cover.
Multipurpose feeder Release lever 6 Carefully remove any paper in front of the transfer belt. 7 Close the front cover. 8 Close the multipurpose feeder. 174 Chapter 8: Clearing printer paper jams 4 Open the multipurpose feeder. 5 Pull the release lever on the printer's front cover and open the front cover.


