Quick Reference Guide
Page 1
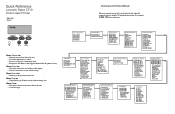
SUPPLIES MENU Toner Tray 1 Status Tray 2 Status Tray 3 Status Coating Roll Transfer Belt COLOR MENU Color Correction Print Resolution Image Enhancement PAPER MENU Paper Source PAPER SIZE PAPER TYPE PAPER WEIGHT CUSTOM TYPES Substitute Size Configure MP ...-422 RS-422 Polarity Serial Protocol Robust XON Baud Data Bits Parity Honor DSR Capitalized menu items (for example, PAPER SIZE) have submenus. Quick Reference Lexmark Optra C710 Color Laser Printer Operator Panel Ready 1 Menu 2 Select 3 Return 4 Go 5 Stop 6 Press to: • Enter the menus from the ready state • Scroll through ...
SUPPLIES MENU Toner Tray 1 Status Tray 2 Status Tray 3 Status Coating Roll Transfer Belt COLOR MENU Color Correction Print Resolution Image Enhancement PAPER MENU Paper Source PAPER SIZE PAPER TYPE PAPER WEIGHT CUSTOM TYPES Substitute Size Configure MP ...-422 RS-422 Polarity Serial Protocol Robust XON Baud Data Bits Parity Honor DSR Capitalized menu items (for example, PAPER SIZE) have submenus. Quick Reference Lexmark Optra C710 Color Laser Printer Operator Panel Ready 1 Menu 2 Select 3 Return 4 Go 5 Stop 6 Press to: • Enter the menus from the ready state • Scroll through ...

Quick Reference Guide
Page 2
...Carefully remove jammed paper. 3 Close the top duplex assembly door. 231 Paper Jam - Recommended Lexmark transparencies are P/N 12A5150 (letter) or P/N 12A5151 (A4). Paper face down top edge entering printer Envelope face down with flap to remove the drawer above the paper jam or clear the jam... any jammed paper. 3 Close the front cover. Fuser and Output Rollers 1 Open the fuser cover, fuser door, and front cover. 2 Remove coating roll. 3 Carefully remove jammed paper. 4 Close the front cover, fuser door, and fuser cover. Move the rear and side guides to properly position ...
...Carefully remove jammed paper. 3 Close the top duplex assembly door. 231 Paper Jam - Recommended Lexmark transparencies are P/N 12A5150 (letter) or P/N 12A5151 (A4). Paper face down top edge entering printer Envelope face down with flap to remove the drawer above the paper jam or clear the jam... any jammed paper. 3 Close the front cover. Fuser and Output Rollers 1 Open the fuser cover, fuser door, and front cover. 2 Remove coating roll. 3 Carefully remove jammed paper. 4 Close the front cover, fuser door, and fuser cover. Move the rear and side guides to properly position ...

User's Guide
Page 6
... replace supplies 116 Print cartridges 117 Coating roll 118 Recycling used supplies 119 Conserving supplies 119 2-Color Draft 119 Black and White 119 Replacing supply items 120 Replacing print cartridges 121 Replacing the coating roll 126 Replacing the fuser kit 131 Replacing the transfer kit 138 8 Solving printer problems 145 Printer problems 145 Theory of operation 146...
... replace supplies 116 Print cartridges 117 Coating roll 118 Recycling used supplies 119 Conserving supplies 119 2-Color Draft 119 Black and White 119 Replacing supply items 120 Replacing print cartridges 121 Replacing the coating roll 126 Replacing the fuser kit 131 Replacing the transfer kit 138 8 Solving printer problems 145 Printer problems 145 Theory of operation 146...

User's Guide
Page 16
...memory.) If you typically print large, complex jobs, you can print four-color and mono jobs at up to accommodate your printer In addition, you can provide you perform routine printer maintenance procedures without the aid of images and graphics, and so on....a service technician. The modular design of your printer lets you with superb quality presentation or draft printouts. 2 Chapter 1: Introducing your many printing needs. This includes replacing the photoconductor, transfer belt, coating roll, fuser, and all four color print cartridges. These settings can print duplex jobs ...
...memory.) If you typically print large, complex jobs, you can print four-color and mono jobs at up to accommodate your printer In addition, you can provide you perform routine printer maintenance procedures without the aid of images and graphics, and so on....a service technician. The modular design of your printer lets you with superb quality presentation or draft printouts. 2 Chapter 1: Introducing your many printing needs. This includes replacing the photoconductor, transfer belt, coating roll, fuser, and all four color print cartridges. These settings can print duplex jobs ...

User's Guide
Page 30
... option is installed. SUPPLIES MENU (page 17) Toner Tray 1 Status Tray 2 Status Tray 3 Status Coating Roll Transfer Belt JOB MENU (page 35) COLOR MENU (page 19) Color Correction Image Enhancement Print Resolution PAPER MENU (page 20) Paper Source PAPER SIZE PAPER TYPE PAPER WEIGHT Custom... Separator Sheets Separator Source Multipage Print Multipage Order Multipage View Multipage Border Cancel Job Reset Printer Print Buffer CONFIDENTIAL JOB HELD JOBS SETUP MENU (page 38) Printer Language Power Saver Resource Save Download Target Print Timeout Auto Continue Wait Timeout Jam Recovery ...
... option is installed. SUPPLIES MENU (page 17) Toner Tray 1 Status Tray 2 Status Tray 3 Status Coating Roll Transfer Belt JOB MENU (page 35) COLOR MENU (page 19) Color Correction Image Enhancement Print Resolution PAPER MENU (page 20) Paper Source PAPER SIZE PAPER TYPE PAPER WEIGHT Custom... Separator Sheets Separator Source Multipage Print Multipage Order Multipage View Multipage Border Cancel Job Reset Printer Print Buffer CONFIDENTIAL JOB HELD JOBS SETUP MENU (page 38) Printer Language Power Saver Resource Save Download Target Print Timeout Auto Continue Wait Timeout Jam Recovery ...

User's Guide
Page 31
Press Menu> or You can view the Supplies Menu when the printer is idle or when the printer is low or needs replacement. Supplies Menu The Supplies Menu provides information about printer supplies that require attention. It is only available when a supply is busy processing or printing a job.
Press Menu> or You can view the Supplies Menu when the printer is idle or when the printer is low or needs replacement. Supplies Menu The Supplies Menu provides information about printer supplies that require attention. It is only available when a supply is busy processing or printing a job.
User's Guide
Page 54
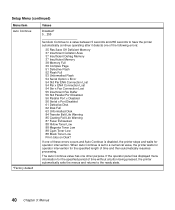
...Disk 84 Transfer Belt Life Warning 85 Coating Roll Life Warning 87 Fuser Exhausted 88 Yellow Toner Low 88 Magenta Toner Low 88 Cyan Toner Low 88 Black Toner Low Print Jobs on Disk? When Auto Continue is disabled, the printer stops and waits for operator intervention.... the operator panel has displayed menu information for the specified length of time without a button being pressed, the printer automatically exits the menus and returns to have the printer automatically continue operating after it detects one other purpose. Setup Menu (continued) Menu item Auto Continue Values Disabled*...
...Disk 84 Transfer Belt Life Warning 85 Coating Roll Life Warning 87 Fuser Exhausted 88 Yellow Toner Low 88 Magenta Toner Low 88 Cyan Toner Low 88 Black Toner Low Print Jobs on Disk? When Auto Continue is disabled, the printer stops and waits for operator intervention.... the operator panel has displayed menu information for the specified length of time without a button being pressed, the printer automatically exits the menus and returns to have the printer automatically continue operating after it detects one other purpose. Setup Menu (continued) Menu item Auto Continue Values Disabled*...

User's Guide
Page 127
...extra replacement supplies so you can operate your printer operating properly. You may want to keep your printer without the need : Routine maintenance supplies Part number Supply item Approx. Ordering supplies Print cartridge Coating roll Transfer belt Fuser unit The following list ...identifies the items and part numbers you will need of a service technician. Replacing 7 supplies Your printer has been designed to let you replace supply items ...
...extra replacement supplies so you can operate your printer operating properly. You may want to keep your printer without the need : Routine maintenance supplies Part number Supply item Approx. Ordering supplies Print cartridge Coating roll Transfer belt Fuser unit The following list ...identifies the items and part numbers you will need of a service technician. Replacing 7 supplies Your printer has been designed to let you replace supply items ...

User's Guide
Page 132
... Chapter 7: When to replace supplies It is located inside the fuser under the printer 's fuser cover. Warning! You can order a coating roll separate from the black print cartridge. Coating roll The coating roll lubricates the fuser with the new cartridge. See page 113 for more information on ordering ...print cartridge. If you are indicators you replace the black print cartridge. You will receive a new coating roll each time you need to replace the coating roll before its scheduled time. With certain types of the page or ghost images are installing the black print...
... Chapter 7: When to replace supplies It is located inside the fuser under the printer 's fuser cover. Warning! You can order a coating roll separate from the black print cartridge. Coating roll The coating roll lubricates the fuser with the new cartridge. See page 113 for more information on ordering ...print cartridge. If you are indicators you replace the black print cartridge. You will receive a new coating roll each time you need to replace the coating roll before its scheduled time. With certain types of the page or ghost images are installing the black print...

User's Guide
Page 134
... and stores information on hand, order one at this time. Replacement of your print cartridges, coating roll, fuser and transfer belt life. The printer counter keeps track of these parts ensures peak printer performance and prevents print quality and paper feed problems resulting from worn parts. You can press Menu> or The Supplies status...
... and stores information on hand, order one at this time. Replacement of your print cartridges, coating roll, fuser and transfer belt life. The printer counter keeps track of these parts ensures peak printer performance and prevents print quality and paper feed problems resulting from worn parts. You can press Menu> or The Supplies status...

User's Guide
Page 135
... the toner level and life of your printer or its components, some supply items will display 88 Color Low on the printer display under the Supplies Menu. When the toner in your print cartridge is getting low, the printer will not permit the printer to operate when the item is time for ...you to your print cartridges. When this occurs, you must install the appropriate new supplies before you replace the print cartridge. If you are installing the black print cartridge, make sure you install the coating roll when ...
... the toner level and life of your printer or its components, some supply items will display 88 Color Low on the printer display under the Supplies Menu. When the toner in your print cartridge is getting low, the printer will not permit the printer to operate when the item is time for ...you to your print cartridges. When this occurs, you must install the appropriate new supplies before you replace the print cartridge. If you are installing the black print cartridge, make sure you install the coating roll when ...

User's Guide
Page 140
... cool before its scheduled time. For more information on ordering a separate coating roll see toner specks on page 113. You can order a coating roll separately from the outlet to replace the coating roll before touching. 1 Make sure the printer is unplugged. 126 Chapter 7: Replacing the coating roll The fuser may be hot. For best print quality, make sure you...
... cool before its scheduled time. For more information on ordering a separate coating roll see toner specks on page 113. You can order a coating roll separately from the outlet to replace the coating roll before touching. 1 Make sure the printer is unplugged. 126 Chapter 7: Replacing the coating roll The fuser may be hot. For best print quality, make sure you...

User's Guide
Page 141
Chapter 7: Replacing the coating roll 127 Note: If the duplex unit is installed, lift the duplex top cover first. 3 Press the fuser cover release button and lift the fuser cover. Fuser door Fuser cover release button 4 Lift the fuser door.
Chapter 7: Replacing the coating roll 127 Note: If the duplex unit is installed, lift the duplex top cover first. 3 Press the fuser cover release button and lift the fuser cover. Fuser door Fuser cover release button 4 Lift the fuser door.

User's Guide
Page 142
rial from its package. 7 Remove the orange tape and other packing mate- Caution! The coating roll and packing material may contain excess oil that could soil clothing. 6 Remove the new coating roll from the coating roll. Make sure all of the fuser. Use the handle to lift the coating roll out of the plastic wrapping is removed from fuser. Coating roll 128 Chapter 7: Replacing the coating roll 5 Lift coating roll from the coating roll.
rial from its package. 7 Remove the orange tape and other packing mate- Caution! The coating roll and packing material may contain excess oil that could soil clothing. 6 Remove the new coating roll from the coating roll. Make sure all of the fuser. Use the handle to lift the coating roll out of the plastic wrapping is removed from fuser. Coating roll 128 Chapter 7: Replacing the coating roll 5 Lift coating roll from the coating roll.

User's Guide
Page 143
Chapter 7: Replacing the coating roll 129 8 Align the bar on the side of the coating roll with the slots in the fuser. 9 Lower the coating roll into the fuser. 10 Close the fuser door.
Chapter 7: Replacing the coating roll 129 8 Align the bar on the side of the coating roll with the slots in the fuser. 9 Lower the coating roll into the fuser. 10 Close the fuser door.

User's Guide
Page 144
11 Close the fuser cover. 12 Plug the power cord into a properly grounded electrical outlet. 13 Place the printer power switch to on (I). 130 Chapter 7: Replacing the coating roll
11 Close the fuser cover. 12 Plug the power cord into a properly grounded electrical outlet. 13 Place the printer power switch to on (I). 130 Chapter 7: Replacing the coating roll

User's Guide
Page 146
You will need to remove the coating roll from the printer. To lift the fuser, use the green lifting handles. 7 Set the fuser aside. This is done during step 6 on each side of the fuser. 6 Lift the fuser from the old fuser and transfer it to the new fuser. Thumbscrews 5 Loosen the green thumbscrews on page 135 after you install the new fuser. 132 Chapter 7: Replacing the fuser kit
You will need to remove the coating roll from the printer. To lift the fuser, use the green lifting handles. 7 Set the fuser aside. This is done during step 6 on each side of the fuser. 6 Lift the fuser from the old fuser and transfer it to the new fuser. Thumbscrews 5 Loosen the green thumbscrews on page 135 after you install the new fuser. 132 Chapter 7: Replacing the fuser kit

User's Guide
Page 149
a Rotate the tabs toward each other as shown. Chapter 7: Replacing the fuser kit 135 b Pull the tabs up to remove them from the fuser. 6 Open the fuser door on the old fuser. 7 Remove the coating roll from inside the fuser. 5 Remove the orange tabs and any packing material from the old fuser.
a Rotate the tabs toward each other as shown. Chapter 7: Replacing the fuser kit 135 b Pull the tabs up to remove them from the fuser. 6 Open the fuser door on the old fuser. 7 Remove the coating roll from inside the fuser. 5 Remove the orange tabs and any packing material from the old fuser.

User's Guide
Page 150
8 Align the bar on the side of the coating roll with the slots in the fuser. 9 Lower the coating roll into the fuser. Bar Slots 10 Close the fuser door. 136 Chapter 7: Replacing the fuser kit
8 Align the bar on the side of the coating roll with the slots in the fuser. 9 Lower the coating roll into the fuser. Bar Slots 10 Close the fuser door. 136 Chapter 7: Replacing the fuser kit

User's Guide
Page 171
... fuser kit must reset the fuser counter to the printer, a coating roll may result in poor toner adhesion to the print cartridge becoming low on the operator panel. Attendance messages (continued) Message 85 Coating Roll Life Warning 86 Transfer Belt Missing 87 Fuser Exhausted 88 Color Low 88 Color Cartridge Empty 20x Paper Jam Action This message...
... fuser kit must reset the fuser counter to the printer, a coating roll may result in poor toner adhesion to the print cartridge becoming low on the operator panel. Attendance messages (continued) Message 85 Coating Roll Life Warning 86 Transfer Belt Missing 87 Fuser Exhausted 88 Color Low 88 Color Cartridge Empty 20x Paper Jam Action This message...


