Wireless Setup Guide
Page 8
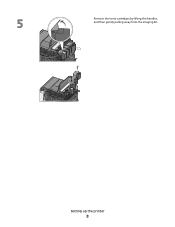
Y C M K Y C M Remove the toner cartridges by lifting the handles, and then gently pulling away from the imaging kit. K M C Y K M C Y Setting up the printer 8
Y C M K Y C M Remove the toner cartridges by lifting the handles, and then gently pulling away from the imaging kit. K M C Y K M C Y Setting up the printer 8
Wireless Setup Guide
Page 10
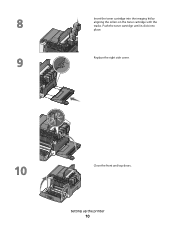
Replace the right side cover. Push the toner cartridge until it clicks into the imaging kit by aligning the rollers on the toner cartridge with the tracks. Y C M K K M C Y Close the front and top doors. Y C M K K M C Y Insert the toner cartridge into place. Setting up the printer 10
Replace the right side cover. Push the toner cartridge until it clicks into the imaging kit by aligning the rollers on the toner cartridge with the tracks. Y C M K K M C Y Close the front and top doors. Y C M K K M C Y Insert the toner cartridge into place. Setting up the printer 10
User's Guide
Page 2
... 13 Installing internal options...13 Installing hardware options...20 Attaching cables...22 Verifying printer setup...22 Setting up the printer software...23 Setting up wireless printing...25 Installing the printer on a wired network...29 Minimizing your printer's environmental impact 33 Saving paper and toner...33 Saving energy...35 Recycling...37 Loading paper and specialty media 39...
... 13 Installing internal options...13 Installing hardware options...20 Attaching cables...22 Verifying printer setup...22 Setting up the printer software...23 Setting up wireless printing...25 Installing the printer on a wired network...29 Minimizing your printer's environmental impact 33 Saving paper and toner...33 Saving energy...35 Recycling...37 Loading paper and specialty media 39...

User's Guide
Page 33
...units, impacts print clarity and how well toner fuses to reduce materials, and provide ...Lexmark Web site at www.lexmark.com/environment • The Lexmark recycling program at www.lexmark.com/recycle By selecting certain printer settings or tasks, you can be made that may be loaded into consideration both sides of how the paper behaves as colorants... and "glue" often generates more information, see "Using Eco-Mode" on the global market. Many factors are taken into a tray) • Surface roughness (measured in laser (electrophotographic) printers. Minimizing your printer...
...units, impacts print clarity and how well toner fuses to reduce materials, and provide ...Lexmark Web site at www.lexmark.com/environment • The Lexmark recycling program at www.lexmark.com/recycle By selecting certain printer settings or tasks, you can be made that may be loaded into consideration both sides of how the paper behaves as colorants... and "glue" often generates more information, see "Using Eco-Mode" on the global market. Many factors are taken into a tray) • Surface roughness (measured in laser (electrophotographic) printers. Minimizing your printer...
User's Guide
Page 34
... (FSC) or The Program for use with laser printers: • Chemically treated papers used to make paper. General sustainability-related information can be affected by selecting 2-sided printing from the Print dialog or the Lexmark Toolbar. Minimizing your printer model supports duplex printing, you use when printing. Lexmark is maintained. Using recycled paper is one or...
... (FSC) or The Program for use with laser printers: • Chemically treated papers used to make paper. General sustainability-related information can be affected by selecting 2-sided printing from the Print dialog or the Lexmark Toolbar. Minimizing your printer model supports duplex printing, you use when printing. Lexmark is maintained. Using recycled paper is one or...

User's Guide
Page 37
... are either reused or demanufactured for recycling: 1 Visit our Web site at www.lexmark.com/recycle. 2 From the Toner Cartridges section, select your Web browser. These efficiencies result in your printer or cartridge and use the pre-paid shipping label. Lexmark cartons are transported in the most efficient and environmentally sensitive manner and that...
... are either reused or demanufactured for recycling: 1 Visit our Web site at www.lexmark.com/recycle. 2 From the Toner Cartridges section, select your Web browser. These efficiencies result in your printer or cartridge and use the pre-paid shipping label. Lexmark cartons are transported in the most efficient and environmentally sensitive manner and that...
User's Guide
Page 48
...or dry conditions, even in .), we recommend 90 g/m2 or heavier paper. If paper is too rough, toner cannot fuse to it is the tendency for paper to curl at http://support.lexmark.com. Extend the time several days if the storage or transportation environment is either grain long, running the... in the Cardstock and Label Guide available at its original wrapper in a sheet of the paper fibers in the same environment as the printer for 24 to 48 hours before printing by storing it in its edges. Paper and specialty media guidelines Additional information for printing on speciality...
...or dry conditions, even in .), we recommend 90 g/m2 or heavier paper. If paper is too rough, toner cannot fuse to it is the tendency for paper to curl at http://support.lexmark.com. Extend the time several days if the storage or transportation environment is either grain long, running the... in the Cardstock and Label Guide available at its original wrapper in a sheet of the paper fibers in the same environment as the printer for 24 to 48 hours before printing by storing it in its edges. Paper and specialty media guidelines Additional information for printing on speciality...

User's Guide
Page 49
... that are oxidation-set or oil-based generally meet these paper storage guidelines to help avoid jams and poor print quality: • Always use in toner. Inks that has been cut or trimmed by the resin in xerographic copiers. This information is usually indicated on top of the paper. To help...
... that are oxidation-set or oil-based generally meet these paper storage guidelines to help avoid jams and poor print quality: • Always use in toner. Inks that has been cut or trimmed by the resin in xerographic copiers. This information is usually indicated on top of the paper. To help...
User's Guide
Page 64
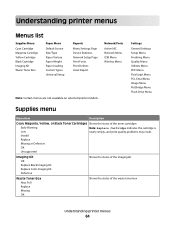
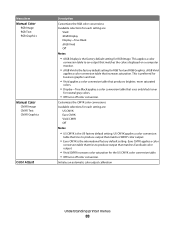
...OK Unsupported Imaging Kit OK Replace Black Imaging Kit Replace Color Imaging Kit Defective Shows the status of the imaging kit Waste Toner Box Near Full Replace Missing OK Shows the status of the toner cartridges Early Warning Low Note: Replace Cartridge indicates the cartridge... Flash Drive Menu Supplies menu Menu item Description Cyan, Magenta, Yellow, or Black Toner Cartridges Shows the status of the waste toner box Understanding printer menus 64 Understanding printer menus Menus list Supplies Menu Cyan Cartridge Magenta Cartridge Yellow Cartridge Black Cartridge Imaging Kit...
...OK Unsupported Imaging Kit OK Replace Black Imaging Kit Replace Color Imaging Kit Defective Shows the status of the imaging kit Waste Toner Box Near Full Replace Missing OK Shows the status of the toner cartridges Early Warning Low Note: Replace Cartridge indicates the cartridge... Flash Drive Menu Supplies menu Menu item Description Cyan, Magenta, Yellow, or Black Toner Cartridges Shows the status of the waste toner box Understanding printer menus 64 Understanding printer menus Menus list Supplies Menu Cyan Cartridge Magenta Cartridge Yellow Cartridge Black Cartridge Imaging Kit...

User's Guide
Page 86
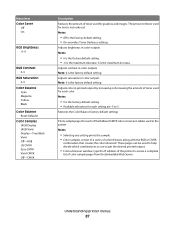
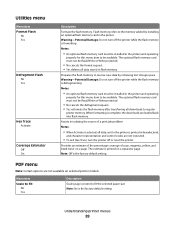
...the printed page. • Off turns off color correction. • Manual allows customization of the color tables using N-up Border None Solid Quality menu Menu item Color Correction Auto Off Manual Print Resolution 4800 CQ 1200 dpi Toner Darkness 1-5 Enhance Fine Lines Off On Description Specifies...setting. Menu item Orientation Auto Landscape Portrait N-up (pages-sides) Note: None is the factory default setting. Understanding printer menus 86 The printer chooses between portrait and landscape. for Windows users, click File ª Print, and then click Properties, Preferences, Options, or...
...the printed page. • Off turns off color correction. • Manual allows customization of the color tables using N-up Border None Solid Quality menu Menu item Color Correction Auto Off Manual Print Resolution 4800 CQ 1200 dpi Toner Darkness 1-5 Enhance Fine Lines Off On Description Specifies...setting. Menu item Orientation Auto Landscape Portrait N-up (pages-sides) Note: None is the factory default setting. Understanding printer menus 86 The printer chooses between portrait and landscape. for Windows users, click File ª Print, and then click Properties, Preferences, Options, or...
User's Guide
Page 87
... used to help decide which combinations to use to get the desired printed output. • From a browser window, type the IP address of the printer to 5. The amount of toner used for each color Notes: • 0 is the factory default setting. • Available selections for each setting are -5 to access a complete list of...
... used to help decide which combinations to use to get the desired printed output. • From a browser window, type the IP address of the printer to 5. The amount of toner used for each color Notes: • 0 is the factory default setting. • Available selections for each setting are -5 to access a complete list of...
User's Guide
Page 88
... an output that uses only black toner for the US CMYK color conversion table. • Off turns off color conversion. This applies a color conversion table to produce output that increases saturation. Initiates an automatic color adjust calibration Understanding printer menus 88 Menu item Manual Color RGB Image RGB Text RGB Graphics Manual Color CMYK Image CMYK Text CMYK...
... an output that uses only black toner for the US CMYK color conversion table. • Off turns off color conversion. This applies a color conversion table to produce output that increases saturation. Initiates an automatic color adjust calibration Understanding printer menus 88 Menu item Manual Color RGB Image RGB Text RGB Graphics Manual Color CMYK Image CMYK Text CMYK...
User's Guide
Page 89
Warning-Potential Damage: Do not turn off or reset the printer. Assists in isolating the source of cyan, magenta, yellow, and black toner on a separator page. Provides an estimate of the percentage coverage of a print job problem Notes: • When Activate is selected, all data sent... request. • Yes deletes all downloads to the memory added by retrieving lost storage space Warning-Potential Damage: Do not turn the printer off the printer while the flash memory is printed on a page. Utilities menu Menu item Format Flash No Yes Defragment Flash No Yes Hex Trace Activate...
Warning-Potential Damage: Do not turn off or reset the printer. Assists in isolating the source of cyan, magenta, yellow, and black toner on a separator page. Provides an estimate of the percentage coverage of a print job problem Notes: • When Activate is selected, all data sent... request. • Yes deletes all downloads to the memory added by retrieving lost storage space Warning-Potential Damage: Do not turn the printer off the printer while the flash memory is printed on a page. Utilities menu Menu item Format Flash No Yes Defragment Flash No Yes Hex Trace Activate...
User's Guide
Page 94
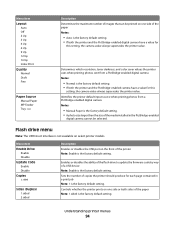
Determines which resolution, toner darkness, and color saver values the printer uses when printing photos sent from a PictBridge-enabled digital camera Notes: • Manual ...of images that can be selected. Menu item Enable Drive Enable Disable Update Code Enable Disable Copies 1-999 Sides (Duplex) 1 sided 2 sided Description Enables or disables the USB port on one side or both sides of the paper ... or disables the ability of the flash drive to update the firmware code by way of the printer Note: Enable is not available on one side of the paper Note: 1 sided is the factory default setting....
Determines which resolution, toner darkness, and color saver values the printer uses when printing photos sent from a PictBridge-enabled digital camera Notes: • Manual ...of images that can be selected. Menu item Enable Drive Enable Disable Update Code Enable Disable Copies 1-999 Sides (Duplex) 1 sided 2 sided Description Enables or disables the USB port on one side or both sides of the paper ... or disables the ability of the flash drive to update the firmware code by way of the printer Note: Enable is not available on one side of the paper Note: 1 sided is the factory default setting....
User's Guide
Page 96
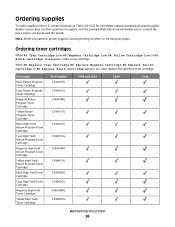
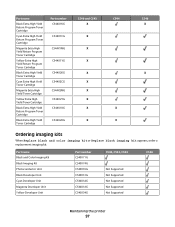
... C540H1KG C540H1CG C540H1MG C540H1YG C540H2KG C540H2CG C540H2MG C540H2YG C540 and C543 C544 C546 Maintaining the printer 96 In other countries or regions, visit the Lexmark Web Site at 1-800-539-6275 for printer supplies assume printing on letter- Ordering toner cartridges When 88 Cyan Cartridge Low, 88 Magenta Cartridge Low, 88 Yellow Cartridge Low...
... C540H1KG C540H1CG C540H1MG C540H1YG C540H2KG C540H2CG C540H2MG C540H2YG C540 and C543 C544 C546 Maintaining the printer 96 In other countries or regions, visit the Lexmark Web Site at 1-800-539-6275 for printer supplies assume printing on letter- Ordering toner cartridges When 88 Cyan Cartridge Low, 88 Magenta Cartridge Low, 88 Yellow Cartridge Low...
User's Guide
Page 97
... Magenta Extra High Yield Toner Cartridge Yellow Extra High Yield Toner Cartridge Black Extra High Yield Return Program Toner Cartridge Black Extra High Yield Toner Cartridge Part number C544X1KG C544X1CG C544X1MG C544X1YG C544X2KG C544X2CG C544X2MG C544X2YG C546U1KG C546U2KG C540 and C543 X X X X X X X X X X C544 X X C546 X X Ordering imaging kits When Replace black and color imaging kit or Replace...
... Magenta Extra High Yield Toner Cartridge Yellow Extra High Yield Toner Cartridge Black Extra High Yield Return Program Toner Cartridge Black Extra High Yield Toner Cartridge Part number C544X1KG C544X1CG C544X1MG C544X1YG C544X2KG C544X2CG C544X2MG C544X2YG C546U1KG C546U2KG C540 and C543 X X X X X X X X X X C544 X X C546 X X Ordering imaging kits When Replace black and color imaging kit or Replace...
User's Guide
Page 98
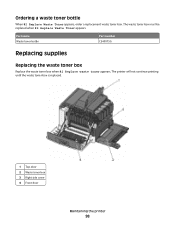
The printer will not continue printing until the waste toner box is replaced. 1 Top door 2 Waste toner box 3 Right side cover 4 Front door Maintaining the printer 98 Ordering a waste toner bottle When 82 Replace Waste Toner appears, order a replacement waste toner box. Part name Waste toner bottle Part number C540X75G Replacing supplies Replacing the waste toner box Replace the waste toner box when 82 Replace waste toner appears. The waste toner box must be replaced when 82 Replace Waste Toner appears.
The printer will not continue printing until the waste toner box is replaced. 1 Top door 2 Waste toner box 3 Right side cover 4 Front door Maintaining the printer 98 Ordering a waste toner bottle When 82 Replace Waste Toner appears, order a replacement waste toner box. Part name Waste toner bottle Part number C540X75G Replacing supplies Replacing the waste toner box Replace the waste toner box when 82 Replace waste toner appears. The waste toner box must be replaced when 82 Replace Waste Toner appears.
User's Guide
Page 99
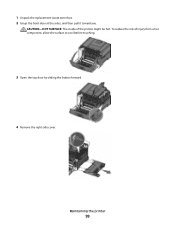
To reduce the risk of the printer might be hot. 1 Unpack the replacement waste toner box. 2 Grasp the front door at the sides, and then pull it toward you. Maintaining the printer 99 CAUTION-HOT SURFACE: The inside of injury from a hot component, allow the surface to cool before touching. 3 Open the top door by sliding the button forward. 4 Remove the right side cover.
To reduce the risk of the printer might be hot. 1 Unpack the replacement waste toner box. 2 Grasp the front door at the sides, and then pull it toward you. Maintaining the printer 99 CAUTION-HOT SURFACE: The inside of injury from a hot component, allow the surface to cool before touching. 3 Open the top door by sliding the button forward. 4 Remove the right side cover.
User's Guide
Page 100
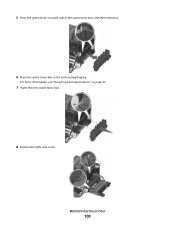
Maintaining the printer 100 For more information, see "Recycling Lexmark products" on each side of the waste toner box, and then remove it. 6 Place the waste toner box in the enclosed packaging. 5 Press the green levers on page 37. 7 Insert the new waste toner box. 8 Replace the right side cover.
Maintaining the printer 100 For more information, see "Recycling Lexmark products" on each side of the waste toner box, and then remove it. 6 Place the waste toner box in the enclosed packaging. 5 Press the green levers on page 37. 7 Insert the new waste toner box. 8 Replace the right side cover.

User's Guide
Page 102
Maintaining the printer 102 2 Open the top door by sliding the button forward. 3 Remove the toner cartridges by lifting the handles, and then gently pulling them away from the imaging kit. 4 Remove the right side cover.
Maintaining the printer 102 2 Open the top door by sliding the button forward. 3 Remove the toner cartridges by lifting the handles, and then gently pulling them away from the imaging kit. 4 Remove the right side cover.

