User's Guide
Page 4
24x paper jam...124 250 paper jam...124 Troubleshooting 125 Understanding printer messages...125 Solving basic printer problems...131 Solving printing problems...131 Solving option problems...135 Solving paper feed problems...137 Solving print quality problems...138 Solving color quality problems...148 Contacting Customer Support...152 Notices 153 Product information...153 Edition notice...153 Power consumption...157 Index 167 Contents 4
24x paper jam...124 250 paper jam...124 Troubleshooting 125 Understanding printer messages...125 Solving basic printer problems...131 Solving printing problems...131 Solving option problems...135 Solving paper feed problems...137 Solving print quality problems...138 Solving color quality problems...148 Contacting Customer Support...152 Notices 153 Product information...153 Edition notice...153 Power consumption...157 Index 167 Contents 4

User's Guide
Page 33
...mechanics of the Lexmark Web site at www.lexmark.com/environment • The Lexmark recycling program at www.lexmark.com/recycle By selecting certain printer settings or tasks, you can significantly reduce your printer's environmental impact 33 Minimizing your printer's environmental impact Lexmark is committed ... on page 35. Many factors are taken into a tray) • Surface roughness (measured in laser (electrophotographic) printers. And while recycled papers are one printer setting, see : • The Notices chapter • The Environmental Sustainability section of how the paper...
...mechanics of the Lexmark Web site at www.lexmark.com/environment • The Lexmark recycling program at www.lexmark.com/recycle By selecting certain printer settings or tasks, you can significantly reduce your printer's environmental impact 33 Minimizing your printer's environmental impact Lexmark is committed ... on page 35. Many factors are taken into a tray) • Surface roughness (measured in laser (electrophotographic) printers. And while recycled papers are one printer setting, see : • The Notices chapter • The Environmental Sustainability section of how the paper...
User's Guide
Page 64
Invalid Replace Missing or Defective OK Unsupported Imaging Kit OK Replace Black Imaging Kit Replace Color Imaging Kit Defective Shows the status of the imaging kit Waste Toner Box Near Full Replace Missing OK Shows the status of the ...Menu Supplies menu Menu item Description Cyan, Magenta, Yellow, or Black Toner Cartridges Shows the status of the waste toner box Understanding printer menus 64 Understanding printer menus Menus list Supplies Menu Cyan Cartridge Magenta Cartridge Yellow Cartridge Black Cartridge Imaging Kit Waste Toner Box Paper Menu Default Source Size/Type...
Invalid Replace Missing or Defective OK Unsupported Imaging Kit OK Replace Black Imaging Kit Replace Color Imaging Kit Defective Shows the status of the imaging kit Waste Toner Box Near Full Replace Missing OK Shows the status of the ...Menu Supplies menu Menu item Description Cyan, Magenta, Yellow, or Black Toner Cartridges Shows the status of the waste toner box Understanding printer menus 64 Understanding printer menus Menus list Supplies Menu Cyan Cartridge Magenta Cartridge Yellow Cartridge Black Cartridge Imaging Kit Waste Toner Box Paper Menu Default Source Size/Type...
User's Guide
Page 66
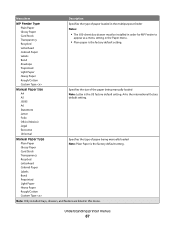
...multipurpose feeder Notes: • The 650-sheet duo drawer must be installed in order for MP Feeder to configure automatic tray linking. Understanding printer menus 66 The paper size value must be set. Note: Only installed trays, drawers, and feeders are listed in this menu item to... is the factory default setting for Tray 1. Menu item Description Tray Type Plain Paper Glossy Paper Card Stock Transparency Recycled Letterhead Colored Paper Labels Bond Preprinted Light Paper Heavy Paper Rough/Cotton Custom Type Specifies the type of Custom Type . • Use this menu.
...multipurpose feeder Notes: • The 650-sheet duo drawer must be installed in order for MP Feeder to configure automatic tray linking. Understanding printer menus 66 The paper size value must be set. Note: Only installed trays, drawers, and feeders are listed in this menu item to... is the factory default setting for Tray 1. Menu item Description Tray Type Plain Paper Glossy Paper Card Stock Transparency Recycled Letterhead Colored Paper Labels Bond Preprinted Light Paper Heavy Paper Rough/Cotton Custom Type Specifies the type of Custom Type . • Use this menu.
User's Guide
Page 67
... • Plain paper is the factory default setting. Manual Paper Type Plain Paper Glossy Paper Card Stock Transparency Recycled Letterhead Colored Paper Labels Bond Preprinted Light Paper Heavy Paper Rough/Cotton Custom Type Specifies the type of paper being manually loaded Note: ... setting in this menu. A4 is the international factory default setting. Understanding printer menus 67 Menu item Description MP Feeder Type Plain Paper Glossy Paper Card Stock Transparency Recycled Letterhead Colored Paper Labels Bond Envelope Preprinted Light Paper Heavy Paper Rough/Cotton Custom Type...
... • Plain paper is the factory default setting. Manual Paper Type Plain Paper Glossy Paper Card Stock Transparency Recycled Letterhead Colored Paper Labels Bond Preprinted Light Paper Heavy Paper Rough/Cotton Custom Type Specifies the type of paper being manually loaded Note: ... setting in this menu. A4 is the international factory default setting. Understanding printer menus 67 Menu item Description MP Feeder Type Plain Paper Glossy Paper Card Stock Transparency Recycled Letterhead Colored Paper Labels Bond Envelope Preprinted Light Paper Heavy Paper Rough/Cotton Custom Type...
User's Guide
Page 69
...Notes: • Normal is the factory default setting. • Settings appear only if the custom type is supported. Understanding printer menus 69 Menu item Bond Texture Rough Smooth Normal Envelope Texture Normal Smooth Rough Letterhead Texture Normal Smooth Rough Preprinted Texture Normal Smooth ...Rough Colored Texture Normal Smooth Rough Light Paper Normal Smooth Rough Heavy Paper Normal Smooth Rough Rough/Cotton Paper Rough Custom Paper Normal...
...Notes: • Normal is the factory default setting. • Settings appear only if the custom type is supported. Understanding printer menus 69 Menu item Bond Texture Rough Smooth Normal Envelope Texture Normal Smooth Rough Letterhead Texture Normal Smooth Rough Preprinted Texture Normal Smooth ...Rough Colored Texture Normal Smooth Rough Light Paper Normal Smooth Rough Heavy Paper Normal Smooth Rough Rough/Cotton Paper Rough Custom Paper Normal...
User's Guide
Page 70
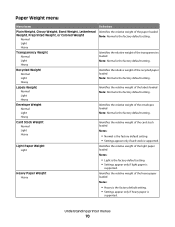
... labels loaded Note: Normal is the factory default setting. Paper Weight menu Menu items Plain Weight, Glossy Weight, Bond Weight, Letterhead Weight, Preprinted Weight, or Colored Weight Normal Light Heavy Transparency Weight Normal Light Heavy Recycled Weight Normal Light Heavy Labels Weight Normal Light Heavy Envelope Weight Normal Light Heavy Card... relative weight of the heavy paper loaded Notes: • Heavy is the factory default setting. • Settings appear only if heavy paper is supported. Understanding printer menus 70
... labels loaded Note: Normal is the factory default setting. Paper Weight menu Menu items Plain Weight, Glossy Weight, Bond Weight, Letterhead Weight, Preprinted Weight, or Colored Weight Normal Light Heavy Transparency Weight Normal Light Heavy Recycled Weight Normal Light Heavy Labels Weight Normal Light Heavy Envelope Weight Normal Light Heavy Card... relative weight of the heavy paper loaded Notes: • Heavy is the factory default setting. • Settings appear only if heavy paper is supported. Understanding printer menus 70
User's Guide
Page 71
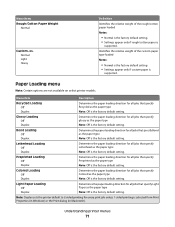
...setting. • Settings appear only if custom paper is supported. Paper Loading menu Note: Certain options are not available on select printer models. Note: Duplex sets the printer default to 2-sided printing for all jobs that specify glossy as the paper type Note: Off is selected from Print Properties (... the paper loading direction for all jobs that specify Bond as the paper type Note: Off is the factory default setting. Colored Loading Off Duplex Determines the paper loading direction for all jobs that specify Light Paper as the paper type Note: Off is the factory default...
...setting. • Settings appear only if custom paper is supported. Paper Loading menu Note: Certain options are not available on select printer models. Note: Duplex sets the printer default to 2-sided printing for all jobs that specify glossy as the paper type Note: Off is selected from Print Properties (... the paper loading direction for all jobs that specify Bond as the paper type Note: Off is the factory default setting. Colored Loading Off Duplex Determines the paper loading direction for all jobs that specify Light Paper as the paper type Note: Off is the factory default...

User's Guide
Page 86
... a print mode preferable for files such as a setting of a multiple-page sheet Note: Auto is the factory default setting. Description Adjusts the color output on the printed page. The printer chooses between portrait and landscape. Auto applies different color conversion tables to each page image when using the settings available from the Manual...
... a print mode preferable for files such as a setting of a multiple-page sheet Note: Auto is the factory default setting. Description Adjusts the color output on the printed page. The printer chooses between portrait and landscape. Auto applies different color conversion tables to each page image when using the settings available from the Manual...
User's Guide
Page 87
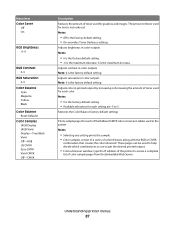
... default settings Prints sample pages for each color Notes: • 0 is the factory default setting. Adjusts color in the printer Notes: • Selecting any setting prints the sample. • Color samples consist of a series of colored boxes along with the RGB or CMYK combination that creates the color observed. Understanding printer menus 87 These pages can be...
... default settings Prints sample pages for each color Notes: • 0 is the factory default setting. Adjusts color in the printer Notes: • Selecting any setting prints the sample. • Color samples consist of a series of colored boxes along with the RGB or CMYK combination that creates the color observed. Understanding printer menus 87 These pages can be...
User's Guide
Page 88
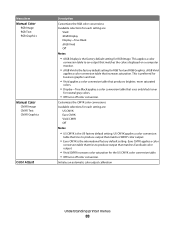
...uses only black toner for neutral gray colors. • Off turns off color conversion. Menu item Manual Color RGB Image RGB Text RGB Graphics Manual Color CMYK Image CMYK Text CMYK Graphics Color Adjust Description Customizes the RGB color conversions Available selections for each setting are...US CMYK applies a color conversion table that tries to an output that matches SWOP color output. • Euro CMYK is the factory default setting for RGB Image. Initiates an automatic color adjust calibration Understanding printer menus 88 sRGB Vivid applies a color conversion table that increases ...
...uses only black toner for neutral gray colors. • Off turns off color conversion. Menu item Manual Color RGB Image RGB Text RGB Graphics Manual Color CMYK Image CMYK Text CMYK Graphics Color Adjust Description Customizes the RGB color conversions Available selections for each setting are...US CMYK applies a color conversion table that tries to an output that matches SWOP color output. • Euro CMYK is the factory default setting for RGB Image. Initiates an automatic color adjust calibration Understanding printer menus 88 sRGB Vivid applies a color conversion table that increases ...
User's Guide
Page 90
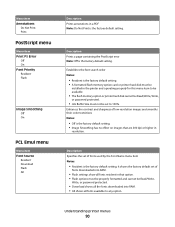
... Prints a page containing the PostScript error Note: Off is the factory default setting. Enhances the contrast and sharpness of low-resolution images and smooths their color transitions Notes: • Off is the factory default setting. • Image Smoothing has no effect on images that are 300 dpi or higher in a... PDF Note: Do Not Print is the factory default setting. • A formatted flash memory option card or printer hard disk must be installed in the printer and operating properly for this menu item to be available. • The flash memory option or...
... Prints a page containing the PostScript error Note: Off is the factory default setting. Enhances the contrast and sharpness of low-resolution images and smooths their color transitions Notes: • Off is the factory default setting. • Image Smoothing has no effect on images that are 300 dpi or higher in a... PDF Note: Do Not Print is the factory default setting. • A formatted flash memory option card or printer hard disk must be installed in the printer and operating properly for this menu item to be available. • The flash memory option or...
User's Guide
Page 94
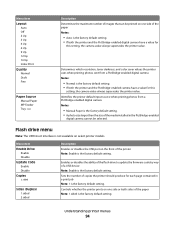
..., the camera value always supersedes the printer value. Menu item Enable Drive Enable Disable Update Code Enable Disable Copies 1-999 Sides (Duplex) 1 sided 2 sided Description Enables or disables the USB port on select printer models. Enables or disables the ability ...enabled digital camera have a value for this setting, the camera value always supersedes the printer value. Understanding printer menus 94 Determines which resolution, toner darkness, and color saver values the printer uses when printing photos sent from a PictBridge-enabled digital camera Notes: • Manual...
..., the camera value always supersedes the printer value. Menu item Enable Drive Enable Disable Update Code Enable Disable Copies 1-999 Sides (Duplex) 1 sided 2 sided Description Enables or disables the USB port on select printer models. Enables or disables the ability ...enabled digital camera have a value for this setting, the camera value always supersedes the printer value. Understanding printer menus 94 Determines which resolution, toner darkness, and color saver values the printer uses when printing photos sent from a PictBridge-enabled digital camera Notes: • Manual...
User's Guide
Page 97
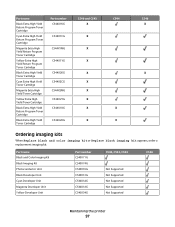
... X X C546 X X Ordering imaging kits When Replace black and color imaging kit or Replace black imaging kit appears, order a replacement imaging kit. Part name Black and Color Imaging Kit Black Imaging Kit Photoconductor Unit Black Developer Unit Cyan Developer ...Unit Magenta Developer Unit Yellow Developer Unit Part number C540X71G C540X74G C540X35G C540X31G C540X32G C540X33G C540X34G C540, C543, C544 Not Supported Not Supported Not Supported Not Supported Not Supported C546 Maintaining the printer...
... X X C546 X X Ordering imaging kits When Replace black and color imaging kit or Replace black imaging kit appears, order a replacement imaging kit. Part name Black and Color Imaging Kit Black Imaging Kit Photoconductor Unit Black Developer Unit Cyan Developer ...Unit Magenta Developer Unit Yellow Developer Unit Part number C540X71G C540X74G C540X35G C540X31G C540X32G C540X33G C540X34G C540, C543, C544 Not Supported Not Supported Not Supported Not Supported Not Supported C546 Maintaining the printer...
User's Guide
Page 101
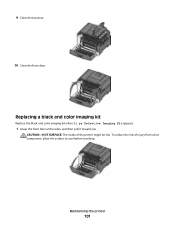
CAUTION-HOT SURFACE: The inside of injury from a hot component, allow the surface to cool before touching. Replacing a black and color imaging kit Replace the black and color imaging kit when 31.yy Defective Imaging Kit appears. 1 Grasp the front door at the sides, and then pull it toward you. To reduce the risk of the printer might be hot. Maintaining the printer 101 9 Close the top door. 10 Close the front door.
CAUTION-HOT SURFACE: The inside of injury from a hot component, allow the surface to cool before touching. Replacing a black and color imaging kit Replace the black and color imaging kit when 31.yy Defective Imaging Kit appears. 1 Grasp the front door at the sides, and then pull it toward you. To reduce the risk of the printer might be hot. Maintaining the printer 101 9 Close the top door. 10 Close the front door.

User's Guide
Page 104
For more information, see "Recycling Lexmark products" on the developer units. 10 Gently shake the yellow, cyan, magenta, and black developer units side to side. 11 Remove the packaging from the ... units. 12 Insert the yellow, cyan, magenta, and black developer units. 8 Remove the yellow, cyan, magenta, and black developer units. 9 Unpack the replacement black and color imaging kit, and leave the packaging on page 37. Note: Make sure each developer unit is inserted into a matching...
For more information, see "Recycling Lexmark products" on the developer units. 10 Gently shake the yellow, cyan, magenta, and black developer units side to side. 11 Remove the packaging from the ... units. 12 Insert the yellow, cyan, magenta, and black developer units. 8 Remove the yellow, cyan, magenta, and black developer units. 9 Unpack the replacement black and color imaging kit, and leave the packaging on page 37. Note: Make sure each developer unit is inserted into a matching...
User's Guide
Page 107
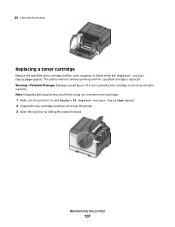
...-Potential Damage: Damage caused by use of a non-Lexmark toner cartridge is on and Ready or 88 Replace Cartridge appears. 2 Unpack the new cartridge, and then set it near the printer. 3 Open the top door by sliding the button forward. Maintaining the printer 107 The printer will not continue printing until the specified cartridge...
...-Potential Damage: Damage caused by use of a non-Lexmark toner cartridge is on and Ready or 88 Replace Cartridge appears. 2 Unpack the new cartridge, and then set it near the printer. 3 Open the top door by sliding the button forward. Maintaining the printer 107 The printer will not continue printing until the specified cartridge...

User's Guide
Page 109
For more information, see "Color misregistration" on page 148. 1 Grasp the front door at the sides, and then pull it toward you must manually calibrate the color. To reduce the risk of the printer might be hot. CAUTION-HOT SURFACE: The inside of injury from a hot component, allow the surface to cool before touching. 2 Open the top door by sliding the button forward. 6 Close the top door. Replacing a developer unit Replace a developer unit when a print quality defect occurs. Maintaining the printer 109 Note: When a developer unit is replaced, you .
For more information, see "Color misregistration" on page 148. 1 Grasp the front door at the sides, and then pull it toward you must manually calibrate the color. To reduce the risk of the printer might be hot. CAUTION-HOT SURFACE: The inside of injury from a hot component, allow the surface to cool before touching. 2 Open the top door by sliding the button forward. 6 Close the top door. Replacing a developer unit Replace a developer unit when a print quality defect occurs. Maintaining the printer 109 Note: When a developer unit is replaced, you .
User's Guide
Page 125
...and continue printing. • Press , and then press to cancel the print job. Insert Tray Insert the specified tray into the printer. Troubleshooting 125 Close door Close the upper and lower doors. Wait for the message to cancel printing. Load with Try one or ...job. Load with the correct paper type and size. • Press , and then press to cancel printing. Troubleshooting Understanding printer messages Calibrating The printer is adjusting the color. Reload printed pages in Tray • Press to clear the message and continue processing the second side of the following :...
...and continue printing. • Press , and then press to cancel the print job. Insert Tray Insert the specified tray into the printer. Troubleshooting 125 Close door Close the upper and lower doors. Wait for the message to cancel printing. Load with Try one or ...job. Load with the correct paper type and size. • Press , and then press to cancel printing. Troubleshooting Understanding printer messages Calibrating The printer is adjusting the color. Reload printed pages in Tray • Press to clear the message and continue processing the second side of the following :...
User's Guide
Page 127
...cover. • Remove the specified toner cartridge, and then insert it until it clicks into place. • Turn the printer off, wait ten seconds, and then turn the printer on. • Replace the specified toner cartridge with a new one. 31.yy Defective Imaging Kit Try one or more ...it until it clicks into place. • Turn the printer off, wait ten seconds, and then turn the printer on. • Replace the defective imaging kit with a new one. 31.yy Replace black and color imaging kit Replace the black and color imaging kit. Troubleshooting 127 Unsupported USB hub, please remove...
...cover. • Remove the specified toner cartridge, and then insert it until it clicks into place. • Turn the printer off, wait ten seconds, and then turn the printer on. • Replace the specified toner cartridge with a new one. 31.yy Defective Imaging Kit Try one or more ...it until it clicks into place. • Turn the printer off, wait ten seconds, and then turn the printer on. • Replace the defective imaging kit with a new one. 31.yy Replace black and color imaging kit Replace the black and color imaging kit. Troubleshooting 127 Unsupported USB hub, please remove...


