
User Manual
Page 3
... panel...14 Additional printer setup 15 Installing internal options...15 Available options ...15 Accessing the system board to install internal options...16 Installing a memory card ...19 Installing a flash memory card...21 Installing hardware options...23 Installing a 650-sheet duo drawer ...23 Attaching cables...24 Verifying printer setup...25 Printing menu settings pages...
... panel...14 Additional printer setup 15 Installing internal options...15 Available options ...15 Accessing the system board to install internal options...16 Installing a memory card ...19 Installing a flash memory card...21 Installing hardware options...23 Installing a 650-sheet duo drawer ...23 Attaching cables...24 Verifying printer setup...25 Printing menu settings pages...
User Manual
Page 7
... page breaks occur...142 Solving option problems...143 Option does not operate correctly or quits after it is installed 143 Drawers...143 Flash memory card...143 Multipurpose feeder...144 Memory card ...144 Solving paper feed problems...144 Paper frequently jams ...144 Paper jam message remains after jam is cleared ...145 Page that...
... page breaks occur...142 Solving option problems...143 Option does not operate correctly or quits after it is installed 143 Drawers...143 Flash memory card...143 Multipurpose feeder...144 Memory card ...144 Solving paper feed problems...144 Paper frequently jams ...144 Paper jam message remains after jam is cleared ...145 Page that...

User Manual
Page 9
.... Do not pinch the power cord between objects such as Ethernet and telephone system connections) are accessing the system board or installing optional hardware or memory devices sometime after setting up the printer, then turn them off as well, and unplug any cables going into the printer. Use of controls or...
.... Do not pinch the power cord between objects such as Ethernet and telephone system connections) are accessing the system board or installing optional hardware or memory devices sometime after setting up the printer, then turn them off as well, and unplug any cables going into the printer. Use of controls or...
User Manual
Page 15
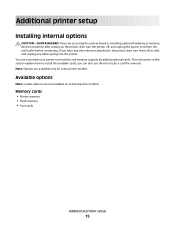
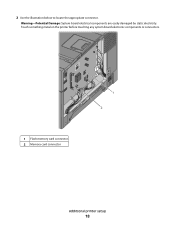
Additional printer setup Installing internal options CAUTION-SHOCK HAZARD: If you are accessing the system board or installing optional hardware or memory devices sometime after setting up the printer, then turn the printer off as well, and unplug any other devices attached to ... also use them off , and unplug the power cord from the wall outlet before continuing. If you can customize your printer connectivity and memory capacity by adding optional cards. Available options Note: Certain options are available only for removal. The instructions in this section explain how to locate...
Additional printer setup Installing internal options CAUTION-SHOCK HAZARD: If you are accessing the system board or installing optional hardware or memory devices sometime after setting up the printer, then turn the printer off as well, and unplug any other devices attached to ... also use them off , and unplug the power cord from the wall outlet before continuing. If you can customize your printer connectivity and memory capacity by adding optional cards. Available options Note: Certain options are available only for removal. The instructions in this section explain how to locate...
User Manual
Page 16
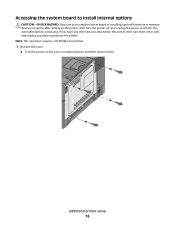
.... Note: This operation requires a #2 Phillips screwdriver. 1 Remove the cover. Additional printer setup 16 If you are accessing the system board or installing optional hardware or memory devices sometime after setting up the printer, then turn them . a Turn the screws on the cover counterclockwise, and then remove them off , and unplug the...
.... Note: This operation requires a #2 Phillips screwdriver. 1 Remove the cover. Additional printer setup 16 If you are accessing the system board or installing optional hardware or memory devices sometime after setting up the printer, then turn them . a Turn the screws on the cover counterclockwise, and then remove them off , and unplug the...
User Manual
Page 18
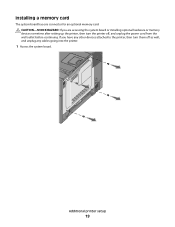
2 Use the illustration below to locate the appropriate connector. Touch something metal on the printer before touching any system board electronic components or connectors. 1 Flash memory card connector 2 Memory card connector 1 2 Additional printer setup 18 Warning-Potential Damage: System board electrical components are easily damaged by static electricity.
2 Use the illustration below to locate the appropriate connector. Touch something metal on the printer before touching any system board electronic components or connectors. 1 Flash memory card connector 2 Memory card connector 1 2 Additional printer setup 18 Warning-Potential Damage: System board electrical components are easily damaged by static electricity.
User Manual
Page 19
Additional printer setup 19 Installing a memory card The system board has one connector for an optional memory card. If you are accessing the system board or installing optional hardware or memory devices sometime after setting up the printer, then turn them off , and unplug the power cord from the wall outlet before continuing. CAUTION-SHOCK HAZARD: If you have any other devices attached to the printer, then turn the printer off as well, and unplug any cables going into the printer. 1 Access the system board.
Additional printer setup 19 Installing a memory card The system board has one connector for an optional memory card. If you are accessing the system board or installing optional hardware or memory devices sometime after setting up the printer, then turn them off , and unplug the power cord from the wall outlet before continuing. CAUTION-SHOCK HAZARD: If you have any other devices attached to the printer, then turn the printer off as well, and unplug any cables going into the printer. 1 Access the system board.

User Manual
Page 20
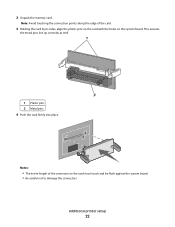
2 Open both latches on the connector. 5 Push the memory card straight into the connector until it snaps into place. Note: Avoid touching the connection points along the edge of the memory card. 1 Notch 2 Latch 2 1 Additional printer setup 20 Make sure each latch fits over the notch located on either side of the card. 4 Align the notches on the memory card with the ridges on the connector completely. 3 Unpack the memory card.
2 Open both latches on the connector. 5 Push the memory card straight into the connector until it snaps into place. Note: Avoid touching the connection points along the edge of the memory card. 1 Notch 2 Latch 2 1 Additional printer setup 20 Make sure each latch fits over the notch located on either side of the card. 4 Align the notches on the memory card with the ridges on the connector completely. 3 Unpack the memory card.
User Manual
Page 21
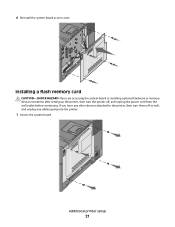
If you are accessing the system board or installing optional hardware or memory devices sometime after setting up the printer, then turn them off , and unplug the power cord from the wall outlet before continuing. Additional printer setup 21 6 Reinstall the system board access cover. Installing a flash memory card CAUTION-SHOCK HAZARD: If you have any other devices attached to the printer, then turn the printer off as well, and unplug any cables going into the printer. 1 Access the system board.
If you are accessing the system board or installing optional hardware or memory devices sometime after setting up the printer, then turn them off , and unplug the power cord from the wall outlet before continuing. Additional printer setup 21 6 Reinstall the system board access cover. Installing a flash memory card CAUTION-SHOCK HAZARD: If you have any other devices attached to the printer, then turn the printer off as well, and unplug any cables going into the printer. 1 Access the system board.
User Manual
Page 22
Notes: • The entire length of the card. 3 Holding the card by its sides, align the plastic pins on the card with the holes on the card must touch and be flush against the system board. • Be careful not to damage the connectors. This ensures the metal pins line up correctly as well. 11 22 1 Plastic pins 2 Metal pins 4 Push the card firmly into place. Additional printer setup 22 Note: Avoid touching the connection points along the edge of the connector on the system board. 2 Unpack the memory card.
Notes: • The entire length of the card. 3 Holding the card by its sides, align the plastic pins on the card with the holes on the card must touch and be flush against the system board. • Be careful not to damage the connectors. This ensures the metal pins line up correctly as well. 11 22 1 Plastic pins 2 Metal pins 4 Push the card firmly into place. Additional printer setup 22 Note: Avoid touching the connection points along the edge of the connector on the system board. 2 Unpack the memory card.
User Manual
Page 23
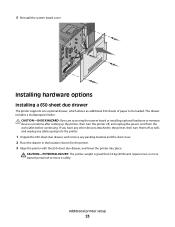
... 650-sheet duo drawer, and remove any other devices attached to be loaded. If you are accessing the system board or installing optional hardware or memory devices sometime after setting up the printer, then turn them off , and unplug the power cord from the wall outlet before continuing. Installing hardware options...
... 650-sheet duo drawer, and remove any other devices attached to be loaded. If you are accessing the system board or installing optional hardware or memory devices sometime after setting up the printer, then turn them off , and unplug the power cord from the wall outlet before continuing. Installing hardware options...
User Manual
Page 59
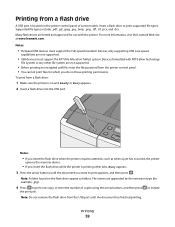
...until the document has finished printing. Note: Folders found on the flash drive appear as when a jam has occurred, the printer ignores the memory device. • If you insert the flash drive while the printer is printing other file system are not supported. • Before printing an...not have printing permissions. Insert a flash drive to initiate the print job. Devices formatted with the printer. For more information, visit the Lexmark Web site at www.lexmark.com. Printing 59 Printing from a flash drive A USB port is on and Ready or Busy appears. 2 Insert a flash drive ...
...until the document has finished printing. Note: Folders found on the flash drive appear as when a jam has occurred, the printer ignores the memory device. • If you insert the flash drive while the printer is printing other file system are not supported. • Before printing an...not have printing permissions. Insert a flash drive to initiate the print job. Devices formatted with the printer. For more information, visit the Lexmark Web site at www.lexmark.com. Printing 59 Printing from a flash drive A USB port is on and Ready or Busy appears. 2 Insert a flash drive ...
User Manual
Page 60
... prints, Ready appears. Printing 60 Resetting the Printer appears briefly, and then Ready appears. Printing a directory list A directory list shows the resources stored in flash memory or on the hard disk. 1 Make sure the printer is on and Ready appears. 2 From the printer control panel, press . 3 Press the arrow buttons until...
... prints, Ready appears. Printing 60 Resetting the Printer appears briefly, and then Ready appears. Printing a directory list A directory list shows the resources stored in flash memory or on the hard disk. 1 Make sure the printer is on and Ready appears. 2 From the printer control panel, press . 3 Press the arrow buttons until...
User Manual
Page 81
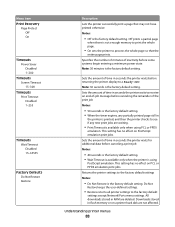
... item Network Setup Page Description Prints a report containing information about the network settings, such as supply information and details about paper loaded into trays, installed memory, the total page count, alarms, timeouts, the printer control panel language, the TCP/IP address, the status of supplies, the status of the network connection...
... item Network Setup Page Description Prints a report containing information about the network settings, such as supply information and details about paper loaded into trays, installed memory, the total page count, alarms, timeouts, the printer control panel language, the TCP/IP address, the status of supplies, the status of the network connection...
User Manual
Page 82
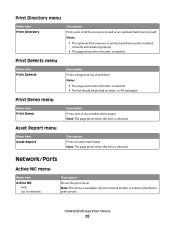
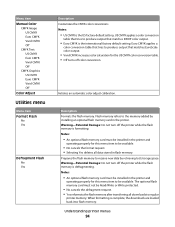
... item is selected. Print Directory menu Menu item Print Directory Description Prints a list of all the resources stored on an optional flash memory card Notes: • The optional flash memory or printer hard disk must be printed on letter- or A4-size paper. Print Defects menu Menu item Print Defects Description Prints...
... item is selected. Print Directory menu Menu item Print Directory Description Prints a list of all the resources stored on an optional flash memory card Notes: • The optional flash memory or printer hard disk must be printed on letter- or A4-size paper. Print Defects menu Menu item Print Defects Description Prints...
User Manual
Page 83
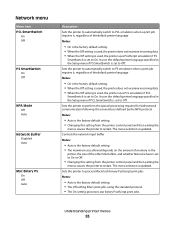
... to restart. Controls the network input buffer Notes: • Auto is the factory default setting. • The maximum size allowed depends on the amount of memory in the printer, the size of the other link buffers, and whether Resource Save is set to process Macintosh binary PostScript print jobs Notes: •...
... to restart. Controls the network input buffer Notes: • Auto is the factory default setting. • The maximum size allowed depends on the amount of memory in the printer, the size of the other link buffers, and whether Resource Save is set to process Macintosh binary PostScript print jobs Notes: •...
User Manual
Page 85
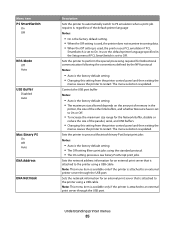
... USB port. Controls the USB port buffer Notes: • Auto is the factory default setting. • The maximum size allowed depends on the amount of memory in the Setup menu if PCL SmartSwitch is set to On. Understanding printer menus 85 It uses the default printer language specified in the printer...
... USB port. Controls the USB port buffer Notes: • Auto is the factory default setting. • The maximum size allowed depends on the amount of memory in the Setup menu if PCL SmartSwitch is set to On. Understanding printer menus 85 It uses the default printer language specified in the printer...
User Manual
Page 87
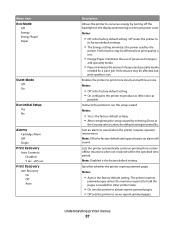
... noise as possible. Specifies whether the printer reprints jammed pages Notes: • Auto is the factory default setting. The printer reprints jammed pages unless the memory required to hold the pages is not. • Energy/Paper minimizes the use of power and of paper and specialty media. • Paper minimizes the...
... noise as possible. Specifies whether the printer reprints jammed pages Notes: • Auto is the factory default setting. The printer reprints jammed pages unless the memory required to hold the pages is not. • Energy/Paper minimizes the use of power and of paper and specialty media. • Paper minimizes the...
User Manual
Page 88
... emulation print jobs. Understanding printer menus 88 Sets the amount of time in seconds the printer waits to receive an end-of time in flash memory or on a printer hard disk are not affected. Returns the printer settings to a Ready state Note: 30 seconds is not enough... memory to print the whole page. • On sets the printer to the factory default settings except Network/Ports menu settings. This setting has no effect ...
... emulation print jobs. Understanding printer menus 88 Sets the amount of time in seconds the printer waits to receive an end-of time in flash memory or on a printer hard disk are not affected. Returns the printer settings to a Ready state Note: 30 seconds is not enough... memory to print the whole page. • On sets the printer to the factory default settings except Network/Ports menu settings. This setting has no effect ...
User Manual
Page 94
...matches EuroScale color output. • Vivid CMYK increases color saturation for this menu item to be available. Notes: • An optional flash memory card must be installed in the printer and operating properly for this menu item to be available. • No cancels the format request. ...operating properly for the US CMYK color conversion table. • Off turns off the printer while the flash memory is the international factory default setting. The optional flash memory card must be Read/Write or Write protected. • No cancels the defragment request. • Yes reformats...
...matches EuroScale color output. • Vivid CMYK increases color saturation for this menu item to be available. Notes: • An optional flash memory card must be installed in the printer and operating properly for this menu item to be available. • No cancels the format request. ...operating properly for the US CMYK color conversion table. • Off turns off the printer while the flash memory is the international factory default setting. The optional flash memory card must be Read/Write or Write protected. • No cancels the defragment request. • Yes reformats...


