
User Manual
Page 3
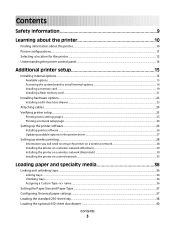
... printer software ...26 Updating available options in the printer driver...27 Setting up wireless printing...28 Information you will need to set up the printer on a wireless network 28 Installing the printer on a wireless network (Windows 29 Installing the printer on a wireless network (Macintosh 30 Installing the printer on a wired network ...33 Loading paper...
... printer software ...26 Updating available options in the printer driver...27 Setting up wireless printing...28 Information you will need to set up the printer on a wireless network 28 Installing the printer on a wireless network (Windows 29 Installing the printer on a wireless network (Macintosh 30 Installing the printer on a wired network ...33 Loading paper...
User Manual
Page 5
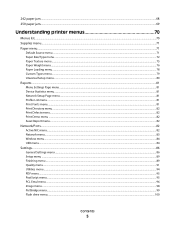
... Directory menu ...82 Print Defects menu...82 Print Demo menu ...82 Asset Report menu...82 Network/Ports...82 Active NIC menu...82 Network menu ...83 Wireless menu...84 USB menu ...84 Settings...86 General Settings menu ...86 Setup menu ...89 Finishing menu...89 Quality menu...91 Utilities menu ...94 PDF menu...
... Directory menu ...82 Print Defects menu...82 Print Demo menu ...82 Asset Report menu...82 Network/Ports...82 Active NIC menu...82 Network menu ...83 Wireless menu...84 USB menu ...84 Settings...86 General Settings menu ...86 Setup menu ...89 Finishing menu...89 Quality menu...91 Utilities menu ...94 PDF menu...
User Manual
Page 10
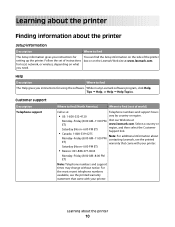
... Setup information gives you instructions for You can find the Setup information on the side of the printer setting up the printer. While in any Lexmark software program, click Help, Tips Œ Help, or Help Œ Help Topics. Learning about the printer Finding information about the printer Setup...Where to find (North America) Where to find (rest of instructions box or on what you need. for local, network, or wireless, depending on the Lexmark Web site at www.lexmark.com. Saturday (Noon-6:00 PM ET) • Mexico: 001-888-377-0063 Monday-Friday (8:00 AM-8:00 PM ET) Note...
... Setup information gives you instructions for You can find the Setup information on the side of the printer setting up the printer. While in any Lexmark software program, click Help, Tips Œ Help, or Help Œ Help Topics. Learning about the printer Finding information about the printer Setup...Where to find (North America) Where to find (rest of instructions box or on what you need. for local, network, or wireless, depending on the Lexmark Web site at www.lexmark.com. Saturday (Noon-6:00 PM ET) • Mexico: 001-888-377-0063 Monday-Friday (8:00 AM-8:00 PM ET) Note...
User Manual
Page 28
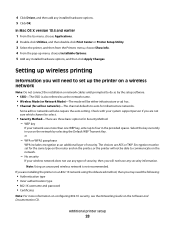
...printer will be able to auto for Security Method: - Select the key currently in the provided spaces. Note: Using an unsecured wireless network is also referred to four in use any security information. Setting up to as an additional layer of security, then you ... type • Inner authentication type • 802.1X username and password • Certificates Note: For more than one WEP key, enter up wireless printing Information you will also require the auto setting. Encryption must be set up menu, choose Installable Options. 5 Add any installed hardware options. ...
...printer will be able to auto for Security Method: - Select the key currently in the provided spaces. Note: Using an unsecured wireless network is also referred to four in use any security information. Setting up to as an additional layer of security, then you ... type • Inner authentication type • 802.1X username and password • Certificates Note: For more than one WEP key, enter up wireless printing Information you will also require the auto setting. Encryption must be set up menu, choose Installable Options. 5 Add any installed hardware options. ...
User Manual
Page 29
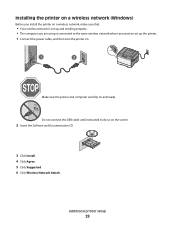
... (Windows) Before you install the printer on a wireless network, make sure that: • Your wireless network is set up the printer. 1 Connect the power cable, and then turn the printer on. 1 2 Make sure the printer and computer are fully on .... Do not connect the USB cable until instructed to set up and working properly. • The computer you are using is connected to the same wireless network where you want to do so on and ready. Additional printer setup 29 Software and Documentation Software and Documentation 3 Click Install. 4 Click Agree. 5 Click...
... (Windows) Before you install the printer on a wireless network, make sure that: • Your wireless network is set up the printer. 1 Connect the power cable, and then turn the printer on. 1 2 Make sure the printer and computer are fully on .... Do not connect the USB cable until instructed to set up and working properly. • The computer you are using is connected to the same wireless network where you want to do so on and ready. Additional printer setup 29 Software and Documentation Software and Documentation 3 Click Install. 4 Click Agree. 5 Click...
User Manual
Page 30
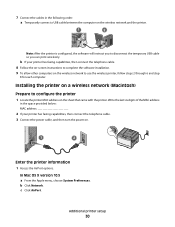
Write the last six digits of the MAC address in the following order: a Temporarily connect a USB cable between the computer on the wireless network and the printer. 1 2 Note: After the printer is configured, the software will instruct you to configure the printer 1 ..., then connect the telephone cable. 8 Follow the on-screen instructions to complete the software installation. 9 To allow other computers on the wireless network to use the wireless printer, follow steps 2 through 6 and step 8 for each computer. Additional printer setup 30 b If your printer has faxing capabilities, ...
Write the last six digits of the MAC address in the following order: a Temporarily connect a USB cable between the computer on the wireless network and the printer. 1 2 Note: After the printer is configured, the software will instruct you to configure the printer 1 ..., then connect the telephone cable. 8 Follow the on-screen instructions to complete the software installation. 9 To allow other computers on the wireless network to use the wireless printer, follow steps 2 through 6 and step 8 for each computer. Additional printer setup 30 b If your printer has faxing capabilities, ...

User Manual
Page 31
..., click AirPort. 7 From the Network pop-up menu, select print server xxxxxx, where the x's are using a wireless router. 3 Select the type of security you use the printer wirelessly To print to a network printer, each Macintosh user must install a custom PostScript Printer Description (PPD) file and create... field. 2 Select Infrastructure as your Network Mode if you are the last six digits of the Embedded Web Server, navigate to join your wireless network. 5 Click Submit. 6 Open the AirPort application on your network (SSID) in the CD or DVD drive. b Double-click Internet...
..., click AirPort. 7 From the Network pop-up menu, select print server xxxxxx, where the x's are using a wireless router. 3 Select the type of security you use the printer wirelessly To print to a network printer, each Macintosh user must install a custom PostScript Printer Description (PPD) file and create... field. 2 Select Infrastructure as your Network Mode if you are the last six digits of the Embedded Web Server, navigate to join your wireless network. 5 Click Submit. 6 Open the AirPort application on your network (SSID) in the CD or DVD drive. b Double-click Internet...
User Manual
Page 70
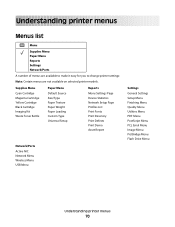
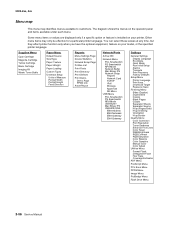
... Settings Page Device Statistics Network Setup Page Profiles List Print Fonts Print Directory Print Defects Print Demo Asset Report Network/Ports Active NIC Network Menu Wireless Menu USB Menu Settings General Settings Setup Menu Finishing Menu Quality Menu Utilities Menu PDF Menu PostScript Menu PCL Emul Menu Image Menu PictBridge Menu...
... Settings Page Device Statistics Network Setup Page Profiles List Print Fonts Print Directory Print Defects Print Demo Asset Report Network/Ports Active NIC Network Menu Wireless Menu USB Menu Settings General Settings Setup Menu Finishing Menu Quality Menu Utilities Menu PDF Menu PostScript Menu PCL Emul Menu Image Menu PictBridge Menu...
User Manual
Page 84
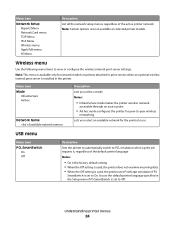
...available on selected printer models. Note: This menu is available only for network models or printers attached to print servers when an optional wireless internal print server is installed in the Setup menu if PS SmartSwitch is set to Off. Understanding printer menus 84 Menu item Mode... printer uses PostScript emulation if PS SmartSwitch is set to On. Lets you select a mode Notes: • Infrastructure mode makes the printer wireless network accessible through an access point. • Ad hoc mode configures the printer for the printer to use USB menu Menu item PCL SmartSwitch...
...available on selected printer models. Note: This menu is available only for network models or printers attached to print servers when an optional wireless internal print server is installed in the Setup menu if PS SmartSwitch is set to Off. Understanding printer menus 84 Menu item Mode... printer uses PostScript emulation if PS SmartSwitch is set to On. Lets you select a mode Notes: • Infrastructure mode makes the printer wireless network accessible through an access point. • Ad hoc mode configures the printer for the printer to use USB menu Menu item PCL SmartSwitch...

User Manual
Page 163
...Code 6, obtainable from windows to licensing. The radiated output power of this compliance information statement should be directed to: Director of Lexmark Technology & Services Lexmark International, Inc. 740 West New Circle Road Lexington, KY 40550 (859) 232-3000 Exposure to radio frequency radiation The following...specification RSS-210. Notices 163 This device has been designed to the following notice is applicable if your printer has a wireless network card installed. To prevent radio interference to the licensed service, this device is intended to satisfy the RF exposure ...
...Code 6, obtainable from windows to licensing. The radiated output power of this compliance information statement should be directed to: Director of Lexmark Technology & Services Lexmark International, Inc. 740 West New Circle Road Lexington, KY 40550 (859) 232-3000 Exposure to radio frequency radiation The following...specification RSS-210. Notices 163 This device has been designed to the following notice is applicable if your printer has a wireless network card installed. To prevent radio interference to the licensed service, this device is intended to satisfy the RF exposure ...

User Manual
Page 176
... 101 Check Model Name 101 Check Serial Num 101 checking an unresponsive printer 140 cleaning exterior of the printer 135 Close Door 101 configuration information wireless network 28 configurations printer 11 configuring multiple printers 139 configuring supply notifications 138 conserving supplies 111 contacting Customer Support 159 Custom Types menu 79 Cyan...
... 101 Check Model Name 101 Check Serial Num 101 checking an unresponsive printer 140 cleaning exterior of the printer 135 Close Door 101 configuration information wireless network 28 configurations printer 11 configuring multiple printers 139 configuring supply notifications 138 conserving supplies 111 contacting Customer Support 159 Custom Types menu 79 Cyan...
User Manual
Page 177
... 56 H Hex Trace 102 I Image menu 98 Imaging Kit 102 imaging kits ordering 113 replacing 117, 123 Insert Tray 102 installation wireless network 29, 30 installing options in driver 27 printer software 26 installing printer software adding options 27 Invalid Engine Code 102 Invalid Network ...41, 44 letterhead in manual feeder 55 letterhead in trays 55 manual feeder 44 multipurpose feeder 41 transparencies 41 Index 177 M Macintosh wireless network installation 30 Magenta Low 101 manual feeder loading 44 memory card installing 19 troubleshooting 144 menu settings loading on multiple printers 139 ...
... 56 H Hex Trace 102 I Image menu 98 Imaging Kit 102 imaging kits ordering 113 replacing 117, 123 Insert Tray 102 installation wireless network 29, 30 installing options in driver 27 printer software 26 installing printer software adding options 27 Invalid Engine Code 102 Invalid Network ...41, 44 letterhead in manual feeder 55 letterhead in trays 55 manual feeder 44 multipurpose feeder 41 transparencies 41 Index 177 M Macintosh wireless network installation 30 Magenta Low 101 manual feeder loading 44 memory card installing 19 troubleshooting 144 menu settings loading on multiple printers 139 ...

User Manual
Page 180
... W Waiting 105 Waiting, too many events 105 waste toner bottle ordering 113 replacing 114 Waste Toner Box 105 Windows wireless network installation 29 wired network setup using Windows 33 wired networking using Macintosh 33 Wireless menu 84 wireless network configuration information 28 installation, using Macintosh 30 installation, using Windows 29 Y Yellow Low 101
... W Waiting 105 Waiting, too many events 105 waste toner bottle ordering 113 replacing 114 Waste Toner Box 105 Windows wireless network installation 29 wired network setup using Windows 33 wired networking using Macintosh 33 Wireless menu 84 wireless network configuration information 28 installation, using Macintosh 30 installation, using Windows 29 Y Yellow Low 101
Service Manual
Page 7
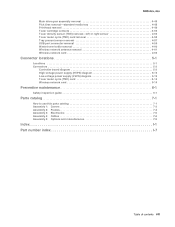
...removal 4-55 Tray present sensor removal 4-57 USB port connector removal 4-59 Waste toner bottle removal 4-60 Wireless network antenna removal 4-61 Wireless network card 4-63 Connector locations 5-1 Locations 5-1 Connectors 5-2 Controller board diagram 5-2 High-voltage power supply... (HVPS) diagram 5-10 Low-voltage power supply (LVPS) diagram 5-12 Toner meter cycle (TMC) card 5-13 Wireless network card 5-14 Preventive maintenance 6-1 Safety inspection guide 6-1 Parts catalog 7-1 How to use this parts catalog 7-1 Assembly 1: Covers 7-2 Assembly ...
...removal 4-55 Tray present sensor removal 4-57 USB port connector removal 4-59 Waste toner bottle removal 4-60 Wireless network antenna removal 4-61 Wireless network card 4-63 Connector locations 5-1 Locations 5-1 Connectors 5-2 Controller board diagram 5-2 High-voltage power supply... (HVPS) diagram 5-10 Low-voltage power supply (LVPS) diagram 5-12 Toner meter cycle (TMC) card 5-13 Wireless network card 5-14 Preventive maintenance 6-1 Safety inspection guide 6-1 Parts catalog 7-1 How to use this parts catalog 7-1 Assembly 1: Covers 7-2 Assembly ...
Service Manual
Page 19
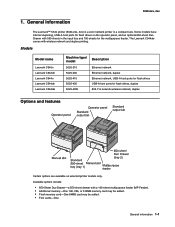
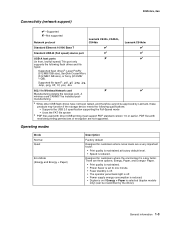
... size. Models Model name Lexmark C540n Lexmark C543dn Lexmark C544n Lexmark C544dn Lexmark C544dw Machine type/ model 5025-210 5025-230 5025-410 5025-430 5025-43W Description Ethernet network Ethernet network, duplex Ethernet network, USB-A host ports for flash drives USB-A host ports for the multipurpose feeder. The Lexmark C544dw comes with wireless network and duplex printing...
... size. Models Model name Lexmark C540n Lexmark C543dn Lexmark C544n Lexmark C544dn Lexmark C544dw Machine type/ model 5025-210 5025-230 5025-410 5025-430 5025-43W Description Ethernet network Ethernet network, duplex Ethernet network, USB-A host ports for flash drives USB-A host ports for the multipurpose feeder. The Lexmark C544dw comes with wireless network and duplex printing...
Service Manual
Page 20
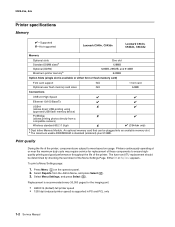
... ( ). 3. Select Menu Settings, and press Select ( ). Select Reports from a compatible camera) Wireless standard 802.11 b/g/n ✘ ✔ (C544dw only) a Dual Inline Memory Module. To print a Menu Settings page: 1. 5025-2xx, 4xx Printer specifications Memory ✔-Supported ✘-Not supported Lexmark C540n, C543dn Lexmark C544n, C544dn, C544dw Memory Optional slots Standard DIMM sizesa Optional (DDR2...
... ( ). 3. Select Menu Settings, and press Select ( ). Select Reports from a compatible camera) Wireless standard 802.11 b/g/n ✘ ✔ (C544dw only) a Dual Inline Memory Module. To print a Menu Settings page: 1. 5025-2xx, 4xx Printer specifications Memory ✔-Supported ✘-Not supported Lexmark C540n, C543dn Lexmark C544n, C544dn, C544dw Memory Optional slots Standard DIMM sizesa Optional (DDR2...
Service Manual
Page 21
...GB size), or Sony (512 MB/ 1 GB). 5025-2xx, 4xx Connectivity (network support) ✔-Supported ✘-Not supported Network protocol Lexmark C540n, C543dn, C544dn Lexmark C544dw Standard Ethernet 10/100 Base T ✔ ✔ Standard USB-B (Full speed) device port ✔ ✔ USB-A host...Speed mode • Uses the FAT file system b PDF files used with restricted printing permissions or encryption are three options; A wireless card CANNOT be approved by the driver). There are not supported. General information 1-3 Energy, Paper, and Energy+ Paper. •...
...GB size), or Sony (512 MB/ 1 GB). 5025-2xx, 4xx Connectivity (network support) ✔-Supported ✘-Not supported Network protocol Lexmark C540n, C543dn, C544dn Lexmark C544dw Standard Ethernet 10/100 Base T ✔ ✔ Standard USB-B (Full speed) device port ✔ ✔ USB-A host...Speed mode • Uses the FAT file system b PDF files used with restricted printing permissions or encryption are three options; A wireless card CANNOT be approved by the driver). There are not supported. General information 1-3 Energy, Paper, and Energy+ Paper. •...
Service Manual
Page 90
... Network/Ports Active NIC Network Menu PCL Smartswitch PS Smartswitch NPA Mode Network Buffer Mac Binary PS Network Setup Reports Network Card TCP/IP IPv6 Wireless AppleTalk SE Menu USB Menu PCL Smartswitch PS Smartswitch NPA Mode USB Buffer Mac Binary PS USB With ENA ENA Address ENA Netmask ENA Gateway...
... Network/Ports Active NIC Network Menu PCL Smartswitch PS Smartswitch NPA Mode Network Buffer Mac Binary PS Network Setup Reports Network Card TCP/IP IPv6 Wireless AppleTalk SE Menu USB Menu PCL Smartswitch PS Smartswitch NPA Mode USB Buffer Mac Binary PS USB With ENA ENA Address ENA Netmask ENA Gateway...

Service Manual
Page 154
5025-2xx, 4xx 6. Warning: For models with a wireless antenna, use supports to protect the controller board, and turn the printer so the rear shield rests on the bottom. 8. Remove the two screws (E) on the table and the bottom is facing you. Reinstall the rear shield to prevent the antenna from taking the weight of the printer. 7. Remove the two springs (D), one on each side. 4-16 Service Manual
5025-2xx, 4xx 6. Warning: For models with a wireless antenna, use supports to protect the controller board, and turn the printer so the rear shield rests on the bottom. 8. Remove the two screws (E) on the table and the bottom is facing you. Reinstall the rear shield to prevent the antenna from taking the weight of the printer. 7. Remove the two springs (D), one on each side. 4-16 Service Manual
Service Manual
Page 181
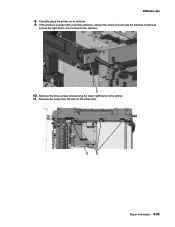
Remove the three screws (D) securing the lower right frame to access the right frame. Do not remove the antenna. 10. Carefully place the printer on its left side. 9. 5025-2xx, 4xx 8. Remove the screw from the front of the printer (E) Repair information 4-43 If the printer is a model with a wireless antenna, remove the screw (C) securing the wireless antenna to the printer. 11.
Remove the three screws (D) securing the lower right frame to access the right frame. Do not remove the antenna. 10. Carefully place the printer on its left side. 9. 5025-2xx, 4xx 8. Remove the screw from the front of the printer (E) Repair information 4-43 If the printer is a model with a wireless antenna, remove the screw (C) securing the wireless antenna to the printer. 11.


