
User Manual
Page 3
... 30 Installing the printer on a wired network ...33 Loading paper and specialty media 36 Linking and unlinking trays...36 Linking trays...36 Unlinking trays...36 Assigning a Custom Type name...36 Setting the Paper Size and Paper Type...37 Configuring Universal paper settings...37 Loading the standard 250-sheet tray...38 Loading the optional 650-sheet duo drawer...40...
... 30 Installing the printer on a wired network ...33 Loading paper and specialty media 36 Linking and unlinking trays...36 Linking trays...36 Unlinking trays...36 Assigning a Custom Type name...36 Setting the Paper Size and Paper Type...37 Configuring Universal paper settings...37 Loading the standard 250-sheet tray...38 Loading the optional 650-sheet duo drawer...40...
User Manual
Page 7
Jobs do not print...140 Job takes longer than expected to print ...141 Job prints from the wrong tray or on the wrong paper 141 Incorrect characters print...141 Tray linking does not work...142 Large jobs do not collate ...142 Unexpected page breaks occur...142 Solving option problems...143 Option does not operate...
Jobs do not print...140 Job takes longer than expected to print ...141 Job prints from the wrong tray or on the wrong paper 141 Incorrect characters print...141 Tray linking does not work...142 Large jobs do not collate ...142 Unexpected page breaks occur...142 Solving option problems...143 Option does not operate...
User Manual
Page 36
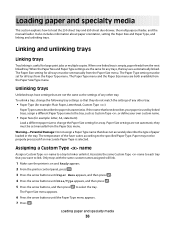
... or unlink it. It also includes information about paper orientation, setting the Paper Size and Paper Type, and linking and unlinking trays. When one linked tray is useful for a tray. Paper Size settings are automatically linked. Paper may not be set manually from the Paper Size menu. to load the 250-sheet tray and 650-sheet duo drawer, the multipurpose...
... or unlink it. It also includes information about paper orientation, setting the Paper Size and Paper Type, and linking and unlinking trays. When one linked tray is useful for a tray. Paper Size settings are automatically linked. Paper may not be set manually from the Paper Size menu. to load the 250-sheet tray and 650-sheet duo drawer, the multipurpose...
User Manual
Page 37
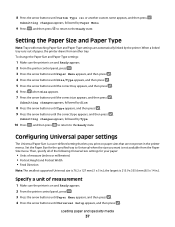
..., and then press . 4 Press the arrow buttons until Universal Setup appears, and then press . Loading paper and specialty media 37 When a linked tray runs out of paper, the printer draws from the Paper Size menu. Set the Paper Size for your paper: • Units of measurement 1 Make sure the printer is 215.9 x 355.6 mm (8.5 x 14 in...
..., and then press . 4 Press the arrow buttons until Universal Setup appears, and then press . Loading paper and specialty media 37 When a linked tray runs out of paper, the printer draws from the Paper Size menu. Set the Paper Size for your paper: • Units of measurement 1 Make sure the printer is 215.9 x 355.6 mm (8.5 x 14 in...
User Manual
Page 38
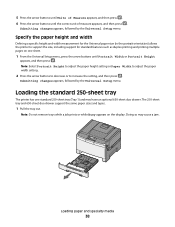
... printing and printing multiple pages on the display. The 250-sheet tray and 650-sheet duo drawer support the same paper sizes and types. 1 Pull the tray out. Loading paper and specialty media 38 Specify the paper height and width Defining a specific height and width measurement for the... Universal paper size (in the portrait orientation) allows the printer to increase the setting...
... printing and printing multiple pages on the display. The 250-sheet tray and 650-sheet duo drawer support the same paper sizes and types. 1 Pull the tray out. Loading paper and specialty media 38 Specify the paper height and width Defining a specific height and width measurement for the... Universal paper size (in the portrait orientation) allows the printer to increase the setting...
User Manual
Page 39
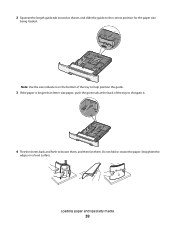
Do not fold or crease the paper. Loading paper and specialty media 39 Straighten the edges on the bottom of the tray to help position the guide. 3 If the paper is longer than letter-size paper, push the green tab at the back of the tray to elongate it. 4 Flex the sheets back and forth to the correct position for the paper size being loaded. 2 Squeeze the length guide tab inward as shown, and slide the guide to loosen them, and then fan them. Note: Use the size indicators on a level surface.
Do not fold or crease the paper. Loading paper and specialty media 39 Straighten the edges on the bottom of the tray to help position the guide. 3 If the paper is longer than letter-size paper, push the green tab at the back of the tray to elongate it. 4 Flex the sheets back and forth to the correct position for the paper size being loaded. 2 Squeeze the length guide tab inward as shown, and slide the guide to loosen them, and then fan them. Note: Use the size indicators on a level surface.
User Manual
Page 40
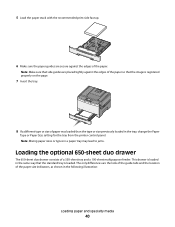
... in the same way that the image is registered properly on the page. 7 Insert the tray. 8 If a different type or size of paper was loaded than the type or size previously loaded in a paper tray may lead to jams. Loading the optional 650-sheet duo drawer The 650-sheet duo drawer ...consists of a 550-sheet tray and a 100-sheet multipurpose feeder. Note: Mixing paper sizes or types in the tray, change the Paper Type or Paper Size setting for the tray from the printer control...
... in the same way that the image is registered properly on the page. 7 Insert the tray. 8 If a different type or size of paper was loaded than the type or size previously loaded in a paper tray may lead to jams. Loading the optional 650-sheet duo drawer The 650-sheet duo drawer ...consists of a 550-sheet tray and a 100-sheet multipurpose feeder. Note: Mixing paper sizes or types in the tray, change the Paper Type or Paper Size setting for the tray from the printer control...
User Manual
Page 46
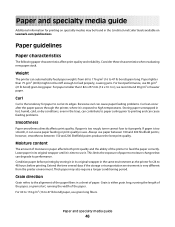
...g/m2 or heavier paper. If paper is either grain long, running the length of the paper, or grain short, running the width of paper to moisture changes that can degrade its original wrapper in the trays, can contribute to paper curling prior to feed.... Excessive curl can cause paper feeding problems. Curl can automatically feed paper weights from the printer environment. Paper guidelines Paper characteristics The following paper characteristics affect print quality and reliability. Paper and specialty media guide Additional information for printing on Lexmark.com/publications.
...g/m2 or heavier paper. If paper is either grain long, running the length of the paper, or grain short, running the width of paper to moisture changes that can degrade its original wrapper in the trays, can contribute to paper curling prior to feed.... Excessive curl can cause paper feeding problems. Curl can automatically feed paper weights from the printer environment. Paper guidelines Paper characteristics The following paper characteristics affect print quality and reliability. Paper and specialty media guide Additional information for printing on Lexmark.com/publications.
User Manual
Page 48
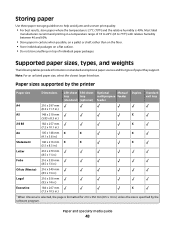
...°F) and the relative humidity is specified by the software program. Storing paper Use these paper storage guidelines to 75°F) with relative humidity between 40 and 60%. • Store paper in cartons when possible, on a pallet or shelf, rather than on ...8226; Do not store anything on standard and optional paper sources and the types of individual paper packages. Paper sizes supported by the printer Paper size Dimensions 250-sheet 550-sheet Optional Manual tray tray multipurpose feeder (standard) (optional) feeder Duplex Standard exit tray A4 210 x 297 mm (8.3 x 11.7 ...
...°F) and the relative humidity is specified by the software program. Storing paper Use these paper storage guidelines to 75°F) with relative humidity between 40 and 60%. • Store paper in cartons when possible, on a pallet or shelf, rather than on ...8226; Do not store anything on standard and optional paper sources and the types of individual paper packages. Paper sizes supported by the printer Paper size Dimensions 250-sheet 550-sheet Optional Manual tray tray multipurpose feeder (standard) (optional) feeder Duplex Standard exit tray A4 210 x 297 mm (8.3 x 11.7 ...
User Manual
Page 49
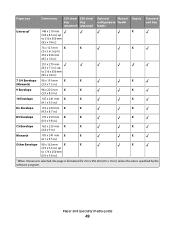
... media guide 49 Paper size Dimensions 250-sheet 550-sheet Optional Manual tray tray multipurpose feeder (standard) (optional) feeder Duplex Standard exit tray Universal* 148 x 210 mm X (5.8 x 8.3 in.) up to 216 x 356 mm (8.5 x 14 in.) 76 x 127 mm X X X (3 x 5 in.) up to 216 x 356 mm (8.5 x 14 in.) 210 x 279 ...
... media guide 49 Paper size Dimensions 250-sheet 550-sheet Optional Manual tray tray multipurpose feeder (standard) (optional) feeder Duplex Standard exit tray Universal* 148 x 210 mm X (5.8 x 8.3 in.) up to 216 x 356 mm (8.5 x 14 in.) 76 x 127 mm X X X (3 x 5 in.) up to 216 x 356 mm (8.5 x 14 in.) 210 x 279 ...
User Manual
Page 50
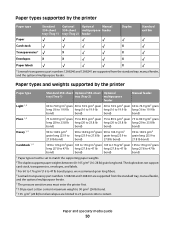
... weights supported by the printer Paper type Paper Standard Optional Optional Manual 250-sheet 550-sheet multipurpose feeder tray (Tray 1) tray (Tray 2) feeder Duplex Standard exit bin Card stock X Transparencies* X X Envelopes X X X Paper labels X * Lexmark transparency part numbers 12A8240 and 12A8241 are supported from the standard tray, manual feeder, and the optional multipurpose feeder. 5 The pressure sensitive area must be...
... weights supported by the printer Paper type Paper Standard Optional Optional Manual 250-sheet 550-sheet multipurpose feeder tray (Tray 1) tray (Tray 2) feeder Duplex Standard exit bin Card stock X Transparencies* X X Envelopes X X X Paper labels X * Lexmark transparency part numbers 12A8240 and 12A8241 are supported from the standard tray, manual feeder, and the optional multipurpose feeder. 5 The pressure sensitive area must be...
User Manual
Page 63
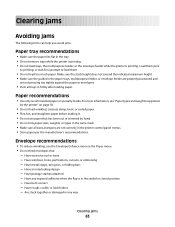
..., or folding bars - Make sure the stack height does not exceed the indicated maximum height. • Make sure the guides in the paper trays, multipurpose feeder, or envelope feeder are properly positioned and are set correctly in the printer control panel menus. • Store.... Clearing jams Avoiding jams The following hints can help you avoid jams. Paper tray recommendations • Make sure the paper lies flat in the tray. • Do not remove trays while the printer is printing. • Do not load trays, the multipurpose feeder, or the envelope feeder while the printer is in ...
..., or folding bars - Make sure the stack height does not exceed the indicated maximum height. • Make sure the guides in the paper trays, multipurpose feeder, or envelope feeder are properly positioned and are set correctly in the printer control panel menus. • Store.... Clearing jams Avoiding jams The following hints can help you avoid jams. Paper tray recommendations • Make sure the paper lies flat in the tray. • Do not remove trays while the printer is printing. • Do not load trays, the multipurpose feeder, or the envelope feeder while the printer is in ...
User Manual
Page 102
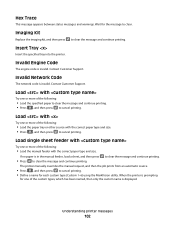
...message to clear. Understanding printer messages 102 Insert Tray Insert the specified tray into the printer. If no paper is displayed. Load with Try one or more of the following : • Load the paper tray or other source with the correct paper type and size. Imaging Kit Replace the imaging.... • Press to clear the message and continue printing. Load with Try one of the following : • Load the specified paper to clear the message and continue printing. • Press , and then press to cancel printing. Hex Trace This message appears between ...
...message to clear. Understanding printer messages 102 Insert Tray Insert the specified tray into the printer. If no paper is displayed. Load with Try one or more of the following : • Load the paper tray or other source with the correct paper type and size. Imaging Kit Replace the imaging.... • Press to clear the message and continue printing. Load with Try one of the following : • Load the specified paper to clear the message and continue printing. • Press , and then press to cancel printing. Hex Trace This message appears between ...

User Manual
Page 104
... bin to clear the message and continue printing. • Press to print. Remove paper from the toner cartridges. Tray Low Load the paper tray or other source with the correct paper type and size. Tray Missing Insert the specified tray into the printer. Programming Flash Fonts and macros are being written to clear. Wait ...packaging material Check for and remove any packaging materials from standard output bin Try one or more of the following : • Load the paper tray or other source with the correct paper type and size. • Press , and then press to clear.
... bin to clear the message and continue printing. • Press to print. Remove paper from the toner cartridges. Tray Low Load the paper tray or other source with the correct paper type and size. Tray Missing Insert the specified tray into the printer. Programming Flash Fonts and macros are being written to clear. Wait ...packaging material Check for and remove any packaging materials from standard output bin Try one or more of the following : • Load the paper tray or other source with the correct paper type and size. • Press , and then press to clear.
User Manual
Page 141
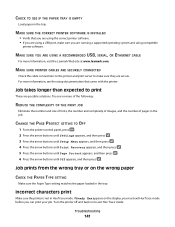
...sure you can print your job. Try one or more information, visit the Lexmark Web site at www.lexmark.com. If Ready Hex appears on the wrong paper CHECK THE PAPER TYPE SETTING Make sure the Paper Type setting matches the paper loaded in the job. MAKE SURE THE CORRECT PRINTER SOFTWARE IS INSTALLED &#... • If you are running a supported operating system and using a USB port, make sure they are possible solutions. Job prints from the wrong tray or on the display, you must exit Hex Trace mode before you are using compatible printer software. Turn the printer off and back on to...
...sure you can print your job. Try one or more information, visit the Lexmark Web site at www.lexmark.com. If Ready Hex appears on the wrong paper CHECK THE PAPER TYPE SETTING Make sure the Paper Type setting matches the paper loaded in the job. MAKE SURE THE CORRECT PRINTER SOFTWARE IS INSTALLED &#... • If you are running a supported operating system and using a USB port, make sure they are possible solutions. Job prints from the wrong tray or on the display, you must exit Hex Trace mode before you are using compatible printer software. Turn the printer off and back on to...
User Manual
Page 143
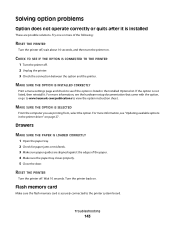
... correctly or quits after it . For more of the paper. 4 Make sure the paper tray closes properly. 5 Close the door. Drawers MAKE SURE THE PAPER IS LOADED CORRECTLY 1 Open the paper tray. 2 Check for paper jams or misfeeds. 3 Make sure paper guides are aligned against the edges of the following: RESET... printer back on page 27. For more information, see the hardware setup documentation that came with the option, or go to www.lexmark.com/publications to the printer system board. Troubleshooting 143 Try one or more information, see "Updating available options in the Installed Options...
... correctly or quits after it . For more of the paper. 4 Make sure the paper tray closes properly. 5 Close the door. Drawers MAKE SURE THE PAPER IS LOADED CORRECTLY 1 Open the paper tray. 2 Check for paper jams or misfeeds. 3 Make sure paper guides are aligned against the edges of the following: RESET... printer back on page 27. For more information, see the hardware setup documentation that came with the option, or go to www.lexmark.com/publications to the printer system board. Troubleshooting 143 Try one or more information, see "Updating available options in the Installed Options...
User Manual
Page 144
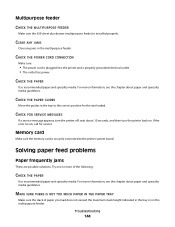
... solutions. CLEAR ANY JAMS Clear any jams in the tray or on . For more information, see the chapter about paper and specialty media guidelines. Troubleshooting 144 Try one or more information, see the chapter about paper and specialty media guidelines. CHECK THE POWER CORD CONNECTION Make...maximum stack height indicated in the multipurpose feeder. MAKE SURE THERE IS NOT TOO MUCH PAPER IN THE PAPER TRAY Make sure the stack of the following: CHECK THE PAPER Use recommended paper and specialty media. Multipurpose feeder CHECK THE MULTIPURPOSE FEEDER Make sure the 650-sheet duo...
... solutions. CLEAR ANY JAMS Clear any jams in the tray or on . For more information, see the chapter about paper and specialty media guidelines. Troubleshooting 144 Try one or more information, see the chapter about paper and specialty media guidelines. CHECK THE POWER CORD CONNECTION Make...maximum stack height indicated in the multipurpose feeder. MAKE SURE THERE IS NOT TOO MUCH PAPER IN THE PAPER TRAY Make sure the stack of the following: CHECK THE PAPER Use recommended paper and specialty media. Multipurpose feeder CHECK THE MULTIPURPOSE FEEDER Make sure the 650-sheet duo...

Service Manual
Page 40
... and macros are being written to use the PictBridge feature. Do not power off . Remove the media from the bin. Load the paper tray or other source with the correct paper type and size. Camera is selected. • Press Stop ( ), and then press Select ( ) to the printer, and change the ...feeder). The printer is receiving a file that is full or nearly full. Try one or more of the indicated color. Load the paper tray or other source with the correct paper type and size. Unplug the camera cable to cancel printing. The following actions can be taken: • Load...
... and macros are being written to use the PictBridge feature. Do not power off . Remove the media from the bin. Load the paper tray or other source with the correct paper type and size. Camera is selected. • Press Stop ( ), and then press Select ( ) to the printer, and change the ...feeder). The printer is receiving a file that is full or nearly full. Try one or more of the indicated color. Load the paper tray or other source with the correct paper type and size. Unplug the camera cable to cancel printing. The following actions can be taken: • Load...

Service Manual
Page 106
... you press Select before closing the front cover, a message appears: Close Cover. or Media present... Activate the sensor by removing and re-inserting the paper tray. Remove the media tray. The sensor should change state. The sensor should change state. Select Motor Detect. Note: Do not press Select yet. 3. The motor detection process...
... you press Select before closing the front cover, a message appears: Close Cover. or Media present... Activate the sensor by removing and re-inserting the paper tray. Remove the media tray. The sensor should change state. The sensor should change state. Select Motor Detect. Note: Do not press Select yet. 3. The motor detection process...

Service Manual
Page 134
The pick motor drives the duplex aligner rolls (A) which push the media down to the bottom turnaround in the front cover and the 250-sheet paper tray to print on the media. This would invoke a jam error. When the S2 signal is detected, the speed of the pick motor is transferred, the ... edge of the media clears the fuser, the fuser engine rotates forward to prepare the fuser for the page traveling through the front door and paper tray, it is the only piece of media being processed. When the S1 sensor is triggered, indicating the presence of the leading edge. The reversed motor...
The pick motor drives the duplex aligner rolls (A) which push the media down to the bottom turnaround in the front cover and the 250-sheet paper tray to print on the media. This would invoke a jam error. When the S2 signal is detected, the speed of the pick motor is transferred, the ... edge of the media clears the fuser, the fuser engine rotates forward to prepare the fuser for the page traveling through the front door and paper tray, it is the only piece of media being processed. When the S1 sensor is triggered, indicating the presence of the leading edge. The reversed motor...


