User's Guide
Page 64
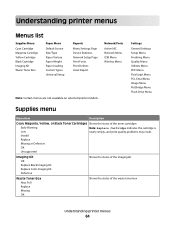
...Menu Image Menu PictBridge Menu Flash Drive Menu Supplies menu Menu item Description Cyan, Magenta, Yellow, or Black Toner Cartridges Shows the status of the waste toner box Understanding printer menus 64 Invalid Replace Missing or Defective OK Unsupported Imaging Kit OK Replace Black Imaging Kit ...Replace Color Imaging Kit Defective Shows the status of the imaging kit Waste Toner Box Near Full Replace Missing OK Shows the status of the toner cartridges Early Warning Low Note: Replace Cartridge indicates the cartridge is nearly empty, and print ...
...Menu Image Menu PictBridge Menu Flash Drive Menu Supplies menu Menu item Description Cyan, Magenta, Yellow, or Black Toner Cartridges Shows the status of the waste toner box Understanding printer menus 64 Invalid Replace Missing or Defective OK Unsupported Imaging Kit OK Replace Black Imaging Kit ...Replace Color Imaging Kit Defective Shows the status of the imaging kit Waste Toner Box Near Full Replace Missing OK Shows the status of the toner cartridges Early Warning Low Note: Replace Cartridge indicates the cartridge is nearly empty, and print ...
User's Guide
Page 98
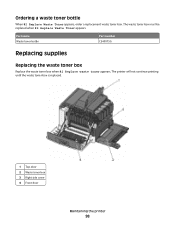
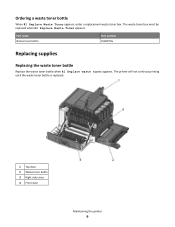
Part name Waste toner bottle Part number C540X75G Replacing supplies Replacing the waste toner box Replace the waste toner box when 82 Replace waste toner appears. The printer will not continue printing until the waste toner box is replaced. 1 Top door 2 Waste toner box 3 Right side cover 4 Front door Maintaining the printer 98 Ordering a waste toner bottle When 82 Replace Waste Toner appears, order a replacement waste toner box. The waste toner box must be replaced when 82 Replace Waste Toner appears.
Part name Waste toner bottle Part number C540X75G Replacing supplies Replacing the waste toner box Replace the waste toner box when 82 Replace waste toner appears. The printer will not continue printing until the waste toner box is replaced. 1 Top door 2 Waste toner box 3 Right side cover 4 Front door Maintaining the printer 98 Ordering a waste toner bottle When 82 Replace Waste Toner appears, order a replacement waste toner box. The waste toner box must be replaced when 82 Replace Waste Toner appears.
User's Guide
Page 99
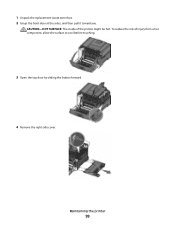
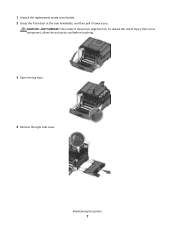
To reduce the risk of the printer might be hot. Maintaining the printer 99 1 Unpack the replacement waste toner box. 2 Grasp the front door at the sides, and then pull it toward you. CAUTION-HOT SURFACE: The inside of injury from a hot component, allow the surface to cool before touching. 3 Open the top door by sliding the button forward. 4 Remove the right side cover.
To reduce the risk of the printer might be hot. Maintaining the printer 99 1 Unpack the replacement waste toner box. 2 Grasp the front door at the sides, and then pull it toward you. CAUTION-HOT SURFACE: The inside of injury from a hot component, allow the surface to cool before touching. 3 Open the top door by sliding the button forward. 4 Remove the right side cover.
User's Guide
Page 100
5 Press the green levers on page 37. 7 Insert the new waste toner box. 8 Replace the right side cover. Maintaining the printer 100 For more information, see "Recycling Lexmark products" on each side of the waste toner box, and then remove it. 6 Place the waste toner box in the enclosed packaging.
5 Press the green levers on page 37. 7 Insert the new waste toner box. 8 Replace the right side cover. Maintaining the printer 100 For more information, see "Recycling Lexmark products" on each side of the waste toner box, and then remove it. 6 Place the waste toner box in the enclosed packaging.
User's Guide
Page 103
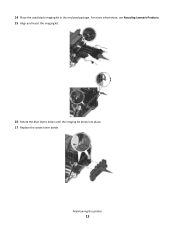
5 Press the green levers on the sides, and then pull the imaging kit out. Warning-Potential Damage: Do not touch the underside of the waste toner box, and then remove it. 6 Lift the blue levers on the imaging kit, and then pull it toward you. 7 Press down on the blue levers, grasp the green handles on each side of the imaging kit. Maintaining the printer 103 This could damage the imaging kit.
5 Press the green levers on the sides, and then pull the imaging kit out. Warning-Potential Damage: Do not touch the underside of the waste toner box, and then remove it. 6 Lift the blue levers on the imaging kit, and then pull it toward you. 7 Press down on the blue levers, grasp the green handles on each side of the imaging kit. Maintaining the printer 103 This could damage the imaging kit.
User's Guide
Page 105
14 Align and insert the imaging kit. 15 Gently, but firmly push the blue levers down until the imaging kit drops into place. 16 Replace the waste toner box. Maintaining the printer 105
14 Align and insert the imaging kit. 15 Gently, but firmly push the blue levers down until the imaging kit drops into place. 16 Replace the waste toner box. Maintaining the printer 105
User's Guide
Page 110
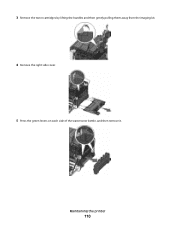
Maintaining the printer 110 3 Remove the toner cartridges by lifting the handles and then gently pulling them away from the imaging kit. 4 Remove the right side cover. 5 Press the green levers on each side of the waste toner bottle, and then remove it.
Maintaining the printer 110 3 Remove the toner cartridges by lifting the handles and then gently pulling them away from the imaging kit. 4 Remove the right side cover. 5 Press the green levers on each side of the waste toner bottle, and then remove it.
User's Guide
Page 113
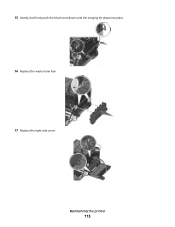
15 Gently, but firmly push the blue levers down until the imaging kit drops into place. 16 Replace the waste toner box. 17 Replace the right side cover. Maintaining the printer 113
15 Gently, but firmly push the blue levers down until the imaging kit drops into place. 16 Replace the waste toner box. 17 Replace the right side cover. Maintaining the printer 113
User's Guide
Page 131
... back on . This often fixes the problem. 82 Replace waste toner box Replace the waste toner bottle, and then press to clear the message. 82 Waste toner box missing Replace the waste toner bottle, and then press to clear the message. 82 Waste toner box nearly full Press to clear the message. 88 Cartridge... is low Press to clear the message. 88 Replace cartridge The specified toner cartridge is blank or displays...
... back on . This often fixes the problem. 82 Replace waste toner box Replace the waste toner bottle, and then press to clear the message. 82 Waste toner box missing Replace the waste toner bottle, and then press to clear the message. 82 Waste toner box nearly full Press to clear the message. 88 Cartridge... is low Press to clear the message. 88 Replace cartridge The specified toner cartridge is blank or displays...
User's Guide
Page 167
Index Numerics 250-sheet tray (standard) loading 41 30.yy Toner Cart Missing 127 31.yy Defective Imaging Kit 127 31.yy Replace black and color imaging kit 127 34 Short paper 128 35 Insufficient memory ... installed 130 58 Too many trays attached 130 59 Incompatible tray 130 650-sheet duo drawer installing 20 loading 43 82 Replace waste toner box 131 82 Waste toner box missing 131 82 Waste toner box nearly full 131 88 Cartridge is low 131 88 Replace cartridge 131 A Active NIC menu 75 AppleTalk menu 79 Asset...
Index Numerics 250-sheet tray (standard) loading 41 30.yy Toner Cart Missing 127 31.yy Defective Imaging Kit 127 31.yy Replace black and color imaging kit 127 34 Short paper 128 35 Insufficient memory ... installed 130 58 Too many trays attached 130 59 Incompatible tray 130 650-sheet duo drawer installing 20 loading 43 82 Replace waste toner box 131 82 Waste toner box missing 131 82 Waste toner box nearly full 131 88 Cartridge is low 131 88 Replace cartridge 131 A Active NIC menu 75 AppleTalk menu 79 Asset...
User's Guide
Page 168
... 550-sheet tray 20 650-sheet duo drawer 20 flash memory card 18 internal 13 memory card 16 memory cards 13 ordering imaging kits 97 toner cartridges 96 waste toner bottle 98
... 550-sheet tray 20 650-sheet duo drawer 20 flash memory card 18 internal 13 memory card 16 memory cards 13 ordering imaging kits 97 toner cartridges 96 waste toner bottle 98

User's Guide
Page 169
...canceling from the printer control panel 62 canceling from Windows 62 print quality replacing developer unit 109 replacing imaging kit 101 replacing the waste toner box 98 print quality test pages, printing 62 print quality troubleshooting blank pages 138 characters have jagged edges 139 clipped images 139 ...58 Too many flash options installed 130 58 Too many trays attached 130 59 Incompatible tray 130 82 Replace waste toner box 98, 131 82 Waste toner box missing 131 82 Waste toner box nearly full 131 88 Cartridge is low 131 88 Replace Cartridge 107 88 Replace cartridge 131 Calibrating 125...
...canceling from the printer control panel 62 canceling from Windows 62 print quality replacing developer unit 109 replacing imaging kit 101 replacing the waste toner box 98 print quality test pages, printing 62 print quality troubleshooting blank pages 138 characters have jagged edges 139 clipped images 139 ...58 Too many flash options installed 130 58 Too many trays attached 130 59 Incompatible tray 130 82 Replace waste toner box 98, 131 82 Waste toner box missing 131 82 Waste toner box nearly full 131 88 Cartridge is low 131 88 Replace Cartridge 107 88 Replace cartridge 131 Calibrating 125...

User's Guide
Page 170
...page 23 photos 61 print quality test pages 62 publications, finding 7 Q Quiet Mode 36 R recycled paper using 33 recycling Lexmark packaging 37 Lexmark products 37 toner cartridges 37 WEEE statement 155 reducing noise 36 Reload printed pages in Tray 125 Remove packaging material 127 Remove paper from standard ... storing paper 49 supplies 95 supplies conserving 34 status of 95 storing 95 Supplies menu 64 supplies, ordering imaging kits 97 toner cartridges 96 waste toner bottle 98 supply notifications configuring 117 Index 170 system board accessing 14 T TCP/IP menu 77 tips labels, paper 58 transparencies ...
...page 23 photos 61 print quality test pages 62 publications, finding 7 Q Quiet Mode 36 R recycled paper using 33 recycling Lexmark packaging 37 Lexmark products 37 toner cartridges 37 WEEE statement 155 reducing noise 36 Reload printed pages in Tray 125 Remove packaging material 127 Remove paper from standard ... storing paper 49 supplies 95 supplies conserving 34 status of 95 storing 95 Supplies menu 64 supplies, ordering imaging kits 97 toner cartridges 96 waste toner bottle 98 supply notifications configuring 117 Index 170 system board accessing 14 T TCP/IP menu 77 tips labels, paper 58 transparencies ...

User's Guide
Page 171
...too light 144 print quality test pages 138 repeating defects 145 skewed print 146 solid color pages 146 toner fog or background shading 146 toner rubs off 147 toner specks 147 uneven print density 148 troubleshooting, printer options flash memory card 136 memory card 136 multipurpose ...Unsupported USB device, please remove 127 Unsupported USB hub, please remove 127 USB flash memory device 60 USB port 22 W waste toner bottle ordering 98 waste toner box replacing 98 Web site finding 7 Windows wireless network installation 25 wired network setup using Windows 29 wired networking using Macintosh...
...too light 144 print quality test pages 138 repeating defects 145 skewed print 146 solid color pages 146 toner fog or background shading 146 toner rubs off 147 toner specks 147 uneven print density 148 troubleshooting, printer options flash memory card 136 memory card 136 multipurpose ...Unsupported USB device, please remove 127 Unsupported USB hub, please remove 127 USB flash memory device 60 USB port 22 W waste toner bottle ordering 98 waste toner box replacing 98 Web site finding 7 Windows wireless network installation 25 wired network setup using Windows 29 wired networking using Macintosh...
Maintenance Guide
Page 2
... control panel 3 Checking the status of supplies from a network computer 3 Ordering supplies...4 Ordering toner cartridges...4 Ordering imaging kits...5 Ordering a waste toner bottle...6 Replacing supplies...6 Replacing the waste toner bottle...6 Replacing a black imaging kit...9 Replacing a black and color imaging kit...15 Replacing a toner cartridge...20 Replacing a developer unit...22 Cleaning the exterior of the printer...27 Moving...
... control panel 3 Checking the status of supplies from a network computer 3 Ordering supplies...4 Ordering toner cartridges...4 Ordering imaging kits...5 Ordering a waste toner bottle...6 Replacing supplies...6 Replacing the waste toner bottle...6 Replacing a black imaging kit...9 Replacing a black and color imaging kit...15 Replacing a toner cartridge...20 Replacing a developer unit...22 Cleaning the exterior of the printer...27 Moving...
Maintenance Guide
Page 6
The waste toner box must be replaced when 82 Replace Waste Toner appears. Part name Waste toner bottle Part number C540X75G Replacing supplies Replacing the waste toner bottle Replace the waste toner bottle when 82 Replace waste toner appears. The printer will not continue printing until the waste toner bottle is replaced. 1 Top door 2 Waste toner bottle 3 Right side cover 4 Front door Maintaining the printer 6 Ordering a waste toner bottle When 82 Replace Waste Toner appears, order a replacement waste toner box.
The waste toner box must be replaced when 82 Replace Waste Toner appears. Part name Waste toner bottle Part number C540X75G Replacing supplies Replacing the waste toner bottle Replace the waste toner bottle when 82 Replace waste toner appears. The printer will not continue printing until the waste toner bottle is replaced. 1 Top door 2 Waste toner bottle 3 Right side cover 4 Front door Maintaining the printer 6 Ordering a waste toner bottle When 82 Replace Waste Toner appears, order a replacement waste toner box.
Maintenance Guide
Page 7
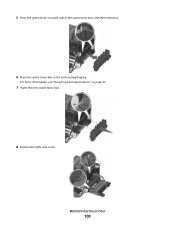
1 Unpack the replacement waste toner bottle. 2 Grasp the front door at the side handholds, and then pull it toward you. CAUTION-HOT SURFACE: The inside of injury from a hot component, allow the surface to cool before touching. 3 Open the top door. 4 Remove the right side cover. Maintaining the printer 7 To reduce the risk of the printer might be hot.
1 Unpack the replacement waste toner bottle. 2 Grasp the front door at the side handholds, and then pull it toward you. CAUTION-HOT SURFACE: The inside of injury from a hot component, allow the surface to cool before touching. 3 Open the top door. 4 Remove the right side cover. Maintaining the printer 7 To reduce the risk of the printer might be hot.

Maintenance Guide
Page 8
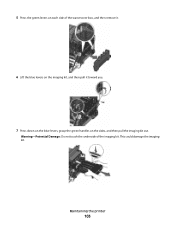
5 Press the green levers on each side of the waste toner bottle, and then remove it. 6 Place the waste toner bottle in the enclosed packaging. Maintaining the printer 8 For more information, see the User's Guide. 7 Insert the new waste toner bottle. 8 Replace the right side cover.
5 Press the green levers on each side of the waste toner bottle, and then remove it. 6 Place the waste toner bottle in the enclosed packaging. Maintaining the printer 8 For more information, see the User's Guide. 7 Insert the new waste toner bottle. 8 Replace the right side cover.

Maintenance Guide
Page 11
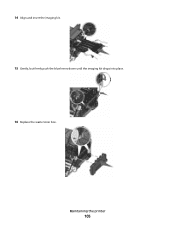
5 Press the green levers on the sides, and then pull the imaging kit out. This could damage the imaging kit. Maintaining the printer 11 Warning-Potential Damage: Do not touch the underside of the waste toner bottle, and then remove it. 6 Lift the blue levers on the imaging kit, and then pull it toward you. 7 Press down on the blue levers, grasp the green handles on each side of the imaging kit.
5 Press the green levers on the sides, and then pull the imaging kit out. This could damage the imaging kit. Maintaining the printer 11 Warning-Potential Damage: Do not touch the underside of the waste toner bottle, and then remove it. 6 Lift the blue levers on the imaging kit, and then pull it toward you. 7 Press down on the blue levers, grasp the green handles on each side of the imaging kit.
Maintenance Guide
Page 13
Maintaining the printer 13 For more information, see Recycling Lexmark Products. 15 Align and insert the imaging kit. 16 Rotate the blue levers down until the imaging kit drops into place. 17 Replace the waste toner bottle. 14 Place the used black imaging kit in the enclosed package.
Maintaining the printer 13 For more information, see Recycling Lexmark Products. 15 Align and insert the imaging kit. 16 Rotate the blue levers down until the imaging kit drops into place. 17 Replace the waste toner bottle. 14 Place the used black imaging kit in the enclosed package.


