
User's Guide
Page 3
......73 Network/Ports...75 Settings...81 Maintaining the printer 95 Storing supplies...95 Checking the status of supplies...95 Ordering supplies...96 Replacing supplies...98 Cleaning the exterior of the printer...114 Moving the printer...115 Administrative support 116 Restoring the factory default settings...116 Using the Embedded Web Server...116...
......73 Network/Ports...75 Settings...81 Maintaining the printer 95 Storing supplies...95 Checking the status of supplies...95 Ordering supplies...96 Replacing supplies...98 Cleaning the exterior of the printer...114 Moving the printer...115 Administrative support 116 Restoring the factory default settings...116 Using the Embedded Web Server...116...

User's Guide
Page 5
... touching. Do not subject the power cord to avoid the possibility of harmful emissions. CAUTION-SHOCK HAZARD: To avoid the risk of electric shock when cleaning the exterior of the printer, unplug the power cord from the wall outlet and disconnect all cables from a hot component, allow the surface to lift...
... touching. Do not subject the power cord to avoid the possibility of harmful emissions. CAUTION-SHOCK HAZARD: To avoid the risk of electric shock when cleaning the exterior of the printer, unplug the power cord from the wall outlet and disconnect all cables from a hot component, allow the surface to lift...
User's Guide
Page 8
...world-See the printed warranty that they may serve you looking for? Support telephone numbers and hours of the printer), and have it here Lexmark Support Web site- Away from direct sunlight, humidity extremes, or temperature fluctuations - It is important to open trays, covers, and doors... • E-mail support • Telephone support Warranty information Find it ready when you plan to view the appropriate support site. Clean, dry, and free of dust • Allow the following information (located on the printed warranty that came with this printer, or at ...
...world-See the printed warranty that they may serve you looking for? Support telephone numbers and hours of the printer), and have it here Lexmark Support Web site- Away from direct sunlight, humidity extremes, or temperature fluctuations - It is important to open trays, covers, and doors... • E-mail support • Telephone support Warranty information Find it ready when you plan to view the appropriate support site. Clean, dry, and free of dust • Allow the following information (located on the printed warranty that came with this printer, or at ...
User's Guide
Page 95
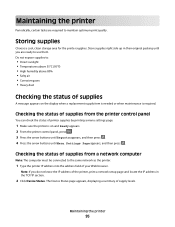
...;F) • High humidity above 80% • Salty air • Corrosive gases • Heavy dust Checking the status of your Web browser. Storing supplies Choose a cool, clean storage area for the printer supplies. Checking the status of supplies from the printer control panel You can check the status of supply levels. Do...
...;F) • High humidity above 80% • Salty air • Corrosive gases • Heavy dust Checking the status of your Web browser. Storing supplies Choose a cool, clean storage area for the printer supplies. Checking the status of supplies from the printer control panel You can check the status of supply levels. Do...
User's Guide
Page 114
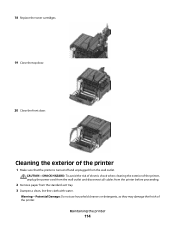
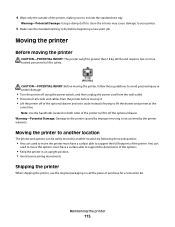
CAUTION-SHOCK HAZARD: To avoid the risk of electric shock when cleaning the exterior of the printer, unplug the power cord from the wall outlet and disconnect all cables from the printer before proceeding. 2 Remove paper from ..., as they may damage the finish of the printer 1 Make sure that the printer is turned off and unplugged from the standard exit tray. 3 Dampen a clean, lint-free cloth with water. Maintaining the printer 114...
CAUTION-SHOCK HAZARD: To avoid the risk of electric shock when cleaning the exterior of the printer, unplug the power cord from the wall outlet and disconnect all cables from the printer before proceeding. 2 Remove paper from ..., as they may damage the finish of the printer 1 Make sure that the printer is turned off and unplugged from the standard exit tray. 3 Dampen a clean, lint-free cloth with water. Maintaining the printer 114...
User's Guide
Page 115
... to lift it off of the optional drawer and set it aside instead of purchase for a relocation kit. Warning-Potential Damage: Using a damp cloth to clean the interior may cause damage to your printer. 5 Make sure the standard exit tray is greater than 18 kg (40 lb) and requires two or...
... to lift it off of the optional drawer and set it aside instead of purchase for a relocation kit. Warning-Potential Damage: Using a damp cloth to clean the interior may cause damage to your printer. 5 Make sure the standard exit tray is greater than 18 kg (40 lb) and requires two or...

User's Guide
Page 167
... 62 from the printer control panel 62 from Windows 62 card stock loading 44 tips on using 59 checking an unresponsive printer 131 cleaning exterior of the printer 114 Close Door 125 configuration information wireless network 25 configurations printer 9 configuring multiple printers 117 configuring supply notifications ... 58 environmental settings 34 Eco-Mode 35 Quiet Mode 36 Ethernet networking Macintosh 29 Windows 29 Ethernet port 22 exterior of the printer cleaning 114 e-mail notice of low supply level 117 notice of paper jam 117 notice of paper needed 117 notice that different paper is...
... 62 from the printer control panel 62 from Windows 62 card stock loading 44 tips on using 59 checking an unresponsive printer 131 cleaning exterior of the printer 114 Close Door 125 configuration information wireless network 25 configurations printer 9 configuring multiple printers 117 configuring supply notifications ... 58 environmental settings 34 Eco-Mode 35 Quiet Mode 36 Ethernet networking Macintosh 29 Windows 29 Ethernet port 22 exterior of the printer cleaning 114 e-mail notice of low supply level 117 notice of paper jam 117 notice of paper needed 117 notice that different paper is...
Maintenance Guide
Page 2
... supplies...6 Replacing the waste toner bottle...6 Replacing a black imaging kit...9 Replacing a black and color imaging kit...15 Replacing a toner cartridge...20 Replacing a developer unit...22 Cleaning the exterior of the printer...27 Moving the printer...28 Before moving the printer...28 Moving the printer to another location...28 Shipping the printer...
... supplies...6 Replacing the waste toner bottle...6 Replacing a black imaging kit...9 Replacing a black and color imaging kit...15 Replacing a toner cartridge...20 Replacing a developer unit...22 Cleaning the exterior of the printer...27 Moving the printer...28 Before moving the printer...28 Moving the printer to another location...28 Shipping the printer...

Maintenance Guide
Page 3
Maintaining the printer Periodically, certain tasks are ready to use them. Storing supplies Choose a cool, clean storage area for the printer supplies. Checking the status of supplies from a network computer Note: The computer must be connected to the same network as ...
Maintaining the printer Periodically, certain tasks are ready to use them. Storing supplies Choose a cool, clean storage area for the printer supplies. Checking the status of supplies from a network computer Note: The computer must be connected to the same network as ...

Maintenance Guide
Page 27
..., as they may damage the finish of the printer 1 Make sure that the printer is turned off and unplugged from the standard exit tray. 3 Dampen a clean, lint-free cloth with water. Maintaining the printer 27 CAUTION-SHOCK HAZARD: To avoid the risk of electric shock when... cleaning the exterior of the printer, unplug the power cord from the wall outlet and disconnect all cables from the printer before proceeding. 2 Remove paper from the wall outlet. Cleaning the exterior of the printer. 17 Replace the toner cartridges. 18...
..., as they may damage the finish of the printer 1 Make sure that the printer is turned off and unplugged from the standard exit tray. 3 Dampen a clean, lint-free cloth with water. Maintaining the printer 27 CAUTION-SHOCK HAZARD: To avoid the risk of electric shock when... cleaning the exterior of the printer, unplug the power cord from the wall outlet and disconnect all cables from the printer before proceeding. 2 Remove paper from the wall outlet. Cleaning the exterior of the printer. 17 Replace the toner cartridges. 18...

Maintenance Guide
Page 28
... the place of the options. • Keep the printer in an upright position. • Avoid severe jarring movements. Warning-Potential Damage: Using a damp cloth to clean the interior may cause damage to your printer. 5 Make sure the standard exit tray is not covered by following these guidelines to move it aside...
... the place of the options. • Keep the printer in an upright position. • Avoid severe jarring movements. Warning-Potential Damage: Using a damp cloth to clean the interior may cause damage to your printer. 5 Make sure the standard exit tray is not covered by following these guidelines to move it aside...
Service Manual
Page 6
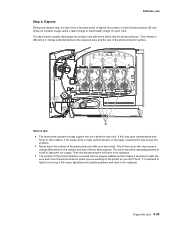
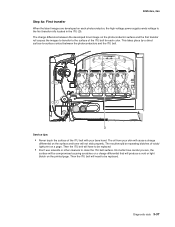
... basics 3-33 Step 1: Charge 3-34 Step 2: Expose 3-35 Step 3: Develop 3-36 Step 4a: First transfer 3-37 Step 4b: Second transfer 3-38 Step 5: Fuse 3-39 Step 6: Clean/erase 3-40 Paper path, transport components 3-42 Paper path Information 3-42 Transport components 3-43 Duplex process 3-44 Color theory 3-45 What is RGB color 3-45...
... basics 3-33 Step 1: Charge 3-34 Step 2: Expose 3-35 Step 3: Develop 3-36 Step 4a: First transfer 3-37 Step 4b: Second transfer 3-38 Step 5: Fuse 3-39 Step 6: Clean/erase 3-40 Paper path, transport components 3-42 Paper path Information 3-42 Transport components 3-43 Duplex process 3-44 Color theory 3-45 What is RGB color 3-45...
Service Manual
Page 77
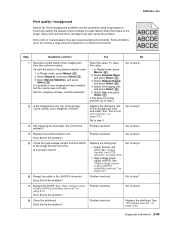
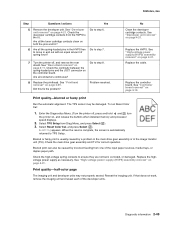
... and press Select ( ). 3. Select Device Statistics, and press Select ( ). Problem resolved. Go to step 2. 2 Is the background only one of the primary colors; Using non-Lexmark toner cartridges may also cause background problems. Some problems occur by using rough paper or incorrectly setting the operator panel settings to rough texture when... in the JHVPS1 connector. Reset the value. To view the status of the photoconductor units: 1. Select Replace Supply, and press Select ( ). 4. Go to step 8. 8 Clean the printhead. Problem resolved.
... and press Select ( ). 3. Select Device Statistics, and press Select ( ). Problem resolved. Go to step 2. 2 Is the background only one of the primary colors; Using non-Lexmark toner cartridges may also cause background problems. Some problems occur by using rough paper or incorrectly setting the operator panel settings to rough texture when... in the JHVPS1 connector. Reset the value. To view the status of the photoconductor units: 1. Select Replace Supply, and press Select ( ). 4. Go to step 8. 8 Clean the printhead. Problem resolved.
Service Manual
Page 79
... the main drive gear assembly or in and out with an equal amount of spring force? Diagnostic information 2-45 Are all the toner cartridge contacts clean on page 4-11. See "Rear shield removal" on both the pins and IU? 6 Are all conductors continuous? 8 Replace the printhead. See "Printhead... that does not work, remove the imaging unit and reseat each of the input paper sources, media trays, or duplex paper path. No Clean the developer cartridge contacts. Replace the controller board. Blurred print can also be damaged. Check the continuity between the spring-loaded pins and the...
... the main drive gear assembly or in and out with an equal amount of spring force? Diagnostic information 2-45 Are all the toner cartridge contacts clean on page 4-11. See "Rear shield removal" on both the pins and IU? 6 Are all conductors continuous? 8 Replace the printhead. See "Printhead... that does not work, remove the imaging unit and reseat each of the input paper sources, media trays, or duplex paper path. No Clean the developer cartridge contacts. Replace the controller board. Blurred print can also be damaged. Check the continuity between the spring-loaded pins and the...
Service Manual
Page 82
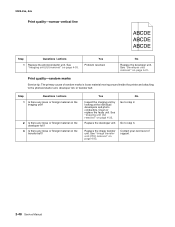
... unit, developer roll, or transfer belt. No Replace the developer unit. Print quality-random marks Service tip: The primary cause of support. 2-48 Service Manual Clean or replace the faulty unit. See "Developer unit removal" on the transfer belt? Yes Inspect the imaging unit by looking at the individual developers and...
... unit, developer roll, or transfer belt. No Replace the developer unit. Print quality-random marks Service tip: The primary cause of support. 2-48 Service Manual Clean or replace the faulty unit. See "Developer unit removal" on the transfer belt? Yes Inspect the imaging unit by looking at the individual developers and...
Service Manual
Page 87
... power supply (HVPS) assembly removal" on page 4-19. 2 Turn the printer off , and remove the rear shield. Replace the controller board. Are the contact dirty?. Clean the contacts, and reinstall the ITU. The display should indicate Tray 1 Missing. Yes Go to step 4. See "Image transfer unit (ITU) removal" on page 4-33...
... power supply (HVPS) assembly removal" on page 4-19. 2 Turn the printer off , and remove the rear shield. Replace the controller board. Are the contact dirty?. Clean the contacts, and reinstall the ITU. The display should indicate Tray 1 Missing. Yes Go to step 4. See "Image transfer unit (ITU) removal" on page 4-33...
Service Manual
Page 123
...and move toner from the tray and carried to the transfer roll where the image is transferred to the transfer belt the photoconductors are cleaned and recharged. The printer has four photoconductors (called the electrophotographic process. Each color toner is painted to it passes under the four ...carries the four-colored image towards the transfer roll. Media is picked up from the toner cartridge to the media. The media is cleaned and the process begins again for the EP process and coordinates the various motors and signals. The transfer unit is carried to various components...
...and move toner from the tray and carried to the transfer roll where the image is transferred to the transfer belt the photoconductors are cleaned and recharged. The printer has four photoconductors (called the electrophotographic process. Each color toner is painted to it passes under the four ...carries the four-colored image towards the transfer roll. Media is picked up from the toner cartridge to the media. The media is cleaned and the process begins again for the EP process and coordinates the various motors and signals. The transfer unit is carried to various components...
Service Manual
Page 125
... the photoconductor when you are working on the surface and toner will have to be repeating patches of voids or light print on the page. Cleaning the lens solves the problem. • Never touch the surface of the photoconductor with your skin may cause a charge differential on the printer so you...
... the photoconductor when you are working on the surface and toner will have to be repeating patches of voids or light print on the page. Cleaning the lens solves the problem. • Never touch the surface of the photoconductor with your skin may cause a charge differential on the printer so you...
Service Manual
Page 127
This takes place by a direct surface-to clean the ITU belt surface. No matter how careful you are developed on the surface and toner will not stick properly. Then the ITU belt will ...
This takes place by a direct surface-to clean the ITU belt surface. No matter how careful you are developed on the surface and toner will not stick properly. Then the ITU belt will ...
Service Manual
Page 130
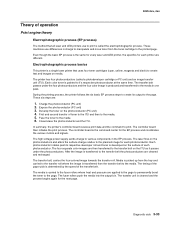
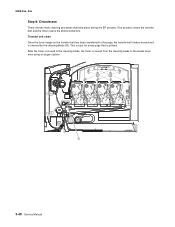
After the toner is moved to the cleaning blade, the toner is moved from the cleaning blade to the page, the transfer belt rotates around and is printed. 5025-2xx, 4xx Step 6: Clean/erase There are two main cleaning processes that is cleaned by the cleaning blade (G). This occurs for every page that take place during the EP process. Transfer unit clean Once the toner image on the transfer belt has been transferred to the waste toner area using an auger system. 3-40 Service Manual One process cleans the transfer belt and the other cleans the photoconductors.
After the toner is moved to the cleaning blade, the toner is moved from the cleaning blade to the page, the transfer belt rotates around and is printed. 5025-2xx, 4xx Step 6: Clean/erase There are two main cleaning processes that is cleaned by the cleaning blade (G). This occurs for every page that take place during the EP process. Transfer unit clean Once the toner image on the transfer belt has been transferred to the waste toner area using an auger system. 3-40 Service Manual One process cleans the transfer belt and the other cleans the photoconductors.


