Troubleshooting Guide
Page 1
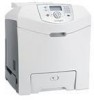
...1 Open the document you want to the Ready state. Load media in Adobe Acrobat. 2 Click the printer icon. For more information about 10 seconds, and then turn the printer back on. Confidential and other network device. Specified output (exit) Remove the stack of the job may ...you are using a recommended cable. • Make sure the connection is not turned off and then back on. Lexmark™ C53x Troubleshooting Guide Troubleshooting Checking an unresponsive printer If your printer. • If you are using a USB port, make sure: • The power cord is plugged into...
...1 Open the document you want to the Ready state. Load media in Adobe Acrobat. 2 Click the printer icon. For more information about 10 seconds, and then turn the printer back on. Confidential and other network device. Specified output (exit) Remove the stack of the job may ...you are using a recommended cable. • Make sure the connection is not turned off and then back on. Lexmark™ C53x Troubleshooting Guide Troubleshooting Checking an unresponsive printer If your printer. • If you are using a USB port, make sure: • The power cord is plugged into...

User's Guide
Page 14
...Installing options Installing a 550-sheet drawer CAUTION: The printer weighs 25.40 kg (56 lb); e From the Available Options list, select the 550-sheet tray. c Click File ΠProperties. f Click Add. b Double-click the printer icon. therefore, it requires at least two people to lift... it, and make sure your fingers are installing a 550-sheet drawer after setting up the printer, turn the printer off and unplug the power cord before continuing. 1 ...
...Installing options Installing a 550-sheet drawer CAUTION: The printer weighs 25.40 kg (56 lb); e From the Available Options list, select the 550-sheet tray. c Click File ΠProperties. f Click Add. b Double-click the printer icon. therefore, it requires at least two people to lift... it, and make sure your fingers are installing a 550-sheet drawer after setting up the printer, turn the printer off and unplug the power cord before continuing. 1 ...
User's Guide
Page 20
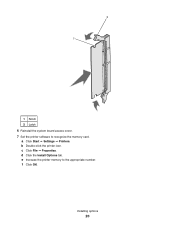
d Click the Install Options tab. f Click OK. c Click File ΠProperties. e Increase the printer memory to recognize the memory card. Installing options 20 a Click Start ΠSettings ΠPrinters. b Double-click the printer icon. 2 1 1 Notch 2 Latch 6 Reinstall the system board access cover. 7 Set the printer software to the appropriate number.
d Click the Install Options tab. f Click OK. c Click File ΠProperties. e Increase the printer memory to recognize the memory card. Installing options 20 a Click Start ΠSettings ΠPrinters. b Double-click the printer icon. 2 1 1 Notch 2 Latch 6 Reinstall the system board access cover. 7 Set the printer software to the appropriate number.

User's Guide
Page 22
... the system board. • Be careful not to damage the connectors. 5 Reinstall the system board access cover. 6 Set the printer software to recognize the flash memory. Notes: • The entire length of the connector on the hard disk. c Click File Œ ...a disk. Warning: Hard disks are easily damaged by static electricity. Touch something metal on the printer before installing the hard disk. 1 Access the system board. Installing options 22 b Double-click the printer icon. e From the Available Options list, select Flash memory. d Click the Install Options tab....
... the system board. • Be careful not to damage the connectors. 5 Reinstall the system board access cover. 6 Set the printer software to recognize the flash memory. Notes: • The entire length of the connector on the hard disk. c Click File Œ ...a disk. Warning: Hard disks are easily damaged by static electricity. Touch something metal on the printer before installing the hard disk. 1 Access the system board. Installing options 22 b Double-click the printer icon. e From the Available Options list, select Flash memory. d Click the Install Options tab....
User's Guide
Page 55
...the Windows desktop 1 Minimize all programs to reveal the desktop. 2 Double-click the My Computer icon. 3 Double-click the Printers icon. 4 Double-click the printer icon. 5 Select the job to print, a small printer icon appears in the printer window. 2 Select a job to cancel, and then press . Printing 55 The following messages:... a print job There are several methods for canceling a print job. A list of the taskbar. 1 Double-click the printer icon. Submitting Selection appears. 6 Press until appears next to the job you want to cancel. 3 From the keyboard, press Delete.
...the Windows desktop 1 Minimize all programs to reveal the desktop. 2 Double-click the My Computer icon. 3 Double-click the Printers icon. 4 Double-click the printer icon. 5 Select the job to print, a small printer icon appears in the printer window. 2 Select a job to cancel, and then press . Printing 55 The following messages:... a print job There are several methods for canceling a print job. A list of the taskbar. 1 Double-click the printer icon. Submitting Selection appears. 6 Press until appears next to the job you want to cancel. 3 From the keyboard, press Delete.

User's Guide
Page 56
...printing to. 3 From the printer window, select the job to cancel. 4 From the icon bar at the top of print jobs appears in the printer window. 2 Choose a job to print, the printer icon for your selected printer appears on the desktop. 1 Double-click the printer icon. Printing 56 A list of... the window, click the Delete icon. Canceling a print job from...
...printing to. 3 From the printer window, select the job to cancel. 4 From the icon bar at the top of print jobs appears in the printer window. 2 Choose a job to print, the printer icon for your selected printer appears on the desktop. 1 Double-click the printer icon. Printing 56 A list of... the window, click the Delete icon. Canceling a print job from...

User's Guide
Page 82
... and then back on. For information regarding tested and approved USB flash memory devices, see the Lexmark Web site at www.lexmark.com. Troubleshooting 82 Solution Turn the printer off, wait about reading USB drive appears USB device may not be supported. If Performing Self ... into the outlet is working. • The printer is turned on. • The printer cable is blank or displays only diamonds Cause Printer self test failed. Control panel display is securely attached to print in Adobe Acrobat. 2 Click the printer icon. Error message about 10 seconds, and then turn...
... and then back on. For information regarding tested and approved USB flash memory devices, see the Lexmark Web site at www.lexmark.com. Troubleshooting 82 Solution Turn the printer off, wait about reading USB drive appears USB device may not be supported. If Performing Self ... into the outlet is working. • The printer is turned on. • The printer cable is blank or displays only diamonds Cause Printer self test failed. Control panel display is securely attached to print in Adobe Acrobat. 2 Click the printer icon. Error message about 10 seconds, and then turn...
Technical Reference
Page 11
... a hard copy by clicking File on the toolbar, and then choosing Print. Click the page number box on the keyboard. - Click the binoculars icon on the keyboard. - ment itself. Use the arrows in the toolbar at the bottom of the page and type the page you want to a... choose Find or Search. - Click a topic in the docu- Click a cross-reference to view. - Printing the File Although this document on a color printer, the color you see on the paper may help you find the information you need. • To move forward and backward through this document: - Select the magnifying...
... a hard copy by clicking File on the toolbar, and then choosing Print. Click the page number box on the keyboard. - Click the binoculars icon on the keyboard. - ment itself. Use the arrows in the toolbar at the bottom of the page and type the page you want to a... choose Find or Search. - Click a topic in the docu- Click a cross-reference to view. - Printing the File Although this document on a color printer, the color you see on the paper may help you find the information you need. • To move forward and backward through this document: - Select the magnifying...

Technical Reference
Page 318
Setting Up the Communications Port Using Windows 95/98/Me In your printer and computer. The Control Panel screen appears. 4 Double-click the System icon. The System Properties screen appears. 5 Click the Device Manager tab. 6 Scroll down to Ports and click the + once to expand the list of available Ports. 7 ... select the COM1 port, then the Communications Port [COM1] Properties screen displays. 9 Click the Port Settings tab. 10 Fill out the fields for the following printer settings to configure. 8 Click the Properties button at the bottom of the screen. Instructions for this , you define your...
Setting Up the Communications Port Using Windows 95/98/Me In your printer and computer. The Control Panel screen appears. 4 Double-click the System icon. The System Properties screen appears. 5 Click the Device Manager tab. 6 Scroll down to Ports and click the + once to expand the list of available Ports. 7 ... select the COM1 port, then the Communications Port [COM1] Properties screen displays. 9 Click the Port Settings tab. 10 Fill out the fields for the following printer settings to configure. 8 Click the Properties button at the bottom of the screen. Instructions for this , you define your...

Technical Reference
Page 319
...port, then the Settings for COM1 screen displays. 7 Fill out the fields for the following printer settings to configure. 6 Click the Settings button. Setting Up the Communications Port Using Windows NT 4.0 In your printer settings: • Baud Rate • Parity • Stop bits • Flow Control Note...protocol. 8 Click OK. 9 Close all windows now that the port is set up . The Control Panel screen appears. 4 Double-click the Ports icon. 8-3 Interfaces 11 Click OK. 12 Close all screens now that the port is set up . The Ports screen appears. 5 Select the communications port...
...port, then the Settings for COM1 screen displays. 7 Fill out the fields for the following printer settings to configure. 6 Click the Settings button. Setting Up the Communications Port Using Windows NT 4.0 In your printer settings: • Baud Rate • Parity • Stop bits • Flow Control Note...protocol. 8 Click OK. 9 Close all windows now that the port is set up . The Control Panel screen appears. 4 Double-click the Ports icon. 8-3 Interfaces 11 Click OK. 12 Close all screens now that the port is set up . The Ports screen appears. 5 Select the communications port...

Technical Reference
Page 320
... COM1 port, then the Communications Port [COM1] Properties screen displays. 9 Click the Port Settings tab. 10 Fill out the fields for the following printer settings to make them match your Windows 2000 application: 1 On the Menu bar, click Start. 2 Click Settings. 3 Click Control Panel. The... port you want DTR protocol or Xon/ Xoff for this specific port displays. 8-4 Interfaces Setting Up the Communications Port Using Windows 2000 In your printer settings: • Bits per second • Data bits • Parity • Stop bits • Flow Control Note: For Flow Control,...
... COM1 port, then the Communications Port [COM1] Properties screen displays. 9 Click the Port Settings tab. 10 Fill out the fields for the following printer settings to make them match your Windows 2000 application: 1 On the Menu bar, click Start. 2 Click Settings. 3 Click Control Panel. The... port you want DTR protocol or Xon/ Xoff for this specific port displays. 8-4 Interfaces Setting Up the Communications Port Using Windows 2000 In your printer settings: • Bits per second • Data bits • Parity • Stop bits • Flow Control Note: For Flow Control,...


