Troubleshooting Guide
Page 4
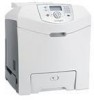
... Printing Quality Test Pages appears, and then the pages print. The message remains on . Solution • Adjust the color alignment. Adjusting the color alignment 1 Make sure the printer is displayed, and then press . Replace the toner cartridge if the defects occur every: • 33.5 mm (1.... toner cartridge or photoconductor may have not resolved the issue, adjust the color alignment again. The printer performs its power-on . Solving print quality problems Isolating print quality problems To help you have a printer part that number is turned off . 2 From the control panel, ...
... Printing Quality Test Pages appears, and then the pages print. The message remains on . Solution • Adjust the color alignment. Adjusting the color alignment 1 Make sure the printer is displayed, and then press . Replace the toner cartridge if the defects occur every: • 33.5 mm (1.... toner cartridge or photoconductor may have not resolved the issue, adjust the color alignment again. The printer performs its power-on . Solving print quality problems Isolating print quality problems To help you have a printer part that number is turned off . 2 From the control panel, ...
Troubleshooting Guide
Page 5
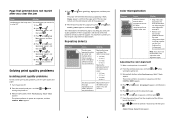
..., or transfer belt is defective. Replace the color cartridge causing the line. Photoconductors are Clean the printhead dirty. photoconductor units. or worn. Photoconductors may be defective. another tray. Transfer belt is defective. Replace the transfer belt. The media being used does not meet the printer specifications. • Load media from media. Replace...
..., or transfer belt is defective. Replace the color cartridge causing the line. Photoconductors are Clean the printhead dirty. photoconductor units. or worn. Photoconductors may be defective. another tray. Transfer belt is defective. Replace the transfer belt. The media being used does not meet the printer specifications. • Load media from media. Replace...
Troubleshooting Guide
Page 7
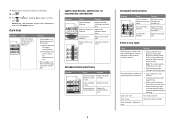
...change Paper Texture from the printer. Printing presses, inkjet printers, and color laser printers create colors in the printer. that meets the printer specifications. Shake the cartridge back and forth several times, and then reinstall it . Solid color pages Cause Photoconductor is RGB color? The Paper Weight setting ...for the type of media being used does not Make sure you are using media meet the printer specifications. Frequently Asked Questions (FAQ) about color printing What is installed incorrectly. For example, you inserted A4-size paper into the selected ...
...change Paper Texture from the printer. Printing presses, inkjet printers, and color laser printers create colors in the printer. that meets the printer specifications. Shake the cartridge back and forth several times, and then reinstall it . Solid color pages Cause Photoconductor is RGB color? The Paper Weight setting ...for the type of media being used does not Make sure you are using media meet the printer specifications. Frequently Asked Questions (FAQ) about color printing What is installed incorrectly. For example, you inserted A4-size paper into the selected ...
Troubleshooting Guide
Page 8
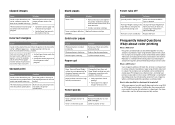
...to create more information about adjusting the Color Balance setting, see the User's Guide on the table selected. Manual Color Correction may want to color conversion tables in the program through the selected color conversion table. When the printer Color Correction setting is based on the ... (for the particular object. Selecting which the printer cannot exactly reproduce the desired color, users should I can examine the color samples pages and identify the box whose color is sent to produce the desired color. Additionally, certain situations exist where the software ...
...to create more information about adjusting the Color Balance setting, see the User's Guide on the table selected. Manual Color Correction may want to color conversion tables in the program through the selected color conversion table. When the printer Color Correction setting is based on the ... (for the particular object. Selecting which the printer cannot exactly reproduce the desired color, users should I can examine the color samples pages and identify the box whose color is sent to produce the desired color. Additionally, certain situations exist where the software ...
Troubleshooting Guide
Page 9
... the Software and Documentation CD. For other countries/regions, visit the Lexmark Web site at www.lexmark.com. 9 This topic applies only to know your printer model type and serial number. These pages require the use RGB-Text Auto SRGB Vivid Manual Manual Color RGB Text Setting RGB-Graphic Auto SRGB Vivid Manual Manual...
... the Software and Documentation CD. For other countries/regions, visit the Lexmark Web site at www.lexmark.com. 9 This topic applies only to know your printer model type and serial number. These pages require the use RGB-Text Auto SRGB Vivid Manual Manual Color RGB Text Setting RGB-Graphic Auto SRGB Vivid Manual Manual...
User's Guide
Page 4
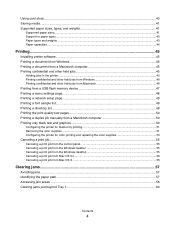
...Supported paper sizes...41 Support for paper types ...43 Paper types and weights ...43 Paper capacities ...44 Printing...45 Installing printer software...45 Printing a document from Windows 45 Printing a document from a Macintosh computer 45 Printing confidential and other held jobs 45... from a Macintosh computer 50 Printing only black text and graphics 50 Configuring the printer for black-only printing 51 Removing the color supplies ...51 Configuring the printer for color printing and replacing the color supplies 54 Canceling a print job...55 Canceling a print job from the control ...
...Supported paper sizes...41 Support for paper types ...43 Paper types and weights ...43 Paper capacities ...44 Printing...45 Installing printer software...45 Printing a document from Windows 45 Printing a document from a Macintosh computer 45 Printing confidential and other held jobs 45... from a Macintosh computer 50 Printing only black text and graphics 50 Configuring the printer for black-only printing 51 Removing the color supplies ...51 Configuring the printer for color printing and replacing the color supplies 54 Canceling a print job...55 Canceling a print job from the control ...

User's Guide
Page 6
Troubleshooting...82 Checking an unresponsive printer...82 Solving printing problems...82 Multiple-language PDFs do not print ...82 Control panel display is blank or displays only diamonds 82 Error message about ... reprint after you clear the jam 87 Solving print quality problems...87 Isolating print quality problems ...87 Repeating defects...88 Color misregistration...88 Dark lines...89 Light colored line, white line, or incorrectly colored line 89 Streaked horizontal lines ...89 Streaked vertical lines ...90 Print is too light ...90 Print irregularities...91 Print...
Troubleshooting...82 Checking an unresponsive printer...82 Solving printing problems...82 Multiple-language PDFs do not print ...82 Control panel display is blank or displays only diamonds 82 Error message about ... reprint after you clear the jam 87 Solving print quality problems...87 Isolating print quality problems ...87 Repeating defects...88 Color misregistration...88 Dark lines...89 Light colored line, white line, or incorrectly colored line 89 Streaked horizontal lines ...89 Streaked vertical lines ...90 Print is too light ...90 Print irregularities...91 Print...

User's Guide
Page 13
Security Max Invalid PIN Job Expiration Network/Ports TCP/IP IPv6 Wireless Standard Network Network Standard USB USB NetWare AppleTalk LexLink USB Direct Help Color Quality Print Quality Printing Guide Supplies Guide Media Guide Print Defects Menu Map Information Guide Connection Guide Moving Guide Learning about the printer 13
Security Max Invalid PIN Job Expiration Network/Ports TCP/IP IPv6 Wireless Standard Network Network Standard USB USB NetWare AppleTalk LexLink USB Direct Help Color Quality Print Quality Printing Guide Supplies Guide Media Guide Print Defects Menu Map Information Guide Connection Guide Moving Guide Learning about the printer 13

User's Guide
Page 50
.... 3 Release the buttons when the clock appears, and wait for an extended period, set the printer to Color Lock Out mode, and remove and store the color printing supplies. ABC 7 Click File ΠPrint. 8 From the drop-down list, choose Paper Handling. 3 Make sure Page order is set to Normal. 10 From ... until Exit Config Menu appears, and then press . The print quality test pages print. 5 Press until Prt Quality Pgs appears, and then press . Resetting the Printer appears briefly, followed by a clock, and then Ready appears.
.... 3 Release the buttons when the clock appears, and wait for an extended period, set the printer to Color Lock Out mode, and remove and store the color printing supplies. ABC 7 Click File ΠPrint. 8 From the drop-down list, choose Paper Handling. 3 Make sure Page order is set to Normal. 10 From ... until Exit Config Menu appears, and then press . The print quality test pages print. 5 Press until Prt Quality Pgs appears, and then press . Resetting the Printer appears briefly, followed by a clock, and then Ready appears.

User's Guide
Page 51
... the control panel, hold down and while turning the printer on. 3 Release the buttons when the clock appears, and wait for CONFIG MENU to appear. 4 Press until Color Lock Out appears, and then press . 5 Press until Remove all color supplies appears. Note: Store the color supplies in a clean, cool, dark, dry place where the...
... the control panel, hold down and while turning the printer on. 3 Release the buttons when the clock appears, and wait for CONFIG MENU to appear. 4 Press until Color Lock Out appears, and then press . 5 Press until Remove all color supplies appears. Note: Store the color supplies in a clean, cool, dark, dry place where the...
User's Guide
Page 54
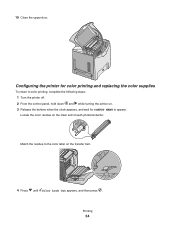
Configuring the printer for color printing and replacing the color supplies To return to color printing, complete the following steps: 1 Turn the printer off. 2 From the control panel, hold down and while turning the printer on the clear end of each photoconductor. Locate the color residue on . 3 Release the buttons when the clock appears, and wait for CONFIG MENU to the color label on the transfer belt. 4 Press until Color Lock Out appears, and then press . Match the residue to appear. Printing 54 10 Close the upper door.
Configuring the printer for color printing and replacing the color supplies To return to color printing, complete the following steps: 1 Turn the printer off. 2 From the control panel, hold down and while turning the printer on the clear end of each photoconductor. Locate the color residue on . 3 Release the buttons when the clock appears, and wait for CONFIG MENU to the color label on the transfer belt. 4 Press until Color Lock Out appears, and then press . Match the residue to appear. Printing 54 10 Close the upper door.

User's Guide
Page 63
...Wait for the fuser to dislodge the photoconductors. 3 If the paper will not move, remove all four photoconductors (for more information, see "Removing the color supplies" on page 51). Clearing jams under the fuser or fuser cover Jams under the fuser or fuser cover When paper is jammed under the ...the jam, and then replace the photoconductors. 2 1 4 Close the lower door, and then close the upper door. CAUTION: The fuser and the inside of the printer near the fuser may appear. 1 Open the upper and inner doors. The lower door opens with the inner door. 2 Pull the jammed paper out straight...
...Wait for the fuser to dislodge the photoconductors. 3 If the paper will not move, remove all four photoconductors (for more information, see "Removing the color supplies" on page 51). Clearing jams under the fuser or fuser cover Jams under the fuser or fuser cover When paper is jammed under the ...the jam, and then replace the photoconductors. 2 1 4 Close the lower door, and then close the upper door. CAUTION: The fuser and the inside of the printer near the fuser may appear. 1 Open the upper and inner doors. The lower door opens with the inner door. 2 Pull the jammed paper out straight...
User's Guide
Page 69
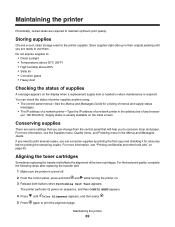
... for a listing of menus and supply status messages. • The IP address of a network printer-Type the IP address of the toner cartridges. Store supplies right side up in their original packing until Color Alignment appears, and then press . 5 Press again to print the alignment page. The... printer performs its power-on sequence, and then CONFIG MENU appears. 4 Press until you can conserve ...
... for a listing of menus and supply status messages. • The IP address of a network printer-Type the IP address of the toner cartridges. Store supplies right side up in their original packing until Color Alignment appears, and then press . 5 Press again to print the alignment page. The... printer performs its power-on sequence, and then CONFIG MENU appears. 4 Press until you can conserve ...
User's Guide
Page 70
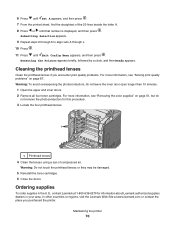
... for information about Lexmark authorized supplies dealers in the U.S., contact Lexmark at www.lexmark.com or contact the place you encounter print quality problems. For more information, see "Solving print quality problems" on page 87. For more information, see "Removing the color supplies" on page...Press until Exit Config Menu appears, and then press . Ordering supplies To order supplies in your area. Maintaining the printer 70 In other countries or regions, visit the Lexmark Web Site at 1-800-539-6275 for this procedure. 3 Locate the four printhead lenses. 1 1 Printhead lenses 4...
... for information about Lexmark authorized supplies dealers in the U.S., contact Lexmark at www.lexmark.com or contact the place you encounter print quality problems. For more information, see "Solving print quality problems" on page 87. For more information, see "Removing the color supplies" on page...Press until Exit Config Menu appears, and then press . Ordering supplies To order supplies in your area. Maintaining the printer 70 In other countries or regions, visit the Lexmark Web Site at 1-800-539-6275 for this procedure. 3 Locate the four printhead lenses. 1 1 Printhead lenses 4...
User's Guide
Page 88
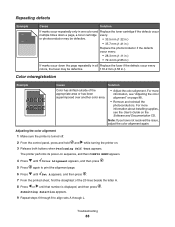
...in all Replace the fuser if the defects occur every colors, the fuser may be defective. 116.2 mm (4.58 in.). Note: If you have not resolved the issue, adjust the color alignment again. The printer performs its power-on the Software and Documentation CD. Troubleshooting... 88 For more information about installing supplies, see "Adjusting the color alignment" on . 3 Release both buttons when Performing Self Test ...
...in all Replace the fuser if the defects occur every colors, the fuser may be defective. 116.2 mm (4.58 in.). Note: If you have not resolved the issue, adjust the color alignment again. The printer performs its power-on the Software and Documentation CD. Troubleshooting... 88 For more information about installing supplies, see "Adjusting the color alignment" on . 3 Release both buttons when Performing Self Test ...

User's Guide
Page 89
..., or transfer belt is defective, empty, or worn. Photoconductors are dirty. Photoconductors may be defective. Troubleshooting 89 Solution Replace the color cartridge causing the line. Solution Replace the toner cartridge. Solution • If the problem is on the front (print side) ...Press . 11 Press until Exit Config Menu appears, and then press . Light colored line, white line, or incorrectly colored line Example ABCDE ABCDE Cause Toner cartridge is defective. Replace the transfer belt. Resetting the Printer appears briefly, followed by a clock, and then Ready appears.
..., or transfer belt is defective, empty, or worn. Photoconductors are dirty. Photoconductors may be defective. Troubleshooting 89 Solution Replace the color cartridge causing the line. Solution Replace the toner cartridge. Solution • If the problem is on the front (print side) ...Press . 11 Press until Exit Config Menu appears, and then press . Light colored line, white line, or incorrectly colored line Example ABCDE ABCDE Cause Toner cartridge is defective. Replace the transfer belt. Resetting the Printer appears briefly, followed by a clock, and then Ready appears.
User's Guide
Page 90
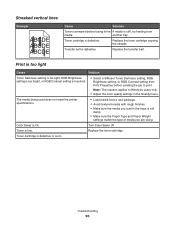
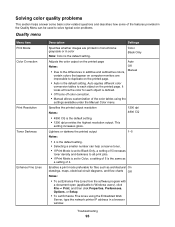
The media being used does not meet the printer specifications. • Load media from a new package. • Avoid textured media with rough finishes. • Make sure the media you load in the Quality menu. ... is too bright, or RGB Contrast setting is incorrect. • Select a different Toner Darkness setting, RGB Brightness setting, or RGB Contrast setting from media. Turn Color Saver off. Troubleshooting 90 Transfer belt is defective or worn. Toner cartridge is defective. another tray. Toner cartridge is On. Streaked vertical lines Example ABCDE...
The media being used does not meet the printer specifications. • Load media from a new package. • Avoid textured media with rough finishes. • Make sure the media you load in the Quality menu. ... is too bright, or RGB Contrast setting is incorrect. • Select a different Toner Darkness setting, RGB Brightness setting, or RGB Contrast setting from media. Turn Color Saver off. Troubleshooting 90 Transfer belt is defective or worn. Toner cartridge is defective. another tray. Toner cartridge is On. Streaked vertical lines Example ABCDE...

User's Guide
Page 93
...for the size than what is loaded in the tray. Auto size sensing is installed incorrectly. Solid color pages Solution • Remove the toner cartridge from the printer. Printer requires servicing. Replace the photoconductor. Skewed print Cause Solution Guides in the selected tray are not in... you inserted A4-size paper into the selected tray but did not set to Off, but you are using media that meets the printer specifications. Make sure you loaded a different size paper in a tray. Solution Remove and then reinstall the photoconductor. Blank pages Cause ...
...for the size than what is loaded in the tray. Auto size sensing is installed incorrectly. Solid color pages Solution • Remove the toner cartridge from the printer. Printer requires servicing. Replace the photoconductor. Skewed print Cause Solution Guides in the selected tray are not in... you inserted A4-size paper into the selected tray but did not set to Off, but you are using media that meets the printer specifications. Make sure you loaded a different size paper in a tray. Solution Remove and then reinstall the photoconductor. Blank pages Cause ...
User's Guide
Page 95
...on the printed page. Auto applies different color conversion tables to each object is defined. • Off turns off color correction. • Manual allows customization of the color tables using the Embedded Web Server, type the network printer IP address in a browser window. Troubleshooting... 95 It looks at how the color for files such as a setting of 4....
...on the printed page. Auto applies different color conversion tables to each object is defined. • Off turns off color correction. • Manual allows customization of the color tables using the Embedded Web Server, type the network printer IP address in a browser window. Troubleshooting... 95 It looks at how the color for files such as a setting of 4....
Technical Reference
Page 11
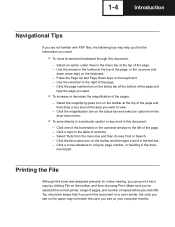
... from the menu bar and then choose Find or Search. - Click a cross-reference to a figure, page number, or heading in this document on a color printer, the color you see on the keyboard. - You should be aware that if you print this document: - Use the scroll bar to the left of the pages... Tools from the drop-down arrow keys on the toolbar and then type a word in the table of copies before you 've selected the correct printer, range of pages, and number of contents. - Printing the File Although this document: - Click a topic in the text box. - ment itself. Make sure ...
... from the menu bar and then choose Find or Search. - Click a cross-reference to a figure, page number, or heading in this document on a color printer, the color you see on the keyboard. - You should be aware that if you print this document: - Use the scroll bar to the left of the pages... Tools from the drop-down arrow keys on the toolbar and then type a word in the table of copies before you 've selected the correct printer, range of pages, and number of contents. - Printing the File Although this document: - Click a topic in the text box. - ment itself. Make sure ...


