Troubleshooting Guide
Page 4
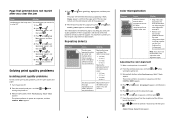
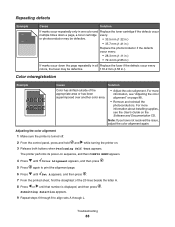
...11 in.) • 72.4 mm (2.85 in.) If marks occur down a page, a toner cartridge or photoconductor may be defective. For more information about installing supplies, see "Adjusting the color alignment" on the control panel until Exit Config Menu appears, and then press . and while 3 ... Press until Jam Recovery appears, and then press . 6 Press until that number is displayed, and then press . Adjusting the color alignment 1 Make sure the printer is set to print the alignment page. 6 Press until Prt Quality Pgs appears, and then press . Printing Quality Test Pages...
...11 in.) • 72.4 mm (2.85 in.) If marks occur down a page, a toner cartridge or photoconductor may be defective. For more information about installing supplies, see "Adjusting the color alignment" on the control panel until Exit Config Menu appears, and then press . and while 3 ... Press until Jam Recovery appears, and then press . 6 Press until that number is displayed, and then press . Adjusting the color alignment 1 Make sure the printer is set to print the alignment page. 6 Press until Prt Quality Pgs appears, and then press . Printing Quality Test Pages...
Troubleshooting Guide
Page 5
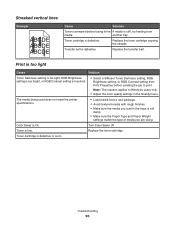
... Properties before fusing to Windows users only. • Adjust the color quality settings in the trays is stiff, try before sending the job to align sets A through 8 to print. Replace the toner cartridge. Resetting the Printer appears briefly, followed by a clock, and then Ready appears. ...Solution • If the problem is on the back of the page, replace the transfer belt. Replace the color cartridge causing the line. lenses. or worn. Note...
... Properties before fusing to Windows users only. • Adjust the color quality settings in the trays is stiff, try before sending the job to align sets A through 8 to print. Replace the toner cartridge. Resetting the Printer appears briefly, followed by a clock, and then Ready appears. ...Solution • If the problem is on the back of the page, replace the transfer belt. Replace the color cartridge causing the line. lenses. or worn. Note...
Troubleshooting Guide
Page 6
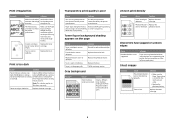
... that do not meet the printer specifications. Replace the toner cartridge. 6 The media being used does not meet the printer specifications. Note: This solution applies to print. Replace the toner cartridge. Solution Reinstall or replace the cartridge. Ghost images Example Cause Solution...moisture due to Transparency. Use only transparencies recommended by the printer, the host computer, and the software application. Toner fog or background shading appears on the page Cause Toner cartridge is Replace the worn or defective. Uneven print density Example...
... that do not meet the printer specifications. Replace the toner cartridge. 6 The media being used does not meet the printer specifications. Note: This solution applies to print. Replace the toner cartridge. Solution Reinstall or replace the cartridge. Ghost images Example Cause Solution...moisture due to Transparency. Use only transparencies recommended by the printer, the host computer, and the software application. Toner fog or background shading appears on the page Cause Toner cartridge is Replace the worn or defective. Uneven print density Example...
Troubleshooting Guide
Page 7
... the guides in this manner. Frequently Asked Questions (FAQ) about color printing What is low. • Remove the toner cartridge from Normal to not in the correct position for the the proper positions for the size loaded. Printing presses, inkjet printers, and color laser printers create colors in the tray. loaded. Additionally, they commonly let users modify...
... the guides in this manner. Frequently Asked Questions (FAQ) about color printing What is low. • Remove the toner cartridge from Normal to not in the correct position for the the proper positions for the size loaded. Printing presses, inkjet printers, and color laser printers create colors in the tray. loaded. Additionally, they commonly let users modify...
User's Guide
Page 5
... the manual feeder 68 Maintaining the printer 69 Storing supplies...69 Checking the status of supplies...69 Conserving supplies...69 Aligning the toner cartridges...69 Cleaning the printhead lenses...70 Ordering supplies...70 Ordering toner cartridges...71 Ordering a transfer belt...72 ...Ordering a waste toner box ...73 Ordering a fuser...73 Ordering photoconductors ...73 Moving the printer...73 Before moving the printer ...73 Moving the printer to another location ...74 Administrative support...
... the manual feeder 68 Maintaining the printer 69 Storing supplies...69 Checking the status of supplies...69 Conserving supplies...69 Aligning the toner cartridges...69 Cleaning the printhead lenses...70 Ordering supplies...70 Ordering toner cartridges...71 Ordering a transfer belt...72 ...Ordering a waste toner box ...73 Ordering a fuser...73 Ordering photoconductors ...73 Moving the printer...73 Before moving the printer ...73 Moving the printer to another location ...74 Administrative support...
User's Guide
Page 12
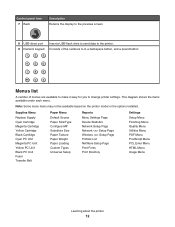
Supplies Menu Replace Supply Cyan Cartridge Magenta Cartridge Yellow Cartridge Black Cartridge Cyan PC Unit Magenta PC Unit Yellow PC Unit Black PC Unit Fuser Transfer Belt Paper Menu Default Source Paper Size/Type Configure MP Substitute ... Print Directory Settings Setup Menu Finishing Menu Quality Menu Utilities Menu PDF Menu PostScript Menu PCL Emul Menu HTML Menu Image Menu Learning about the printer 12 Control panel item 7 Back Description Returns the display to the previous screen 8 USB direct port 9 Numeric keypad Insert a USB flash drive to send data...
Supplies Menu Replace Supply Cyan Cartridge Magenta Cartridge Yellow Cartridge Black Cartridge Cyan PC Unit Magenta PC Unit Yellow PC Unit Black PC Unit Fuser Transfer Belt Paper Menu Default Source Paper Size/Type Configure MP Substitute ... Print Directory Settings Setup Menu Finishing Menu Quality Menu Utilities Menu PDF Menu PostScript Menu PCL Emul Menu HTML Menu Image Menu Learning about the printer 12 Control panel item 7 Back Description Returns the display to the previous screen 8 USB direct port 9 Numeric keypad Insert a USB flash drive to send data...

User's Guide
Page 40
...sheets may wrinkle or seal envelopes. Partial sheets also contaminate the printer and the cartridge with exposed adhesive. Adhesive material contaminates the printer and could void the printer and cartridge warranties. • Do not print within 1 mm (0.04 ... printing bar codes. • Do not use before buying large quantities. Many of the adhesive at www.lexmark.com/publications. When printing on this product. Have any exposed adhesive when the flap is not possible, remove... available on the card stock being considered for laser printers. Have an interlocking design -
...sheets may wrinkle or seal envelopes. Partial sheets also contaminate the printer and the cartridge with exposed adhesive. Adhesive material contaminates the printer and could void the printer and cartridge warranties. • Do not print within 1 mm (0.04 ... printing bar codes. • Do not use before buying large quantities. Many of the adhesive at www.lexmark.com/publications. When printing on this product. Have any exposed adhesive when the flap is not possible, remove... available on the card stock being considered for laser printers. Have an interlocking design -

User's Guide
Page 53
Remove all three color toner cartridges. 8 Place the toner cartridges in a clean, sturdy box. 9 Close the lower door. 6 Close the box to protect the photoconductors from light. 7 Lift the small toner cartridge handles slightly and pull straight out. Printing 53
Remove all three color toner cartridges. 8 Place the toner cartridges in a clean, sturdy box. 9 Close the lower door. 6 Close the box to protect the photoconductors from light. 7 Lift the small toner cartridge handles slightly and pull straight out. Printing 53
User's Guide
Page 55
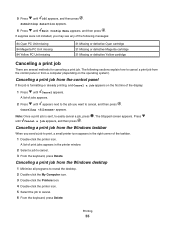
...84 Cyan PC Unit missing 84 Magenta PC Unit missing 84 Yellow PC Unit missing 31 Missing or defective Cyan cartridge 31 Missing or defective Magenta cartridge 31 Missing or defective Yellow cartridge Canceling a print job There are several methods for canceling a print job. A list of jobs appears. 2... or from the Windows desktop 1 Minimize all programs to reveal the desktop. 2 Double-click the My Computer icon. 3 Double-click the Printers icon. 4 Double-click the printer icon. 5 Select the job to easily cancel a job, press . A list of print jobs appears in the right corner of the ...
...84 Cyan PC Unit missing 84 Magenta PC Unit missing 84 Yellow PC Unit missing 31 Missing or defective Cyan cartridge 31 Missing or defective Magenta cartridge 31 Missing or defective Yellow cartridge Canceling a print job There are several methods for canceling a print job. A list of jobs appears. 2... or from the Windows desktop 1 Minimize all programs to reveal the desktop. 2 Double-click the My Computer icon. 3 Double-click the Printers icon. 4 Double-click the printer icon. 5 Select the job to easily cancel a job, press . A list of print jobs appears in the right corner of the ...
User's Guide
Page 69
...change from the control panel that will help you can check the status of the toner cartridges. Aligning the toner cartridges Sometimes replacing the transfer belt affects the alignment of printer supplies anytime using: • The control panel menus-See the Menus and Messages Guide ...for the printer supplies. Maintaining the printer 69 Supply status is usually available on . 3 Release both buttons when Performing Self Test appears. Store supplies right side up in their original packing until Color Alignment appears, and then press . 5 Press...
...change from the control panel that will help you can check the status of the toner cartridges. Aligning the toner cartridges Sometimes replacing the transfer belt affects the alignment of printer supplies anytime using: • The control panel menus-See the Menus and Messages Guide ...for the printer supplies. Maintaining the printer 69 Supply status is usually available on . 3 Release both buttons when Performing Self Test appears. Store supplies right side up in their original packing until Color Alignment appears, and then press . 5 Press...
User's Guide
Page 70
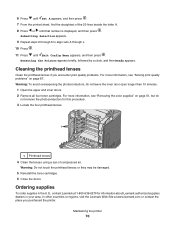
... Lexmark authorized supplies dealers in the U.S., contact Lexmark at www.lexmark.com or contact the place you purchased the printer. Warning: Do not touch the printhead lenses or they may be damaged. 5 Reinstall the toner cartridges. 6 Close the doors. Resetting the Printer ...appears briefly, followed by a clock, and then Ready appears. Ordering supplies To order supplies in your area. For more information, see "Removing the color...
... Lexmark authorized supplies dealers in the U.S., contact Lexmark at www.lexmark.com or contact the place you purchased the printer. Warning: Do not touch the printhead lenses or they may be damaged. 5 Reinstall the toner cartridges. 6 Close the doors. Resetting the Printer ...appears briefly, followed by a clock, and then Ready appears. Ordering supplies To order supplies in your area. For more information, see "Removing the color...
User's Guide
Page 71
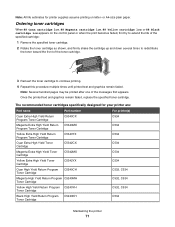
... may be printed after one of the toner cartridge. 3 Reinsert the toner cartridge to redistribute the toner toward the front of the messages first appears. The recommended toner cartridges specifically designed for printer supplies assume printing on the control panel or when... Cartridge C532, C534 Yellow High Yield Return Program C5240YH Toner Cartridge C532, C534 Black High Yield Return Program Toner Cartridge C5240KH C534 Maintaining the printer 71 Ordering toner cartridges When 88 Cyan cartridge low, 88 Magenta cartridge low, 88 Yellow cartridge low, or 88 Black cartridge low...
... may be printed after one of the toner cartridge. 3 Reinsert the toner cartridge to redistribute the toner toward the front of the messages first appears. The recommended toner cartridges specifically designed for printer supplies assume printing on the control panel or when... Cartridge C532, C534 Yellow High Yield Return Program C5240YH Toner Cartridge C532, C534 Black High Yield Return Program Toner Cartridge C5240KH C534 Maintaining the printer 71 Ordering toner cartridges When 88 Cyan cartridge low, 88 Magenta cartridge low, 88 Yellow cartridge low, or 88 Black cartridge low...
User's Guide
Page 72
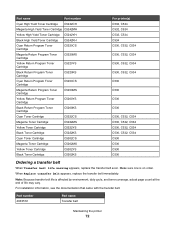
... Program Toner Cartridge C5220KS Cyan Return Program Toner Cartridge C5200CS Magenta Return Program Toner Cartridge C5200MS Yellow Return Program Toner Cartridge C5200YS Black Return Program Toner Cartridge C5200KS Cyan Toner Cartridge C5222CS Magenta Toner Cartridge C5222MS Yellow Toner Cartridge C5222YS Black Toner Cartridge C5222KS Cyan Toner Cartridge C5202CS Magenta Toner Cartridge C5202MS Yellow Toner Cartridge C5202YS Black Toner Cartridge C5202KS For printer(s) C532, C534...
... Program Toner Cartridge C5220KS Cyan Return Program Toner Cartridge C5200CS Magenta Return Program Toner Cartridge C5200MS Yellow Return Program Toner Cartridge C5200YS Black Return Program Toner Cartridge C5200KS Cyan Toner Cartridge C5222CS Magenta Toner Cartridge C5222MS Yellow Toner Cartridge C5222YS Black Toner Cartridge C5222KS Cyan Toner Cartridge C5202CS Magenta Toner Cartridge C5202MS Yellow Toner Cartridge C5202YS Black Toner Cartridge C5202KS For printer(s) C532, C534...
User's Guide
Page 88
... 1 Make sure the printer is displayed, and then press . The printer performs its power-on the Software and Documentation CD. Note: If you have not resolved the issue, adjust the color alignment again. Repeating defects ) ) Example Cause Solution If marks occur repeatedly only in one color and Replace the toner cartridge if the defects occur...
... 1 Make sure the printer is displayed, and then press . The printer performs its power-on the Software and Documentation CD. Note: If you have not resolved the issue, adjust the color alignment again. Repeating defects ) ) Example Cause Solution If marks occur repeatedly only in one color and Replace the toner cartridge if the defects occur...

User's Guide
Page 89
... 11 Press until Exit Config Menu appears, and then press . Solution Replace the color cartridge causing the line. Replace the photoconductor units. Clean the printhead lenses. Dark lines Example ABCDE ABCDE ABCDE Cause Toner cartridge(s), photoconductor, or transfer belt is defective or worn. Replace the transfer belt. Printhead.... Solution • If the problem is on the back of the page, replace the transfer belt. Resetting the Printer appears briefly, followed by a clock, and then Ready appears. Solution Replace the toner cartridge. Replace the fuser.
... 11 Press until Exit Config Menu appears, and then press . Solution Replace the color cartridge causing the line. Replace the photoconductor units. Clean the printhead lenses. Dark lines Example ABCDE ABCDE ABCDE Cause Toner cartridge(s), photoconductor, or transfer belt is defective or worn. Replace the transfer belt. Printhead.... Solution • If the problem is on the back of the page, replace the transfer belt. Resetting the Printer appears briefly, followed by a clock, and then Ready appears. Solution Replace the toner cartridge. Replace the fuser.
User's Guide
Page 90
...Toner Darkness setting, RGB Brightness setting, or RGB Contrast setting from Print Properties before fusing to print. The media being used does not meet the printer specifications. • Load media from a new package. • Avoid textured media with rough finishes. • Make sure the media you ...load in the Quality menu. Replace the toner cartridge causing the streaks. Troubleshooting 90 Note: This solution applies to Windows users only. • Adjust the color quality settings in the trays is not damp. • Make sure the Paper Type and...
...Toner Darkness setting, RGB Brightness setting, or RGB Contrast setting from Print Properties before fusing to print. The media being used does not meet the printer specifications. • Load media from a new package. • Avoid textured media with rough finishes. • Make sure the media you ...load in the Quality menu. Replace the toner cartridge causing the streaks. Troubleshooting 90 Note: This solution applies to Windows users only. • Adjust the color quality settings in the trays is not damp. • Make sure the Paper Type and...

User's Guide
Page 91
...for customer service. Note: This solution applies to print. Toner cartridge is worn or defective. Photoconductor is too high. into the paper tray. The media being used does not meet the printer Use only transparencies recommended by the printer specifications. Print is too dark Cause Solution Toner Darkness setting is... users only. Call for the tray you are using transparencies that do not meet Make sure the Paper Type and the printer specifications. Solution Reinstall or replace the cartridge. Replace the transfer belt. Transparency print quality is worn or defective.
...for customer service. Note: This solution applies to print. Toner cartridge is worn or defective. Photoconductor is too high. into the paper tray. The media being used does not meet the printer Use only transparencies recommended by the printer specifications. Print is too dark Cause Solution Toner Darkness setting is... users only. Call for the tray you are using transparencies that do not meet Make sure the Paper Type and the printer specifications. Solution Reinstall or replace the cartridge. Replace the transfer belt. Transparency print quality is worn or defective.

User's Guide
Page 92
...jagged or uneven edges Cause Downloaded font is worn or defective. Ghost images Example Cause The photoconductors are supported by the printer, the host computer, and the software application. Troubleshooting 92 Photoconductor is not supported. Solution • Make sure the Paper ...Type setting is too dark. Solution Replace the toner cartridge. Replace the toner cartridge. Select a different toner darkness setting in the Print Properties before sending the job to print. Solution If you ...
...jagged or uneven edges Cause Downloaded font is worn or defective. Ghost images Example Cause The photoconductors are supported by the printer, the host computer, and the software application. Troubleshooting 92 Photoconductor is not supported. Solution • Make sure the Paper ...Type setting is too dark. Solution Replace the toner cartridge. Replace the toner cartridge. Select a different toner darkness setting in the Print Properties before sending the job to print. Solution If you ...

User's Guide
Page 93
...the for a different media size than what proper positions for the size loaded. Solid color pages Solution • Remove the toner cartridge from the printer. Replace the toner cartridge. Cause Photoconductor is defective or empty. Solution Remove and then reinstall the photoconductor. Clipped... page size in the selected tray are using media that meets the printer specifications. Shake the cartridge back and forth several times, and then reinstall it. • Install a new toner cartridge. Printer requires servicing. Troubleshooting 93 is set to match the media in the...
...the for a different media size than what proper positions for the size loaded. Solid color pages Solution • Remove the toner cartridge from the printer. Replace the toner cartridge. Cause Photoconductor is defective or empty. Solution Remove and then reinstall the photoconductor. Clipped... page size in the selected tray are using media that meets the printer specifications. Shake the cartridge back and forth several times, and then reinstall it. • Install a new toner cartridge. Printer requires servicing. Troubleshooting 93 is set to match the media in the...

User's Guide
Page 94
are worn or defective. Replace the fuser. Toner is in the printer. Call for customer service. If for the type of paper or specialty media you use it. Toner specks Cause Toner cartridges are using. The fuser is selected. Paper curl Cause Solution Paper Type and ... in the media path. Make sure the correct Media Type is worn or defective. Toner rubs off Solution Replace the defective or worn toner cartridges. necessary, change Paper Texture from Normal to Rough. Paper has been stored in a high humidity environment. • Load paper from a fresh...
are worn or defective. Replace the fuser. Toner is in the printer. Call for customer service. If for the type of paper or specialty media you use it. Toner specks Cause Toner cartridges are using. The fuser is selected. Paper curl Cause Solution Paper Type and ... in the media path. Make sure the correct Media Type is worn or defective. Toner rubs off Solution Replace the defective or worn toner cartridges. necessary, change Paper Texture from Normal to Rough. Paper has been stored in a high humidity environment. • Load paper from a fresh...

