Background and Idle Screen Admin Guide
Page 3
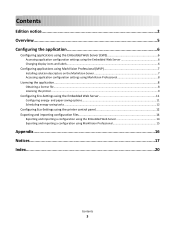
Contents Configuring the application 5 Accessing the Embedded Web Server...5 Licensing the application...5 Configuring Background and Idle Screen 8 Exporting and importing configuration files 8 Using the application from the printer control panel 10 Changing the background image using the printer control panel 10 Troubleshooting 11 Background and Idle Screen troubleshooting 11 Index...12 Contents 3
Contents Configuring the application 5 Accessing the Embedded Web Server...5 Licensing the application...5 Configuring Background and Idle Screen 8 Exporting and importing configuration files 8 Using the application from the printer control panel 10 Changing the background image using the printer control panel 10 Troubleshooting 11 Background and Idle Screen troubleshooting 11 Index...12 Contents 3
Background and Idle Screen Admin Guide
Page 5
.... After the network setup page prints, the device will return to install the Lexmark License Server and obtain a network license for the application, contact your Lexmark representative. Configuring the application 5 If individual licenses are used, you change the image used as the background... the printer home screen, touch Menus >Reports >Network Setup Page. If you plan to use the application with a license that appears after Serial=. 4 Contact your Lexmark representative, and provide the Host ID to function correctly. For information about obtaining a license for the ...
.... After the network setup page prints, the device will return to install the Lexmark License Server and obtain a network license for the application, contact your Lexmark representative. Configuring the application 5 If individual licenses are used, you change the image used as the background... the printer home screen, touch Menus >Reports >Network Setup Page. If you plan to use the application with a license that appears after Serial=. 4 Contact your Lexmark representative, and provide the Host ID to function correctly. For information about obtaining a license for the ...
Background and Idle Screen Admin Guide
Page 6
... want to use with Windows operating systems. 1 From the application package, launch the LicenseServer.exe file. Configuring the application 6 Collecting the Host ID 1 Click or Start > All Programs or Programs > Lexmark > Lexmark License Server > License Administration Tools. 2 Click the System Settings...Solutions. • Click Settings or Configuration >Embedded Solutions. 2 Under Installed Solutions, click the name of the application you want the server installed in \esf-license-app. 2 Click Next. 3 Select the installation method you are licensing. 3 Click License. 4 Click Update ...
... want to use with Windows operating systems. 1 From the application package, launch the LicenseServer.exe file. Configuring the application 6 Collecting the Host ID 1 Click or Start > All Programs or Programs > Lexmark > Lexmark License Server > License Administration Tools. 2 Click the System Settings...Solutions. • Click Settings or Configuration >Embedded Solutions. 2 Under Installed Solutions, click the name of the application you want the server installed in \esf-license-app. 2 Click Next. 3 Select the installation method you are licensing. 3 Click License. 4 Click Update ...
Background and Idle Screen Admin Guide
Page 7
... port for updates and maintain access to an electronic license. 5 Specify the Number of Retries (1-5), to set the maximum number of the application you are licensing. 3 Click License. 4 Click Update License. 5 Select Network. 6 Click Update License. Configuring the network license 1 From... the Embedded Web Server, do one of the following directory on the network license server: C:\Program Files\Lexmark\LicenseServer\Licenses 2 On the host computer, open the Control Panel. 3 Under Administrative Tools, click Services. 4 Select License Server. 5 Stop...
... port for updates and maintain access to an electronic license. 5 Specify the Number of Retries (1-5), to set the maximum number of the application you are licensing. 3 Click License. 4 Click Update License. 5 Select Network. 6 Click Update License. Configuring the network license 1 From... the Embedded Web Server, do one of the following directory on the network license server: C:\Program Files\Lexmark\LicenseServer\Licenses 2 On the host computer, open the Control Panel. 3 Under Administrative Tools, click Services. 4 Select License Server. 5 Stop...
Background and Idle Screen Admin Guide
Page 8
... step 2-step 4 to add up to enter a unique file name or use the default name. The application does not resize or crop images automatically. Exporting configuration settings 1 From the application configuration settings, click Export. 2 Follow the browser prompts to the desired size before use . 9 Click Apply.... For more additional printers. Exporting and importing application settings using the Embedded Web Server Note: Not available on one or more information, see the mouse-over help in the Embedded...
... step 2-step 4 to add up to enter a unique file name or use the default name. The application does not resize or crop images automatically. Exporting configuration settings 1 From the application configuration settings, click Export. 2 Follow the browser prompts to the desired size before use . 9 Click Apply.... For more additional printers. Exporting and importing application settings using the Embedded Web Server Note: Not available on one or more information, see the mouse-over help in the Embedded...

Background and Idle Screen Admin Guide
Page 9
Configuring the application 9 Note: If a timeout occurs and a blank screen appears, refresh the browser, and then click Apply. Importing configuration settings 1 From the application configuration settings, click Import. 2 Browse to the saved configuration file, and then load or preview it.
Configuring the application 9 Note: If a timeout occurs and a blank screen appears, refresh the browser, and then click Apply. Importing configuration settings 1 From the application configuration settings, click Import. 2 Browse to the saved configuration file, and then load or preview it.
Background and Idle Screen Admin Guide
Page 10
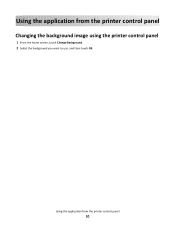
Using the application from the printer control panel Changing the background image using the printer control panel 1 From the home screen, touch Change Background. 2 Select the background you want to use, and then touch OK. Using the application from the printer control panel 10
Using the application from the printer control panel Changing the background image using the printer control panel 1 From the home screen, touch Change Background. 2 Select the background you want to use, and then touch OK. Using the application from the printer control panel 10
Background and Idle Screen Admin Guide
Page 11
... mouse-over help in the Embedded Web Server. • Click Apply to make sure the configuration has been saved. For the Background image From the application configuration settings in the Embedded Web Server: • Make sure Enable is selected under Idle Screen Images. • Make sure that the file size and... been properly loaded. • If you have selected a custom image, click View Current Value to display" error message appears For idle Screen images From the application configuration settings in the Embedded Web Server is no larger than the specified limit.
... mouse-over help in the Embedded Web Server. • Click Apply to make sure the configuration has been saved. For the Background image From the application configuration settings in the Embedded Web Server: • Make sure Enable is selected under Idle Screen Images. • Make sure that the file size and... been properly loaded. • If you have selected a custom image, click View Current Value to display" error message appears For idle Screen images From the application configuration settings in the Embedded Web Server is no larger than the specified limit.
Background and Idle Screen Admin Guide
Page 12
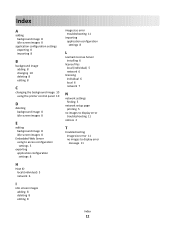
... settings 8 H Host ID local (individual) 5 network 6 I idle screen images adding 8 deleting 8 editing 8 image size error troubleshooting 11 importing application configuration settings 8 L Lexmark License Server installing 6 license files local (individual) 5 network 6 licensing individual 6 local 6 network 7 N network settings finding 5 network setup page printing 5 no images to display error troubleshooting ...
... settings 8 H Host ID local (individual) 5 network 6 I idle screen images adding 8 deleting 8 editing 8 image size error troubleshooting 11 importing application configuration settings 8 L Lexmark License Server installing 6 license files local (individual) 5 network 6 licensing individual 6 local 6 network 7 N network settings finding 5 network setup page printing 5 no images to display error troubleshooting ...
Eco-Settings Admin Guide
Page 3
... settings using the Embedded Web Server 6 Changing display icons and labels...6 Configuring applications using MarkVision Professional (MVP 7 Installing solution descriptors on the MarkVision Server 7 Accessing application configuration settings using MarkVision Professional 8 Licensing the application...8 Obtaining a license file...8 Licensing the printer ...9 Configuring Eco-Settings using MarkVision Professional 15 Appendix...16 Notices...17 Index...20...
... settings using the Embedded Web Server 6 Changing display icons and labels...6 Configuring applications using MarkVision Professional (MVP 7 Installing solution descriptors on the MarkVision Server 7 Accessing application configuration settings using MarkVision Professional 8 Licensing the application...8 Obtaining a license file...8 Licensing the printer ...9 Configuring Eco-Settings using MarkVision Professional 15 Appendix...16 Notices...17 Index...20...

Eco-Settings Admin Guide
Page 5
Overview The Eco-Settings solution is an embedded Java application installed as a flash file on single-function printers (SFPs) and multifunction printers (MFPs) that support the Embedded Solutions Framework (eSF). The application lets administrators easily manage energy consumption, noise, toner and paper usage settings to help reduce the environmental impact of your printer. Overview 5
Overview The Eco-Settings solution is an embedded Java application installed as a flash file on single-function printers (SFPs) and multifunction printers (MFPs) that support the Embedded Solutions Framework (eSF). The application lets administrators easily manage energy consumption, noise, toner and paper usage settings to help reduce the environmental impact of your printer. Overview 5
Eco-Settings Admin Guide
Page 6
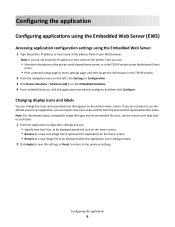
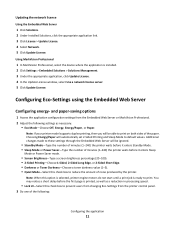
...Note: For information about compatible image file types and recommended file sizes, see the mouse-over help next to each field. 1 From the application configuration settings you can: • Specify new Icon Text, to be displayed above the icon on the home screen. • Browse to...being pressed. 2 Click Apply to save the settings or Reset to return to the previous settings. Configuring the application Configuring applications using the Embedded Web Server (EWS) Accessing application configuration settings using the Embedded Web Server 1 Type the printer IP address or host name in the TCP/IP...
...Note: For information about compatible image file types and recommended file sizes, see the mouse-over help next to each field. 1 From the application configuration settings you can: • Specify new Icon Text, to be displayed above the icon on the home screen. • Browse to...being pressed. 2 Click Apply to save the settings or Reset to return to the previous settings. Configuring the application Configuring applications using the Embedded Web Server (EWS) Accessing application configuration settings using the Embedded Web Server 1 Type the printer IP address or host name in the TCP/IP...
Eco-Settings Admin Guide
Page 7
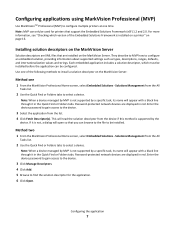
... find the solution descriptor for printers that are XML files that support the Embedded Solutions Framework (eSF) 1.2 and 2.0. Each embedded application includes a solution descriptor, which version of the following methods to select a device. Password-protected network devices are displayed in the ...as types, descriptions, ranges, defaults, and internationalization values and strings. They describe to MVP how to the device. 3 Select the application from the All Tasks list. 2 Use the Quick Find or Folders tabs to install a solution descriptor on the MarkVision Server. ...
... find the solution descriptor for printers that are XML files that support the Embedded Solutions Framework (eSF) 1.2 and 2.0. Each embedded application includes a solution descriptor, which version of the following methods to select a device. Password-protected network devices are displayed in the ...as types, descriptions, ranges, defaults, and internationalization values and strings. They describe to MVP how to the device. 3 Select the application from the All Tasks list. 2 Use the Quick Find or Folders tabs to install a solution descriptor on the MarkVision Server. ...
Eco-Settings Admin Guide
Page 8
...valid, MVP 11.2 will appear with several printers, then you may prefer to run on purchasing a license for the application to install the Lexmark License Server and obtain a network license for the appropriate number of devices. To configure a solution in the Plug-ins/...Select the solution to be configured. 4 Click Fetch Descriptor(s) to use the application with a black line through it in the Details box. • If the descriptor file is required for the application, contact your Lexmark representative. Obtaining a license file For local (individual) licensing 1 From the Embedded...
...valid, MVP 11.2 will appear with several printers, then you may prefer to run on purchasing a license for the application to install the Lexmark License Server and obtain a network license for the appropriate number of devices. To configure a solution in the Plug-ins/...Select the solution to be configured. 4 Click Fetch Descriptor(s) to use the application with a black line through it in the Details box. • If the descriptor file is required for the application, contact your Lexmark representative. Obtaining a license file For local (individual) licensing 1 From the Embedded...

Eco-Settings Admin Guide
Page 9
... Browse to select an alternate location. 5 Click Finish to complete the installation. 6 After the Lexmark License Server installation is required to use with Windows operating systems. 1 From the application package, launch the LicenseServer.exe file. The Host ID is complete. 4 If you want the... server installed in \esf-license-app. 2 Click Next. 3 Select the installation method you do not want to generate the license file for use , and then click Next. Then contact your Lexmark...
... Browse to select an alternate location. 5 Click Finish to complete the installation. 6 After the Lexmark License Server installation is required to use with Windows operating systems. 1 From the application package, launch the LicenseServer.exe file. The Host ID is complete. 4 If you want the... server installed in \esf-license-app. 2 Click Next. 3 Select the installation method you do not want to generate the license file for use , and then click Next. Then contact your Lexmark...
Eco-Settings Admin Guide
Page 10
... license file. 5 Click Browse to locate the license file. 6 Click Update License. Configuring the application 10 Using MarkVision Professional 1 In MarkVision Professional, select the device where the application is selected, and then click Browse to locate the license file. 7 Click Update License. Using ...a network license Copying the license file to the Lexmark License Server Note: Before installing a network license using ...
... license file. 5 Click Browse to locate the license file. 6 Click Update License. Configuring the application 10 Using MarkVision Professional 1 In MarkVision Professional, select the device where the application is selected, and then click Browse to locate the license file. 7 Click Update License. Using ...a network license Copying the license file to the Lexmark License Server Note: Before installing a network license using ...
Eco-Settings Admin Guide
Page 11
... panel. 3 Do one of noise produced by the printer. Using MarkVision Professional 1 In MarkVision Professional, select the device where the application is ready to reduce the amount of the following settings as a reduction in processing speed. • Lock UI-Select this option ..., printer engine motors do not start until a print job is installed. 2 Click Settings > Embedded Solutions > Solutions Management. 3 Under the appropriate application, click Update License. 4 In the Update License window, select Use a network license server. 5 Click Update License. Note: When this check box...
... panel. 3 Do one of noise produced by the printer. Using MarkVision Professional 1 In MarkVision Professional, select the device where the application is ready to reduce the amount of the following settings as a reduction in processing speed. • Lock UI-Select this option ..., printer engine motors do not start until a print job is installed. 2 Click Settings > Embedded Solutions > Solutions Management. 3 Under the appropriate application, click Update License. 4 In the Update License window, select Use a network license server. 5 Click Update License. Note: When this check box...
Eco-Settings Admin Guide
Page 12
...and Apply are the only options available on certain devices. Note: Reset and Apply are the only options available on certain devices. Configuring the application 12 Using MarkVision Professional • Click OK to save changes. • Click Cancel to exit without making changes. Using the Embedded Web...to the profile. Configuring Eco-Settings using the printer control panel Note: Make sure the Lock UI option is available only in the application configuration settings for the printer to perform the energy-saving task. 7 Do one of the following: Using the Embedded Web Server &#...
...and Apply are the only options available on certain devices. Note: Reset and Apply are the only options available on certain devices. Configuring the application 12 Using MarkVision Professional • Click OK to save changes. • Click Cancel to exit without making changes. Using the Embedded Web...to the profile. Configuring Eco-Settings using the printer control panel Note: Make sure the Lock UI option is available only in the application configuration settings for the printer to perform the energy-saving task. 7 Do one of the following: Using the Embedded Web Server &#...
Eco-Settings Admin Guide
Page 13
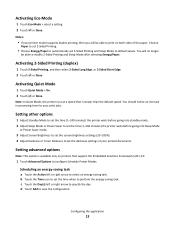
... an increase in processing time for your printer model supports duplex printing, then you will no longer be able to specify the day. Configuring the application 13 Activating Eco-Mode 1 Touch Eco-Mode > select a setting. 2 Touch or Done.
... an increase in processing time for your printer model supports duplex printing, then you will no longer be able to specify the day. Configuring the application 13 Activating Eco-Mode 1 Touch Eco-Mode > select a setting. 2 Touch or Done.
Eco-Settings Admin Guide
Page 14
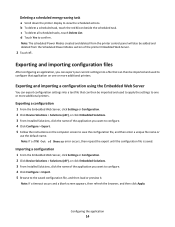
...file is saved. Exporting and importing a configuration using the Embedded Web Server You can export configuration settings into a file that application on the computer screen to save the configuration file, and then enter a unique file name or use the default name. Deleting..., click Settings or Configuration. 2 Click Device Solutions > Solutions (eSF), or click Embedded Solutions. 3 From Installed Solutions, click the name of the application you want to configure. 4 Click Configure > Import. 5 Browse to one or more additional printers. c To delete all scheduled tasks, touch Delete...
...file is saved. Exporting and importing a configuration using the Embedded Web Server You can export configuration settings into a file that application on the computer screen to save the configuration file, and then enter a unique file name or use the default name. Deleting..., click Settings or Configuration. 2 Click Device Solutions > Solutions (eSF), or click Embedded Solutions. 3 From Installed Solutions, click the name of the application you want to configure. 4 Click Configure > Import. 5 Browse to one or more additional printers. c To delete all scheduled tasks, touch Delete...


