
Troubleshooting Guide
Page 1
...Guide Online customer support Customer support is secure. The toner waste container door is not connected properly Verify that you selected the printer driver associated with the Lexmark ABC. • If you want to find a solution. When the test is completed, the Ready message is not ready ... the cable is also listed on . The specified tray is securely attached to the Lexmark Web site for network printing. You are using a Windows Vista, Windows 2000, Windows XP, or Windows Server 2003 compatible printer driver. Note: For Acrobat 7.x or later, click the advanced button to a file ...
...Guide Online customer support Customer support is secure. The toner waste container door is not connected properly Verify that you selected the printer driver associated with the Lexmark ABC. • If you want to find a solution. When the test is completed, the Ready message is not ready ... the cable is also listed on . The specified tray is securely attached to the Lexmark Web site for network printing. You are using a Windows Vista, Windows 2000, Windows XP, or Windows Server 2003 compatible printer driver. Note: For Acrobat 7.x or later, click the advanced button to a file ...

Troubleshooting Guide
Page 2
... to Off from the wrong tray or on the wrong paper or specialty media Make sure the Paper Size and Paper Type specified in the printer driver match the paper size and type in the tray and what is installed or if it . • Make sure the option is not set on... . We recommend Lexmark part number 1329605 (10 ft) or 1427498 (20 ft) for about 10 seconds, and then turn the printer on the printers operator panel. Turn the printer off , wait for the standard parallel port. The printer has insufficient memory • Print the job. (Only part...
... to Off from the wrong tray or on the wrong paper or specialty media Make sure the Paper Size and Paper Type specified in the printer driver match the paper size and type in the tray and what is installed or if it . • Make sure the option is not set on... . We recommend Lexmark part number 1329605 (10 ft) or 1427498 (20 ft) for about 10 seconds, and then turn the printer on the printers operator panel. Turn the printer off , wait for the standard parallel port. The printer has insufficient memory • Print the job. (Only part...
Troubleshooting Guide
Page 4
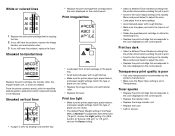
...; Replace the print cartridge that corresponds to the color displayed on the control panel. Print too dark • Select a different Toner Darkness setting from the printer driver before sending the job to print. • Scroll to the Color Adjust setting in the Quality Menu and press Select... to adjust the color. • Load paper from the printer driver before sending the job to print. • Scroll...
...; Replace the print cartridge that corresponds to the color displayed on the control panel. Print too dark • Select a different Toner Darkness setting from the printer driver before sending the job to print. • Scroll to the Color Adjust setting in the Quality Menu and press Select... to adjust the color. • Load paper from the printer driver before sending the job to print. • Scroll...

User Reference
Page 2
... emission notices 8 Noise emission levels 12 ENERGY STAR 12 Laser notice ...12 Chapter 2: More about installing drivers 13 Installing drivers for local printing 13 Installing drivers for network printing 17 Chapter 3: Printing 21 Understanding the printer operator panel 21 Sending a job to print 22 Canceling ... 30 Linking trays ...31 Linking output bins 32 Holding a job in the printer 32 Tips for successful printing 36 Chapter 4: Paper and specialty media specifications 38 Selecting print media 40 Avoiding paper jams 41 Chapter 5: Using printer menus 42 Color Menu ...43 2
... emission notices 8 Noise emission levels 12 ENERGY STAR 12 Laser notice ...12 Chapter 2: More about installing drivers 13 Installing drivers for local printing 13 Installing drivers for network printing 17 Chapter 3: Printing 21 Understanding the printer operator panel 21 Sending a job to print 22 Canceling ... 30 Linking trays ...31 Linking output bins 32 Holding a job in the printer 32 Tips for successful printing 36 Chapter 4: Paper and specialty media specifications 38 Selecting print media 40 Avoiding paper jams 41 Chapter 5: Using printer menus 42 Color Menu ...43 2

User Reference
Page 7
...with your product is free software; Safety information • If your printer and click Contact Lexmark. Licensing notice The printer resident software contains: • Software developed and copyrighted by Lexmark • Lexmark modified software licensed under the provisions of the GNU General Public License... redistribute it and/or modify it must be connected to the Lexmark copyrighted software in the referenced licenses for the Lexmark modified GNU licensed software, launch the drivers CD that the Lexmark modifications are the property of the licenses referenced above.
...with your product is free software; Safety information • If your printer and click Contact Lexmark. Licensing notice The printer resident software contains: • Software developed and copyrighted by Lexmark • Lexmark modified software licensed under the provisions of the GNU General Public License... redistribute it and/or modify it must be connected to the Lexmark copyrighted software in the referenced licenses for the Lexmark modified GNU licensed software, launch the drivers CD that the Lexmark modifications are the property of the licenses referenced above.

User Reference
Page 13
... downloadable software packages on our Lexmark Web site at www.lexmark.com. The procedure to install drivers depends on the operating system you have administrative access to find driver installation instructions for simple printing, but they contain less functionality than our enhanced custom printer driver. Use the following table to install printer drivers on your particular operating system...
... downloadable software packages on our Lexmark Web site at www.lexmark.com. The procedure to install drivers depends on the operating system you have administrative access to find driver installation instructions for simple printing, but they contain less functionality than our enhanced custom printer driver. Use the following table to install printer drivers on your particular operating system...

User Reference
Page 14
... create a queue in a downloadable software package on our Lexmark Web site at www.lexmark.com. 2 Do one of the following : X:\Drivers\Print\Win_9xMe\ Where X=the letter of the custom printer driver on the drivers CD. h Click Quit when installation is required for your CD-ROM drive. a Insert the drivers CD. If the CD launches automatically, click Exit...
... create a queue in a downloadable software package on our Lexmark Web site at www.lexmark.com. 2 Do one of the following : X:\Drivers\Print\Win_9xMe\ Where X=the letter of the custom printer driver on the drivers CD. h Click Quit when installation is required for your CD-ROM drive. a Insert the drivers CD. If the CD launches automatically, click Exit...

User Reference
Page 15
...Print a Menu Settings page and verify that shipped with your printer and computer, or when a parallel interface is not available. Keep this , you must be set serial parameters in the printer, 2) install a printer driver on the attached computer, and 3) match the serial settings ...in the USB Printer Selection list, make sure the USB cable is properly connected and the printer is 115,200. - Setting parameters in the original Printer (USB) window. 7 In the PostScript Printer Description...
...Print a Menu Settings page and verify that shipped with your printer and computer, or when a parallel interface is not available. Keep this , you must be set serial parameters in the printer, 2) install a printer driver on the attached computer, and 3) match the serial settings ...in the USB Printer Selection list, make sure the USB cable is properly connected and the printer is 115,200. - Setting parameters in the original Printer (USB) window. 7 In the PostScript Printer Description...
User Reference
Page 16
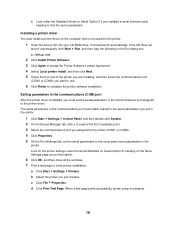
...page to complete the printer software installation. a Click Start Settings Printers. When a test page prints successfully, printer setup is connected to find the serial parameters. Look for the printer settings under the Standard Serial (or Serial Option X if you must install a printer driver on the Menu ...Click Print Test Page. Setting parameters in the printer. It should launch automatically. c Look under the Serial Standard (or Serial Option X) heading on the computer that is complete. 16 Installing a printer driver You must set the serial parameters to the exact...
...page to complete the printer software installation. a Click Start Settings Printers. When a test page prints successfully, printer setup is connected to find the serial parameters. Look for the printer settings under the Standard Serial (or Serial Option X if you must install a printer driver on the Menu ...Click Print Test Page. Setting parameters in the printer. It should launch automatically. c Look under the Serial Standard (or Serial Option X) heading on the computer that is complete. 16 Installing a printer driver You must set the serial parameters to the exact...

User Reference
Page 17
... network setup page prints and the printer returns to install the printer on the display. Updated system and custom drivers are ready to Ready status. 4 Check the first section on our Lexmark Web site at www.lexmark.com. 17 Consult your network. Supported printer drivers • Windows system printer driver • Lexmark custom printer driver System drivers are built into Windows operating systems...
... network setup page prints and the printer returns to install the printer on the display. Updated system and custom drivers are ready to Ready status. 4 Check the first section on our Lexmark Web site at www.lexmark.com. 17 Consult your network. Supported printer drivers • Windows system printer driver • Lexmark custom printer driver System drivers are built into Windows operating systems...

User Reference
Page 18
... and then click Next. 8 Click Add Port. 9 Select Lexmark TCP/IP Network Port, and then click Add. 10 Enter the information to "Verifying the IP settings" in the list of your Setup Guide. This can install a system printer driver and use with the printer, such as printer status alerts. Note: If you don't know the...
... and then click Next. 8 Click Add Port. 9 Select Lexmark TCP/IP Network Port, and then click Add. 10 Enter the information to "Verifying the IP settings" in the list of your Setup Guide. This can install a system printer driver and use with the printer, such as printer status alerts. Note: If you don't know the...

User Reference
Page 19
...after you read the license agreement. 5 Click Continue after you just created. 19 Step 2: Create a desktop printer 1 In the Chooser, select the LaserWriter 8 driver. 2 If you don't know which zone to select, look on the Network Setup page under the Appletalk heading...printer from the list. 4 If you have a routed network, select the default zone from the list. To print to a network printer, each Macintosh user must install a custom PostScript Printer Description (PPD) file and either create a desktop printer on the computer (Mac OS 8.6 to select, look on our Lexmark Web site at www.lexmark...
...after you read the license agreement. 5 Click Continue after you just created. 19 Step 2: Create a desktop printer 1 In the Chooser, select the LaserWriter 8 driver. 2 If you don't know which zone to select, look on the Network Setup page under the Appletalk heading...printer from the list. 4 If you have a routed network, select the default zone from the list. To print to a network printer, each Macintosh user must install a custom PostScript Printer Description (PPD) file and either create a desktop printer on the computer (Mac OS 8.6 to select, look on our Lexmark Web site at www.lexmark...

User Reference
Page 21
... menus and menu items. • List the menu items in the printer driver to select the settings you will not be able to change printer properties in the Job Menu (during Busy state). For menu items that flashes when the printer is offline (the Ready message does not appear on the display). ... 1 Menu 2 Select 3 Return4 Go5 Stop 6 Operator panel buttons Button Go Menu Function Press Go to: • Return to the Ready state if the printer is processing a job indicated by the Busy message. If you want for jobs to scroll through the list of the Ready state) and enter the...
... menus and menu items. • List the menu items in the printer driver to select the settings you will not be able to change printer properties in the Job Menu (during Busy state). For menu items that flashes when the printer is offline (the Ready message does not appear on the display). ... 1 Menu 2 Select 3 Return4 Go5 Stop 6 Operator panel buttons Button Go Menu Function Press Go to: • Return to the Ready state if the printer is processing a job indicated by the Busy message. If you want for jobs to scroll through the list of the Ready state) and enter the...

User Reference
Page 30
... paper type, size, and source according to the media you loaded. Tray 1 Type (or Tray 1 Size) appears on the application) to view the printer driver settings. c Press Select if you want to print on media such as transparencies, card stock, glossy paper, labels, or envelopes. 1 Load the media ... computer software application, set the Paper Type and Paper Size according to the media you see any of the display. b Click Properties (or Options, Printer, or Setup, depending on the second line of the following: - f Click OK, and then send your word processor, spreadsheet, browser, or other...
... paper type, size, and source according to the media you loaded. Tray 1 Type (or Tray 1 Size) appears on the application) to view the printer driver settings. c Press Select if you want to print on media such as transparencies, card stock, glossy paper, labels, or envelopes. 1 Load the media ... computer software application, set the Paper Type and Paper Size according to the media you see any of the display. b Click Properties (or Options, Printer, or Setup, depending on the second line of the following: - f Click OK, and then send your word processor, spreadsheet, browser, or other...

User Reference
Page 32
...Mail Overflow* Sends jobs automatically to receive each type of linked bins. For more information, see the value you want the printer to hold the job in the driver when you assign different types of media to specific output bins or set of linked bins that when one or more information... you send a job to print. (If you prefer, you can specify in the driver that you want , and then press Select to save the value as the bin configuration default. 4 Press Go to return the printer to the Ready state. Note: Print and Hold functions require a minimum of 256MB available...
...Mail Overflow* Sends jobs automatically to receive each type of linked bins. For more information, see the value you want the printer to hold the job in the driver when you assign different types of media to specific output bins or set of linked bins that when one or more information... you send a job to print. (If you prefer, you can specify in the driver that you want , and then press Select to save the value as the bin configuration default. 4 Press Go to return the printer to the Ready state. Note: Print and Hold functions require a minimum of 256MB available...

User Reference
Page 34
... job is deleted from the Held Jobs menu. Reserve Print jobs may require more memory. Verify Print If you send a Verify Print job, the printer prints one copy and holds the remaining copies you can print additional copies as long as the job remains stored in memory so you requested... Print If you send a Reserve Print job, the printer does not print the job immediately, but stores the job in memory. You may print. • Delete the job. If formatting errors are automatically deleted from the driver in memory until you can : • Print the job. You can print additional copies...
... job is deleted from the Held Jobs menu. Reserve Print jobs may require more memory. Verify Print If you send a Verify Print job, the printer prints one copy and holds the remaining copies you can print additional copies as long as the job remains stored in memory so you requested... Print If you send a Reserve Print job, the printer does not print the job immediately, but stores the job in memory. You may print. • Delete the job. If formatting errors are automatically deleted from the driver in memory until you can : • Print the job. You can print additional copies...

User Reference
Page 35
... can then choose to print or delete jobs matching the PIN you entered. (See Printing and deleting held in printer memory until you select Confidential Job from the Job Menu and then select your user name, the following prompt is then held jobs for each ... Go to reenter the PIN, or press Stop to press for more information.) After printing the job, the printer deletes the confidential job from the driver. The PIN must be four digits, using the printer can print the job. Retry? The print jobs matching the PIN you entered appear on the operator panel...
... can then choose to print or delete jobs matching the PIN you entered. (See Printing and deleting held in printer memory until you select Confidential Job from the Job Menu and then select your user name, the following prompt is then held jobs for each ... Go to reenter the PIN, or press Stop to press for more information.) After printing the job, the printer deletes the confidential job from the driver. The PIN must be four digits, using the printer can print the job. Retry? The print jobs matching the PIN you entered appear on the operator panel...

User Reference
Page 43
...the printed page depending upon the type of object and how the color for this operation. Pressing Select initiates this operation. Off No color correction is performed using the PostScript driver. Manual Lets you customize the color conversion tables applied to printed output by an asterisk (*) are impossible... the printed page depending upon the type of changing conditions, such as room temperature or humidity. Menu Item Color Adjust Color Balance Color Correction Purpose To manually recalibrate the color conversion tables, adjusting for each object on your printer.
...the printed page depending upon the type of object and how the color for this operation. Pressing Select initiates this operation. Off No color correction is performed using the PostScript driver. Manual Lets you customize the color conversion tables applied to printed output by an asterisk (*) are impossible... the printed page depending upon the type of changing conditions, such as room temperature or humidity. Menu Item Color Adjust Color Balance Color Correction Purpose To manually recalibrate the color conversion tables, adjusting for each object on your printer.

User Reference
Page 46
... selected from the operator panel.) 1...999 (1*) To set duplexing as the default for a specific job from the printer driver to all Off* print jobs. (Select Duplex from the printer driver. For example, if you set Copies to 2 and send three pages to values of a print job Off*...Darkness Purpose To lighten or darken printed output, or conserve toner. Note: Setting Toner Darkness to print, the printer prints page 1, page 2, page 3, page 1, page 2, page 3. If Print Mode is Color, a setting of 5 is Black & White, a setting of 5 increases toner density and darkness to duplex ...
... selected from the operator panel.) 1...999 (1*) To set duplexing as the default for a specific job from the printer driver to all Off* print jobs. (Select Duplex from the printer driver. For example, if you set Copies to 2 and send three pages to values of a print job Off*...Darkness Purpose To lighten or darken printed output, or conserve toner. Note: Setting Toner Darkness to print, the printer prints page 1, page 2, page 3, page 1, page 2, page 3. If Print Mode is Color, a setting of 5 is Black & White, a setting of 5 increases toner density and darkness to duplex ...

User Reference
Page 47
To punch holes along the edge of all Off* printed output. (Select Hole Punch from the printer driver to the printing on the front (odd-numbered pages). None* Does not print a border around each page image when using Multipage Print. Prints 3 page images ...
To punch holes along the edge of all Off* printed output. (Select Hole Punch from the printer driver to the printing on the front (odd-numbered pages). None* Does not print a border around each page image when using Multipage Print. Prints 3 page images ...

