
User's Guide
Page 2
... Eire, send to the public switched telephone network. Any functionally equivalent product, program, or service that the manufacturer intends to Lexmark International, Inc., Department F95/032-2, 740 West New Circle Road, Lexington, Kentucky 40550, U.S.A. Changes are periodically made at ... reserved. therefore, this publication may be made to you . References in later editions. UNITED STATES GOVERNMENT RIGHTS This software and any accompanying documentation provided under this publication to products, programs, or services do not allow disclaimer of publications related...
... Eire, send to the public switched telephone network. Any functionally equivalent product, program, or service that the manufacturer intends to Lexmark International, Inc., Department F95/032-2, 740 West New Circle Road, Lexington, Kentucky 40550, U.S.A. Changes are periodically made at ... reserved. therefore, this publication may be made to you . References in later editions. UNITED STATES GOVERNMENT RIGHTS This software and any accompanying documentation provided under this publication to products, programs, or services do not allow disclaimer of publications related...
User's Guide
Page 3
... the control panel menus...22 Using the Copy menu...23 Using the Scan menu...24 Using the Fax menu...24 Learning about the software 26 Using the printer software...26 Using the Productivity Suite...26 Using the All-In-One Center...27 Opening the All-In-One Center...27 Using the Scanning...
... the control panel menus...22 Using the Copy menu...23 Using the Scan menu...24 Using the Fax menu...24 Learning about the software 26 Using the printer software...26 Using the Productivity Suite...26 Using the All-In-One Center...27 Opening the All-In-One Center...27 Using the Scanning...
User's Guide
Page 6
... 72 Preserving the print cartridges...73 Cleaning the scanner glass...73 Ordering supplies...74 Recycling Lexmark products...74 Troubleshooting...75 Setup troubleshooting...75 Incorrect language appears on the display 75 Power button is not lit...76 Software does not install...76 Page does not print...77 Cannot print from digital camera using...
... 72 Preserving the print cartridges...73 Cleaning the scanner glass...73 Ordering supplies...74 Recycling Lexmark products...74 Troubleshooting...75 Setup troubleshooting...75 Incorrect language appears on the display 75 Power button is not lit...76 Software does not install...76 Page does not print...77 Cannot print from digital camera using...
User's Guide
Page 7
... or specialty media misfeeds...93 Printer does not feed paper, envelopes, or specialty media 93 Banner paper jams...94 Error messages...94 Black Ink Low/Color Ink Low/Photo Ink Low 94 Clear Paper Jam...94 Clear ADF Jam...94 Left Cartridge Error/Right Cartridge Error 94 Cartridge Error...95 Clear... Unsupported...97 Failed to Connect...97 Phone Line Error...98 Remote Fax Error...98 Phone Line Busy...99 Memory Full...100 Removing and reinstalling the software 100 Notices...102 Power consumption...106 Index...108 7
... or specialty media misfeeds...93 Printer does not feed paper, envelopes, or specialty media 93 Banner paper jams...94 Error messages...94 Black Ink Low/Color Ink Low/Photo Ink Low 94 Clear Paper Jam...94 Clear ADF Jam...94 Left Cartridge Error/Right Cartridge Error 94 Cartridge Error...95 Clear... Unsupported...97 Failed to Connect...97 Phone Line Error...98 Remote Fax Error...98 Phone Line Busy...99 Memory Full...100 Removing and reinstalling the software 100 Notices...102 Power consumption...106 Index...108 7
User's Guide
Page 9
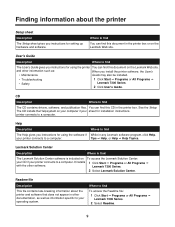
... Center: your CD if your operating system. Lexmark 7300 Series. 2 Select Lexmark Solution Center. and other software. User's Guide Description Where to a computer. Lexmark Solution Center Description Where to find The Lexmark Solution Center software is included on your computer if your sheet for using the software if While in any Lexmark software program, click Help, your printer connects...
... Center: your CD if your operating system. Lexmark 7300 Series. 2 Select Lexmark Solution Center. and other software. User's Guide Description Where to a computer. Lexmark Solution Center Description Where to find The Lexmark Solution Center software is included on your computer if your sheet for using the software if While in any Lexmark software program, click Help, your printer connects...
User's Guide
Page 11
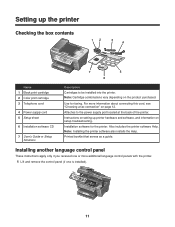
... be installed into the printer. Instructions on setting up the printer Checking the box contents 12 3 4 x 7 5 6 Name 1 Black print cartridge 2 Color print cartridge 3 Telephone cord 4 Power supply cord 5 Setup sheet 6 Installation software CD 7 User's Guide or Setup Solutions Description Cartridges to the power supply port located at the back of the printer...
... be installed into the printer. Instructions on setting up the printer Checking the box contents 12 3 4 x 7 5 6 Name 1 Black print cartridge 2 Color print cartridge 3 Telephone cord 4 Power supply cord 5 Setup sheet 6 Installation software CD 7 User's Guide or Setup Solutions Description Cartridges to the power supply port located at the back of the printer...
User's Guide
Page 16
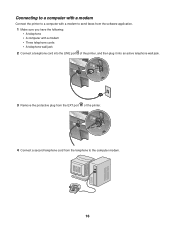
Connecting to a computer with a modem Connect the printer to a computer with a modem • Three telephone cords • A telephone wall jack 2 Connect a telephone cord into an active telephone wall jack. LINE EXT LINE EXT 4 Connect a second telephone cord from the telephone to send faxes from the EXT port of the printer, and then plug it into the LINE port of the printer. LINE EXT LINE EXT 3 Remove the protective plug from the software application. 1 Make sure you have the following: • A telephone • A computer with a modem to the computer modem. 16
Connecting to a computer with a modem Connect the printer to a computer with a modem • Three telephone cords • A telephone wall jack 2 Connect a telephone cord into an active telephone wall jack. LINE EXT LINE EXT 4 Connect a second telephone cord from the telephone to send faxes from the EXT port of the printer, and then plug it into the LINE port of the printer. LINE EXT LINE EXT 3 Remove the protective plug from the software application. 1 Make sure you have the following: • A telephone • A computer with a modem to the computer modem. 16
User's Guide
Page 26
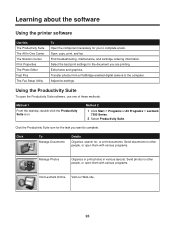
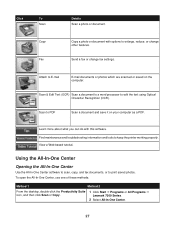
...copy, print, and fax. Edit photos and graphics. Transfer photos from a PictBridge-enabled digital camera to other people, or open the Productivity Suite software, use one of these methods: Method 1 From the desktop, double-click the Productivity Suite icon. Using the Productivity Suite To open them with... various programs. Visit Lexmark Online Visit our Web site. 26 Click To Manage Documents Details Organize, search for the task you want to other people, or ...
...copy, print, and fax. Edit photos and graphics. Transfer photos from a PictBridge-enabled digital camera to other people, or open the Productivity Suite software, use one of these methods: Method 1 From the desktop, double-click the Productivity Suite icon. Using the Productivity Suite To open them with... various programs. Visit Lexmark Online Visit our Web site. 26 Click To Manage Documents Details Organize, search for the task you want to other people, or ...
User's Guide
Page 27
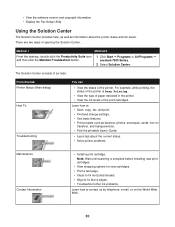
...to enlarge, reduce, or change fax settings. Using the All-In-One Center Opening the All-In-One Center Use the All-In-One Center software to scan, copy, and fax documents, or to edit the text using Optical Character Recognition (OCR). Learn more about what you can do ...1 Method 2 From the desktop, double-click the Productivity Suite icon, and then click Scan or Copy. 1 Click Start ΠPrograms or All Programs ΠLexmark 7300 Series. 2 Select All-In-One Center. 27 Find maintenance and troubleshooting information and tools to E-mail E-mail documents or photos which are scanned or...
...to enlarge, reduce, or change fax settings. Using the All-In-One Center Opening the All-In-One Center Use the All-In-One Center software to scan, copy, and fax documents, or to edit the text using Optical Character Recognition (OCR). Learn more about what you can do ...1 Method 2 From the desktop, double-click the Productivity Suite icon, and then click Scan or Copy. 1 Click Start ΠPrograms or All Programs ΠLexmark 7300 Series. 2 Select All-In-One Center. 27 Find maintenance and troubleshooting information and tools to E-mail E-mail documents or photos which are scanned or...
User's Guide
Page 30
...the desktop, double-click the Productivity Suite icon, and then click the Maintain/Troubleshoot button. 1 Click Start Œ Programs or All Programs Œ Lexmark 7300 Series. 2 Select Solution Center. Note: Wait until scanning is Busy Printing. • View the type of paper detected in the printer. •...; View the ink levels of the printer. • View the software version and copyright information • Display the Fax Setup Utility Using the Solution Center The Solution Center provides help, as well as banners, ...
...the desktop, double-click the Productivity Suite icon, and then click the Maintain/Troubleshoot button. 1 Click Start Œ Programs or All Programs Œ Lexmark 7300 Series. 2 Select Solution Center. Note: Wait until scanning is Busy Printing. • View the type of paper detected in the printer. •...; View the ink levels of the printer. • View the software version and copyright information • Display the Fax Setup Utility Using the Solution Center The Solution Center provides help, as well as banners, ...
User's Guide
Page 31
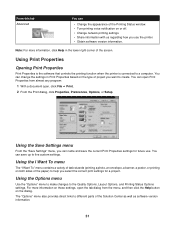
... printing settings. • Share information with us regarding how you select the correct print settings for future use the printer. • Obtain software version information. From this tab Advanced You can • Change the appearance of the screen. Using the I Want To menu The "I ...Options menu Use the "Options" menu to make changes to a computer. Using Print Properties Opening Print Properties Print Properties is the software that controls the printing function when the printer is connected to the Quality Options, Layout Options, and Printing Status Options settings. The ...
... printing settings. • Share information with us regarding how you select the correct print settings for future use the printer. • Obtain software version information. From this tab Advanced You can • Change the appearance of the screen. Using the I Want To menu The "I ...Options menu Use the "Options" menu to make changes to a computer. Using Print Properties Opening Print Properties Print Properties is the software that controls the printing function when the printer is connected to the Quality Options, Layout Options, and Printing Status Options settings. The ...

User's Guide
Page 32
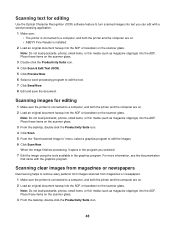
... reflection. • Fix the photo with the available tools. Using the Photo Editor Use the Photo Editor software to edit graphics or photos. 1 Click Start Œ Programs or All Programs Œ Lexmark 7300 Series. 2 Select Photo Editor. 3 Click File Œ Open to select the image you want to...Customize how the printer prints several copies of a single print job: collated or normal. • Choose Automatic Image Sharpening. • Choose to print color images in black and white. • Choose to have the last page printed first. • Specify the size of paper loaded. • Select ...
... reflection. • Fix the photo with the available tools. Using the Photo Editor Use the Photo Editor software to edit graphics or photos. 1 Click Start Œ Programs or All Programs Œ Lexmark 7300 Series. 2 Select Photo Editor. 3 Click File Œ Open to select the image you want to...Customize how the printer prints several copies of a single print job: collated or normal. • Choose Automatic Image Sharpening. • Choose to print color images in black and white. • Choose to have the last page printed first. • Specify the size of paper loaded. • Select ...

User's Guide
Page 42
...15 minutes to dry. Notes: • Most envelopes use landscape orientation. • Make sure the same orientation is also selected in the software application. 7 Click OK. 8 Click OK. 9 Click OK or Print. Printing multiple pages on an envelope. 5 From the Envelope Size... list, select the envelope size loaded. 6 Select Portrait or Landscape orientation. Printing envelopes 1 Load envelopes. 2 From the software application, click File Œ Print. 3 Click Properties, Preferences, Options, or Setup. 4 From the "I Want To" menu, select Print on one sheet...
...15 minutes to dry. Notes: • Most envelopes use landscape orientation. • Make sure the same orientation is also selected in the software application. 7 Click OK. 8 Click OK. 9 Click OK or Print. Printing multiple pages on an envelope. 5 From the Envelope Size... list, select the envelope size loaded. 6 Select Portrait or Landscape orientation. Printing envelopes 1 Load envelopes. 2 From the software application, click File Œ Print. 3 Click Properties, Preferences, Options, or Setup. 4 From the "I Want To" menu, select Print on one sheet...

User's Guide
Page 43
Printing cards 1 Load greeting cards, index cards, or postcards. 2 From the software application, click File ΠPrint. 3 Click Properties, Preferences, Options, or Setup. 4 Select a Quality/Speed setting. 4 From the Print Layout tab, select N-up. 5 Select the number ...
Printing cards 1 Load greeting cards, index cards, or postcards. 2 From the software application, click File ΠPrint. 3 Click Properties, Preferences, Options, or Setup. 4 Select a Quality/Speed setting. 4 From the Print Layout tab, select N-up. 5 Select the number ...
User's Guide
Page 48
... load postcards, photos, small items, or thin media (such as magazine clippings) into the ADF. Scanning images for editing Use the Optical Character Recognition (OCR) software feature to turn scanned images into text you selected. 7 Edit the image using the tools available in the program you can edit with the graphics...
... load postcards, photos, small items, or thin media (such as magazine clippings) into the ADF. Scanning images for editing Use the Optical Character Recognition (OCR) software feature to turn scanned images into text you selected. 7 Edit the image using the tools available in the program you can edit with the graphics...
User's Guide
Page 51
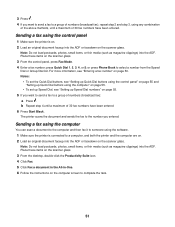
... the Quick Dial buttons, see "Setting up Quick Dial buttons using the control panel" on page 55 and "Setting up Quick Dial buttons using the software. 1 Make sure the printer is on. 2 Load an original document faceup into the ADF. 3 Press . 4 If you want to send a fax to a group of numbers...
... the Quick Dial buttons, see "Setting up Quick Dial buttons using the control panel" on page 55 and "Setting up Quick Dial buttons using the software. 1 Make sure the printer is on. 2 Load an original document faceup into the ADF. 3 Press . 4 If you want to send a fax to a group of numbers...
User's Guide
Page 66
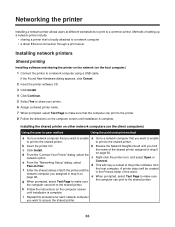
... installation is locally attached to a network computer • a direct Ethernet connection through a print server Installing network printers Shared printing Installing software and sharing the printer on the network (on the host computer) 1 Connect the printer to the printer. 8 Follow the directions on... the "Connect Your Printer" dialog, select the on the host computer. If the Found New Hardware dialog appears, click Cancel. 2 Insert the printer software CD. 3 Click Install. 4 Click Continue. 5 Select Yes to share your printer. 6 Assign a shared printer name. 7 When prompted, select ...
... installation is locally attached to a network computer • a direct Ethernet connection through a print server Installing network printers Shared printing Installing software and sharing the printer on the network (on the host computer) 1 Connect the printer to the printer. 8 Follow the directions on... the "Connect Your Printer" dialog, select the on the host computer. If the Found New Hardware dialog appears, click Cancel. 2 Insert the printer software CD. 3 Click Install. 4 Click Continue. 5 Select Yes to share your printer. 6 Assign a shared printer name. 7 When prompted, select ...
User's Guide
Page 67
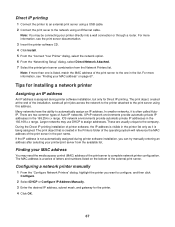
..., see "Finding your printer/print server from the Network Printers list. For more information, see the print server documentation. 3 Insert the printer software CD. 4 Click Install. 5 From the "Connect Your Printer" dialog, select the network option. 6 From the "Networking Setup" dialog, select ... printing. Finding your printer directly into a wall connection or through a router. The MAC address is not automatically assigned during printer software installation, but only for the printer. 4 Click OK. 67 Tips for installing a network printer Assigning an IP address An IP...
..., see "Finding your printer/print server from the Network Printers list. For more information, see the print server documentation. 3 Insert the printer software CD. 4 Click Install. 5 From the "Connect Your Printer" dialog, select the network option. 6 From the "Networking Setup" dialog, select ... printing. Finding your printer directly into a wall connection or through a router. The MAC address is not automatically assigned during printer software installation, but only for the printer. 4 Click OK. 67 Tips for installing a network printer Assigning an IP address An IP...

User's Guide
Page 68
...the same network as the computer. Network traffic speeds vary. 5 Make sure the computer you must manually enter an IP address during printer software installation. For more information, see the printer setup documentation. 2 Make sure all cable connections are using to install the printer is set... up correctly. Finding a printer/print server located on remote subnets The printer software CD can automatically find the printer/print server, wait a few minutes, and then try running the CD again. For more information, see...
...the same network as the computer. Network traffic speeds vary. 5 Make sure the computer you must manually enter an IP address during printer software installation. For more information, see the printer setup documentation. 2 Make sure all cable connections are using to install the printer is set... up correctly. Finding a printer/print server located on remote subnets The printer software CD can automatically find the printer/print server, wait a few minutes, and then try running the CD again. For more information, see...
User's Guide
Page 75
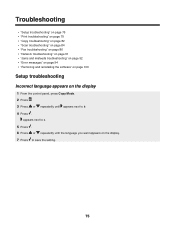
... • "Network troubleshooting" on page 91 • "Jams and misfeeds troubleshooting" on page 92 • "Error messages" on page 94 • "Removing and reinstalling the software" on page 100 Setup troubleshooting Incorrect language appears on the display 1 From the control panel, press Copy Mode. 2 Press . 3 Press or repeatedly until the language...
... • "Network troubleshooting" on page 91 • "Jams and misfeeds troubleshooting" on page 92 • "Error messages" on page 94 • "Removing and reinstalling the software" on page 100 Setup troubleshooting Incorrect language appears on the display 1 From the control panel, press Copy Mode. 2 Press . 3 Press or repeatedly until the language...


