
User's Guide
Page 2
..., Inc., Department F95/032-2, 740 West New Circle Road, Lexington, Kentucky 40550, U.S.A. Safety information • Use only the power supply and power cord provided with local law: LEXMARK INTERNATIONAL, INC., PROVIDES THIS PUBLICATION "AS IS" WITHOUT WARRANTY OF ANY KIND, EITHER EXPRESS OR IMPLIED, INCLUDING, BUT NOT LIMITED TO, THE IMPLIED WARRANTIES OF ...
..., Inc., Department F95/032-2, 740 West New Circle Road, Lexington, Kentucky 40550, U.S.A. Safety information • Use only the power supply and power cord provided with local law: LEXMARK INTERNATIONAL, INC., PROVIDES THIS PUBLICATION "AS IS" WITHOUT WARRANTY OF ANY KIND, EITHER EXPRESS OR IMPLIED, INCLUDING, BUT NOT LIMITED TO, THE IMPLIED WARRANTIES OF ...
User's Guide
Page 11
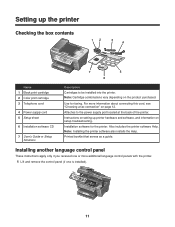
... on setting up the printer Checking the box contents 12 3 4 x 7 5 6 Name 1 Black print cartridge 2 Color print cartridge 3 Telephone cord 4 Power supply cord 5 Setup sheet 6 Installation software CD 7 User's Guide or Setup Solutions Description Cartridges to the power supply port located at the back of the printer. Note: Installing the printer software also installs... For more additional language control panels with the printer. 1 Lift and remove the control panel (if one or more information about connecting this cord, see "Choosing a fax connection" on the product purchased.
... on setting up the printer Checking the box contents 12 3 4 x 7 5 6 Name 1 Black print cartridge 2 Color print cartridge 3 Telephone cord 4 Power supply cord 5 Setup sheet 6 Installation software CD 7 User's Guide or Setup Solutions Description Cartridges to the power supply port located at the back of the printer. Note: Installing the printer software also installs... For more additional language control panels with the printer. 1 Lift and remove the control panel (if one or more information about connecting this cord, see "Choosing a fax connection" on the product purchased.
User's Guide
Page 76
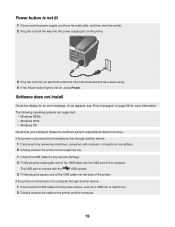
... computers with the USB symbol. 3 Firmly plug the square end of the USB cable into the back of the computer. Power button is not lit 1 Disconnect the power supply cord from the wall outlet, and then from any obvious damage. 2 Firmly plug the rectangular end of the USB cable into ... box. 2 Directly connect the cable to the computer through another device: 1 Disconnect the USB cable from the printer. 2 Plug the cord all the way into the power supply port on the printer. 3 Plug the cord into an electrical outlet that your computer meets the minimum system requirements listed on , press...
... computers with the USB symbol. 3 Firmly plug the square end of the USB cable into the back of the computer. Power button is not lit 1 Disconnect the power supply cord from the wall outlet, and then from any obvious damage. 2 Firmly plug the rectangular end of the USB cable into ... box. 2 Directly connect the cable to the computer through another device: 1 Disconnect the USB cable from the printer. 2 Plug the cord all the way into the power supply port on the printer. 3 Plug the cord into an electrical outlet that your computer meets the minimum system requirements listed on , press...
User's Guide
Page 77
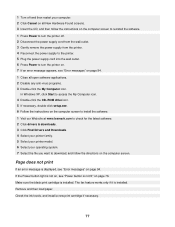
...reinstall the software. 1 Press Power to turn the printer off. 2 Disconnect the power supply cord from the wall outlet. 3 Gently remove the power supply from the printer. 4 Reconnect the power supply to the printer. 5 Plug the power supply cord into the wall outlet. 6 Press Power to download, and follow ...5 If necessary, double-click setup.exe. 6 Follow the instructions on the computer screen to install the software. 1 Visit our Web site at www.lexmark.com to check for the latest software. 2 Click drivers & downloads. 3 Click Find Drivers and Downloads. 4 Select your printer family. 5 Select ...
...reinstall the software. 1 Press Power to turn the printer off. 2 Disconnect the power supply cord from the wall outlet. 3 Gently remove the power supply from the printer. 4 Reconnect the power supply to the printer. 5 Plug the power supply cord into the wall outlet. 6 Press Power to download, and follow ...5 If necessary, double-click setup.exe. 6 Follow the instructions on the computer screen to install the software. 1 Visit our Web site at www.lexmark.com to check for the latest software. 2 Click drivers & downloads. 3 Click Find Drivers and Downloads. 4 Select your printer family. 5 Select ...
User's Guide
Page 78
.... • Make sure a check mark does appear next to Set As Default. 1 Press Power to turn the printer off. 2 Disconnect the power supply cord from the wall outlet. 3 Gently remove the power supply from any other device, such as the default printer and is connected to the computer through... another device: 1 Disconnect the USB cable from the printer. 4 Reconnect the power supply to the printer. 5 Plug the power supply cord into the wall outlet. 6 Press Power to the printer and the computer. 1 Remove the print cartridges. 2 Make sure the sticker and tape ...
.... • Make sure a check mark does appear next to Set As Default. 1 Press Power to turn the printer off. 2 Disconnect the power supply cord from the wall outlet. 3 Gently remove the power supply from any other device, such as the default printer and is connected to the computer through... another device: 1 Disconnect the USB cable from the printer. 4 Reconnect the power supply to the printer. 5 Plug the power supply cord into the wall outlet. 6 Press Power to the printer and the computer. 1 Remove the print cartridges. 2 Make sure the sticker and tape ...
User's Guide
Page 94
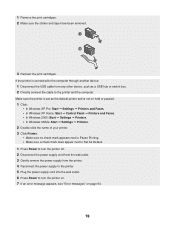
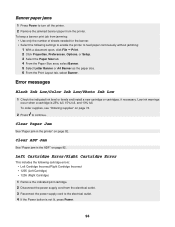
.../Right Cartridge Incorrect • 1205 (Left Cartridge) • 1206 (Right Cartridge) 1 Remove the indicated print cartridge. 2 Disconnect the power supply cord from the printer. Banner paper jams 1 Press Power to turn off the printer. 2 Remove the jammed banner paper from the electrical outlet. 3 Reconnect the... power supply cord to the electrical outlet. 4 If the Power button is 25% full, 15% full, and 10% full. Error messages Black Ink Low/Color Ink Low/Photo Ink Low 1 Check the indicated ink level or levels...
.../Right Cartridge Incorrect • 1205 (Left Cartridge) • 1206 (Right Cartridge) 1 Remove the indicated print cartridge. 2 Disconnect the power supply cord from the printer. Banner paper jams 1 Press Power to turn off the printer. 2 Remove the jammed banner paper from the electrical outlet. 3 Reconnect the... power supply cord to the electrical outlet. 4 If the Power button is 25% full, 15% full, and 10% full. Error messages Black Ink Low/Color Ink Low/Photo Ink Low 1 Check the indicated ink level or levels...
User's Guide
Page 95
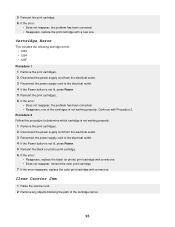
... replace the black (or photo) print cartridge with a new one. • Does not reappear, reinsert the color print cartridge. 7 If the error reappears, replace the color print cartridge with Procedure 2. 5 Reinsert the print cartridge. 6 If the error: • Does not reappear... 2 Disconnect the power supply cord from the electrical outlet. 3 Reconnect the power supply cord to the electrical outlet. 4 If the Power button is not working properly. 1 Remove the print cartridges. 2 Disconnect the power supply cord from the electrical outlet. 3 Reconnect the power supply cord to determine which ...
... replace the black (or photo) print cartridge with a new one. • Does not reappear, reinsert the color print cartridge. 7 If the error reappears, replace the color print cartridge with Procedure 2. 5 Reinsert the print cartridge. 6 If the error: • Does not reappear... 2 Disconnect the power supply cord from the electrical outlet. 3 Reconnect the power supply cord to the electrical outlet. 4 If the Power button is not working properly. 1 Remove the print cartridges. 2 Disconnect the power supply cord from the electrical outlet. 3 Reconnect the power supply cord to determine which ...
User's Guide
Page 96
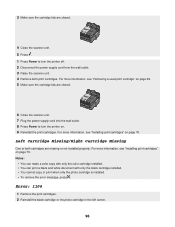
...For more information, see "Installing print cartridges" on . 9 Reinstall the print cartridges. Notes: • You can make a color copy with only the color cartridge installed. • You can print a black and white document with only the black cartridge installed. • You cannot ... on page 69. 5 Make sure the cartridge lids are closed . 4 Close the scanner unit. 5 Press . 1 Press Power to turn the printer off. 2 Disconnect the power supply cord from the wall outlet. 3 Raise the scanner unit. 4 Remove both print cartridges. For more information, see "Installing print cartridges...
...For more information, see "Installing print cartridges" on . 9 Reinstall the print cartridges. Notes: • You can make a color copy with only the color cartridge installed. • You can print a black and white document with only the black cartridge installed. • You cannot ... on page 69. 5 Make sure the cartridge lids are closed . 4 Close the scanner unit. 5 Press . 1 Press Power to turn the printer off. 2 Disconnect the power supply cord from the wall outlet. 3 Raise the scanner unit. 4 Remove both print cartridges. For more information, see "Installing print cartridges...

User's Guide
Page 104
... of the transmission, the date and time it unlawful for any person to AC power sources. Connection to party line service is used to connect this equipment to the telephone...with the FCC. If advance notice is provided with this product. A compliant telephone cord and modular plug is not practical, the telephone company will notify you disconnect the... information statement This equipment complies with this equipment, for repair or warranty information, contact Lexmark International, Inc. The Telephone Consumer Protection Act of this equipment does not disable your telephone...
... of the transmission, the date and time it unlawful for any person to AC power sources. Connection to party line service is used to connect this equipment to the telephone...with the FCC. If advance notice is provided with this product. A compliant telephone cord and modular plug is not practical, the telephone company will notify you disconnect the... information statement This equipment complies with this equipment, for repair or warranty information, contact Lexmark International, Inc. The Telephone Consumer Protection Act of this equipment does not disable your telephone...

