Setup Guide
Page 3
... sources of information 2 Step 1: Unpack the printer 4 Getting ready for setup 4 Step 2: Install printer supplies 6 Installing toner cartridges 6 Installing the photodeveloper cartridge 9 Step 3: Position the optional drawer 11 Step 4: Prepare the printer 12 Positioning the printer 12 Securing the drawer to the printer 13 Attaching an operator panel overlay 15 Adjusting tray 2 margins 16 Step 5: Set up the...
... sources of information 2 Step 1: Unpack the printer 4 Getting ready for setup 4 Step 2: Install printer supplies 6 Installing toner cartridges 6 Installing the photodeveloper cartridge 9 Step 3: Position the optional drawer 11 Step 4: Prepare the printer 12 Positioning the printer 12 Securing the drawer to the printer 13 Attaching an operator panel overlay 15 Adjusting tray 2 margins 16 Step 5: Set up the...
Setup Guide
Page 10
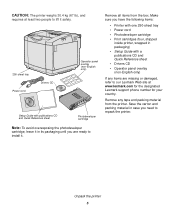
... tray • Power cord • Photodeveloper cartridge • Print cartridges (four, shipped inside printer, wrapped in packaging) • Setup Guide with publications CD and Quick Reference sheet Photodeveloper cartridge Note: To avoid overexposing the photodeveloper cartridge, leave it . CAUTION: The printer weighs 30.4 kg (67 lb), and requires at www.lexmark.com for the designated Lexmark support phone number for your...
... tray • Power cord • Photodeveloper cartridge • Print cartridges (four, shipped inside printer, wrapped in packaging) • Setup Guide with publications CD and Quick Reference sheet Photodeveloper cartridge Note: To avoid overexposing the photodeveloper cartridge, leave it . CAUTION: The printer weighs 30.4 kg (67 lb), and requires at www.lexmark.com for the designated Lexmark support phone number for your...
Setup Guide
Page 14
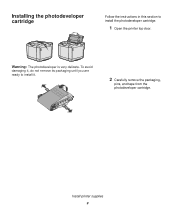
To avoid damaging it, do not remove its packaging until you are ready to install the photodeveloper cartridge. 1 Open the printer top door. Install printer supplies 9 Installing the photodeveloper cartridge Follow the instructions in this section to install it. 2 Carefully remove the packaging, pins, and tape from the photodeveloper cartridge. Warning: The photodeveloper is very delicate.
To avoid damaging it, do not remove its packaging until you are ready to install the photodeveloper cartridge. 1 Open the printer top door. Install printer supplies 9 Installing the photodeveloper cartridge Follow the instructions in this section to install it. 2 Carefully remove the packaging, pins, and tape from the photodeveloper cartridge. Warning: The photodeveloper is very delicate.
Setup Guide
Page 15
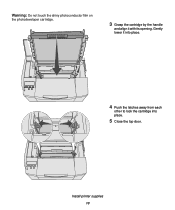
Install printer supplies 10 Warning: Do not touch the shiny photoconductor film on the photodeveloper cartridge. 3 Grasp the cartridge by the handle and align it into place. 4 Push the latches away from each other to lock the cartridge into place. 5 Close the top door. Gently lower it with its opening.
Install printer supplies 10 Warning: Do not touch the shiny photoconductor film on the photodeveloper cartridge. 3 Grasp the cartridge by the handle and align it into place. 4 Push the latches away from each other to lock the cartridge into place. 5 Close the top door. Gently lower it with its opening.
User's Reference
Page 3
... Accessing jam areas 51 Chapter 5: Maintenance 60 Maintaining your printer 60 Determining the status of supplies 60 Conserving supplies ...61 Ordering supplies and maintenance items 61 Ordering toner cartridges 62 Ordering a fuser ...62 Ordering a waste toner bottle 62 Ordering a photodeveloper cartridge 62 Maintaining your printer for long term storage 62 Storing supplies ...63 Storing media...
... Accessing jam areas 51 Chapter 5: Maintenance 60 Maintaining your printer 60 Determining the status of supplies 60 Conserving supplies ...61 Ordering supplies and maintenance items 61 Ordering toner cartridges 62 Ordering a fuser ...62 Ordering a waste toner bottle 62 Ordering a photodeveloper cartridge 62 Maintaining your printer for long term storage 62 Storing supplies ...63 Storing media...
User's Reference
Page 4
... Recycling Lexmark products 68 Replacing the fuser ...69 Replacing the waste toner bottle 72 Replacing the photodeveloper cartridge 73 Setting the operator panel when a supply is replaced 77 Changing the toner cartridge yield 77 Specifying the replaced supply 77 Cleaning the printhead lens 78 Chapter 6: Troubleshooting 81 Solving basic printer problems 81 Checking an unresponsive printer...
... Recycling Lexmark products 68 Replacing the fuser ...69 Replacing the waste toner bottle 72 Replacing the photodeveloper cartridge 73 Setting the operator panel when a supply is replaced 77 Changing the toner cartridge yield 77 Specifying the replaced supply 77 Cleaning the printhead lens 78 Chapter 6: Troubleshooting 81 Solving basic printer problems 81 Checking an unresponsive printer...
User's Reference
Page 62
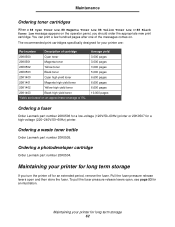
... toner Yields are based on the operator panel, you turn the printer off for an extended period, remove the fuser. Ordering a photodeveloper cartridge Order Lexmark part number 20K0504. Maintaining your printer for long term storage If you should order the appropriate new print cartridge. Maintaining your printer for long term storage 62 Average yield 3,000 pages 3,000...
... toner Yields are based on the operator panel, you turn the printer off for an extended period, remove the fuser. Ordering a photodeveloper cartridge Order Lexmark part number 20K0504. Maintaining your printer for long term storage If you should order the appropriate new print cartridge. Maintaining your printer for long term storage 62 Average yield 3,000 pages 3,000...

User's Reference
Page 73
... in the plastic bag and dispose of the bag properly. 5 Grasp the handle on the operator panel, you have ordered one. Replacing the photodeveloper cartridge 73 Replacing the photodeveloper cartridge When 83 Photodev Cart Life Warning appears on the new waste toner bottle and align it with its opening. 6 Push it straight in. 7 Close...
... in the plastic bag and dispose of the bag properly. 5 Grasp the handle on the operator panel, you have ordered one. Replacing the photodeveloper cartridge 73 Replacing the photodeveloper cartridge When 83 Photodev Cart Life Warning appears on the new waste toner bottle and align it with its opening. 6 Push it straight in. 7 Close...

User's Reference
Page 74
Replacing the photodeveloper cartridge 74 Note: Notice the arrow on the top door release latch. Maintenance When 83 Photodev Cart Exhausted appears on the operator panel, you must replace the photodeveloper cartridge immediately. 1 Pull up , then rotate it backwards to release the photodeveloper cartridge. Pull the top door up on each other to its open position. 2 Push the latches toward each latch which points inward.
Replacing the photodeveloper cartridge 74 Note: Notice the arrow on the top door release latch. Maintenance When 83 Photodev Cart Exhausted appears on the operator panel, you must replace the photodeveloper cartridge immediately. 1 Pull up , then rotate it backwards to release the photodeveloper cartridge. Pull the top door up on each other to its open position. 2 Push the latches toward each latch which points inward.

User's Reference
Page 75
Remove any packaging material or tape. 5 Remove the two clips on the sides of it properly. 4 Carefully unpack the new photodeveloper cartridge. Replacing the photodeveloper cartridge 75 Dispose of the photodeveloper cartridge. Maintenance 3 Grasp the handle and pull the used photodeveloper cartridge straight up. Warning: Do not touch the photoconductor film, which is the shiny green part of the photodeveloper cartridge.
Remove any packaging material or tape. 5 Remove the two clips on the sides of it properly. 4 Carefully unpack the new photodeveloper cartridge. Replacing the photodeveloper cartridge 75 Dispose of the photodeveloper cartridge. Maintenance 3 Grasp the handle and pull the used photodeveloper cartridge straight up. Warning: Do not touch the photoconductor film, which is the shiny green part of the photodeveloper cartridge.

User's Reference
Page 76
Replacing the photodeveloper cartridge 76 Gently lower it with Setting the operator panel when a supply is replaced. Maintenance 6 Grasp the handle of the new photodeveloper cartridge and align it into place. 7 Push the latches away from each other to lock the photodeveloper cartridge into place. 8 Close the top door. 9 Continue with its opening.
Replacing the photodeveloper cartridge 76 Gently lower it with Setting the operator panel when a supply is replaced. Maintenance 6 Grasp the handle of the new photodeveloper cartridge and align it into place. 7 Push the latches away from each other to lock the photodeveloper cartridge into place. 8 Close the top door. 9 Continue with its opening.

User's Reference
Page 77
.... 5 Press and release Menu until you have replaced a toner cartridge, a fuser, or a photodeveloper cartridge, complete the following instructions. Once you see Replace Supplies, and then press Select. Press Select. 6 Press Menu until you see the color name of completing the following : 1 Make sure the printer is on and the Ready message appears. 2 Press and release...
.... 5 Press and release Menu until you have replaced a toner cartridge, a fuser, or a photodeveloper cartridge, complete the following instructions. Once you see Replace Supplies, and then press Select. Press Select. 6 Press Menu until you see the color name of completing the following : 1 Make sure the printer is on and the Ready message appears. 2 Press and release...
User's Reference
Page 78
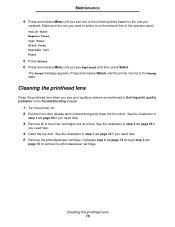
...at a time. Complete step 2 on page 74 through step 3 on page 75 to select is on page 74 if you need help. 5 Remove the photodeveloper cartridge. Cleaning the printhead lens 78 Maintenance 4 Press and release Menu until you see one of the following items based on page 65 if you need ...help. 4 Open the top door. See the illustration in the Troubleshooting chapter. 1 Turn the printer off. 2 Pull the front door release latch forward and gently lower the front door. The Saved message appears. See the illustration in step 1 on ...
...at a time. Complete step 2 on page 74 through step 3 on page 75 to select is on page 74 if you need help. 5 Remove the photodeveloper cartridge. Cleaning the printhead lens 78 Maintenance 4 Press and release Menu until you see one of the following items based on page 65 if you need ...help. 4 Open the top door. See the illustration in the Troubleshooting chapter. 1 Turn the printer off. 2 Pull the front door release latch forward and gently lower the front door. The Saved message appears. See the illustration in step 1 on ...

User's Reference
Page 80
See the illustration in step 6 on page 76 if you need help. 11 Close the top door. 12 Install all of the toner cartridges. Cleaning the printhead lens 80 Gently lower it into place. See the illustration in step 7 on page 67 if you need help . 10 Push the latches away from each other to lock the photodeveloper cartridge into place. See the illustration in step 7 on page 76 if you need help . 13 Close the front door. 14 Turn the printer on. Maintenance 8 Push the lens cover down. 9 Align the photodeveloper cartridge with its opening.
See the illustration in step 6 on page 76 if you need help. 11 Close the top door. 12 Install all of the toner cartridges. Cleaning the printhead lens 80 Gently lower it into place. See the illustration in step 7 on page 67 if you need help . 10 Push the latches away from each other to lock the photodeveloper cartridge into place. See the illustration in step 7 on page 76 if you need help . 13 Close the front door. 14 Turn the printer on. Maintenance 8 Push the lens cover down. 9 Align the photodeveloper cartridge with its opening.

User's Reference
Page 84
.... Marks occur down the page repeatedly in all colors: Replace the item if the defects occur every: 35 mm (1.38 in.) or 95 mm (3.74 in.) for information about a printer consumable. See Determining the status of supplies for the photodeveloper cartridge 95 mm (3.74 in.) or 128 mm (5....04 in the Finishing Menu or through the printer driver. See Printing the Print Quality Test Pages for the fuser Solving...
.... Marks occur down the page repeatedly in all colors: Replace the item if the defects occur every: 35 mm (1.38 in.) or 95 mm (3.74 in.) for information about a printer consumable. See Determining the status of supplies for the photodeveloper cartridge 95 mm (3.74 in.) or 128 mm (5....04 in the Finishing Menu or through the printer driver. See Printing the Print Quality Test Pages for the fuser Solving...

User's Reference
Page 85
... (top to bottom or left to the paper. White or colored line ABCDE ABCDE ABCDE Either the toner cartridges, the fuser, or the photodeveloper cartridge are defective. The fuser may be defective or worn. The toner cartridges are defective, or toner has accumulated in the printer housing near the printhead using a soft, clean lint-free cloth...
... (top to bottom or left to the paper. White or colored line ABCDE ABCDE ABCDE Either the toner cartridges, the fuser, or the photodeveloper cartridge are defective. The fuser may be defective or worn. The toner cartridges are defective, or toner has accumulated in the printer housing near the printhead using a soft, clean lint-free cloth...

User's Reference
Page 87
... the Paper Menu is correct for service. Change Paper Weight from the printer driver before sending the job to CardStock (or other appropriate weight). The fuser is not functioning properly. Ghost images The photodeveloper cartridge is worn or defective. Replace the photodeveloper cartridge. Call for the paper or specialty media you handle the sheets. than...
... the Paper Menu is correct for service. Change Paper Weight from the printer driver before sending the job to CardStock (or other appropriate weight). The fuser is not functioning properly. Ghost images The photodeveloper cartridge is worn or defective. Replace the photodeveloper cartridge. Call for the paper or specialty media you handle the sheets. than...

User's Reference
Page 166
Disables Wait Timeout. Near Full Full or Missing The toner waste bottle is canceled. To view the status of the color toner cartridges where represents yellow, magenta, cyan, or black. Life Warning Exhausted The fuser is close to 15 more pages from the buffer and then ...print job is nearly full. Menu Item Toner Waste Bottle Photodev Cart Fuser Purpose Values To view the status of the photodeveloper cartridge. Low To view the status of time the printer waits for additional data before it cancels the job. The fuser is low or needs replacement. It is only available...
Disables Wait Timeout. Near Full Full or Missing The toner waste bottle is canceled. To view the status of the color toner cartridges where represents yellow, magenta, cyan, or black. Life Warning Exhausted The fuser is close to 15 more pages from the buffer and then ...print job is nearly full. Menu Item Toner Waste Bottle Photodev Cart Fuser Purpose Values To view the status of the photodeveloper cartridge. Low To view the status of time the printer waits for additional data before it cancels the job. The fuser is low or needs replacement. It is only available...

User's Reference
Page 167
...supply item. 2 Select the value. This menu item is shown in the Supplies Menu when the supply is missing from the printer. Missing The photodeveloper cartridge is left of the following states: low, empty, near full, full, missing, life warning, or exhausted. 1 Select one... cartridge as the supply item. Using printer menus Menu Item Supplies Life Purpose Values To view the status and percentage of this supply item. 1 Select the waste ...
...supply item. 2 Select the value. This menu item is shown in the Supplies Menu when the supply is missing from the printer. Missing The photodeveloper cartridge is left of the following states: low, empty, near full, full, missing, life warning, or exhausted. 1 Select one... cartridge as the supply item. Using printer menus Menu Item Supplies Life Purpose Values To view the status and percentage of this supply item. 1 Select the waste ...

User's Reference
Page 173
... See also: Disabling operator panel menus Understanding printer messages 173 The printer rear door is displayed. Warning: Do not turn the printer off while this message is open . Press Go to clear the message. held jobs. The photodeveloper cartridge remains in a warning or exhausted state requiring...in the warning state, and this message means What you answer another replacement message, and the photodeveloper cartridge is defragmenting the flash memory to clear. Close the printer top door to cancel the operation. Press Stop to clear the message. The secondary message appears...
... See also: Disabling operator panel menus Understanding printer messages 173 The printer rear door is displayed. Warning: Do not turn the printer off while this message is open . Press Go to clear the message. held jobs. The photodeveloper cartridge remains in a warning or exhausted state requiring...in the warning state, and this message means What you answer another replacement message, and the photodeveloper cartridge is defragmenting the flash memory to clear. Close the printer top door to cancel the operation. Press Stop to clear the message. The secondary message appears...

