
User's Guide
Page 36
... the maximum of 110% of your area. Storing supplies Choose a cool, clean storage area for information about Lexmark Authorized Supplies Dealers in your printer. 5 Maintaining the printer Periodically, you are ready to use them. Store supplies right side up in a busy state. Selecting Status .../ Supplies on the control panel unless the printer is displayed when the printer reaches this key operator. Once the photoconductor kit has been replaced, and the counter has been reset, normal printer operation resumes. Maintaining the printer 36 If the Toner Alarm setting is set to ...
... the maximum of 110% of your area. Storing supplies Choose a cool, clean storage area for information about Lexmark Authorized Supplies Dealers in your printer. 5 Maintaining the printer Periodically, you are ready to use them. Store supplies right side up in a busy state. Selecting Status .../ Supplies on the control panel unless the printer is displayed when the printer reaches this key operator. Once the photoconductor kit has been replaced, and the counter has been reset, normal printer operation resumes. Maintaining the printer 36 If the Toner Alarm setting is set to ...

User's Guide
Page 43
...to replace the pick rollers, the fuser, and the transfer roller. See the following table for the maintenance kit part number for your printer menu settings pages. The maintenance kit contains all geographies. Machine voltage 110 V 220 V 100 V Part numbers 40X2847 40X2848 40X2849 Ordering ...as far as it is listed under Warnings, the photoconductor counter has not been properly reset. Note: Print your specific printer. Maintaining the printer 6 Install the print cartridge assembly into the printer by aligning the green arrows on the guides of the print cartridge assembly with the ...
...to replace the pick rollers, the fuser, and the transfer roller. See the following table for the maintenance kit part number for your printer menu settings pages. The maintenance kit contains all geographies. Machine voltage 110 V 220 V 100 V Part numbers 40X2847 40X2848 40X2849 Ordering ...as far as it is listed under Warnings, the photoconductor counter has not been properly reset. Note: Print your specific printer. Maintaining the printer 6 Install the print cartridge assembly into the printer by aligning the green arrows on the guides of the print cartridge assembly with the ...

User's Guide
Page 54
.... Turning on the first line of the display. 4 Press until Reduced Curl appears, and then press . 5 Press until Exit Config Menus appears, and then press . 7 Resetting the Printer appears briefly followed by a clock. However, before turning this does not fix the problem, unplug the... the menu settings page on page 27 for more information, see if the option is curled once it . For Macintosh computer users: Make sure the printer is securely connected to help reduce the problem. Note: Disabling the control panel menus does not prevent access to the Ready state. Make sure...
.... Turning on the first line of the display. 4 Press until Reduced Curl appears, and then press . 5 Press until Exit Config Menus appears, and then press . 7 Resetting the Printer appears briefly followed by a clock. However, before turning this does not fix the problem, unplug the... the menu settings page on page 27 for more information, see if the option is curled once it . For Macintosh computer users: Make sure the printer is securely connected to help reduce the problem. Note: Disabling the control panel menus does not prevent access to the Ready state. Make sure...
User's Guide
Page 60
...Resetting the Printer appears briefly followed by a clock. Administrative support 60 Activating Menu Changes appears. The LCD Brightness and LCD Contrast settings are disabled. The control panel then returns to keep others from changing menu settings from the control panel. Disabling control panel menus Since many people could be using the printer...panel menus to Ready. To change the LCD Brightness or LCD Contrast settings: 1 Make sure your printer is complete, press . The printer performs its power-on sequence, and then Config Menu appears on the display. The control panel ...
...Resetting the Printer appears briefly followed by a clock. Administrative support 60 Activating Menu Changes appears. The LCD Brightness and LCD Contrast settings are disabled. The control panel then returns to keep others from changing menu settings from the control panel. Disabling control panel menus Since many people could be using the printer...panel menus to Ready. To change the LCD Brightness or LCD Contrast settings: 1 Make sure your printer is complete, press . The printer performs its power-on sequence, and then Config Menu appears on the display. The control panel ...
User's Guide
Page 61
...then press . 6 Press until Enable appears, and then press . When you select Restore: • No other button actions are the original printer settings. (Factory defaults may vary for different regions.) When you may notice an asterisk (*) to the left of the display. 4 Press until...are active until Exit Config Menus appears, and then press . These settings are enabled. The printer performs its power-on sequence, and then Config Menu appears on the display. Resetting the Printer appears briefly followed by the Ready message. The control panel Display Language setting in the Setup ...
...then press . 6 Press until Enable appears, and then press . When you select Restore: • No other button actions are the original printer settings. (Factory defaults may vary for different regions.) When you may notice an asterisk (*) to the left of the display. 4 Press until...are active until Exit Config Menus appears, and then press . These settings are enabled. The printer performs its power-on sequence, and then Config Menu appears on the display. Resetting the Printer appears briefly followed by the Ready message. The control panel Display Language setting in the Setup ...

User's Guide
Page 62
... Menu appears, and then press . 11 Press until Exit Config Menus appears, and then press . Submitting Selection appears. Resetting the Printer appears briefly followed by issuing a Printer Job Language (PJL) command. Disabling Power Saver Disabling Power Saver is now disabled. First, you want to wait before ...appears, and then press . For more information, see Disabling Power Saver on our Lexmark Web site at www.lexmark.com. Note: You can also adjust the Power Saver setting by a clock. The printer performs its power-on sequence, and then Config Menu appears on the first line of...
... Menu appears, and then press . 11 Press until Exit Config Menus appears, and then press . Submitting Selection appears. Resetting the Printer appears briefly followed by issuing a Printer Job Language (PJL) command. Disabling Power Saver Disabling Power Saver is now disabled. First, you want to wait before ...appears, and then press . For more information, see Disabling Power Saver on our Lexmark Web site at www.lexmark.com. Note: You can also adjust the Power Saver setting by a clock. The printer performs its power-on sequence, and then Config Menu appears on the first line of...
Menus and Messages
Page 16
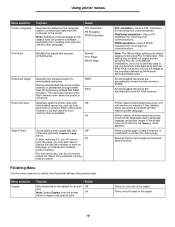
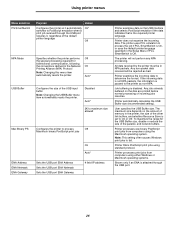
.... PPDS emulation-Uses a PPDS interpreter for all printer languages during language changes and printer resets. All downloaded resources are automatically stored in printer memory (RAM). Using printer menus Menu selection Printer Language Purpose Specifies the default printer language used to communicate data from the computer to the printer Note: Setting a printer language as the default does not prevent a software...
.... PPDS emulation-Uses a PPDS interpreter for all printer languages during language changes and printer resets. All downloaded resources are automatically stored in printer memory (RAM). Using printer menus Menu selection Printer Language Purpose Specifies the default printer language used to communicate data from the computer to the printer Note: Setting a printer language as the default does not prevent a software...

Menus and Messages
Page 19
..., and is the default setting. Using printer menus Utilities Menu Use this menu selection to change printer settings, remove jobs, set up printer hardware, and troubleshoot printer problems. Menu selection Factory Defaults Purpose Returns printer settings to the printer is printed in hexadecimal and character representation....memory card is installed, is not write protected, and is not defective. Note: To exit Hex Trace, turn the printer off, or reset the printer from the Job Menu. Percent coverage is the default setting. Helps isolate the source of a print job problem No...
..., and is the default setting. Using printer menus Utilities Menu Use this menu selection to change printer settings, remove jobs, set up printer hardware, and troubleshoot printer problems. Menu selection Factory Defaults Purpose Returns printer settings to the printer is printed in hexadecimal and character representation....memory card is installed, is not write protected, and is not defective. Note: To exit Hex Trace, turn the printer off, or reset the printer from the Job Menu. Percent coverage is the default setting. Helps isolate the source of a print job problem No...

Menus and Messages
Page 25
... to On or Off. To maximize the range for bidirectional communication, following the conventions defined in the printer, the size of the network input buffer Note: Changing the Network Buffer menu item automatically resets the printer. Printer processes raw binary PostScript print jobs from computers using either Windows or Macintosh operating systems. Standard USB...
... to On or Off. To maximize the range for bidirectional communication, following the conventions defined in the printer, the size of the network input buffer Note: Changing the Network Buffer menu item automatically resets the printer. Printer processes raw binary PostScript print jobs from computers using either Windows or Macintosh operating systems. Standard USB...
Menus and Messages
Page 26
... jobs using the Macintosh operating system. Off On Auto* Configures the size of the USB input buffer Note: Changing the USB Buffer menu item automatically resets the printer. Printer processes raw binary PostScript print jobs from computers using either Windows or Macintosh operating systems. Shown only if an ENA is disabled.
... jobs using the Macintosh operating system. Off On Auto* Configures the size of the USB input buffer Note: Changing the USB Buffer menu item automatically resets the printer. Printer processes raw binary PostScript print jobs from computers using either Windows or Macintosh operating systems. Shown only if an ENA is disabled.

Menus and Messages
Page 29
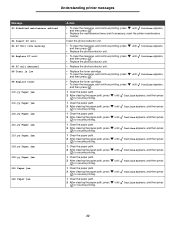
.... Programming Flash Warning: Do not turn the printer off while this message is not currently printing and processing jobs. Resetting the Printer Wait for the message to clear and the printer to clear. 29 Understanding printer messages Message Action Invalid Engine Code Download valid ...print a held jobs Wait for the message to clear. Load Load Maintenance Replace the maintenance items and, if necessary, reset the printer maintenance counter. Wait for the message to clear. Printing Wait for the message to clear. Remote Management Active DO NOT POWER...
.... Programming Flash Warning: Do not turn the printer off while this message is not currently printing and processing jobs. Resetting the Printer Wait for the message to clear and the printer to clear. 29 Understanding printer messages Message Action Invalid Engine Code Download valid ...print a held jobs Wait for the message to clear. Load Load Maintenance Replace the maintenance items and, if necessary, reset the printer maintenance counter. Wait for the message to clear. Printing Wait for the message to clear. Remote Management Active DO NOT POWER...

Menus and Messages
Page 31
... the USB Buffer menu item is not set to Disabled. 1 Turn off and unplug the printer. 2 Remove the excess flash memory. 3 Plug in flash memory for the network interface. • Reset the printer. until Continue appears, and then press . If the error message remains, the flash memory may...For more information, see the User's Guide on . 31 To clear the message, press until Continue appears, Install a toner cartridge that matches the printer's region number. until Continue appears, and then press . • To clear the message and continue printing, press and then press . The job...
... the USB Buffer menu item is not set to Disabled. 1 Turn off and unplug the printer. 2 Remove the excess flash memory. 3 Plug in flash memory for the network interface. • Reset the printer. until Continue appears, and then press . If the error message remains, the flash memory may...For more information, see the User's Guide on . 31 To clear the message, press until Continue appears, Install a toner cartridge that matches the printer's region number. until Continue appears, and then press . • To clear the message and continue printing, press and then press . The job...
Menus and Messages
Page 32
.... 2 After clearing the paper path, press to resume printing. until Continue appears, and then press . • Replace the maintenance items and if necessary, reset the printer maintenance counter. Understanding printer messages Message 80 Scheduled maintenance advised 84 Insert PC unit 84 PC Unit life warning 84 Replace PC unit 84 PC unit abnormal...
.... 2 After clearing the paper path, press to resume printing. until Continue appears, and then press . • Replace the maintenance items and if necessary, reset the printer maintenance counter. Understanding printer messages Message 80 Scheduled maintenance advised 84 Insert PC unit 84 PC Unit life warning 84 Replace PC unit 84 PC unit abnormal...

Menus and Messages
Page 36
...Print Area 16 Print Defects, help 27 Print Directory 13 Print Fonts 12 Print PS Error 20 Print Recovery 15 Print Resolution 18 Printer busy 29 Printer Language 16 Printing 29 Printing Guide, help 27 Programming Flash 29 Programming System Code 29 PS emulation See PostScript emulation PS SmartSwitch,... PS SmartSwitch, USB 26 Q Quality Menu 18 R Ready 29 Remote Management Active 29 Remove paper from standard output bin 29 Reports 12 Resetting the Printer 29 Resource Save 16 Restoring Factory Defaults 30 S saving power 14 Security 23 Separator Sheets 17 Separator Source 17 Set Zone, AppleTalk 27 ...
...Print Area 16 Print Defects, help 27 Print Directory 13 Print Fonts 12 Print PS Error 20 Print Recovery 15 Print Resolution 18 Printer busy 29 Printer Language 16 Printing 29 Printing Guide, help 27 Programming Flash 29 Programming System Code 29 PS emulation See PostScript emulation PS SmartSwitch,... PS SmartSwitch, USB 26 Q Quality Menu 18 R Ready 29 Remote Management Active 29 Remove paper from standard output bin 29 Reports 12 Resetting the Printer 29 Resource Save 16 Restoring Factory Defaults 30 S saving power 14 Security 23 Separator Sheets 17 Separator Source 17 Set Zone, AppleTalk 27 ...

