Service Manual
Page 28
... set the printer down. User status messages provide the user with a print cartridge, paper jam, option, port, and so on the first line of the display unless Power Saver is invoked, then Power Saver is displayed. User error messages are working on the machine, go to the "Service Error Codes" on page 2-2 and take the appropriate action. Use the hand grips on the current status of the printer. If a service error code is displayed, go to repair a malfunctioning printer. If a user status message is displayed, go to the "User Error Messages...
... set the printer down. User status messages provide the user with a print cartridge, paper jam, option, port, and so on the first line of the display unless Power Saver is invoked, then Power Saver is displayed. User error messages are working on the machine, go to the "Service Error Codes" on page 2-2 and take the appropriate action. Use the hand grips on the current status of the printer. If a service error code is displayed, go to repair a malfunctioning printer. If a user status message is displayed, go to the "User Error Messages...
Service Manual
Page 33
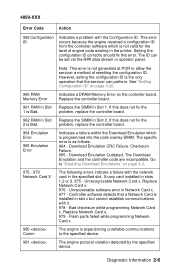
... device. Download Emulation Outdated, The Download Emulation and the controller code are incompatible. Replace Network Card x. 976 - Setting the configuration ID correctly should fix this does not fix the 1 is experiencing unreliable communications to allow the servicer a method of engine code existing in the printer. If this error. Replace Network Card x. 979 - See "Setting Configuration ID" on page 3-20. 960 RAM Memory Error Indicates a DRAM Memory Error on page 3-3. 975 - 979 Network Card X The following errors indicate a failure with the network card...
... device. Download Emulation Outdated, The Download Emulation and the controller code are incompatible. Replace Network Card x. 976 - Setting the configuration ID correctly should fix this does not fix the 1 is experiencing unreliable communications to allow the servicer a method of engine code existing in the printer. If this error. Replace Network Card x. 979 - See "Setting Configuration ID" on page 3-20. 960 RAM Memory Error Indicates a DRAM Memory Error on page 3-3. 975 - 979 Network Card X The following errors indicate a failure with the network card...

Service Manual
Page 35
... isolate paper jams and paper feed problems in the machine during POST and the input sensor flag has tripped the input sensor. A paper jam is in the base printer. Paper Tray 4 pass thru sensor is not activated by a sheet of the printer. 4059-XXX Base Printer Sub Error Codes Each status byte has a different level of troubleshooting value for each area of paper. This set of paper through the input sensor. Paper Tray 2 pass thru sensor is...
... isolate paper jams and paper feed problems in the machine during POST and the input sensor flag has tripped the input sensor. A paper jam is in the base printer. Paper Tray 4 pass thru sensor is not activated by a sheet of the printer. 4059-XXX Base Printer Sub Error Codes Each status byte has a different level of troubleshooting value for each area of paper. This set of paper through the input sensor. Paper Tray 2 pass thru sensor is...
Service Manual
Page 43
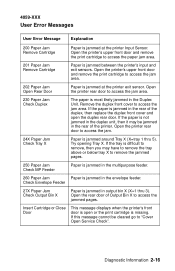
...pages. 250 Paper Jam Check MP Feeder Paper is jammed in the multipurpose feeder. 260 Paper Jam Paper is jammed in the rear of the printer. 4059-XXX User Error Messages User Error Message Explanation 200 Paper Jam Remove Cartridge Paper is jammed at the printer exit sensor. Check Envelope Feeder 27X Paper Jam Check Output Bin X Paper is jammed in the rear of Output Bin X to access the jam area. 202 Paper Jam Open Rear Door Paper is jammed in output bin X (X=1 thru 3). Diagnostic Information 2-16 Remove the duplex front cover to "Cover Open Service Check". If the paper...
...pages. 250 Paper Jam Check MP Feeder Paper is jammed in the multipurpose feeder. 260 Paper Jam Paper is jammed in the rear of the printer. 4059-XXX User Error Messages User Error Message Explanation 200 Paper Jam Remove Cartridge Paper is jammed at the printer exit sensor. Check Envelope Feeder 27X Paper Jam Check Output Bin X Paper is jammed in the rear of Output Bin X to access the jam area. 202 Paper Jam Open Rear Door Paper is jammed in output bin X (X=1 thru 3). Diagnostic Information 2-16 Remove the duplex front cover to "Cover Open Service Check". If the paper...

Service Manual
Page 52
...) fails to the "Paper Feed Service Check" on page 2-35. Printer sounds 5 beeps. Go to the "Operator Panel Service Check" on page 2-74. All Black Page" on page 2-92. Light Print" on page 2-32. One or more buttons do not work. Go to the "Operator Panel Buttons Service Check" on page 2-74. Paper jams at exit of Redrive Assembly - Display is blank. Go to "Print Quality - Go to "Print Quality - No Duplex Option installed. Go to the "Auxiliary Fan Service Check" on page 2-86. 4059-XXX Symptom...
...) fails to the "Paper Feed Service Check" on page 2-35. Printer sounds 5 beeps. Go to the "Operator Panel Service Check" on page 2-74. All Black Page" on page 2-92. Light Print" on page 2-32. One or more buttons do not work. Go to the "Operator Panel Buttons Service Check" on page 2-74. Paper jams at exit of Redrive Assembly - Display is blank. Go to "Print Quality - Go to "Print Quality - No Duplex Option installed. Go to the "Auxiliary Fan Service Check" on page 2-86. 4059-XXX Symptom...

Service Manual
Page 55
... option. • Paperfeed Problems with error message: Use the "Sub Error Codes For 9XX and 2XX Error Codes" on page 2-7 to help diagnose the problem. • Print Quality Problems: Go to "Print Quality Test Pages" on page 2-78. 4059-XXX Symptom Table - Go to help diagnose problems before changing any settings or working on the printer. • Use the resident diagnostics test provided to "Setting Configuration ID" on the new engine board. Output Expander Symptom Printer does not display Output Bin Full Paper does not feed...
... option. • Paperfeed Problems with error message: Use the "Sub Error Codes For 9XX and 2XX Error Codes" on page 2-7 to help diagnose the problem. • Print Quality Problems: Go to "Print Quality Test Pages" on page 2-78. 4059-XXX Symptom Table - Go to help diagnose problems before changing any settings or working on the printer. • Use the resident diagnostics test provided to "Setting Configuration ID" on the new engine board. Output Expander Symptom Printer does not display Output Bin Full Paper does not feed...
Service Manual
Page 105
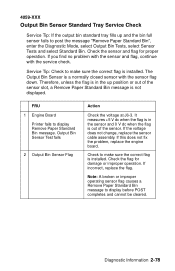
... 1 Engine Board Printer fails to display before POST completes and cannot be cleared. If the voltage does not change, replace the sensor cable assembly. If incorrect, replace the flag. Service Tip: Check to make sure the correct flag is not displayed. Note: A broken or improper operating sensor flag causes a Remove Paper Standard Bin message to display Remove Paper Standard Bin message. Check to post the message "Remove Paper Standard Bin", enter the Diagnostic Mode, select Output Bin Tests, select Sensor Tests and select Standard Bin. Diagnostic Information 2-78...
... 1 Engine Board Printer fails to display before POST completes and cannot be cleared. If the voltage does not change, replace the sensor cable assembly. If incorrect, replace the flag. Service Tip: Check to make sure the correct flag is not displayed. Note: A broken or improper operating sensor flag causes a Remove Paper Standard Bin message to display Remove Paper Standard Bin message. Check to post the message "Remove Paper Standard Bin", enter the Diagnostic Mode, select Output Bin Tests, select Sensor Tests and select Standard Bin. Diagnostic Information 2-78...

Service Manual
Page 111
... Assembly Control Board Action Check the sensor flag for the failing sensor. The voltage measures approximately +5 V dc. If correct, check to make sure the pass thru sensor cable is displayed, POST Incomplete, Unable to J3 on the control board and check the voltage at J3-2. Sensor Test: NF = Near Full (Upper part of sensor assembly) F = Full (Lower Part of paper feeds into Output Bin X. 4059-XXX Remove Paper - Output Bin X is correctly connected to clear the message...
... Assembly Control Board Action Check the sensor flag for the failing sensor. The voltage measures approximately +5 V dc. If correct, check to make sure the pass thru sensor cable is displayed, POST Incomplete, Unable to J3 on the control board and check the voltage at J3-2. Sensor Test: NF = Near Full (Upper part of sensor assembly) F = Full (Lower Part of paper feeds into Output Bin X. 4059-XXX Remove Paper - Output Bin X is correctly connected to clear the message...
Service Manual
Page 118
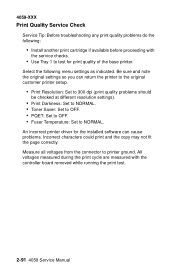
... copy may not fit the page correctly. 4059-XXX Print Quality Service Check Service Tip: Before troubleshooting any print quality problems do the following menu settings as indicated. All voltages measured during the print cycle are measured with the service checks. • Use Tray 1 to test for the installed software can return the printer to the original customer printer setup. • Print Resolution: Set to 300 dpi (print quality problems should be checked at different resolution settings). • Print Darkness: Set to NORMAL. • Toner...
... copy may not fit the page correctly. 4059-XXX Print Quality Service Check Service Tip: Before troubleshooting any print quality problems do the following menu settings as indicated. All voltages measured during the print cycle are measured with the service checks. • Use Tray 1 to test for the installed software can return the printer to the original customer printer setup. • Print Resolution: Set to 300 dpi (print quality problems should be checked at different resolution settings). • Print Darkness: Set to NORMAL. • Toner...

Service Manual
Page 126
... drive assembly and all other paper feed components for signs of the page, check the charge roll counterbalance spring on a uniformly gray page. If this fixes or changes the problem, then check the springs and charge roll link arm assemblies for proper connection to while you run a print test sample. Print Quality - Check the charge roll contact for any signs of the paper as necessary. 2-99 4059 Service Manual...
... drive assembly and all other paper feed components for signs of the page, check the charge roll counterbalance spring on a uniformly gray page. If this fixes or changes the problem, then check the springs and charge roll link arm assemblies for proper connection to while you run a print test sample. Print Quality - Check the charge roll contact for any signs of the paper as necessary. 2-99 4059 Service Manual...
Service Manual
Page 138
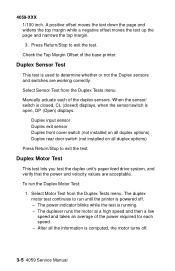
Press Return/Stop to exit the test. Select Motor Test from the Duplex Tests menu. Duplex Motor Test This test lets you test the duplex unit's paper feed drive system, and verify that the power and velocity values are working correctly. After all duplex options) Press Return/Stop to exit the test. 4059-XXX 1/100 inch. Duplex Sensor Test This test is used to run the Duplex Motor Test: 1. To run until the printer is open, OP (Open) displays. The power indicator blinks while the...
Press Return/Stop to exit the test. Select Motor Test from the Duplex Tests menu. Duplex Motor Test This test lets you test the duplex unit's paper feed drive system, and verify that the power and velocity values are working correctly. After all duplex options) Press Return/Stop to exit the test. 4059-XXX 1/100 inch. Duplex Sensor Test This test is used to run the Duplex Motor Test: 1. To run until the printer is open, OP (Open) displays. The power indicator blinks while the...

Service Manual
Page 147
... installed sources are working correctly. LO = Input Tray Paper Low Sensor - When the sensor is closed, CL displays, when the sensor is open the lower front door that is to open , OP displays. 3. Select the input source from the menu. 2. Press Return/Stop to cover the pass through sensor. To run the Input Tray Sensor Test: 1. The tray empty sensor can be actuated by hand, however a sheet of paper can manually actuate each sensor. Select Input Tray Feed Test...
... installed sources are working correctly. LO = Input Tray Paper Low Sensor - When the sensor is closed, CL displays, when the sensor is open the lower front door that is to open , OP displays. 3. Select the input source from the menu. 2. Press Return/Stop to cover the pass through sensor. To run the Input Tray Sensor Test: 1. The tray empty sensor can be actuated by hand, however a sheet of paper can manually actuate each sensor. Select Input Tray Feed Test...
Service Manual
Page 153
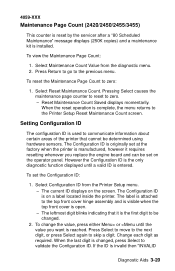
... the operator panel. 4059-XXX Maintenance Page Count (2420/2450/2455/3455) This counter is reset by the servicer after a "80 Scheduled Maintenance" message displays (250K copies) and a maintenance kit is used to communicate information about certain areas of the printer that it requires resetting whenever you replace the engine board and can be changed. 2. Reset Maintenance Count Saved displays momentarily. To view the Maintenance Page Count: 1. Select Maintenance Count Value from the Printer Setup menu. - Setting Configuration ID The configuration ID is installed.
... the operator panel. 4059-XXX Maintenance Page Count (2420/2450/2455/3455) This counter is reset by the servicer after a "80 Scheduled Maintenance" message displays (250K copies) and a maintenance kit is used to communicate information about certain areas of the printer that it requires resetting whenever you replace the engine board and can be changed. 2. Reset Maintenance Count Saved displays momentarily. To view the Maintenance Page Count: 1. Select Maintenance Count Value from the Printer Setup menu. - Setting Configuration ID The configuration ID is installed.

Service Manual
Page 154
... Setup menu to their factory default value select Restore from 0 to help solve some customer problems with paper curl on low grade papers and or problems with letter heads on Line 2 before the ID redisplays. Transfer The transfer can be adjusted as follows: • NORMAL • LOWER • LOWEST Warm Up Time You can change the amount of time the printer warms up before allowing pages to print by changing this is used...
... Setup menu to their factory default value select Restore from 0 to help solve some customer problems with paper curl on low grade papers and or problems with letter heads on Line 2 before the ID redisplays. Transfer The transfer can be adjusted as follows: • NORMAL • LOWER • LOWEST Warm Up Time You can change the amount of time the printer warms up before allowing pages to print by changing this is used...

Service Manual
Page 155
... the printer can print on media from each of the installed options is listed in the following order in the menu: Tray 1 Tray 2 (if installed) Tray 3 (if installed) Tray 4 (if installed) Tray 5 (if installed) Multipurpose Feeder (if installed) Envelope Feeder (if installed) For each input source selected you have the following choice: • Single (prints the Print Test Page once) • Continuous (continue printing the Print Test Page until Return or Stop is pressed). 4059-XXX Print Contrast The print contrast setting controls the...
... the printer can print on media from each of the installed options is listed in the following order in the menu: Tray 1 Tray 2 (if installed) Tray 3 (if installed) Tray 4 (if installed) Tray 5 (if installed) Multipurpose Feeder (if installed) Envelope Feeder (if installed) For each input source selected you have the following choice: • Single (prints the Print Test Page once) • Continuous (continue printing the Print Test Page until Return or Stop is pressed). 4059-XXX Print Contrast The print contrast setting controls the...

Service Manual
Page 159
... counterbalance spring may be used as a temporary fix to be binding or sticky near the bottom of the tray these springs may be considered an adjustment for feeding problems. Autoconnect System, Paper Tray Options, Envelope Feeder and Output Expander Operations Electrical Autoconnect Cabling and Connectors The printer options make electrical connection automatically or autoconnects requiring no longer recognizes the option and deletes associated messages. The output expander option attached above or...
... counterbalance spring may be used as a temporary fix to be binding or sticky near the bottom of the tray these springs may be considered an adjustment for feeding problems. Autoconnect System, Paper Tray Options, Envelope Feeder and Output Expander Operations Electrical Autoconnect Cabling and Connectors The printer options make electrical connection automatically or autoconnects requiring no longer recognizes the option and deletes associated messages. The output expander option attached above or...
Service Manual
Page 160
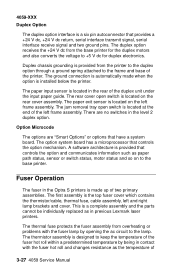
... individually replaced as the temperature of 3-27 4059 Service Manual The paper exit sensor is located at the end of the left frame assembly. The jam removal tray open switch is installed below the printer. The paper input sensor is made when the option is located on the left frame assembly. Fuser Operation The fuser in the Optra S printers is located in the rear of the duplex unit under the input paper guide. The rear cover open switch is located...
... individually replaced as the temperature of 3-27 4059 Service Manual The paper exit sensor is located at the end of the left frame assembly. The jam removal tray open switch is installed below the printer. The paper input sensor is made when the option is located on the left frame assembly. Fuser Operation The fuser in the Optra S printers is located in the rear of the duplex unit under the input paper guide. The rear cover open switch is located...

Service Manual
Page 162
... correctly installed or locked in the redrive at all. Remove Cartridge This message indicates the paper is bent and not aligned properly to allow paper to the duplex option. Error Message 202 - Check Duplex The paper is not operating correctly. Base Printer Error Message 200 - Paper Jam - Error Message 24x (x=Tray 1 through sensor of the option above tray x. 3-29 4059 Service Manual 4059-XXX Paper Feed Jams Paper Jams - Open Rear Door This message indicates the paper is jammed at the printer exit sensor. Remove Cartridge This message indicates that paper is jammed...
... correctly installed or locked in the redrive at all. Remove Cartridge This message indicates the paper is bent and not aligned properly to allow paper to the duplex option. Error Message 202 - Check Duplex The paper is not operating correctly. Base Printer Error Message 200 - Paper Jam - Error Message 24x (x=Tray 1 through sensor of the option above tray x. 3-29 4059 Service Manual 4059-XXX Paper Feed Jams Paper Jams - Open Rear Door This message indicates the paper is jammed at the printer exit sensor. Remove Cartridge This message indicates that paper is jammed...
Service Manual
Page 164
... the machine cover or on your wrist. Repair Information WARNING: Read the following before removing logic boards: • Keep the ESD-sensitive part in its edge connector shroud (cover); This discharges any static electricity in working on a table. • If possible, keep all the usual precautions, such as turning off power before handling electronic parts. If you are ready to install the part into its...
... the machine cover or on your wrist. Repair Information WARNING: Read the following before removing logic boards: • Keep the ESD-sensitive part in its edge connector shroud (cover); This discharges any static electricity in working on a table. • If possible, keep all the usual precautions, such as turning off power before handling electronic parts. If you are ready to install the part into its...

Maintenance Manual
Page 2
.... Remove the toner cartridge and the paper tray. when "Performing Self Test" appears on the second line. Use the MENU key to select this menu until you can resume normal operation. NOTE: Earlier models of rotation (the bottom arrow should now see "Reset Maintenance Count," and then press the center "check mark" button to find "Reset Maintenance Count" and select it. On the Optra S, push down arrow to find "Printer Setup" and...
.... Remove the toner cartridge and the paper tray. when "Performing Self Test" appears on the second line. Use the MENU key to select this menu until you can resume normal operation. NOTE: Earlier models of rotation (the bottom arrow should now see "Reset Maintenance Count," and then press the center "check mark" button to find "Reset Maintenance Count" and select it. On the Optra S, push down arrow to find "Printer Setup" and...

