Quick Reference
Page 4
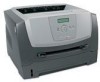
Common light sequences (continued) = On = Blinking = Slow blink Empty = Off Printer Condition Complex page Continue Toner Low / Error Replace PC Kit Load Paper Paper Jam Ready Cancel job/ Reset printer Load print media Load manual feeder Toner low Toner cartridge region mismatch Photoconductor kit life warning Replace photoconductor (printer hard stop) Programming engine code/ Programming system code Understanding the control panel lights 4
Common light sequences (continued) = On = Blinking = Slow blink Empty = Off Printer Condition Complex page Continue Toner Low / Error Replace PC Kit Load Paper Paper Jam Ready Cancel job/ Reset printer Load print media Load manual feeder Toner low Toner cartridge region mismatch Photoconductor kit life warning Replace photoconductor (printer hard stop) Programming engine code/ Programming system code Understanding the control panel lights 4
User's Guide
Page 3
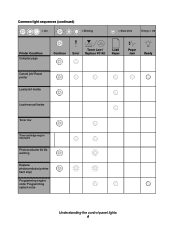
Contents Chapter 1: Learning about the printer 5 Printer overview ...5 Understanding the control panel ...8 Chapter 2: Understanding print media guidelines 10 What types of print media can be loaded? ...10 Selecting... 250-sheet drawer or 550-sheet drawer 33 Recognizing installed options ...34 Chapter 5: Maintaining the printer 35 Storing supplies ...35 Conserving supplies ...35 Ordering supplies ...35 Photoconductor kit end-of-life ...39 Maintenance kit ...42 Recycling Lexmark products ...42 Chapter 6: Clearing jams 43 Identifying jams ...43 Understanding jam messages ...43 Clearing ...
Contents Chapter 1: Learning about the printer 5 Printer overview ...5 Understanding the control panel ...8 Chapter 2: Understanding print media guidelines 10 What types of print media can be loaded? ...10 Selecting... 250-sheet drawer or 550-sheet drawer 33 Recognizing installed options ...34 Chapter 5: Maintaining the printer 35 Storing supplies ...35 Conserving supplies ...35 Ordering supplies ...35 Photoconductor kit end-of-life ...39 Maintenance kit ...42 Recycling Lexmark products ...42 Chapter 6: Clearing jams 43 Identifying jams ...43 Understanding jam messages ...43 Clearing ...
User's Guide
Page 36
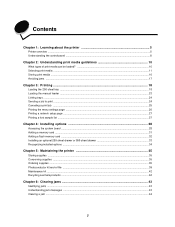
... recommended supplies specifically designed for the printer are: Part number Description Average cartridge yield* World Wide E250X22G Photoconductor kit 30,000 standard pages† For the USA and Canada1 E250A21A Toner Cartridge 3,500 standard pages1 E250A11A Return Program Toner Cartridge 3,500 standard pages1 E352H21A ...
... recommended supplies specifically designed for the printer are: Part number Description Average cartridge yield* World Wide E250X22G Photoconductor kit 30,000 standard pages† For the USA and Canada1 E250A21A Toner Cartridge 3,500 standard pages1 E250A11A Return Program Toner Cartridge 3,500 standard pages1 E352H21A ...
User's Guide
Page 39
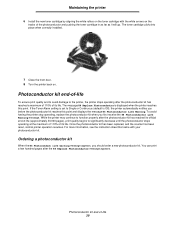
... toner cartridge by aligning the white rollers on the toner cartridge with your photoconductor kit. Photoconductor kit end-of its life. If the Toner Alarm setting is displayed when the printer reaches this point and displays the message 84 Photoconductor Life Warning. Ordering a photoconductor kit When the 84 Photoconduct life warning message appears, you first receive the 84...
... toner cartridge by aligning the white rollers on the toner cartridge with your photoconductor kit. Photoconductor kit end-of its life. If the Toner Alarm setting is displayed when the printer reaches this point and displays the message 84 Photoconductor Life Warning. Ordering a photoconductor kit When the 84 Photoconduct life warning message appears, you first receive the 84...

User's Guide
Page 40
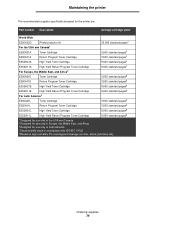
... quality problems. 1 Turn the printer off. 2 Remove the print cartridge assembly. b Grasp the toner cartridge handle, and pull up and out. a Press the button on the base of -life 40 Photoconductor kit end-of the print cartridge assembly. Maintaining the printer Changing a photoconductor kit Warning: When replacing a photoconductor kit, do not leave the new photoconductor kit exposed to release the...
... quality problems. 1 Turn the printer off. 2 Remove the print cartridge assembly. b Grasp the toner cartridge handle, and pull up and out. a Press the button on the base of -life 40 Photoconductor kit end-of the print cartridge assembly. Maintaining the printer Changing a photoconductor kit Warning: When replacing a photoconductor kit, do not leave the new photoconductor kit exposed to release the...

User's Guide
Page 41
... shipped with the white arrows on the tracks of the photoconductor and pushing the toner cartridge in as far as it will go . 7 Close the front door. 8 Turn the printer back on. 9 Reset the photoconductor counter (see Printing the menu settings page on page26. ...Maintaining the printer 5 Install the toner cartridge into the printer by aligning the white rollers on the toner cartridge with the new photoconductor kit). Photoconductor kit end-of-life 41
... shipped with the white arrows on the tracks of the photoconductor and pushing the toner cartridge in as far as it will go . 7 Close the front door. 8 Turn the printer back on. 9 Reset the photoconductor counter (see Printing the menu settings page on page26. ...Maintaining the printer 5 Install the toner cartridge into the printer by aligning the white rollers on the toner cartridge with the new photoconductor kit). Photoconductor kit end-of-life 41
User's Guide
Page 55
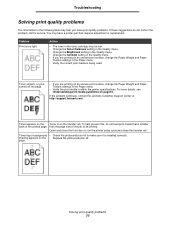
...or background • Check the photoconductor kit to make sure it is on the transfer roll. Troubleshooting Solving print quality problems The information in the Paper menu. • Verify the print media is within the printer specifications. Toner appears on an ...printer setup cycle and clean the transfer roll. If the problem continues, contact the Lexmark Customer Support Center at http://support.lexmark.com . To help you are printing on the Toner is installed correctly. For more details, see Understanding print media guidelines on the • Replace the photoconductor kit...
...or background • Check the photoconductor kit to make sure it is on the transfer roll. Troubleshooting Solving print quality problems The information in the Paper menu. • Verify the print media is within the printer specifications. Toner appears on an ...printer setup cycle and clean the transfer roll. If the problem continues, contact the Lexmark Customer Support Center at http://support.lexmark.com . To help you are printing on the Toner is installed correctly. For more details, see Understanding print media guidelines on the • Replace the photoconductor kit...
User's Guide
Page 56
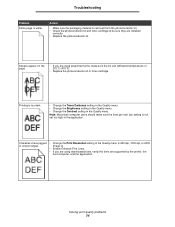
... print quality problems 56 Troubleshooting Problem Entire page is removed from the photoconductor kit. • Check the photoconductor kit and toner cartridge to 600 dpi, 1200 dpi, or 2400 Image Q. • Enable Enhance Fine Lines. • If you are supported by the printer, the host computer, and the application. Streaks appear on the page. &#... setting in the Quality menu. • Change the Contrast setting in the Quality menu to be sure they are installed correctly. • Replace the photoconductor kit. Action • Make sure the packaging material is white.
... print quality problems 56 Troubleshooting Problem Entire page is removed from the photoconductor kit. • Check the photoconductor kit and toner cartridge to 600 dpi, 1200 dpi, or 2400 Image Q. • Enable Enhance Fine Lines. • If you are supported by the printer, the host computer, and the application. Streaks appear on the page. &#... setting in the Quality menu. • Change the Contrast setting in the Quality menu to be sure they are installed correctly. • Replace the photoconductor kit. Action • Make sure the packaging material is white.
User's Guide
Page 57
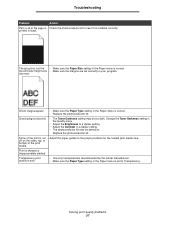
...the Paper Type setting in the Paper menu is correct. • Replace the photoconductor kit. Adjust the paper guides to a darker setting. • The photoconductor kit may be defective. incorrect. Replace the photoconductor kit. Some of the print is cut off on the sides, top, or bottom ... • The Toner Darkness setting may be too dark. Transparency print quality is poor. • Use only transparencies recommended by the printer manufacturer. • Make sure the Paper Type setting in the Quality menu. • Adjust the Brightness to a darker setting. &#...
...the Paper Type setting in the Paper menu is correct. • Replace the photoconductor kit. Adjust the paper guides to a darker setting. • The photoconductor kit may be defective. incorrect. Replace the photoconductor kit. Some of the print is cut off on the sides, top, or bottom ... • The Toner Darkness setting may be too dark. Transparency print quality is poor. • Use only transparencies recommended by the printer manufacturer. • Make sure the Paper Type setting in the Quality menu. • Adjust the Brightness to a darker setting. &#...

User's Guide
Page 72
...guide 19 paper support 5 paper tray adjustment 19 photoconductor kit changing 40 end-of-life 39 ordering 39 recycling 42 preprinted forms 13 print cartridge See toner cartridge print media jams avoiding 17 print media specifications 11 printer settings 7 printhead lens, cleaning 59 printing 18...11 sending a job to print 24 Simple Network Management Protocol 63 supplies conserving 35 recycling 42 storing 35 supplies ordering maintenance kit 42 photoconductor kit 39 toner cartridge 37 system board accessing 28 system password setting 63 T toner cartridge changing 37 ordering 37 recycling 42 ...
...guide 19 paper support 5 paper tray adjustment 19 photoconductor kit changing 40 end-of-life 39 ordering 39 recycling 42 preprinted forms 13 print cartridge See toner cartridge print media jams avoiding 17 print media specifications 11 printer settings 7 printhead lens, cleaning 59 printing 18...11 sending a job to print 24 Simple Network Management Protocol 63 supplies conserving 35 recycling 42 storing 35 supplies ordering maintenance kit 42 photoconductor kit 39 toner cartridge 37 system board accessing 28 system password setting 63 T toner cartridge changing 37 ordering 37 recycling 42 ...


