
Menus and Messages Guide
Page 4
...to change printer settings. Paper Menu Paper Source Paper Size Paper Type Custom Types Universal Setup Substitute Size Paper Texture Paper Weight Paper Loading Finishing Menu Duplex Duplex Bind Copies Blank Pages Collation Separator Sheets Separator Source Multipage Print Multipage Order Multipage View Multipage Border Utilities Menu Print Menus Print Stats Print Net Setup Print Fonts Print Directory Factory Defaults Format Flash Defragment Flash Hex Trace Job Menu Reset Printer PostScript Menu Print PS Error Font Priority PCL Emul Menu Font Source Font Name Point Size Pitch Symbol Set...
...to change printer settings. Paper Menu Paper Source Paper Size Paper Type Custom Types Universal Setup Substitute Size Paper Texture Paper Weight Paper Loading Finishing Menu Duplex Duplex Bind Copies Blank Pages Collation Separator Sheets Separator Source Multipage Print Multipage Order Multipage View Multipage Border Utilities Menu Print Menus Print Stats Print Net Setup Print Fonts Print Directory Factory Defaults Format Flash Defragment Flash Hex Trace Job Menu Reset Printer PostScript Menu Print PS Error Font Priority PCL Emul Menu Font Source Font Name Point Size Pitch Symbol Set...
Menus and Messages Guide
Page 9
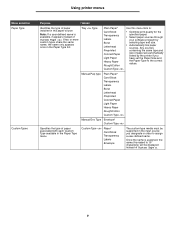
... type and size. • Automatically link paper sources. Tray Type Plain Paper* Card Stock Transparency Labels Bond Letterhead Preprinted Colored Paper Light Paper Heavy Paper Rough/Cotton Custom Type Use this paper source Note: If a user-defined name is assigned, the name (truncated to assign a user-defined name. Using printer menus Menu selection Paper Type Custom Types Purpose Values Identifies the type of paper installed in this menu item to: • Optimize print quality for the specified paper. • Select paper sources through your software...
... type and size. • Automatically link paper sources. Tray Type Plain Paper* Card Stock Transparency Labels Bond Letterhead Preprinted Colored Paper Light Paper Heavy Paper Rough/Cotton Custom Type Use this paper source Note: If a user-defined name is assigned, the name (truncated to assign a user-defined name. Using printer menus Menu selection Paper Type Custom Types Purpose Values Identifies the type of paper installed in this menu item to: • Optimize print quality for the specified paper. • Select paper sources through your software...
Menus and Messages Guide
Page 13
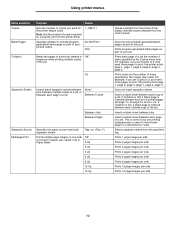
... Prints entire job the number of times specified by the Copies menu item. Using printer menus Menu selection Copies Blank Pages Collation Purpose Values Sets the number of copies you want to insert blank pages in a document for a specific job from the printer driver. 1...999 (1*) Specifies whether to include programgenerated blank pages as part of your printed output Do Not Print* Print Keeps the pages of a print job stacked in Off* sequence when printing multiple copies of the job On Separator Sheets Inserts blank separator sheets between None* jobs, between multiple copies...
... Prints entire job the number of times specified by the Copies menu item. Using printer menus Menu selection Copies Blank Pages Collation Purpose Values Sets the number of copies you want to insert blank pages in a document for a specific job from the printer driver. 1...999 (1*) Specifies whether to include programgenerated blank pages as part of your printed output Do Not Print* Print Keeps the pages of a print job stacked in Off* sequence when printing multiple copies of the job On Separator Sheets Inserts blank separator sheets between None* jobs, between multiple copies...
Menus and Messages Guide
Page 14
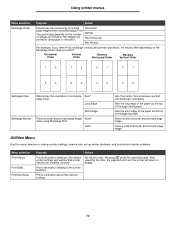
... number Vertical of images and whether the images are installed correctly Prints information relating to Ready. 14 After selecting this item, the page will print and the printer will return to the printer statistics Prints information about the network settings Values No value for this menu selection to change printer settings, remove jobs, set up printer hardware, and troubleshoot printer problems. Menu selection Print Menus Print Stats Print Net Setup Purpose Prints information relating to the default printer settings and verifies that printer options...
... number Vertical of images and whether the images are installed correctly Prints information relating to Ready. 14 After selecting this item, the page will print and the printer will return to the printer statistics Prints information about the network settings Values No value for this menu selection to change printer settings, remove jobs, set up printer hardware, and troubleshoot printer problems. Menu selection Print Menus Print Stats Print Net Setup Purpose Prints information relating to the default printer settings and verifies that printer options...
Menus and Messages Guide
Page 21
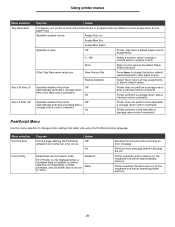
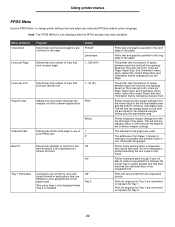
...%. Using printer menus Menu selection Tray Renumber Auto CR after LF Auto LF after CR Purpose Values Configures your printer to work with printer drivers or programs that affect jobs using the PostScript printer language. Printer performs a carriage return after a line feed control command. Menu selection Print PS Error Font Priority Purpose Prints a page defining the PostScript emulation error when an error occurs Values Off* On Establishes the font search order Font Priority is only displayed when a formatted flash is installed, is...
...%. Using printer menus Menu selection Tray Renumber Auto CR after LF Auto LF after CR Purpose Values Configures your printer to work with printer drivers or programs that affect jobs using the PostScript printer language. Printer performs a carriage return after a line feed control command. Menu selection Print PS Error Font Priority Purpose Prints a page defining the PostScript emulation error when an error occurs Values Off* On Establishes the font search order Font Priority is only displayed when a formatted flash is installed, is...
Menus and Messages Guide
Page 22
... the margin settings from software applications Whole Character Set Best Fit Determines which code page to use different source assignments for Tray 1. An error message is only displayed after the PPDS emulator has been activated. This menu item is only displayed when Tray 2 is installed. Instead, the printer tries to select another font that print on each page 1...255 (64*) Lines per Page. Print jobs are converted to requests for the paper trays. Using printer menus PPDS Menu Use...
... the margin settings from software applications Whole Character Set Best Fit Determines which code page to use different source assignments for Tray 1. An error message is only displayed after the PPDS emulator has been activated. This menu item is only displayed when Tray 2 is installed. Instead, the printer tries to select another font that print on each page 1...255 (64*) Lines per Page. Print jobs are converted to requests for the paper trays. Using printer menus PPDS Menu Use...
Menus and Messages Guide
Page 29
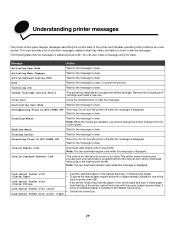
... print cartridge and install a new one of the printer and indicates possible printer problems you must resolve. Load manual feeder with the correct paper type and size, it feeds paper from the control panel. You can also locate a message using the index. Activating Menu Changes Wait for the message to clear. Activating/Deactivating PPDS Wait for the message to clear. Enabling Menus Wait for the message to the internal print server. Download valid code to clear, or cancel the print job. Busy Wait for the message to clear. Change Cartridge...
... print cartridge and install a new one of the printer and indicates possible printer problems you must resolve. Load manual feeder with the correct paper type and size, it feeds paper from the control panel. You can also locate a message using the index. Activating Menu Changes Wait for the message to clear. Activating/Deactivating PPDS Wait for the message to clear. Enabling Menus Wait for the message to the internal print server. Download valid code to clear, or cancel the print job. Busy Wait for the message to clear. Change Cartridge...
Menus and Messages Guide
Page 30
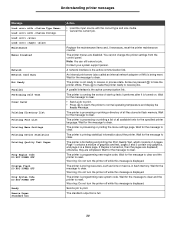
... Message Load with Load with Load Load Maintenance Menus Disabled Network Network Card Busy Not Ready Parallel Performing Self Test Power Saver Printing Directory List Printing Font List Printing Menu Settings Printing Device Statistics Printing Quality Test Pages Prog Engine Code DO NOT POWER OFF Program Flash DO NOT POWER OFF Prog System Code DO NOT POWER OFF Ready Remove Paper Standard bin Action • Load the input source with the correct type and size media. • Cancel the current job. You cannot change the printer settings from the control panel. A network interface...
... Message Load with Load with Load Load Maintenance Menus Disabled Network Network Card Busy Not Ready Parallel Performing Self Test Power Saver Printing Directory List Printing Font List Printing Menu Settings Printing Device Statistics Printing Quality Test Pages Prog Engine Code DO NOT POWER OFF Program Flash DO NOT POWER OFF Prog System Code DO NOT POWER OFF Ready Remove Paper Standard bin Action • Load the input source with the correct type and size media. • Cancel the current job. You cannot change the printer settings from the control panel. A network interface...
Menus and Messages Guide
Page 32
... any data received through the USB port. • Make sure the USB Buffer menu item is not set to Disabled. • To clear the message, press . The printer discards any resources to clear the message and continue printing the job. Understanding printer messages Message 39 Complex Page 42 Cartridge Region Mismatch 50 PPDS font error 51 Defective flash 52 Flash full 53 Unformatted flash 54 Std network software error 55 Unsupported flash in slot 56 Std parallel port disabled 56 Standard USB port disabled 56 Standard USB port disabled...
... any data received through the USB port. • Make sure the USB Buffer menu item is not set to Disabled. • To clear the message, press . The printer discards any resources to clear the message and continue printing the job. Understanding printer messages Message 39 Complex Page 42 Cartridge Region Mismatch 50 PPDS font error 51 Defective flash 52 Flash full 53 Unformatted flash 54 Std network software error 55 Unsupported flash in slot 56 Std parallel port disabled 56 Standard USB port disabled 56 Standard USB port disabled...
Menus and Messages Guide
Page 33
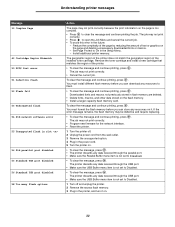
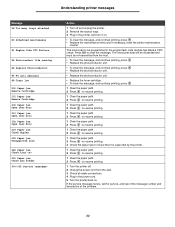
Understanding printer messages Message 58 Too many trays attached 80 Scheduled maintenance 81 Engine Code CFC Failure 84 Photoconduct life warning 84 Replace Photoconductor 84 PC unit abnormal 88 Toner low 200 Paper jam Remove Cartridge 201 Paper jam Remove Cartridge 202 Paper jam Open rear door 231 Paper jam Open rear door 23x Paper jam Open rear door 234 Paper jam Check duplex 235 Paper jam Unsupported size 24x Paper jam Check tray 251 Paper jam Check man feeder 900-999 Service Action 1 Turn off . 2 Unplug the power cord from the host. • To clear the message, and continue printing...
Understanding printer messages Message 58 Too many trays attached 80 Scheduled maintenance 81 Engine Code CFC Failure 84 Photoconduct life warning 84 Replace Photoconductor 84 PC unit abnormal 88 Toner low 200 Paper jam Remove Cartridge 201 Paper jam Remove Cartridge 202 Paper jam Open rear door 231 Paper jam Open rear door 23x Paper jam Open rear door 234 Paper jam Check duplex 235 Paper jam Unsupported size 24x Paper jam Check tray 251 Paper jam Check man feeder 900-999 Service Action 1 Turn off . 2 Unplug the power cord from the host. • To clear the message, and continue printing...
Menus and Messages Guide
Page 34
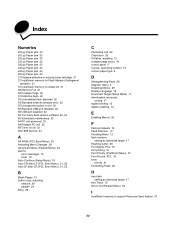
... low 33 900-999 Service 33 A A4 Width (PCL Emul Menu) 20 Activating Menu Changes 29 Advanced Status (Parallel Menu) 24 alarms error messages 18 toner 19 Auto Continue (Setup Menu) 18 Auto CR after LF (PCL Emul Menu) 21, 23 Auto LF after CR (PCL Emul Menu) 21, 23 B Blank Pages 13 buffer sizes, adjusting network 26 parallel 24 Busy 29 C Cancelling Job 29 Close door 29 Collation, enabling 13 complex page errors 18 control panel 5 Copies, specifying number 13 custom paper type 9 D Defragmenting Flash 29 diagram, menu 4 Disabling Menus 29 Display Language...
... low 33 900-999 Service 33 A A4 Width (PCL Emul Menu) 20 Activating Menu Changes 29 Advanced Status (Parallel Menu) 24 alarms error messages 18 toner 19 Auto Continue (Setup Menu) 18 Auto CR after LF (PCL Emul Menu) 21, 23 Auto LF after CR (PCL Emul Menu) 21, 23 B Blank Pages 13 buffer sizes, adjusting network 26 parallel 24 Busy 29 C Cancelling Job 29 Close door 29 Collation, enabling 13 complex page errors 18 control panel 5 Copies, specifying number 13 custom paper type 9 D Defragmenting Flash 29 diagram, menu 4 Disabling Menus 29 Display Language...
Menus and Messages Guide
Page 35
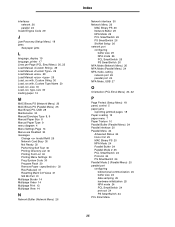
...jams L language, display 19 language, printer 17 Lines per Page (PCL Emul Menu) 20, 22 Load Manual 29 Load Manual 29 Load Manual 29 Load Manual 29 Load, src with, Custom String 30 Load, src with, Custom Type Name 30 Load, src, size 30 Load, src, type, size 30 loading paper 12 M MAC Binary PS (Network Menu) 26 MAC Binary PS (Parallel Menu) 25 Mac Binary PS, USB 28 Maintenance 30 Manual Envelope Type 8, 9 Manual Paper Size 8 Manual Paper Type 9 menu diagram 4 Menu Settings Page 14 Menus are Disabled 30 messages Change Invalid Refill 29 Network Card Busy 30 Not Ready 30 Performing Self Test...
...jams L language, display 19 language, printer 17 Lines per Page (PCL Emul Menu) 20, 22 Load Manual 29 Load Manual 29 Load Manual 29 Load Manual 29 Load, src with, Custom String 30 Load, src with, Custom Type Name 30 Load, src, size 30 Load, src, type, size 30 loading paper 12 M MAC Binary PS (Network Menu) 26 MAC Binary PS (Parallel Menu) 25 Mac Binary PS, USB 28 Maintenance 30 Manual Envelope Type 8, 9 Manual Paper Size 8 Manual Paper Type 9 menu diagram 4 Menu Settings Page 14 Menus are Disabled 30 messages Change Invalid Refill 29 Network Card Busy 30 Not Ready 30 Performing Self Test...
Quick Reference
Page 6
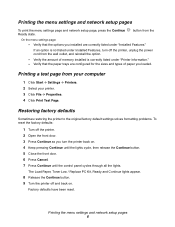
... the front door. 6 Press Cancel. 7 Press Continue until the control panel cycles through all the lights. Printing a test page from the On the menu settings page: - If an option is correctly listed under "Installed Features." Printing the menu settings and network setup pages To print the menu settings page and network setup page, press the Continue Ready state. Printing the menu settings and network setup pages 6 The Load Paper, Toner Low / Replace PC Kit, Ready and Continue lights appear. 8 Release the Continue button. 9 Turn the printer off the printer. 2 Open the front door. 3 Press...
... the front door. 6 Press Cancel. 7 Press Continue until the control panel cycles through all the lights. Printing a test page from the On the menu settings page: - If an option is correctly listed under "Installed Features." Printing the menu settings and network setup pages To print the menu settings page and network setup page, press the Continue Ready state. Printing the menu settings and network setup pages 6 The Load Paper, Toner Low / Replace PC Kit, Ready and Continue lights appear. 8 Release the Continue button. 9 Turn the printer off the printer. 2 Open the front door. 3 Press...
User's Guide
Page 3
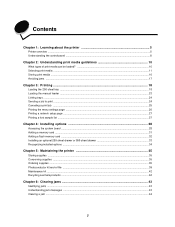
... 5 Printer overview ...5 Understanding the control panel ...8 Chapter 2: Understanding print media guidelines 10 What types of print media can be loaded? ...10 Selecting print media ...11 Storing print media ...16 Avoiding jams ...17 Chapter 3: Printing ...18 Loading the 250-sheet tray ...18 Loading the manual feeder ...23 Linking trays ...24 Sending a job to print ...24 Canceling a print job ...25 Printing the menu settings page ...26 Printing a network setup page ...27 Printing a font sample list ...27 Chapter 4: Installing options 28 Accessing the system board ...28 Adding a memory card...
... 5 Printer overview ...5 Understanding the control panel ...8 Chapter 2: Understanding print media guidelines 10 What types of print media can be loaded? ...10 Selecting print media ...11 Storing print media ...16 Avoiding jams ...17 Chapter 3: Printing ...18 Loading the 250-sheet tray ...18 Loading the manual feeder ...23 Linking trays ...24 Sending a job to print ...24 Canceling a print job ...25 Printing the menu settings page ...26 Printing a network setup page ...27 Printing a font sample list ...27 Chapter 4: Installing options 28 Accessing the system board ...28 Adding a memory card...
User's Guide
Page 15
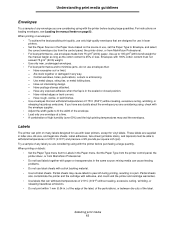
For instructions on loading envelopes, see Loading the manual feeder on labels: • Set the Paper Type menu item to 105 g/m2 (28 lb bond) weight for use envelopes made from MarkVision Professional. • Do not load labels together with adhesive, and could void the printer and cartridge warranties. • Use labels that are designed for the manual feeder as long as the cotton content is in letter-size, A4-size, and legal-size sheets. Have excessive...
For instructions on loading envelopes, see Loading the manual feeder on labels: • Set the Paper Type menu item to 105 g/m2 (28 lb bond) weight for use envelopes made from MarkVision Professional. • Do not load labels together with adhesive, and could void the printer and cartridge warranties. • Use labels that are designed for the manual feeder as long as the cotton content is in letter-size, A4-size, and legal-size sheets. Have excessive...
User's Guide
Page 24
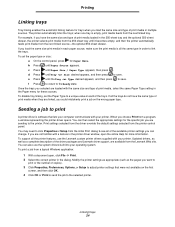
... Lexmark Web site. Sending a job to the selected printer. b Press until Paper Size / Paper Type appears, then press . To print a job from the printer control panel. To set the Paper Type to a unique value in each paper source, make sure the print media is all of the available printer settings you load the same size and type of print media loaded in the Paper menu for these sources. e Press until Tray Size desired appears, and then press to link the trays. To disable tray linking, set...
... Lexmark Web site. Sending a job to the selected printer. b Press until Paper Size / Paper Type appears, then press . To print a job from the printer control panel. To set the Paper Type to a unique value in each paper source, make sure the print media is all of the available printer settings you load the same size and type of print media loaded in the Paper menu for these sources. e Press until Tray Size desired appears, and then press to link the trays. To disable tray linking, set...
User's Guide
Page 35
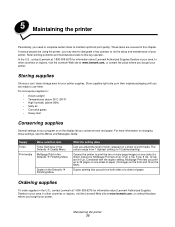
... on the display let you conserve toner and paper. In other countries or regions, visit the Lexmark Web site at 1-800-539-6275 for your printer. Do not expose supplies to this chapter. Duplex printing lets you print on changing these settings, see the Menus and Messages Guide. 5 Maintaining the printer Periodically, you need to complete certain tasks to 32 pages on one side of a sheet. In the...
... on the display let you conserve toner and paper. In other countries or regions, visit the Lexmark Web site at 1-800-539-6275 for your printer. Do not expose supplies to this chapter. Duplex printing lets you print on changing these settings, see the Menus and Messages Guide. 5 Maintaining the printer Periodically, you need to complete certain tasks to 32 pages on one side of a sheet. In the...
User's Guide
Page 51
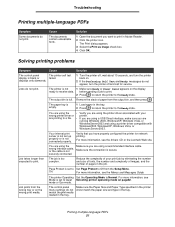
... printing problems Symptom Cause Solution The control panel The printer self test display is empty. 1 Load paper in the tray. 2 Press to return the printer to Quiet Selecting printer operating mode on . 2 If the Performing Self Test and Ready messages do not match the print media loaded in the tray. The paper tray is blank or failed. Your internal print server is not set to Set Page Protect to receive data. wrong interface cable, or the cable is not Make sure the connection...
... printing problems Symptom Cause Solution The control panel The printer self test display is empty. 1 Load paper in the tray. 2 Press to return the printer to Quiet Selecting printer operating mode on . 2 If the Performing Self Test and Ready messages do not match the print media loaded in the tray. The paper tray is blank or failed. Your internal print server is not set to Set Page Protect to receive data. wrong interface cable, or the cable is not Make sure the connection...
User's Guide
Page 52
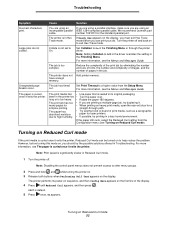
... problem. The printer does not Add printer memory. Turning on heavy print media, open the rear exit door for laser printers. • If possible, try duplexing it exits the printer, Reduced Curl mode can print your job. Note: Print speed is curled once it exits the printer. We recommend Lexmark part cable. Reduce the complexity of the print job by eliminating the number and size of fonts, the number and complexity of images, and the number of print media, such as a xerographic paper...
... problem. The printer does not Add printer memory. Turning on heavy print media, open the rear exit door for laser printers. • If possible, try duplexing it exits the printer, Reduced Curl mode can print your job. Note: Print speed is curled once it exits the printer. We recommend Lexmark part cable. Reduce the complexity of the print job by eliminating the number and size of fonts, the number and complexity of images, and the number of print media, such as a xerographic paper...
User's Guide
Page 69
... party of products, supplies or parts • Products, supplies, parts, materials (such as warranted during the warranty period, contact a Remarketer or Lexmark for this product under this limited warranty is not free of Lexmark. ALL INFORMATION, SPECIFICATIONS, PRICES, AND SERVICES ARE SUBJECT TO CHANGE AT ANY TIME WITHOUT NOTICE. Lexmark's liability for actual damages from any maintenance items included with Lexmark user's guides, manuals, instructions or guidance •...
... party of products, supplies or parts • Products, supplies, parts, materials (such as warranted during the warranty period, contact a Remarketer or Lexmark for this product under this limited warranty is not free of Lexmark. ALL INFORMATION, SPECIFICATIONS, PRICES, AND SERVICES ARE SUBJECT TO CHANGE AT ANY TIME WITHOUT NOTICE. Lexmark's liability for actual damages from any maintenance items included with Lexmark user's guides, manuals, instructions or guidance •...


