User's Reference
Page 6
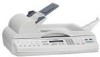
... displayed. If necessary, press Stop/Clear to reset the control panel to copy mode. 3 Press Go/Send. 1 Making copies Quick copies 1 Make sure the MFP (Multifunction Printer) control panel is in copy mode and the Ready status message is displayed. If necessary, press Stop/Clear to return to the drawing...to Place Next Or Stop, place the next page on the flatbed and then press Go/Send to continue scanning. Each of copies you are installed on the control panel to start scanning your documents. Make sure you want to make using the flatbed of the scanner, watch the control ...
... displayed. If necessary, press Stop/Clear to reset the control panel to copy mode. 3 Press Go/Send. 1 Making copies Quick copies 1 Make sure the MFP (Multifunction Printer) control panel is in copy mode and the Ready status message is displayed. If necessary, press Stop/Clear to return to the drawing...to Place Next Or Stop, place the next page on the flatbed and then press Go/Send to continue scanning. Each of copies you are installed on the control panel to start scanning your documents. Make sure you want to make using the flatbed of the scanner, watch the control ...
User's Reference
Page 17
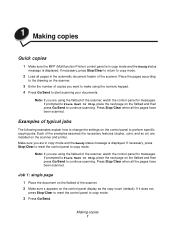
...to PC or Scan to e-mail profiles. Step 1: Set up your originals and presets the MFP control panel to those settings. if you select. 4 Make sure to PC profiles. Lexmark™ ScanBack™ Utility is shipped on the scanner. Use ScanBack utility The ScanBack Utility .... Place the pages according to PC profile 1 Launch the ScanBack Utility. If you installed the software using the default directories, click Start, Programs, Lexmark, MFP, and then ScanBack Utility. 2 Select the MFP you want to view or print the final directions • Create Shortcut -- if you want to use ...
...to PC or Scan to e-mail profiles. Step 1: Set up your originals and presets the MFP control panel to those settings. if you select. 4 Make sure to PC profiles. Lexmark™ ScanBack™ Utility is shipped on the scanner. Use ScanBack utility The ScanBack Utility .... Place the pages according to PC profile 1 Launch the ScanBack Utility. If you installed the software using the default directories, click Start, Programs, Lexmark, MFP, and then ScanBack Utility. 2 Select the MFP you want to view or print the final directions • Create Shortcut -- if you want to use ...
User's Reference
Page 18
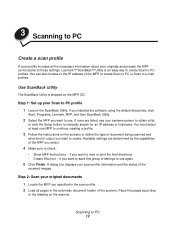
Note: If you are stored on the MarkNet print server installed in the SCAN → PROFILE list on the MFP control panel. 3 Click Submit. Use the MarkNet Web pages The MarkNet™ resident Web pages are using the flatbed of the MFP in a file name. 2 Assign a Profile Name. For example, ...continue scanning. For more explanation about the settings, see SCAN → PROFILE. A Receiving Image window appears on your desktop indicating that appears in your MFP. Place the pages according to the drawing on page 14. 5 Click Next. Step 1: Set up your PC is saved in a directory or ...
Note: If you are stored on the MarkNet print server installed in the SCAN → PROFILE list on the MFP control panel. 3 Click Submit. Use the MarkNet Web pages The MarkNet™ resident Web pages are using the flatbed of the MFP in a file name. 2 Assign a Profile Name. For example, ...continue scanning. For more explanation about the settings, see SCAN → PROFILE. A Receiving Image window appears on your desktop indicating that appears in your MFP. Place the pages according to the drawing on page 14. 5 Click Next. Step 1: Set up your PC is saved in a directory or ...
User's Reference
Page 43
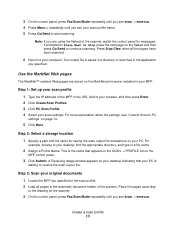
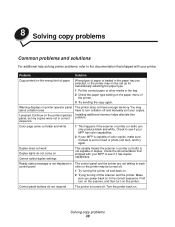
...Wrong type of paper is loaded in the paper tray you power back on in correct sequence The printer does not have to turn on . Installing additional memory helps alleviate this problem. Check to see if it has duplex capabilities. Control panel buttons do not come on . 2 Trying ...turning off . 8 Solving copy problems Common problems and solutions For additional help solving printer problems, refer to the documentation that shipped with your MFP is capable of color copies, make sure Content is set up for automatically selecting the paper type. 1 Put the correct paper or other or...
...Wrong type of paper is loaded in the paper tray you power back on in correct sequence The printer does not have to turn on . Installing additional memory helps alleviate this problem. Check to see if it has duplex capabilities. Control panel buttons do not come on . 2 Trying ...turning off . 8 Solving copy problems Common problems and solutions For additional help solving printer problems, refer to the documentation that shipped with your MFP is capable of color copies, make sure Content is set up for automatically selecting the paper type. 1 Put the correct paper or other or...

User's Reference
Page 45
Check printer documentation for all scanner and printer combinations. Message appears if user presses Duplex on the printer. This message does not display for information about installing the duplex option. Copy error messages 40 Error Close Door No Duplex Option Installed Description Message appears in the top line of the control panel display. Toner cartridge door is not installed correctly on the MFP control panel, but the duplex option is open.
Check printer documentation for all scanner and printer combinations. Message appears if user presses Duplex on the printer. This message does not display for information about installing the duplex option. Copy error messages 40 Error Close Door No Duplex Option Installed Description Message appears in the top line of the control panel display. Toner cartridge door is not installed correctly on the MFP control panel, but the duplex option is open.
User's Reference
Page 47
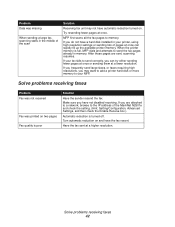
.... If you may not have not disabled receiving. If you frequently send large faxes, or faxes requiring high resolutions, you do not have a hard disk installed in memory. Have the fax sent at once. Turn automatic reduction on two pages Fax quality is full..., MFP dials and attempts to memory. Try resending fewer pages at a higher resolution. MFP first scans all the fax pages to send the fax pages already in your MFP. When the printer memory is poor Solution Have the sender resend the...
.... If you may not have not disabled receiving. If you frequently send large faxes, or faxes requiring high resolutions, you do not have a hard disk installed in memory. Have the fax sent at once. Turn automatic reduction on two pages Fax quality is full..., MFP dials and attempts to memory. Try resending fewer pages at a higher resolution. MFP first scans all the fax pages to send the fax pages already in your MFP. When the printer memory is poor Solution Have the sender resend the...
Setup Guide
Page 3
...option card is properly grounded. All rights reserved. This product contains mercury in later editions. In the United Kingdom and Eire, send to Lexmark International, Inc., Department F95/032-2, 740 West New Circle Road, Lexington, Kentucky 40550, U.S.A. References in which the card is being installed. • Never install...this publication to products, programs, or services do not allow disclaimer of specific Lexmark components. In other replacement parts. • When installing the print server containing the fax modem port, follow all countries in this ...
...option card is properly grounded. All rights reserved. This product contains mercury in later editions. In the United Kingdom and Eire, send to Lexmark International, Inc., Department F95/032-2, 740 West New Circle Road, Lexington, Kentucky 40550, U.S.A. References in which the card is being installed. • Never install...this publication to products, programs, or services do not allow disclaimer of specific Lexmark components. In other replacement parts. • When installing the print server containing the fax modem port, follow all countries in this ...
Setup Guide
Page 4
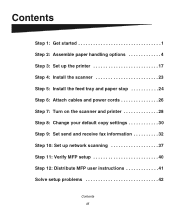
Contents Step 1: Get started 1 Step 2: Assemble paper handling options 4 Step 3: Set up the printer 17 Step 4: Install the scanner 23 Step 5: Install the feed tray and paper stop 24 Step 6: Attach cables and power cords 26 Step 7: Turn on the scanner and printer 28 Step 8: Change your default copy settings 30 Step 9: Set send and receive fax information 32 Step 10: Set up network scanning 37 Step 11: Verify MFP setup 40 Step 12: Distribute MFP user instructions 41 Solve setup problems 42 Contents iii
Contents Step 1: Get started 1 Step 2: Assemble paper handling options 4 Step 3: Set up the printer 17 Step 4: Install the scanner 23 Step 5: Install the feed tray and paper stop 24 Step 6: Attach cables and power cords 26 Step 7: Turn on the scanner and printer 28 Step 8: Change your default copy settings 30 Step 9: Set send and receive fax information 32 Step 10: Set up network scanning 37 Step 11: Verify MFP setup 40 Step 12: Distribute MFP user instructions 41 Solve setup problems 42 Contents iii
Setup Guide
Page 6
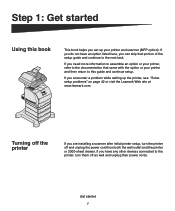
... "Solve setup problems" on page 42 or visit the Lexmark Web site at www.lexmark.com. Get started Using this guide and continue setup. Step 1: Get started 1 If you can skip that came with the option or your printer and scanner (MFP option). If you do not have any other devices connected to... to the next task. If you have an option listed here, you need more information to assemble an option or your printer, refer to the documentation that portion of the setup guide and continue to this book This book helps you are installing a scanner after initial printer setup, turn them...
... "Solve setup problems" on page 42 or visit the Lexmark Web site at www.lexmark.com. Get started Using this guide and continue setup. Step 1: Get started 1 If you can skip that came with the option or your printer and scanner (MFP option). If you do not have any other devices connected to... to the next task. If you have an option listed here, you need more information to assemble an option or your printer, refer to the documentation that portion of the setup guide and continue to this book This book helps you are installing a scanner after initial printer setup, turn them...
Setup Guide
Page 7
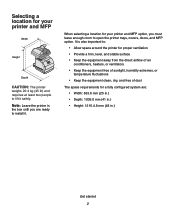
... (41 in.) • Height: 1216.4.8 mm (48 in the box until you must leave enough room to open the printer trays, covers, doors, and MFP option. It is also important to: • Allow space around the printer for proper ventilation • Provide a firm, level, and stable surface • Keep ...; Keep the equipment clean, dry, and free of dust The space requirements for your printer and MFP Width Height Depth CAUTION: The printer weighs 20.4 kg (45 lb) and requires at least two people to lift it . Selecting a location for your printer and MFP option, you are ready to install it safely.
... (41 in.) • Height: 1216.4.8 mm (48 in the box until you must leave enough room to open the printer trays, covers, doors, and MFP option. It is also important to: • Allow space around the printer for proper ventilation • Provide a firm, level, and stable surface • Keep ...; Keep the equipment clean, dry, and free of dust The space requirements for your printer and MFP Width Height Depth CAUTION: The printer weighs 20.4 kg (45 lb) and requires at least two people to lift it . Selecting a location for your printer and MFP option, you are ready to install it safely.
Setup Guide
Page 8
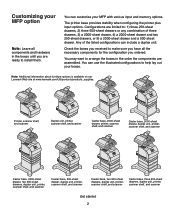
... customize your boxes. Customizing your MFP option Note: Leave all the necessary components for the configuration you ordered. You can include a duplex unit. The printer base provides stability when configuring the printer plus input options. Note: Additional information about furniture options is available on our Lexmark Web site at www.lexmark.com/US/products/products_supplies. Printer... to arrange the boxes in the boxes until you have all components and hardware in the order the components are assembled. You may want to install them.
... customize your boxes. Customizing your MFP option Note: Leave all the necessary components for the configuration you ordered. You can include a duplex unit. The printer base provides stability when configuring the printer plus input options. Note: Additional information about furniture options is available on our Lexmark Web site at www.lexmark.com/US/products/products_supplies. Printer... to arrange the boxes in the boxes until you have all components and hardware in the order the components are assembled. You may want to install them.
Setup Guide
Page 9
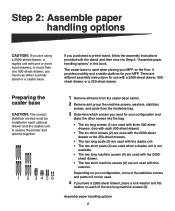
It provides mobility and a stable platform for your MFP on each 500-sheet drawer) • The six short screws... (5). There are different assembly instructions for use either a printer stand or a caster base. Assemble paper handling options 4 Preparing the caster base CAUTION: The correct stabilizer screws must use with the 2000- If you purchased a...screws (1) are used with three 500-sheet drawers. (two with each of the stabilizer screws and posts will not be installed in this scanner. sheet drawer. • The two short machine screws (6) are not used . 4 If you have...
It provides mobility and a stable platform for your MFP on each 500-sheet drawer) • The six short screws... (5). There are different assembly instructions for use either a printer stand or a caster base. Assemble paper handling options 4 Preparing the caster base CAUTION: The correct stabilizer screws must use with the 2000- If you purchased a...screws (1) are used with three 500-sheet drawers. (two with each of the stabilizer screws and posts will not be installed in this scanner. sheet drawer. • The two short machine screws (6) are not used . 4 If you have...
Setup Guide
Page 10
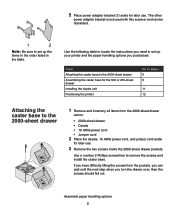
... 2000-sheet drawer pockets. Topic Attaching the caster base to the 2000-sheet drawer Assembling the caster base for the 500 or 250-sheet drawer Installing the duplex unit Positioning the printer Go to page... 5 8 11 12 Attaching the caster base to set up the items in the order listed in... 1 Remove and inventory all items from the pockets, you can be discarded. Use a number 2 Phillips screwdriver to set up your printer and the paper handling options you need to remove the screws and install the caster base. Use the following table to locate the instructions you purchased.
... 2000-sheet drawer pockets. Topic Attaching the caster base to the 2000-sheet drawer Assembling the caster base for the 500 or 250-sheet drawer Installing the duplex unit Positioning the printer Go to page... 5 8 11 12 Attaching the caster base to set up the items in the order listed in... 1 Remove and inventory all items from the pockets, you can be discarded. Use a number 2 Phillips screwdriver to set up your printer and the paper handling options you need to remove the screws and install the caster base. Use the following table to locate the instructions you purchased.

Setup Guide
Page 13
Installing screws in the location you have chosen for your MFP. Assemble paper handling options 8 Assembling the caster base for the 500 or 250-sheet drawer 1 Remove the caster cover, screws, and frame assembly from the caster box, and place ... drawer 1 Insert two short stabilizer screws (2) into the pockets of the 2000-sheet drawer. 2 Tighten the screws securely. 3 If you have a duplex unit, go to "Installing the duplex unit" on page 11 otherwise, go to "Positioning the printer" on page 12.
Installing screws in the location you have chosen for your MFP. Assemble paper handling options 8 Assembling the caster base for the 500 or 250-sheet drawer 1 Remove the caster cover, screws, and frame assembly from the caster box, and place ... drawer 1 Insert two short stabilizer screws (2) into the pockets of the 2000-sheet drawer. 2 Tighten the screws securely. 3 If you have a duplex unit, go to "Installing the duplex unit" on page 11 otherwise, go to "Positioning the printer" on page 12.

Setup Guide
Page 14
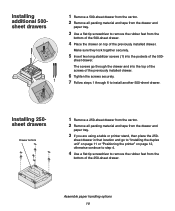
...the drawer and paper tray. 3 If you have additional 500 or 250-sheet drawers, go to "Installing the duplex unit" on page 11, or "Positioning the printer" on page 12. sheet drawer. The screws go to... "Installing additional 500-sheet drawers" on page 10, "Installing 250-sheet drawers" on the caster base. 6 Insert two long stabilizer screws (1) into the caster frame assembly. 7..., go through the drawer, caster cover, and into the pockets of the 500- Assemble paper handling options 9
...the drawer and paper tray. 3 If you have additional 500 or 250-sheet drawers, go to "Installing the duplex unit" on page 11, or "Positioning the printer" on page 12. sheet drawer. The screws go to... "Installing additional 500-sheet drawers" on page 10, "Installing 250-sheet drawers" on the caster base. 6 Insert two long stabilizer screws (1) into the caster frame assembly. 7..., go through the drawer, caster cover, and into the pockets of the 500- Assemble paper handling options 9
Setup Guide
Page 15
...the printer" on top of the previously installed drawer. sheet drawer in that location and go through 6 to install another 500-sheet drawer. sheet drawer. Installing 250sheet drawers Drawer bottom 1 Remove a 250... tray. 3 If you are using a table or printer stand, then place the 250- Installing additional 500sheet drawers 1 Remove a 500-sheet drawer from the carton. 2 Remove all packing material... securely. 5 Insert two long stabilizer screws (1) into the pockets of the previously installed drawer. 6 Tighten the screws securely. 7 Follow steps 1 through the drawer and into the...
...the printer" on top of the previously installed drawer. sheet drawer in that location and go through 6 to install another 500-sheet drawer. sheet drawer. Installing 250sheet drawers Drawer bottom 1 Remove a 250... tray. 3 If you are using a table or printer stand, then place the 250- Installing additional 500sheet drawers 1 Remove a 500-sheet drawer from the carton. 2 Remove all packing material... securely. 5 Insert two long stabilizer screws (1) into the pockets of the previously installed drawer. 6 Tighten the screws securely. 7 Follow steps 1 through the drawer and into the...

Setup Guide
Page 16
... the duplex unit from the bottom of the duplex unit. Assemble paper handling options 11 5 Place the drawer on page 12, otherwise continue to step 4. 4 Use a flat tip screwdriver to "Positioning the printer" on top of the previously installed drawer or caster base. 6 Insert two short stabilizer screws (2) into the caster frame... printer stand, then place the duplex unit in that location and go through the drawer and into the top of the screws of the previously installed drawer or into the pockets of the 250-sheet drawer.
... the duplex unit from the bottom of the duplex unit. Assemble paper handling options 11 5 Place the drawer on page 12, otherwise continue to step 4. 4 Use a flat tip screwdriver to "Positioning the printer" on top of the previously installed drawer or caster base. 6 Insert two short stabilizer screws (2) into the caster frame... printer stand, then place the duplex unit in that location and go through the drawer and into the top of the screws of the previously installed drawer or into the pockets of the 250-sheet drawer.
Setup Guide
Page 17
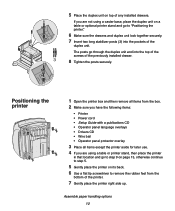
.... 4 If you are not using a caster base, place the duplex unit on a table or optional printer stand and go to step 9 on page 13, otherwise continue to step 5. 5 Gently place the printer on top of any installed drawers. Positioning the printer 1 Open the printer box and then remove all items from the... printer." 6 Make sure the drawers and duplex unit lock together securely. 7 Insert two long stabilizer posts (3) into the top of the screws of the previously installed drawer. 8 Tighten the posts securely. Assemble paper handling options 12
.... 4 If you are not using a caster base, place the duplex unit on a table or optional printer stand and go to step 9 on page 13, otherwise continue to step 5. 5 Gently place the printer on top of any installed drawers. Positioning the printer 1 Open the printer box and then remove all items from the... printer." 6 Make sure the drawers and duplex unit lock together securely. 7 Insert two long stabilizer posts (3) into the top of the screws of the previously installed drawer. 8 Tighten the posts securely. Assemble paper handling options 12

Setup Guide
Page 18
...into the top of the stabilizer screws that were previously installed in the optional drawer. CAUTION: The printer weighs 20.4 kg (45 lb) and requires at least two people to lift it safely. 9 Lower the printer onto the duplex unit, optional drawer, table, or printer cabinet. 10 Make sure... the printer and duplex unit lock together securely. 11 If you have memory or network options to install, go to "Installing printer memory and network options" on page 14 otherwise, go to "Removing the print cartridge packaging" on page 17. b Tighten the posts securely. 8...
...into the top of the stabilizer screws that were previously installed in the optional drawer. CAUTION: The printer weighs 20.4 kg (45 lb) and requires at least two people to lift it safely. 9 Lower the printer onto the duplex unit, optional drawer, table, or printer cabinet. 10 Make sure... the printer and duplex unit lock together securely. 11 If you have memory or network options to install, go to "Installing printer memory and network options" on page 14 otherwise, go to "Removing the print cartridge packaging" on page 17. b Tighten the posts securely. 8...
Setup Guide
Page 19
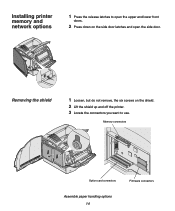
Installing printer memory and network options 1 Press the release latches to open the upper and lower front doors. 2 Press down on the shield. 2 Lift the shield up and off the printer. 3 Locate the connectors you want to use. Removing the shield 1 Loosen, but do not remove, the six screws on the side door latches and open the side door. Memory connectors Option card connectors Firmware connectors Assemble paper handling options 14
Installing printer memory and network options 1 Press the release latches to open the upper and lower front doors. 2 Press down on the shield. 2 Lift the shield up and off the printer. 3 Locate the connectors you want to use. Removing the shield 1 Loosen, but do not remove, the six screws on the side door latches and open the side door. Memory connectors Option card connectors Firmware connectors Assemble paper handling options 14


