Setup Guide
Page 17
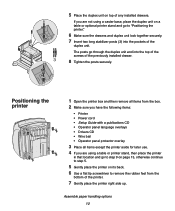
...sure you have the following items: • Printer • Power cord • Setup Guide with a publications CD • Operator panel language overlays • Drivers CD • Wire bail • Operator panel protector overlay 3 Place all items except the printer aside for later use. 4 If you are using a caster ...stand, then place the printer in that location and go through the duplex unit and into the pockets of the duplex unit. Assemble paper handling options 12 5 Place the duplex unit on its back. 6 Use a flat tip screwdriver to "Positioning the printer." 6 Make sure the drawers ...
...sure you have the following items: • Printer • Power cord • Setup Guide with a publications CD • Operator panel language overlays • Drivers CD • Wire bail • Operator panel protector overlay 3 Place all items except the printer aside for later use. 4 If you are using a caster ...stand, then place the printer in that location and go through the duplex unit and into the pockets of the duplex unit. Assemble paper handling options 12 5 Place the duplex unit on its back. 6 Use a flat tip screwdriver to "Positioning the printer." 6 Make sure the drawers ...
Setup Guide
Page 28
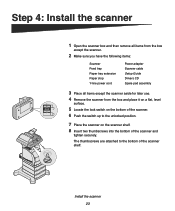
... scanner. 2 Make sure you have the following items: Scanner Feed tray Paper tray extension Paper stop Y-line power cord Power adapter Scanner cable Setup Guide Drivers CD Spare pad assembly 3 Place all items except the scanner aside for later use. 4 Remove the scanner from the box and place it on a flat...
... scanner. 2 Make sure you have the following items: Scanner Feed tray Paper tray extension Paper stop Y-line power cord Power adapter Scanner cable Setup Guide Drivers CD Spare pad assembly 3 Place all items except the scanner aside for later use. 4 Remove the scanner from the box and place it on a flat...
Setup Guide
Page 36
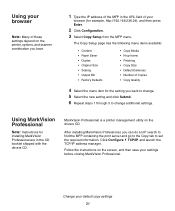
Using your browser Note: Many of these settings depend on the printer, options, and scanner combination you have. 1 Type the IP address of the MFP in the CD booklet shipped with the drivers CD. Using MarkVision Professional Note: Instructions for installing MarkVision Professional are in the URL ...item for example, http://192.168.236.24), and then press Enter. 2 Click Configuration. 3 Select Copy Setup from the MFP menu. Follow the instructions on the drivers CD. The Copy Setup page has the following menu items available: • Content • Paper Saver • Duplex &#...
Using your browser Note: Many of these settings depend on the printer, options, and scanner combination you have. 1 Type the IP address of the MFP in the CD booklet shipped with the drivers CD. Using MarkVision Professional Note: Instructions for installing MarkVision Professional are in the URL ...item for example, http://192.168.236.24), and then press Enter. 2 Click Configuration. 3 Select Copy Setup from the MFP menu. Follow the instructions on the drivers CD. The Copy Setup page has the following menu items available: • Content • Paper Saver • Duplex &#...
Setup Guide
Page 40
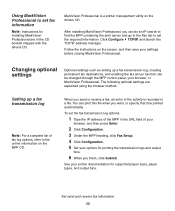
The following optional settings are in the CD booklet shipped with the drivers CD. When you want, or specify that it be changed through the MFP control panel, your printer documentation for printing the transmission logs and output bins. 6 When you can print this file when... information 35 Click Configure TCP/IP, and launch the TCP/IP address manager. Using MarkVision Professional to the online information on the MFP CD. Changing optional settings Optional settings such as setting up a fax transmission log Note: For a complete list of your browser, and then press Enter. 2...
The following optional settings are in the CD booklet shipped with the drivers CD. When you want, or specify that it be changed through the MFP control panel, your printer documentation for printing the transmission logs and output bins. 6 When you can print this file when... information 35 Click Configure TCP/IP, and launch the TCP/IP address manager. Using MarkVision Professional to the online information on the MFP CD. Changing optional settings Optional settings such as setting up a fax transmission log Note: For a complete list of your browser, and then press Enter. 2...


