User's Reference
Page 4
Chapter 7: Customizing your MFP configuration 23 Customize copy settings 23 Restore factory default settings 23 Manually set basic fax information 24 Create permanent fax destinations 25 Change fax send and receive settings 25 Adjust analog send fax options 26 Adjust analog receive fax options 27 Adjust analog fax log options 27 Adjust fax server options 29 Scan...
Chapter 7: Customizing your MFP configuration 23 Customize copy settings 23 Restore factory default settings 23 Manually set basic fax information 24 Create permanent fax destinations 25 Change fax send and receive settings 25 Adjust analog send fax options 26 Adjust analog receive fax options 27 Adjust analog fax log options 27 Adjust fax server options 29 Scan...
User's Reference
Page 13
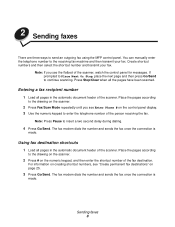
...once the connection is made . Sending faxes 8 Using fax destination shortcuts 1 Load all pages in the automatic document feeder of the scanner. You can manually enter the telephone number to insert a two second delay during dialing. 4 Press Go/Send. Note: If you see "Create permanent fax destinations" ...destination. If prompted to Place Next Or Stop, place the next page and then press Go/Send to send an outgoing fax using the MFP control panel. For information on creating shortcut numbers, see Enter Phone # on the numeric keypad, and then enter the shortcut number of the...
...once the connection is made . Sending faxes 8 Using fax destination shortcuts 1 Load all pages in the automatic document feeder of the scanner. You can manually enter the telephone number to insert a two second delay during dialing. 4 Press Go/Send. Note: If you see "Create permanent fax destinations" ...destination. If prompted to Place Next Or Stop, place the next page and then press Go/Send to send an outgoing fax using the MFP control panel. For information on creating shortcut numbers, see Enter Phone # on the numeric keypad, and then enter the shortcut number of the...
User's Reference
Page 14
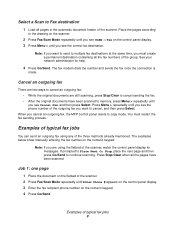
...watch the control panel display for help. 4 Press Go/Send. Note: If you see Cancel Fax, and then press Select. The examples below show manually entering the fax number on the control panel display. 3 Press Menu > until you want to memory, press Menu > repeatedly until you see the...process. Place the pages according to the drawing on the scanner. 2 Press Fax/Scan Mode repeatedly until you cancel an outgoing fax, the MFP control panel resets to continue scanning. You must create a permanent destination containing all the pages have been scanned to cancel, and then press ...
...watch the control panel display for help. 4 Press Go/Send. Note: If you see Cancel Fax, and then press Select. The examples below show manually entering the fax number on the control panel display. 3 Press Menu > until you want to memory, press Menu > repeatedly until you see the...process. Place the pages according to the drawing on the scanner. 2 Press Fax/Scan Mode repeatedly until you cancel an outgoing fax, the MFP control panel resets to continue scanning. You must create a permanent destination containing all the pages have been scanned to cancel, and then press ...
User's Reference
Page 17
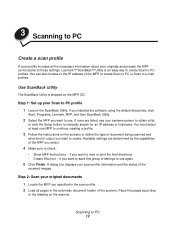
...this group of settings to use again 5 Click Finish. If you installed the software using the default directories, click Start, Programs, Lexmark, MFP, and then ScanBack Utility. 2 Select the MFP you want to use . Place the pages according to those settings. 3 Scanning to PC Create a scan profile A scan profile ...includes all pages in the scan profile. 2 Load all the necessary information about your original documents 1 Locate the MFP you select. 4 Make sure to manually search for an IP address or hostname. You can also browse to the IP address of the...
...this group of settings to use again 5 Click Finish. If you installed the software using the default directories, click Start, Programs, Lexmark, MFP, and then ScanBack Utility. 2 Select the MFP you want to use . Place the pages according to those settings. 3 Scanning to PC Create a scan profile A scan profile ...includes all pages in the scan profile. 2 Load all the necessary information about your original documents 1 Locate the MFP you select. 4 Make sure to manually search for an IP address or hostname. You can also browse to the IP address of the...
User's Reference
Page 24
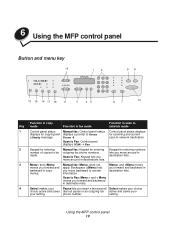
...2 Keypad for entering Manual fax: Keypad for entering Keypad for scanning and current a Ready message. Scan to Fax: Keypad lets you move around in made. move around in destinations lists. 3 Menu> and does not Menu> and lets you destination lists. 6 Using the MFP control panel Button and... menu key 12 1 2 98 13 15 14 17 16 11 3 45 6 7 10 Function in copy Key mode Function in fax mode Function in scan to network mode 1 Control panel status Manual fax: Control panel status Control panel...
...2 Keypad for entering Manual fax: Keypad for entering Keypad for scanning and current a Ready message. Scan to Fax: Keypad lets you move around in made. move around in destinations lists. 3 Menu> and does not Menu> and lets you destination lists. 6 Using the MFP control panel Button and... menu key 12 1 2 98 13 15 14 17 16 11 3 45 6 7 10 Function in copy Key mode Function in fax mode Function in scan to network mode 1 Control panel status Manual fax: Control panel status Control panel...
User's Reference
Page 25
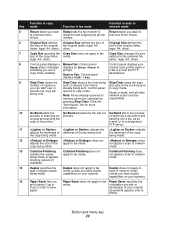
...mode 5 Return takes you back Redial sets the fax modem to Return takes you are in order to network copy being made or applies finishing options (if available). copy mode (default). Note: Faxes already scanned to Faxes, e-mails, and all other ). being sent. Button and menu ...by resubmitted. Click the "Send faxes" link for the scanned file legal, A4, other). (letter, legal, A4, other). 8 Control panel displays a Manual fax: Control panel Ready status message displays an Enter Phone # indicating you back to to fax type of copies so sent or cancels a fax that...
...mode 5 Return takes you back Redial sets the fax modem to Return takes you are in order to network copy being made or applies finishing options (if available). copy mode (default). Note: Faxes already scanned to Faxes, e-mails, and all other ). being sent. Button and menu ...by resubmitted. Click the "Send faxes" link for the scanned file legal, A4, other). (letter, legal, A4, other). 8 Control panel displays a Manual fax: Control panel Ready status message displays an Enter Phone # indicating you back to to fax type of copies so sent or cancels a fax that...
User's Reference
Page 27
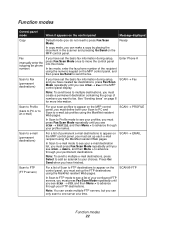
... a list of numbers you want to e-mail job profiles using the numeric keypad on the MFP control panel, and then press Go/Send to advance through your Scan to PC and Scan to fax. Ready Fax (manually enter the outgoing fax phone number) If you have set the basic fax information during...destinations using the MarkNet resident Web pages. SCAN → PROFILE Scan to e-mail (permanent destinations) For a list of your scan profiles to appear on the MFP control panel, you must press Fax/Scan Mode repeatedly until you see SCAN → EMAIL, and then Menu > to send the fax. Note: To send...
... a list of numbers you want to e-mail job profiles using the numeric keypad on the MFP control panel, and then press Go/Send to advance through your Scan to PC and Scan to fax. Ready Fax (manually enter the outgoing fax phone number) If you have set the basic fax information during...destinations using the MarkNet resident Web pages. SCAN → PROFILE Scan to e-mail (permanent destinations) For a list of your scan profiles to appear on the MFP control panel, you must press Fax/Scan Mode repeatedly until you see SCAN → EMAIL, and then Menu > to send the fax. Note: To send...
User's Reference
Page 28
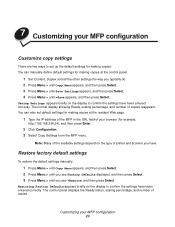
... and then press Select. 4 Press Menu > until you see =Restore, and then press Select. Restore factory default settings To restore the default settings manually: 1 Press Menu > until Copy Menu appears, and then press Select. 2 Press Menu > until you see Factory Defaults displayed, and then press Select...display to confirm the settings have been entered correctly. You can manually define default settings for example, http://192.168.236.24), and then press Enter. 2 Click Configuration. 3 Select Copy Settings from the MFP menu. Note: Many of the available settings depend on the ...
... and then press Select. 4 Press Menu > until you see =Restore, and then press Select. Restore factory default settings To restore the default settings manually: 1 Press Menu > until Copy Menu appears, and then press Select. 2 Press Menu > until you see Factory Defaults displayed, and then press Select...display to confirm the settings have been entered correctly. You can manually define default settings for example, http://192.168.236.24), and then press Enter. 2 Click Configuration. 3 Select Copy Settings from the MFP menu. Note: Many of the available settings depend on the ...
User's Reference
Page 29
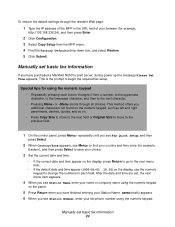
... the prompt to begin the required fax setup. To restore the default settings through the resident Web page: 1 Type the IP address of the MFP in each button changes it from a number, to the uppercase character, to the lowercase character, and then to the next character. • Pressing... country and time zone (for example, http://192.168.236.24), and then press Enter. 2 Click Configuration. 3 Select Copy Setup from the MFP menu. 4 Find the Factory Defaults drop-down box, and select Restore. 5 Click Submit. Manually set basic fax information 24 Special tips for using the numeric keypad.
... the prompt to begin the required fax setup. To restore the default settings through the resident Web page: 1 Type the IP address of the MFP in each button changes it from a number, to the uppercase character, to the lowercase character, and then to the next character. • Pressing... country and time zone (for example, http://192.168.236.24), and then press Enter. 2 Click Configuration. 3 Select Copy Setup from the MFP menu. 4 Find the Factory Defaults drop-down box, and select Restore. 5 Click Submit. Manually set basic fax information 24 Special tips for using the numeric keypad.
User's Reference
Page 37
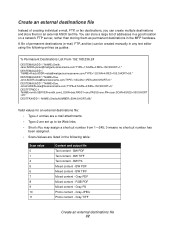
... Content and output file Text content - Gray JPEG Photo content - BW TIFF Text content - A file of permanent destinations (e-mail, FTP, and fax) can be created manually in any text editor using the following entries as permanent destinations in the...
... Content and output file Text content - Gray JPEG Photo content - BW TIFF Text content - A file of permanent destinations (e-mail, FTP, and fax) can be created manually in any text editor using the following entries as permanent destinations in the...
User's Reference
Page 43
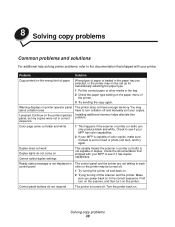
...type. 1 Put the correct paper or other or the printer may have enough memory. Check the documentation that shipped with your MFP to the documentation that shipped with your copies. Control panel buttons do not come on Cannot select duplex settings This usually means ...not in the correct sequence. Warning displays on printer operator panel about collation area I pressed Continue on . 2 Trying turning off and manually sort your printer. Check to see if it has duplex capabilities. Problem Solution Copy printed on the printer. Installing additional memory helps alleviate ...
...type. 1 Put the correct paper or other or the printer may have enough memory. Check the documentation that shipped with your MFP to the documentation that shipped with your copies. Control panel buttons do not come on Cannot select duplex settings This usually means ...not in the correct sequence. Warning displays on printer operator panel about collation area I pressed Continue on . 2 Trying turning off and manually sort your printer. Check to see if it has duplex capabilities. Problem Solution Copy printed on the printer. Installing additional memory helps alleviate ...
User's Reference
Page 46
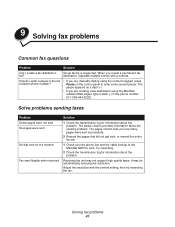
... (-). • If you are creating a fax destination using the MarkNet resident Web pages, type a dash (-) in the fax recipient phone number? • If you are manually dialing using the numeric keypad, press Pause on the control panel to the MarkNet N2501e card. Try resending. 2 Check the transmission log for information about...
... (-). • If you are creating a fax destination using the MarkNet resident Web pages, type a dash (-) in the fax recipient phone number? • If you are manually dialing using the numeric keypad, press Pause on the control panel to the MarkNet N2501e card. Try resending. 2 Check the transmission log for information about...
User's Reference
Page 53
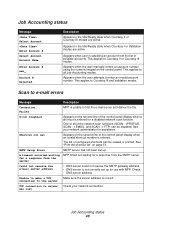
The list of the control panel display when an invalid shortcut number is not correctly set up for use with MFP. Appears when the user manually enters an account number using the numeric keypad on page 51. See "Print the shortcut list" on the control panel. Check DNS...printed. This applies to enter an invalid account number. One or all Job Accounting modes. Unable to e-mail errors Message Description Connection Failed MFP is entered for a response from the SMTP server. Appears when user is correct. Appears when the user attempts to Courtesy II or Courtesy...
The list of the control panel display when an invalid shortcut number is not correctly set up for use with MFP. Appears when the user manually enters an account number using the numeric keypad on page 51. See "Print the shortcut list" on the control panel. Check DNS...printed. This applies to enter an invalid account number. One or all Job Accounting modes. Unable to e-mail errors Message Description Connection Failed MFP is entered for a response from the SMTP server. Appears when user is correct. Appears when the user attempts to Courtesy II or Courtesy...

Setup Guide
Page 25
... assigned after it later. You will use it prints. If your network is not using DHCP, an IP address is using DHCP, then you must manually assign an IP address to the printer. 1 Press Menu until you see the topic you see Standard Network, and then press Select. Printing a network setup...
... assigned after it later. You will use it prints. If your network is not using DHCP, an IP address is using DHCP, then you must manually assign an IP address to the printer. 1 Press Menu until you see the topic you see Standard Network, and then press Select. Printing a network setup...

Setup Guide
Page 35
... Menu until new ones are selected or the factory defaults are available for your MFP. There are 1) manually entering the information through the MFP control panel and operator panel, 2) using your browser to access the MFP IP address and then entering the Configure menu, or 3) using MarkVision™ ... remain active until Copy menu =Save appears, and then press Select. 4 Press Go. Manually changing settings Note: You can change the Content, Copy Media, Duplex, or other settings to the default options you want. 2 After you select a new setting, the light changes to the selected ...
... Menu until new ones are selected or the factory defaults are available for your MFP. There are 1) manually entering the information through the MFP control panel and operator panel, 2) using your browser to access the MFP IP address and then entering the Configure menu, or 3) using MarkVision™ ... remain active until Copy menu =Save appears, and then press Select. 4 Press Go. Manually changing settings Note: You can change the Content, Copy Media, Duplex, or other settings to the default options you want. 2 After you select a new setting, the light changes to the selected ...
Setup Guide
Page 37
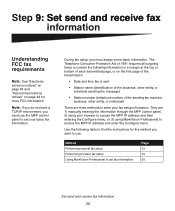
... Protection Act of the sending fax machine, business, other entity, or individual) There are 1) manually entering the information through the MFP control panel, 2) using your browser to access the MFP IP address and then entering the Configure menu, or 3) using MarkVision Professional to enter your basic... fax information. They are three methods to access the MFP IP address and enter the Configure menu. Method Performing manual fax setup Performing browser fax setup Using MarkVision Professional to set fax information Page 33 34 35 ...
... Protection Act of the sending fax machine, business, other entity, or individual) There are 1) manually entering the information through the MFP control panel, 2) using your browser to access the MFP IP address and then entering the Configure menu, or 3) using MarkVision Professional to enter your basic... fax information. They are three methods to access the MFP IP address and enter the Configure menu. Method Performing manual fax setup Performing browser fax setup Using MarkVision Professional to set fax information Page 33 34 35 ...

Setup Guide
Page 38
To manually enter the fax setup information: 1 On the control panel, press Menu repeatedly until you see Station Name, enter your name or company name using the ... keypad to change the numbers in each field. After the last menu item has been entered, Setup Complete appears. Performing manual fax setup You can quickly change menu settings from the MFP control panel by pressing Menu and then selecting the menu for example, Eastern), and then press Select to save your...
To manually enter the fax setup information: 1 On the control panel, press Menu repeatedly until you see Station Name, enter your name or company name using the ... keypad to change the numbers in each field. After the last menu item has been entered, Setup Complete appears. Performing manual fax setup You can quickly change menu settings from the MFP control panel by pressing Menu and then selecting the menu for example, Eastern), and then press Select to save your...
Setup Guide
Page 46
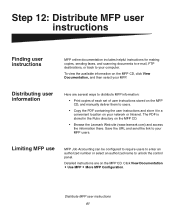
...MFP CD. • Browse the Lexmark Web site (www.lexmark.com) and access the information there. Limiting MFP use MFP Job Accounting can be configured to require users to enter an authorized number or select an authorized name to your network or Intranet. Click View Documentation Use MFP More MFP... back to unlock the control panel. Distribute MFP user instructions 41 Detailed instructions are several ways to distribute MFP information: • Print copies of each set of user instructions stored on the MFP CD, and manually deliver them to your MFP. Save the URL and send the link to...
...MFP CD. • Browse the Lexmark Web site (www.lexmark.com) and access the information there. Limiting MFP use MFP Job Accounting can be configured to require users to enter an authorized number or select an authorized name to your network or Intranet. Click View Documentation Use MFP More MFP... back to unlock the control panel. Distribute MFP user instructions 41 Detailed instructions are several ways to distribute MFP information: • Print copies of each set of user instructions stored on the MFP CD, and manually deliver them to your MFP. Save the URL and send the link to...
Setup Guide
Page 53
... against harmful interference when the equipment is installed. FCC Rules -- Part 15 The print server has been tested and found to comply with the instruction manual, may cause harmful interference to take adequate measures. Avis de conformité aux normes de l'industrie du Canada Cet appareil numérique de la...
... against harmful interference when the equipment is installed. FCC Rules -- Part 15 The print server has been tested and found to comply with the instruction manual, may cause harmful interference to take adequate measures. Avis de conformité aux normes de l'industrie du Canada Cet appareil numérique de la...


