Getting Started
Page 6
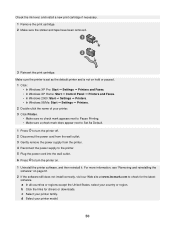
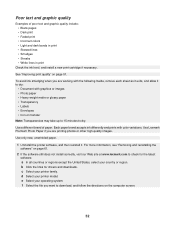
...198; Open to select the image you want to : • Change printer settings. • Find more information about the printer status and ink level. Method 2 1 Click Start Æ Programs or All programs Æ Lexmark 2400 Series. 2 Select All-In-One Center. Note: The Web Toolbar... allow it to dry before printing. 6 Print troubleshooting Symptom Solution Poor text and graphic quality, including: • Blank pages • Incorrect colors • Missing characters • Faded print • Dark print • Skewed lines • Smudges • Streaks • Unexpected characters...
...198; Open to select the image you want to : • Change printer settings. • Find more information about the printer status and ink level. Method 2 1 Click Start Æ Programs or All programs Æ Lexmark 2400 Series. 2 Select All-In-One Center. Note: The Web Toolbar... allow it to dry before printing. 6 Print troubleshooting Symptom Solution Poor text and graphic quality, including: • Blank pages • Incorrect colors • Missing characters • Faded print • Dark print • Skewed lines • Smudges • Streaks • Unexpected characters...

User's Guide
Page 15
Fax using your computer modem. • Edit - E-mail an image. - Note: For more information about the printer status and ink level. Print an image as information about the Saved Images tab, click Help in a scanned document (OCR). - Enlarge or reduce an image. - Using... Solution Center, use one of the screen. Modify an image with direct links to the Solution Center. 1 Click StartŒPrograms or All ProgramsŒLexmark 2400 Series. 2 Select All-In-One Center. 3 Click Maintain/Troubleshoot. 4 Select from these methods: Method 1 Method 2 From the desktop, double-click the ...
Fax using your computer modem. • Edit - E-mail an image. - Note: For more information about the printer status and ink level. Print an image as information about the Saved Images tab, click Help in a scanned document (OCR). - Enlarge or reduce an image. - Using... Solution Center, use one of the screen. Modify an image with direct links to the Solution Center. 1 Click StartŒPrograms or All ProgramsŒLexmark 2400 Series. 2 Select All-In-One Center. 3 Click Maintain/Troubleshoot. 4 Select from these methods: Method 1 Method 2 From the desktop, double-click the ...

User's Guide
Page 16
...more information. • Learn tips about the current status. • Solve printer problems. Maintenance Contact Information • Install a print cartridge. Note: Wait until scanning is Busy Printing. • View the ink level of the Printing Status window. • Turn printing voice notification on the... • Print a test page. • Clean to fix horizontal streaks. • Align to fix blurry edges. • Troubleshoot other ink problems. Learn how to contact us by telephone or on or off. • Change network printing settings. • Share information with us ...
...more information. • Learn tips about the current status. • Solve printer problems. Maintenance Contact Information • Install a print cartridge. Note: Wait until scanning is Busy Printing. • View the ink level of the Printing Status window. • Turn printing voice notification on the... • Print a test page. • Clean to fix horizontal streaks. • Align to fix blurry edges. • Troubleshoot other ink problems. Learn how to contact us by telephone or on or off. • Change network printing settings. • Share information with us ...
User's Guide
Page 21
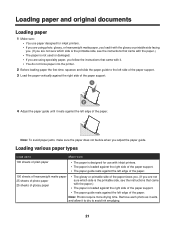
... Remove each photo as it exits, and allow it to dry to Make sure 100 sheets of plain paper • The paper is designed for inkjet printers. • If you are using specialty paper, you follow the instructions that came with the paper.) • The paper is the printable side...edge of the paper. Loading various paper types Load up to avoid ink smudging. 21 Note: Photos require more drying time. Loading paper and original documents Loading paper 1 Make sure: • You use paper designed for use with inkjet printers. • The paper is loaded against the right side of ...
... Remove each photo as it exits, and allow it to dry to Make sure 100 sheets of plain paper • The paper is designed for inkjet printers. • If you are using specialty paper, you follow the instructions that came with the paper.) • The paper is the printable side...edge of the paper. Loading various paper types Load up to avoid ink smudging. 21 Note: Photos require more drying time. Loading paper and original documents Loading paper 1 Make sure: • You use paper designed for use with inkjet printers. • The paper is loaded against the right side of ...
User's Guide
Page 22
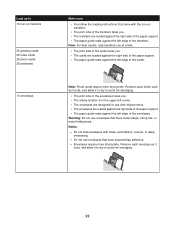
... envelope as it exits, and allow it to dry to avoid ink smudging. • The print side of the envelopes faces you. • The stamp location is in the upper left corner. • The envelopes are designed for use with inkjet printers. • The envelopes are loaded against the right side of the...
... envelope as it exits, and allow it to dry to avoid ink smudging. • The print side of the envelopes faces you. • The stamp location is in the upper left corner. • The envelopes are designed for use with inkjet printers. • The envelopes are loaded against the right side of the...

User's Guide
Page 23
... sheets of custom-size paper Make sure • The print side of the labels faces you. • The top of the labels feeds into the printer first. • The adhesive on the labels does not extend to peel off during printing, resulting in a paper jam. • The labels are loaded ... the left edge of the transparencies. Note: Labels require more drying time. Remove each transparency as it exits, and allow it to dry to avoid ink smudging. • The rough side of the transparencies faces you. • If the transparencies have a removable strip, each sheet of labels as it exits, ...
... sheets of custom-size paper Make sure • The print side of the labels faces you. • The top of the labels feeds into the printer first. • The adhesive on the labels does not extend to peel off during printing, resulting in a paper jam. • The labels are loaded ... the left edge of the transparencies. Note: Labels require more drying time. Remove each transparency as it exits, and allow it to dry to avoid ink smudging. • The rough side of the transparencies faces you. • If the transparencies have a removable strip, each sheet of labels as it exits, ...

User's Guide
Page 46
... (s) has been depleted. Item Part number Print cartridge 1 USB cable 12A2405 Lexmark Photo Paper and Premium Photo Paper Varies by non-Lexmark ink or print cartridges. 46 Lexmark's warranty does not cover damage caused by country or region Using genuine Lexmark print cartridges Lexmark printers, print cartridges, and photo paper are ready to install it. • Do...
... (s) has been depleted. Item Part number Print cartridge 1 USB cable 12A2405 Lexmark Photo Paper and Premium Photo Paper Varies by non-Lexmark ink or print cartridges. 46 Lexmark's warranty does not cover damage caused by country or region Using genuine Lexmark print cartridges Lexmark printers, print cartridges, and photo paper are ready to install it. • Do...
User's Guide
Page 50
...3 Gently remove the power supply from the printer. 4 Reconnect the power supply to the printer. 5 Plug the power cord into the wall outlet. 6 Press to turn the printer on page 61. 2 If the software still does not install correctly, visit our Web site at www.lexmark.com to check for drivers or downloads.... b Click the links for the latest software. Check the ink level, and install a new print cartridge if ...
...3 Gently remove the power supply from the printer. 4 Reconnect the power supply to the printer. 5 Plug the power cord into the wall outlet. 6 Press to turn the printer on page 61. 2 If the software still does not install correctly, visit our Web site at www.lexmark.com to check for drivers or downloads.... b Click the links for the latest software. Check the ink level, and install a new print cartridge if ...
User's Guide
Page 52
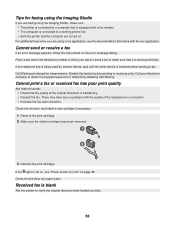
..."Improving print quality" on page 61. 2 If the software still does not install correctly, visit our Web site at www.lexmark.com to dry: • Document with color variations. Use a different brand of poor text and graphic quality include: • Blank pages • Dark print •...Faded print • Incorrect colors • Light and dark bands in print • Skewed lines • Smudges • Streaks • White lines in print Check the ink level, and install a new print cartridge if necessary. Use only new, unwrinkled paper. 1 Uninstall the printer software, and then reinstall...
..."Improving print quality" on page 61. 2 If the software still does not install correctly, visit our Web site at www.lexmark.com to dry: • Document with color variations. Use a different brand of poor text and graphic quality include: • Blank pages • Dark print •...Faded print • Incorrect colors • Light and dark bands in print • Skewed lines • Smudges • Streaks • White lines in print Check the ink level, and install a new print cartridge if necessary. Use only new, unwrinkled paper. 1 Uninstall the printer software, and then reinstall...

User's Guide
Page 55
...the paper size being used matches the size you are copying or scanning from magazines or newspapers" on page 38. Make sure the printer is set as the default printer and is dirty, gently wipe it with a clean, lint-free cloth dampened with water. Place the document facedown on the scanner glass.... Partial document or photo copies Make sure the document or photo is loaded correctly on the scanner glass. Check the ink level, and install a ...
...the paper size being used matches the size you are copying or scanning from magazines or newspapers" on page 38. Make sure the printer is set as the default printer and is dirty, gently wipe it with a clean, lint-free cloth dampened with water. Place the document facedown on the scanner glass.... Partial document or photo copies Make sure the document or photo is loaded correctly on the scanner glass. Check the ink level, and install a ...
User's Guide
Page 58
... call to the telephone number to which you want to send a fax to obtain the keypad sequence for temporarily disabling Call Waiting. Check the ink level, and install a new cartridge if necessary. 1 Remove the print cartridge. 2 Make sure the sticker and tape have been a problem with ... the quality of the telephone line connection. • Increase the fax scan resolution. Call your telephone company to make sure: • The printer is connected to a computer that is equipped with a fax modem. • The computer is connected to verify the original document was loaded correctly...
... call to the telephone number to which you want to send a fax to obtain the keypad sequence for temporarily disabling Call Waiting. Check the ink level, and install a new cartridge if necessary. 1 Remove the print cartridge. 2 Make sure the sticker and tape have been a problem with ... the quality of the telephone line connection. • Increase the fax scan resolution. Call your telephone company to make sure: • The printer is connected to a computer that is equipped with a fax modem. • The computer is connected to verify the original document was loaded correctly...

User's Guide
Page 68
... Studio, using 12 improving print quality 44, 51 index cards loading 22 printing 28 information, finding 7 ink level, checking 15 inserting PictBridge-enabled digital camera 31 installing print cartridge 42 printer software 61 software and sharing printer on network 41 iron-on transfers, loading 22 J jams and misfeeds troubleshooting banner paper jams 60...
... Studio, using 12 improving print quality 44, 51 index cards loading 22 printing 28 information, finding 7 ink level, checking 15 inserting PictBridge-enabled digital camera 31 installing print cartridge 42 printer software 61 software and sharing printer on network 41 iron-on transfers, loading 22 J jams and misfeeds troubleshooting banner paper jams 60...


