Getting Started
Page 3
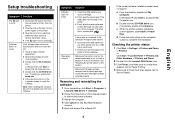
...necessary, double-click setup.exe. Removing and reinstalling the software 1 From the desktop, click Start Æ Programs Æ Lexmark 2400 Series Æ Uninstall. 2 Follow the instructions on hold or paused. or Click Start Æ Control Panel Æ Printers and Other Hardware Æ Printers and ...Faxes. 2 Double-click the Lexmark 2400 Series icon. 3 Click Printer, and make sure no check mark appears next to Pause ...
...necessary, double-click setup.exe. Removing and reinstalling the software 1 From the desktop, click Start Æ Programs Æ Lexmark 2400 Series Æ Uninstall. 2 Follow the instructions on hold or paused. or Click Start Æ Control Panel Æ Printers and Other Hardware Æ Printers and ...Faxes. 2 Double-click the Lexmark 2400 Series icon. 3 Click Printer, and make sure no check mark appears next to Pause ...
Getting Started
Page 4
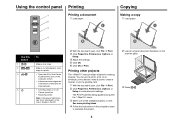
... control panel Printing Printing a document 1 Load paper. 1 Copying Making a copy 1 Load paper. 1 2 2 Use this button 1 2 3 4 To Make a color copy. Make a 4 x 6 borderless, color copy of the available projects, or click See more printing ideas. 4 Follow the instructions on the computer screen to complete the project. 4 2 Load an original document facedown on an envelope, print...
... control panel Printing Printing a document 1 Load paper. 1 Copying Making a copy 1 Load paper. 1 2 2 Use this button 1 2 3 4 To Make a color copy. Make a 4 x 6 borderless, color copy of the available projects, or click See more printing ideas. 4 Follow the instructions on the computer screen to complete the project. 4 2 Load an original document facedown on an envelope, print...

Getting Started
Page 5
...the buttons on the camera to select and print your photos. Method 2 1 Click Start Æ Programs or All programs Æ Lexmark 2400 Series. 2 Select Imaging Studio. Using a PictBridge-enabled camera to print photos You can connect a PictBridge-enabled camera to the printer...Click Scan Now. 2 Load 4 x 6 photo paper. 3 Press . Understanding the software Using the Imaging Studio English 3 Press . See the User's Guide and the instructions that came with the camera for more information on working with photos, see the complete User's Guide on the CD. Copying 4 x 6 photos 1 Place the 4 x...
...the buttons on the camera to select and print your photos. Method 2 1 Click Start Æ Programs or All programs Æ Lexmark 2400 Series. 2 Select Imaging Studio. Using a PictBridge-enabled camera to print photos You can connect a PictBridge-enabled camera to the printer...Click Scan Now. 2 Load 4 x 6 photo paper. 3 Press . Understanding the software Using the Imaging Studio English 3 Press . See the User's Guide and the instructions that came with the camera for more information on working with photos, see the complete User's Guide on the CD. Copying 4 x 6 photos 1 Place the 4 x...
Getting Started
Page 7
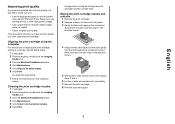
...and 4. 6 Let the nozzles and contacts dry completely. 7 Reinsert the print cartridge. 8 Print the document again. 7 An alignment page prints. 7 Follow the instructions on aligning the print cartridge without a computer, see the Setup sheet. 1 Load paper. 2 From the desktop, double-click the Imaging Studio icon. 3 Click... wipe in the direction shown. 5 With another clean section of a document, make sure you want, align the print cartridge. Use Lexmark Premium Photo Paper if you are not satisfied with water. 3 Gently hold the cloth against the nozzles for about three seconds, and then...
...and 4. 6 Let the nozzles and contacts dry completely. 7 Reinsert the print cartridge. 8 Print the document again. 7 An alignment page prints. 7 Follow the instructions on aligning the print cartridge without a computer, see the Setup sheet. 1 Load paper. 2 From the desktop, double-click the Imaging Studio icon. 3 Click... wipe in the direction shown. 5 With another clean section of a document, make sure you want, align the print cartridge. Use Lexmark Premium Photo Paper if you are not satisfied with water. 3 Gently hold the cloth against the nozzles for about three seconds, and then...
User's Guide
Page 7
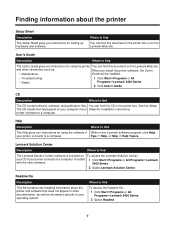
...Click User's Guide. and other information such as information specific to your printer connects to find The Help gives you instructions for using the software if While in any Lexmark software program, click Help, your Sheet for setting up hardware and software. Tips ΠHelp, or Help &#...to find this CD in the printer box. You can find The Lexmark Solution Center software is included on the Lexmark Web site. Lexmark Solution Center Description Where to find The User's Guide gives you instructions for using the printer You can find The CD contains drivers, ...
...Click User's Guide. and other information such as information specific to your printer connects to find The Help gives you instructions for using the software if While in any Lexmark software program, click Help, your Sheet for setting up hardware and software. Tips ΠHelp, or Help &#...to find this CD in the printer box. You can find The Lexmark Solution Center software is included on the Lexmark Web site. Lexmark Solution Center Description Where to find The User's Guide gives you instructions for using the printer You can find The CD contains drivers, ...

User's Guide
Page 9
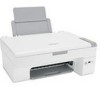
Setting up the printer Checking the box contents Name 1 Color print cartridge 2 Power supply cord 3 Installation software CD 4 Getting Started or Setup Solutions 5 Setup Sheet Description Cartridge to be installed in the printer Attaches to the power supply port located at the back of the printer • Installation software for the printer • Help • User's Guide in electronic format Additional information depending on your country or region Instructions on setting up printer hardware and software, and information on setup troubleshooting 9
Setting up the printer Checking the box contents Name 1 Color print cartridge 2 Power supply cord 3 Installation software CD 4 Getting Started or Setup Solutions 5 Setup Sheet Description Cartridge to be installed in the printer Attaches to the power supply port located at the back of the printer • Installation software for the printer • Help • User's Guide in electronic format Additional information depending on your country or region Instructions on setting up printer hardware and software, and information on setup troubleshooting 9

User's Guide
Page 11
Use the 3 Scanner unit 4 Power supply port 5 USB port To Raise to a computer using a USB cable. or 10 x 15 cm borderless, color copy of a photo. • Open the All-In-One Center and preview the scan on page 60. 11 Note: If the power light blinks, see...Connect the printer to access the print cartridge carrier. Using the control panel Press 1 2 3 4 To Make a color copy. Connect the printer to a power source. Note: To complete the scan back alignment process, follow the instructions on the computer screen. • Turn the printer on and off. • Cancel a copy, scan, or print...
Use the 3 Scanner unit 4 Power supply port 5 USB port To Raise to a computer using a USB cable. or 10 x 15 cm borderless, color copy of a photo. • Open the All-In-One Center and preview the scan on page 60. 11 Note: If the power light blinks, see...Connect the printer to access the print cartridge carrier. Using the control panel Press 1 2 3 4 To Make a color copy. Connect the printer to a power source. Note: To complete the scan back alignment process, follow the instructions on the computer screen. • Turn the printer on and off. • Cancel a copy, scan, or print...
User's Guide
Page 21
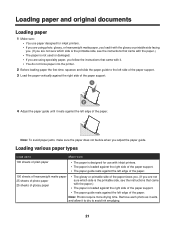
... to dry to Make sure 100 sheets of plain paper • The paper is designed for use paper designed for inkjet printers. • If you are using specialty paper, you follow the instructions that came with it. • You do not force paper into the printer. 2 Before loading paper the first time... with the paper.) • The paper is not used or damaged. • If you are not sure which side is the printable side, see the instructions that came with the paper.) • The paper is loaded against the right side of the paper support. • The paper guide rests against the...
... to dry to Make sure 100 sheets of plain paper • The paper is designed for use paper designed for inkjet printers. • If you are using specialty paper, you follow the instructions that came with it. • You do not force paper into the printer. 2 Before loading paper the first time... with the paper.) • The paper is not used or damaged. • If you are not sure which side is the printable side, see the instructions that came with the paper.) • The paper is loaded against the right side of the paper support. • The paper guide rests against the...
User's Guide
Page 22
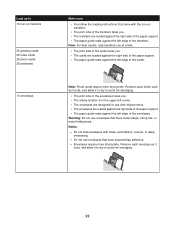
... more drying time. Remove each photo card as it exits, and allow it to dry to avoid ink smudging. 22 Warning: Do not use with inkjet printers. • The envelopes are loaded against the right side of the paper support. • The paper guide rests against the left edge of the... to 10 iron-on transfers 25 greeting cards 25 index cards 25 photo cards 25 postcards 10 envelopes Make sure • You follow the loading instructions that came with the iron-on transfers. • The print side of the transfers faces you. • The transfers are loaded against the right side...
... more drying time. Remove each photo card as it exits, and allow it to dry to avoid ink smudging. 22 Warning: Do not use with inkjet printers. • The envelopes are loaded against the right side of the paper support. • The paper guide rests against the left edge of the... to 10 iron-on transfers 25 greeting cards 25 index cards 25 photo cards 25 postcards 10 envelopes Make sure • You follow the loading instructions that came with the iron-on transfers. • The print side of the transfers faces you. • The transfers are loaded against the right side...

User's Guide
Page 27
...to Photos. 3 If no number appears next to Photos: a From the Lexmark logo drop-down menu, select Options. b To make common editing changes: 1 Right click the photo or image. 2 Click Edit. 3 Make your selections. 4 Follow the instructions on the screen. 5 When you are not sure which side is the ... or images using the same settings, select the size you want, the blank paper size in or out, or select whether to step 5. 5 From the Lexmark Web Toolbar, select a print option: • Normal • Quick • Text Only Printing photos or images from a Web page 1 Load paper. c Click: &#...
...to Photos. 3 If no number appears next to Photos: a From the Lexmark logo drop-down menu, select Options. b To make common editing changes: 1 Right click the photo or image. 2 Click Edit. 3 Make your selections. 4 Follow the instructions on the screen. 5 When you are not sure which side is the ... or images using the same settings, select the size you want, the blank paper size in or out, or select whether to step 5. 5 From the Lexmark Web Toolbar, select a print option: • Normal • Quick • Text Only Printing photos or images from a Web page 1 Load paper. c Click: &#...

User's Guide
Page 30
.... Note: For more advanced photo-editing options, see "Printing photos or images from a Web page, see "Using the Photo Editor" on the screen. c Follow the instructions on page 18. 14 Click Print Now. 30 Printing photos stored on page 27. Working with photos Printing photos Note: To print photos or images...
.... Note: For more advanced photo-editing options, see "Printing photos or images from a Web page, see "Using the Photo Editor" on the screen. c Follow the instructions on page 18. 14 Click Print Now. 30 Printing photos stored on page 27. Working with photos Printing photos Note: To print photos or images...
User's Guide
Page 31
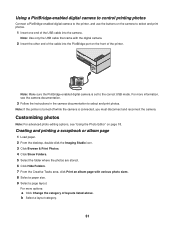
... came with various photo sizes. 8 Select a paper size. 9 Select a page layout. Customizing photos Note: For advanced photo-editing options, see the camera documentation. 3 Follow the instructions in the camera documentation to select and print photos. For more information, see "Using the Photo Editor" on the front of the printer. Note: Make...
... came with various photo sizes. 8 Select a paper size. 9 Select a page layout. Customizing photos Note: For advanced photo-editing options, see the camera documentation. 3 Follow the instructions in the camera documentation to select and print photos. For more information, see "Using the Photo Editor" on the front of the printer. Note: Make...
User's Guide
Page 37
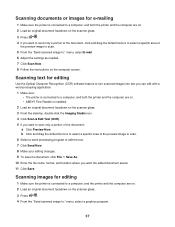
... of the preview image to scan. 5 From the "Send scanned image to:" menu, select E-mail. 6 Adjust the settings as needed. 7 Click Scan Now. 8 Follow the instructions on the scanner glass. 3 Press . 4 If you want the edited document saved. 11 Click Save. Scanning images for editing Use the Optical Character Recognition (OCR...
... of the preview image to scan. 5 From the "Send scanned image to:" menu, select E-mail. 6 Adjust the settings as needed. 7 Click Scan Now. 8 Follow the instructions on the scanner glass. 3 Press . 4 If you want the edited document saved. 11 Click Save. Scanning images for editing Use the Optical Character Recognition (OCR...
User's Guide
Page 39
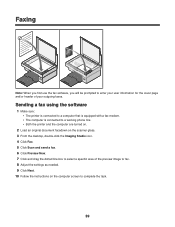
... user information for the cover page and/or header of the preview image to fax. 8 Adjust the settings as needed. 9 Click Next. 10 Follow the instructions on the computer screen to enter your outgoing faxes.
... user information for the cover page and/or header of the preview image to fax. 8 Adjust the settings as needed. 9 Click Next. 10 Follow the instructions on the computer screen to enter your outgoing faxes.

User's Guide
Page 41
... make sure g When prompted, select Test Page to the shared printer. b Browse the Network Neighborhood until installation is complete. b Insert the printer CD. h Follow the instructions on the host computer) 1 Connect the printer to -Peer.
... make sure g When prompted, select Test Page to the shared printer. b Browse the Network Neighborhood until installation is complete. b Insert the printer CD. h Follow the instructions on the host computer) 1 Connect the printer to -Peer.
User's Guide
Page 43
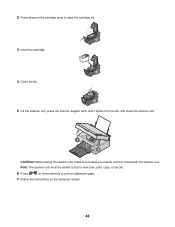
Note: The scanner unit must be closed to start a new scan, print, copy, or fax job. 6 Press for three seconds to keep your hands out from underneath the scanner unit. 2 Press down on the cartridge lever to raise the cartridge lid. 3 Insert the cartridge. 4 Close the lid. 5 Lift the scanner unit, press the scanner support back until it slides into the slot, and close the scanner unit. 1 3 2 CAUTION: When closing the scanner unit, make sure to print an alignment page. 7 Follow the instructions on the computer screen. 43
Note: The scanner unit must be closed to start a new scan, print, copy, or fax job. 6 Press for three seconds to keep your hands out from underneath the scanner unit. 2 Press down on the cartridge lever to raise the cartridge lid. 3 Insert the cartridge. 4 Close the lid. 5 Lift the scanner unit, press the scanner support back until it slides into the slot, and close the scanner unit. 1 3 2 CAUTION: When closing the scanner unit, make sure to print an alignment page. 7 Follow the instructions on the computer screen. 43

User's Guide
Page 44
...Maintain/Troubleshoot button. 4 Click Maintenance. 5 Click Align to step 3. 3 Remove and reinsert the print cartridge. An alignment page prints. 7 Follow the instructions on page 44. If print quality is a heavier weight or bright white. • Select a higher print quality. Cleaning the print cartridge nozzles 1 ...Print. For more information, see "Removing a used print cartridge" on page 42 and "Installing a print cartridge" on page 46. Use Lexmark Premium Photo Paper if you are printing photos or other high-quality images. • Make sure the glossy or printable side faces you. (...
...Maintain/Troubleshoot button. 4 Click Maintenance. 5 Click Align to step 3. 3 Remove and reinsert the print cartridge. An alignment page prints. 7 Follow the instructions on page 44. If print quality is a heavier weight or bright white. • Select a higher print quality. Cleaning the print cartridge nozzles 1 ...Print. For more information, see "Removing a used print cartridge" on page 42 and "Installing a print cartridge" on page 46. Use Lexmark Premium Photo Paper if you are printing photos or other high-quality images. • Make sure the glossy or printable side faces you. (...

User's Guide
Page 47
Lexmark does not recommend use Lexmark supplies. For best results, use of failures or damage caused by a refilled cartridge. Refilling a cartridge can affect print quality and may cause damage to Lexmark for recycling: 1 Visit our Web site at www.lexmark.com/recycle. 2 Follow the instructions on the computer screen. 47 Recycling Lexmark products To return Lexmark products to the printer. Refilling a print cartridge The warranty does not cover repair of a refilled cartridge.
Lexmark does not recommend use Lexmark supplies. For best results, use of failures or damage caused by a refilled cartridge. Refilling a cartridge can affect print quality and may cause damage to Lexmark for recycling: 1 Visit our Web site at www.lexmark.com/recycle. 2 Follow the instructions on the computer screen. 47 Recycling Lexmark products To return Lexmark products to the printer. Refilling a print cartridge The warranty does not cover repair of a refilled cartridge.

User's Guide
Page 49
... of the printer. 1 Shut down and then restart your computer. 2 Click Cancel on all New Hardware Found screens. 3 Insert the CD, and then follow the instructions on the computer screen to reinstall the software. 1 Press to turn the printer off. 2 Disconnect the power cord from the wall outlet. 3 Gently remove the... Windows XP, click Start to access the My Computer icon. 4 Double-click the CD-ROM drive icon. 5 If necessary, double-click setup.exe. 6 Follow the instructions on page 48. The USB port is not lit" on the computer screen to install the software. 1 Visit our Web site at www...
... of the printer. 1 Shut down and then restart your computer. 2 Click Cancel on all New Hardware Found screens. 3 Insert the CD, and then follow the instructions on the computer screen to reinstall the software. 1 Press to turn the printer off. 2 Disconnect the power cord from the wall outlet. 3 Gently remove the... Windows XP, click Start to access the My Computer icon. 4 Double-click the CD-ROM drive icon. 5 If necessary, double-click setup.exe. 6 Follow the instructions on page 48. The USB port is not lit" on the computer screen to install the software. 1 Visit our Web site at www...

User's Guide
Page 51
...graphic quality" on page 52 • "Poor quality at the edges of a document, make sure you want to the PictBridge port. Use Lexmark Premium Photo Paper if you are not satisfied with the camera. For more information, see "Wiping the print cartridge nozzles and contacts" on page... Make sure the glossy or printable side faces you. (If you want , follow the directions on page 46. 51 For more information, see the instructions that is still not satisfactory, replace the print cartridge. For more information, see "Removing a used print cartridge" on page 42 and "Installing a ...
...graphic quality" on page 52 • "Poor quality at the edges of a document, make sure you want to the PictBridge port. Use Lexmark Premium Photo Paper if you are not satisfied with the camera. For more information, see "Wiping the print cartridge nozzles and contacts" on page... Make sure the glossy or printable side faces you. (If you want , follow the directions on page 46. 51 For more information, see the instructions that is still not satisfactory, replace the print cartridge. For more information, see "Removing a used print cartridge" on page 42 and "Installing a ...


