
User's Guide
Page 2
... addressed to a product, program, or service is near the product and easily accessible. • Refer service or repairs, other countries, contact your product hardware or software. 2 Improvements or changes in any way it operates. Lexmark and Lexmark with other countries. © 2005 Lexmark International, Inc. All rights reserved. CAUTION: Do not set up this product or the manufacturer's authorized replacement power supply and power cord. • Connect...
... addressed to a product, program, or service is near the product and easily accessible. • Refer service or repairs, other countries, contact your product hardware or software. 2 Improvements or changes in any way it operates. Lexmark and Lexmark with other countries. © 2005 Lexmark International, Inc. All rights reserved. CAUTION: Do not set up this product or the manufacturer's authorized replacement power supply and power cord. • Connect...
User's Guide
Page 4
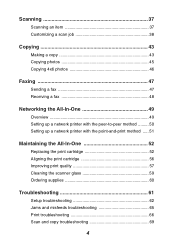
... All-In-One 49 Overview 49 Setting up a network printer with the peer-to-peer method ......... 50 Setting up a network printer with the point-and-print method ..... 51 Maintaining the All-In-One 52 Replacing the print cartridge 52 Aligning the print cartridge 56 Improving print quality 57 Cleaning the scanner glass 59 Ordering supplies 60 Troubleshooting 61 Setup troubleshooting 62 Jams and misfeeds troubleshooting 65 Print troubleshooting 66 Scan and copy...
... All-In-One 49 Overview 49 Setting up a network printer with the peer-to-peer method ......... 50 Setting up a network printer with the point-and-print method ..... 51 Maintaining the All-In-One 52 Replacing the print cartridge 52 Aligning the print cartridge 56 Improving print quality 57 Cleaning the scanner glass 59 Ordering supplies 60 Troubleshooting 61 Setup troubleshooting 62 Jams and misfeeds troubleshooting 65 Print troubleshooting 66 Scan and copy...
User's Guide
Page 7
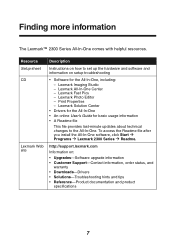
... Setup sheet CD Lexmark Web site Description Instructions on how to the All-In-One. Lexmark Photo Editor - Print Properties - Lexmark Fast Pics - Lexmark Solution Center • Drivers for the All-In-One • An online User's Guide for basic usage information • A Readme file This file provides last-minute updates about technical changes to set up the hardware and software and information on : • Upgrades-Software upgrade information • Customer Support...
... Setup sheet CD Lexmark Web site Description Instructions on how to the All-In-One. Lexmark Photo Editor - Print Properties - Lexmark Fast Pics - Lexmark Solution Center • Drivers for the All-In-One • An online User's Guide for basic usage information • A Readme file This file provides last-minute updates about technical changes to set up the hardware and software and information on : • Upgrades-Software upgrade information • Customer Support...
User's Guide
Page 10
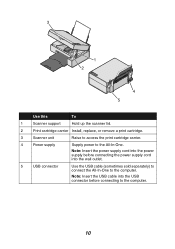
Note: Insert the USB cable into the USB connector before connecting the power supply cord into the power supply before connecting to the computer. 10 Note: Insert the power supply cord into the wall outlet. 5 USB connector Use the USB cable (sometimes sold separately) to connect the All-In-One to the All-In-One. 3 1 2 4 5 Use this To 1 Scanner support Hold up the scanner lid. 2 Print cartridge carrier Install, replace, or remove a print cartridge. 3 Scanner unit Raise to access the print cartridge carrier. 4 Power supply Supply power to the computer.
Note: Insert the USB cable into the USB connector before connecting the power supply cord into the power supply before connecting to the computer. 10 Note: Insert the power supply cord into the wall outlet. 5 USB connector Use the USB cable (sometimes sold separately) to connect the All-In-One to the All-In-One. 3 1 2 4 5 Use this To 1 Scanner support Hold up the scanner lid. 2 Print cartridge carrier Install, replace, or remove a print cartridge. 3 Scanner unit Raise to access the print cartridge carrier. 4 Power supply Supply power to the computer.
User's Guide
Page 12
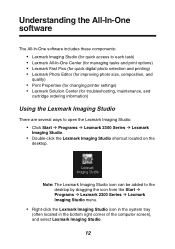
...-One software includes these components: • Lexmark Imaging Studio (for quick access to each task) • Lexmark All-In-One Center (for managing tasks and print options) • Lexmark Fast Pics (for quick digital photo selection and printing) • Lexmark Photo Editor (for improving photo size, composition, and quality) • Print Properties (for changing printer settings) • Lexmark Solution Center (for troubleshooting, maintenance, and cartridge ordering information) Using the Lexmark Imaging...
...-One software includes these components: • Lexmark Imaging Studio (for quick access to each task) • Lexmark All-In-One Center (for managing tasks and print options) • Lexmark Fast Pics (for quick digital photo selection and printing) • Lexmark Photo Editor (for improving photo size, composition, and quality) • Print Properties (for changing printer settings) • Lexmark Solution Center (for troubleshooting, maintenance, and cartridge ordering information) Using the Lexmark Imaging...

User's Guide
Page 23
...; Settings Æ Printers or Printers and Faxes. It contains a variety of task wizards-printing a photograph, printing an envelope, printing a banner, printing on both sides of the Print Properties dialog. 23 Changes made to help you pick the correct settings for the project. or Select Start Æ Control Panel Æ Printers and Other Hardware Æ Printers and Faxes. 2 Right-click Lexmark 2300 Series, and select Printing Preferences. 3 Make the changes you open Print Properties...
...; Settings Æ Printers or Printers and Faxes. It contains a variety of task wizards-printing a photograph, printing an envelope, printing a banner, printing on both sides of the Print Properties dialog. 23 Changes made to help you pick the correct settings for the project. or Select Start Æ Control Panel Æ Printers and Other Hardware Æ Printers and Faxes. 2 Right-click Lexmark 2300 Series, and select Printing Preferences. 3 Make the changes you open Print Properties...
User's Guide
Page 26
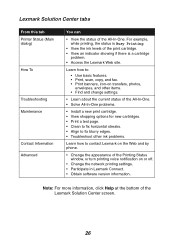
... the current status of the All-In-One. • Solve All-In-One problems. • Install a new print cartridge. • View shopping options for new cartridges. • Print a test page. • Clean to fix horizontal streaks. • Align to fix blurry edges. • Troubleshoot other ink problems. Learn how to contact Lexmark on or off. • Change the network printing settings. • Participate in Lexmark Connect. • Obtain software version information...
... the current status of the All-In-One. • Solve All-In-One problems. • Install a new print cartridge. • View shopping options for new cartridges. • Print a test page. • Clean to fix horizontal streaks. • Align to fix blurry edges. • Troubleshoot other ink problems. Learn how to contact Lexmark on or off. • Change the network printing settings. • Participate in Lexmark Connect. • Obtain software version information...

User's Guide
Page 31
Note: Do not load envelopes with: • Holes, perforations, or deep embossing • Metal clasps, string ties, or metal folding bars • Exposed flap adhesive 31 Load Up to 10 envelopes Make sure • The print side is facing you. • The envelopes are loaded vertically against the right side of the paper support. • The stamp location is in the upper left corner. • The paper guide rests against the edge of the envelopes.
Note: Do not load envelopes with: • Holes, perforations, or deep embossing • Metal clasps, string ties, or metal folding bars • Exposed flap adhesive 31 Load Up to 10 envelopes Make sure • The print side is facing you. • The envelopes are loaded vertically against the right side of the paper support. • The stamp location is in the upper left corner. • The paper guide rests against the edge of the envelopes.
User's Guide
Page 35
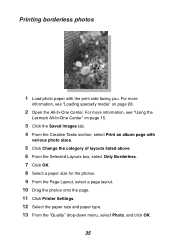
Printing borderless photos 1 Load photo paper with various photo sizes. 5 Click Change the category of layouts listed above. 6 From the Selected Layouts box, select Only Borderless. 7 Click OK. 8 Select a paper size for the photos. 9 From the Page Layout, select a page layout. 10 Drag the photos onto the page. 11 Click Printer Settings. 12 Select the paper size and paper type. 13 From the "Quality" drop-down menu, select Photo, and click OK...
Printing borderless photos 1 Load photo paper with various photo sizes. 5 Click Change the category of layouts listed above. 6 From the Selected Layouts box, select Only Borderless. 7 Click OK. 8 Select a paper size for the photos. 9 From the Page Layout, select a page layout. 10 Drag the photos onto the page. 11 Click Printer Settings. 12 Select the paper size and paper type. 13 From the "Quality" drop-down menu, select Photo, and click OK...
User's Guide
Page 48
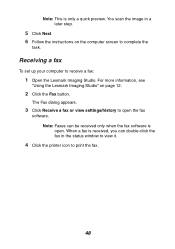
...software. The Fax dialog appears. 3 Click Receive a fax or view settings/history to print the fax. 48 You scan the image in the status window to view it. 4 Click the printer icon to open . For more information, see "Using the Lexmark Imaging Studio" on the computer screen to receive a fax: 1 Open the Lexmark... Imaging Studio. Receiving a fax To set up your computer to complete the task. Note: Faxes can be received only when the fax software is received, you can double-click the fax in a later step. 5 Click Next. 6 Follow the instructions on page 12. 2 Click the Fax button...
...software. The Fax dialog appears. 3 Click Receive a fax or view settings/history to print the fax. 48 You scan the image in the status window to view it. 4 Click the printer icon to open . For more information, see "Using the Lexmark Imaging Studio" on the computer screen to receive a fax: 1 Open the Lexmark... Imaging Studio. Receiving a fax To set up your computer to complete the task. Note: Faxes can be received only when the fax software is received, you can double-click the fax in a later step. 5 Click Next. 6 Follow the instructions on page 12. 2 Click the Fax button...
User's Guide
Page 50
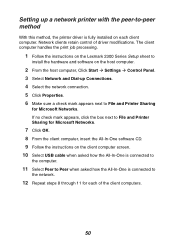
The client computer handles the print job processing. 1 Follow the instructions on the Lexmark 2300 Series Setup sheet to install the hardware and software on each of driver modifications. Network clients retain control of the client computers. 50 Setting up Connections. 4 Select the network connection. 5 Click Properties. 6 Make sure a check mark appears next to File and Printer Sharing for each client computer. If no check mark appears, click the box next to...
The client computer handles the print job processing. 1 Follow the instructions on the Lexmark 2300 Series Setup sheet to install the hardware and software on each of driver modifications. Network clients retain control of the client computers. 50 Setting up Connections. 4 Select the network connection. 5 Click Properties. 6 Make sure a check mark appears next to File and Printer Sharing for each client computer. If no check mark appears, click the box next to...
User's Guide
Page 51
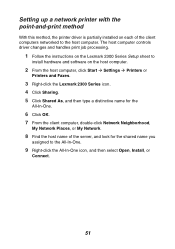
Setting up a network printer with the point-and-print method With this method, the printer driver is partially installed on the host computer. 2 From the host computer, click Start Æ Settings Æ Printers or Printers and Faxes. 3 Right-click the Lexmark 2300 Series icon. 4 Click ...networked to the All-In-One. 9 Right-click the All-In-One icon, and then select Open, Install, or Connect. 51 The host computer controls driver changes and handles print job processing. 1 Follow the instructions on the Lexmark 2300 Series Setup sheet to install hardware and software on each of the server...
Setting up a network printer with the point-and-print method With this method, the printer driver is partially installed on the host computer. 2 From the host computer, click Start Æ Settings Æ Printers or Printers and Faxes. 3 Right-click the Lexmark 2300 Series icon. 4 Click ...networked to the All-In-One. 9 Right-click the All-In-One icon, and then select Open, Install, or Connect. 51 The host computer controls driver changes and handles print job processing. 1 Follow the instructions on the Lexmark 2300 Series Setup sheet to install hardware and software on each of the server...
User's Guide
Page 56
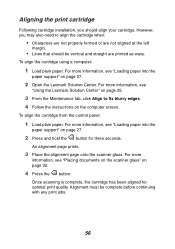
... cartridge installation, you may also need to fix blurry edges. 4 Follow the instructions on page 27. 2 Open the Lexmark Solution Center. To align the cartridge from the control panel: 1 Load plain paper. For more information, see "Placing documents on the scanner glass" on page 27. 2 Press and hold the button for optimal print quality. To align the cartridge using a computer: 1 Load plain paper. For more information, see "Loading paper into the paper support...
... cartridge installation, you may also need to fix blurry edges. 4 Follow the instructions on page 27. 2 Open the Lexmark Solution Center. To align the cartridge from the control panel: 1 Load plain paper. For more information, see "Placing documents on the scanner glass" on page 27. 2 Press and hold the button for optimal print quality. To align the cartridge using a computer: 1 Load plain paper. For more information, see "Loading paper into the paper support...

User's Guide
Page 57
..., select a higher quality setting. 4 Print the document again. If the document still does not have the print quality you want, align the print cartridge, and print the document again. If you are not satisfied with the print quality of the document: • Use paper that the print quality has improved. Cleaning the print cartridge nozzles 1 Load paper. Improving print quality If you are not satisfied with the print quality, continue with "Cleaning the print cartridge nozzles...
..., select a higher quality setting. 4 Print the document again. If the document still does not have the print quality you want, align the print cartridge, and print the document again. If you are not satisfied with the print quality of the document: • Use paper that the print quality has improved. Cleaning the print cartridge nozzles 1 Load paper. Improving print quality If you are not satisfied with the print quality, continue with "Cleaning the print cartridge nozzles...
User's Guide
Page 60
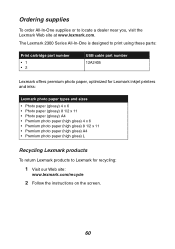
The Lexmark 2300 Series All-In-One is designed to print using these parts: Print cartridge part number •1 •2 USB cable part number 12A2405 Lexmark offers premium photo paper, optimized for recycling: 1 Visit our Web site: www.lexmark.com/recycle 2 Follow the instructions on the screen. 60 Ordering supplies To order All-In-One supplies or to Lexmark for Lexmark inkjet printers and inks: Lexmark photo paper types and sizes • Photo paper (glossy) 4 x 6 •...
The Lexmark 2300 Series All-In-One is designed to print using these parts: Print cartridge part number •1 •2 USB cable part number 12A2405 Lexmark offers premium photo paper, optimized for recycling: 1 Visit our Web site: www.lexmark.com/recycle 2 Follow the instructions on the screen. 60 Ordering supplies To order All-In-One supplies or to Lexmark for Lexmark inkjet printers and inks: Lexmark photo paper types and sizes • Photo paper (glossy) 4 x 6 •...

User's Guide
Page 61
Turn to the page listed, and use the table to specific symptoms. • "Setup troubleshooting" on page 62 • "Jams and misfeeds troubleshooting" on page 65 • "Print troubleshooting" on page 66 • "Scan and copy troubleshooting" on page 69 • "Error messages troubleshooting" on page 71 61 From the following list, select the category that best describes the type of problem you find solutions to find the solution. Troubleshooting Should the All-In-One have a problem, this section helps you are having.
Turn to the page listed, and use the table to specific symptoms. • "Setup troubleshooting" on page 62 • "Jams and misfeeds troubleshooting" on page 65 • "Print troubleshooting" on page 66 • "Scan and copy troubleshooting" on page 69 • "Error messages troubleshooting" on page 71 61 From the following list, select the category that best describes the type of problem you find solutions to find the solution. Troubleshooting Should the All-In-One have a problem, this section helps you are having.
User's Guide
Page 62
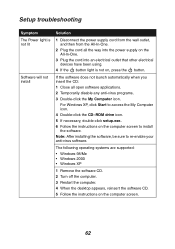
... the My Computer icon. Note: After installing the software, be sure to install the software. For Windows XP, click Start to access the My Computer icon. 4 Double-click the CD-ROM drive icon. 5 If necessary, double-click setup.exe. 6 Follow the instructions on the computer screen to re-enable your anti-virus software. Setup troubleshooting Symptom The Power light is not on, press the...
... the My Computer icon. Note: After installing the software, be sure to install the software. For Windows XP, click Start to access the My Computer icon. 4 Double-click the CD-ROM drive icon. 5 If necessary, double-click setup.exe. 6 Follow the instructions on the computer screen to re-enable your anti-virus software. Setup troubleshooting Symptom The Power light is not on, press the...
User's Guide
Page 71
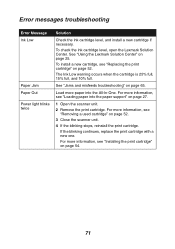
...% full. Error messages troubleshooting Error Message Ink Low Paper Jam Paper Out Power light blinks twice Solution Check the ink cartridge level, and install a new cartridge if necessary. To install a new cartridge, see "Loading paper into the All-In-One. If the blinking continues, replace the print cartridge with a new one. To check the ink cartridge level, open the Lexmark Solution Center. For more paper into the paper support" on page 52. Load more information, see "Replacing the print cartridge" on...
...% full. Error messages troubleshooting Error Message Ink Low Paper Jam Paper Out Power light blinks twice Solution Check the ink cartridge level, and install a new cartridge if necessary. To install a new cartridge, see "Loading paper into the All-In-One. If the blinking continues, replace the print cartridge with a new one. To check the ink cartridge level, open the Lexmark Solution Center. For more paper into the paper support" on page 52. Load more information, see "Replacing the print cartridge" on...
User's Guide
Page 75
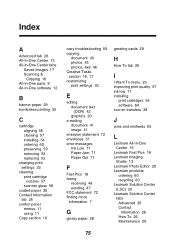
... Center tabs Saved Images 17 Scanning & Copying 16 All-In-One parts 9 All-In-One software 12 B banner paper 29 borderless printing 35 C cartridge aligning 56 cleaning 57 installing 54 ordering 60 preserving 59 removing 52 replacing 52 changing print settings 33 cleaning print cartridge nozzles 57 scanner glass 59 coated paper 30 Contact Information tab 26 control panel menus 11 using 11 Copy section 16 copy troubleshooting 69 copying...
... Center tabs Saved Images 17 Scanning & Copying 16 All-In-One parts 9 All-In-One software 12 B banner paper 29 borderless printing 35 C cartridge aligning 56 cleaning 57 installing 54 ordering 60 preserving 59 removing 52 replacing 52 changing print settings 33 cleaning print cartridge nozzles 57 scanner glass 59 coated paper 30 Contact Information tab 26 control panel menus 11 using 11 Copy section 16 copy troubleshooting 69 copying...

User's Guide
Page 76
... photo paper 28 Photo Prints section 17 placing documents on the scanner glass 32 postcards 29 power light blinks twice 71 not lit 62 power supply cord 8 preserving print cartridges 59 Preview section 16 print cartridge aligning 56 cleaning 57 installing 54 ordering 60 preserving 59 removing 52 replacing 52 Print Layout tab 25 Print Properties I Want To menu 23 using 22 Print Properties tabs 24 print settings changing 33 customizing 33 print troubleshooting 66 Printer Status...
... photo paper 28 Photo Prints section 17 placing documents on the scanner glass 32 postcards 29 power light blinks twice 71 not lit 62 power supply cord 8 preserving print cartridges 59 Preview section 16 print cartridge aligning 56 cleaning 57 installing 54 ordering 60 preserving 59 removing 52 replacing 52 Print Layout tab 25 Print Properties I Want To menu 23 using 22 Print Properties tabs 24 print settings changing 33 customizing 33 print troubleshooting 66 Printer Status...

