
Troubleshooting Guide
Page 1
..., the Ready message is full Remove the stack of paper from the location of the printer. For information regarding tested and approved USB flash memory devices, see the Lexmark Web site at www.lexmark.com Note: When calling for service, call for network printing. The specified output bin is...2003 and using may not be supported or has an error. The toner waste container door is available on the Lexmark Web site at www.lexmark.com. Checking an unresponsive printer If your printer model type and serial number. Note: For Acrobat 7.x or later, click the advanced button to find a solution...
..., the Ready message is full Remove the stack of paper from the location of the printer. For information regarding tested and approved USB flash memory devices, see the Lexmark Web site at www.lexmark.com Note: When calling for service, call for network printing. The specified output bin is...2003 and using may not be supported or has an error. The toner waste container door is available on the Lexmark Web site at www.lexmark.com. Checking an unresponsive printer If your printer model type and serial number. Note: For Acrobat 7.x or later, click the advanced button to find a solution...
Troubleshooting Guide
Page 2
...the wrong interface cable, or the cable is secure. For more informations, see the Menus and Messages Guide. Job takes longer than expected to the Lexmark Web site for information. Large jobs do not print A formatting error has occurred • Print the job. (Only part of pages in the tray... Messages Guide. Collate is set to On Set Collation to exit Hex Trace mode. The job has timed out Set Print Timeout to the printer. Solving option problems If an option does not operate correctly after it quits working: Make sure the connection is not securely connected Make sure ...
...the wrong interface cable, or the cable is secure. For more informations, see the Menus and Messages Guide. Job takes longer than expected to the Lexmark Web site for information. Large jobs do not print A formatting error has occurred • Print the job. (Only part of pages in the tray... Messages Guide. Collate is set to On Set Collation to exit Hex Trace mode. The job has timed out Set Print Timeout to the printer. Solving option problems If an option does not operate correctly after it quits working: Make sure the connection is not securely connected Make sure ...

Troubleshooting Guide
Page 3
...• Guides are using paper that is loaded correctly. A jam occurs Remove the paper in the feeder. Consistent misfeeds or jams in the printer paper path, and check the stack to see if your service representative. Check the following : • Flex the paper. • Turn ...securely connected to ensure the paper has been loaded properly. For more details, see if the option is secure. Check the following table lists printer options and suggested corrective actions for service. Try the following : • Feeder is properly installed. • Paper is loaded correctly. •...
...• Guides are using paper that is loaded correctly. A jam occurs Remove the paper in the feeder. Consistent misfeeds or jams in the printer paper path, and check the stack to see if your service representative. Check the following : • Flex the paper. • Turn ...securely connected to ensure the paper has been loaded properly. For more details, see if the option is secure. Check the following table lists printer options and suggested corrective actions for service. Try the following : • Feeder is properly installed. • Paper is loaded correctly. •...

Troubleshooting Guide
Page 4
... the image transfer unit. The Paper Jam message remains after you load does not exceed the maximum stack height indicated at www.lexmark.com for the size paper loaded. Config Menu appears. 3 Press until you remove the jammed paper. The pages are not set to Right... them while you still have loaded too much paper or too many envelopes. White or colored lines 1 Replace the color print cartridge that can help isolate print quality problems, print the Print Quality Test Pages. 1 Turn the printer off. 2 Press and . Print irregularities • Load paper from a fresh package....
... the image transfer unit. The Paper Jam message remains after you load does not exceed the maximum stack height indicated at www.lexmark.com for the size paper loaded. Config Menu appears. 3 Press until you remove the jammed paper. The pages are not set to Right... them while you still have loaded too much paper or too many envelopes. White or colored lines 1 Replace the color print cartridge that can help isolate print quality problems, print the Print Quality Test Pages. 1 Turn the printer off. 2 Press and . Print irregularities • Load paper from a fresh package....

Troubleshooting Guide
Page 5
...Avoid textured paper with rough finishes. • Make sure the paper you load in the trays is set to the color displayed on the control panel. • Make sure the printer paper type, paper texture, and paper weight settings match the type of paper you are using . • The default.... • Select a different Toner Darkness setting from the printer driver before sending the job to print. • Scroll to the Color Adjust setting in the Quality Menu and press Select to adjust the color. • Load paper from the printer driver before sending the job to print. • Scroll ...
...Avoid textured paper with rough finishes. • Make sure the paper you load in the trays is set to the color displayed on the control panel. • Make sure the printer paper type, paper texture, and paper weight settings match the type of paper you are using . • The default.... • Select a different Toner Darkness setting from the printer driver before sending the job to print. • Scroll to the Color Adjust setting in the Quality Menu and press Select to adjust the color. • Load paper from the printer driver before sending the job to print. • Scroll ...

User's Guide
Page 2
.... Evaluation and verification of operation in certain transactions; OptraImage is a registered trademark of the Hewlett-Packard Company. This printer is designed, tested, and approved to meet strict global safety standards with local law: LEXMARK INTERNATIONAL, INC., PROVIDES THIS PUBLICATION "AS IS" WITHOUT WARRANTY OF ANY KIND, EITHER EXPRESS OR IMPLIED, INCLUDING, BUT...
.... Evaluation and verification of operation in certain transactions; OptraImage is a registered trademark of the Hewlett-Packard Company. This printer is designed, tested, and approved to meet strict global safety standards with local law: LEXMARK INTERNATIONAL, INC., PROVIDES THIS PUBLICATION "AS IS" WITHOUT WARRANTY OF ANY KIND, EITHER EXPRESS OR IMPLIED, INCLUDING, BUT...

User's Guide
Page 3
...11 Installing a StapleSmart finisher ...12 Installing memory and option cards ...13 Removing memory and option cards ...18 Chapter 2: Printing ...24 Understanding the printer operator panel ...24 Sending a job to print ...26 Printing from a USB flash memory device ...27 Canceling a print job ...28 Printing a... Printing on specialty media (transparencies, labels, other 37 Linking trays ...38 Linking output bins ...39 Holding a job in the printer ...39 Printing confidential jobs ...40 Tips for successful printing ...44 Chapter 3: Media specifications 46 Media guidelines ...46 Storing paper ...48...
...11 Installing a StapleSmart finisher ...12 Installing memory and option cards ...13 Removing memory and option cards ...18 Chapter 2: Printing ...24 Understanding the printer operator panel ...24 Sending a job to print ...26 Printing from a USB flash memory device ...27 Canceling a print job ...28 Printing a... Printing on specialty media (transparencies, labels, other 37 Linking trays ...38 Linking output bins ...39 Holding a job in the printer ...39 Printing confidential jobs ...40 Tips for successful printing ...44 Chapter 3: Media specifications 46 Media guidelines ...46 Storing paper ...48...

User's Guide
Page 4
Contents Print cartridges ...59 Toner waste container ...60 Fuser and ITU ...60 Recycling Lexmark products ...61 Chapter 5: Clearing paper jams 62 Identifying jams ...62 Access doors and trays ...63 Understanding jam messages ...64 Clearing... Online customer support ...87 Calling for service ...87 Checking an unresponsive printer ...87 Printing multi-language PDFs ...87 Solving printing problems ...88 Solving mailbox problems ...89 Solving option problems ...90 Solving paper feed problems ...92 Solving print quality problems ...92 Solving color quality problems ...97 Chapter 8: Notices ...101 4
Contents Print cartridges ...59 Toner waste container ...60 Fuser and ITU ...60 Recycling Lexmark products ...61 Chapter 5: Clearing paper jams 62 Identifying jams ...62 Access doors and trays ...63 Understanding jam messages ...64 Clearing... Online customer support ...87 Calling for service ...87 Checking an unresponsive printer ...87 Printing multi-language PDFs ...87 Solving printing problems ...88 Solving mailbox problems ...89 Solving option problems ...90 Solving paper feed problems ...92 Solving print quality problems ...92 Solving color quality problems ...97 Chapter 8: Notices ...101 4

User's Guide
Page 5
... and removing options 5 PrintCryption™ Note: Use a Phillips screwdriver to help you are installing options after setting up the printer, turn the printer off and unplug the power cord before continuing. • High capacity feeder (2000-sheet drawer) • Optional drawers • ...Duplex unit • Printer • Output options The instructions in this section cover the following options: Input options • High capacity feeder (2000-sheet drawer...
... and removing options 5 PrintCryption™ Note: Use a Phillips screwdriver to help you are installing options after setting up the printer, turn the printer off and unplug the power cord before continuing. • High capacity feeder (2000-sheet drawer) • Optional drawers • ...Duplex unit • Printer • Output options The instructions in this section cover the following options: Input options • High capacity feeder (2000-sheet drawer...

User's Guide
Page 6
... on the ground, narrow side up. Leveling feet Installing a 2000-sheet drawer 6 Installing a 2000-sheet drawer Your printer supports one optional 2000-sheet drawer. Note: You will install the power cord for your printer. 3 If you align the holes in the bars. Warning: If you have an optional duplex unit and a 2000...
... on the ground, narrow side up. Leveling feet Installing a 2000-sheet drawer 6 Installing a 2000-sheet drawer Your printer supports one optional 2000-sheet drawer. Note: You will install the power cord for your printer. 3 If you align the holes in the bars. Warning: If you have an optional duplex unit and a 2000...

User's Guide
Page 7
... packing material. 2 Place the drawer in the 500-sheet drawer with Installing a duplex unit. Warning: If you have chosen for your printer, or install it on the lower drawer. Make sure it on another 500-sheet drawer, or continue with the positioning posts on another ...one additional 500-sheet drawer. Installing a 500-sheet drawer 7 b Hand-tighten the screws. Installing and removing options Installing a 500-sheet drawer Your printer supports up to the positioning posts on top of a 2000-sheet drawer, secure the drawers with stabilizing screws. b Lower the 500-sheet drawer ...
... packing material. 2 Place the drawer in the 500-sheet drawer with Installing a duplex unit. Warning: If you have chosen for your printer, or install it on the lower drawer. Make sure it on another 500-sheet drawer, or continue with the positioning posts on another ...one additional 500-sheet drawer. Installing a 500-sheet drawer 7 b Hand-tighten the screws. Installing and removing options Installing a 500-sheet drawer Your printer supports up to the positioning posts on top of a 2000-sheet drawer, secure the drawers with stabilizing screws. b Lower the 500-sheet drawer ...

User's Guide
Page 8
... the drawer with the holes in the location you print on both sides of a sheet of paper. Installing and removing options Installing a duplex unit Your printer supports an optional duplex unit that lets you have an optional duplex unit and a 2000-sheet drawer, you must install a 500-sheet drawer between the... a duplex unit 8 b Lower the duplex unit into place. To install it is seated securely on a 500-sheet drawer. Warning: If you have chosen for your printer or install it on the drawer.
... the drawer with the holes in the location you print on both sides of a sheet of paper. Installing and removing options Installing a duplex unit Your printer supports an optional duplex unit that lets you have an optional duplex unit and a 2000-sheet drawer, you must install a 500-sheet drawer between the... a duplex unit 8 b Lower the duplex unit into place. To install it is seated securely on a 500-sheet drawer. Warning: If you have chosen for your printer or install it on the drawer.

User's Guide
Page 9
..., install it safely. excess weight may cause it is designed to hold the weight of the printer. 4 Lower the output expander into place. Installing and removing options Installing the printer CAUTION: The printer weighs 48-82 kg (105-181 lb). It requires at least three (3) people to disengage ... stack up to lift it, do not lift by the front of the output expander with the holes in one bin. Installing the printer 9 Use the printer handholds to 650 sheets of the mounting brackets could damage tabletops or fabrics. 1 Unpack the output expander and remove any packing material....
..., install it safely. excess weight may cause it is designed to hold the weight of the printer. 4 Lower the output expander into place. Installing and removing options Installing the printer CAUTION: The printer weighs 48-82 kg (105-181 lb). It requires at least three (3) people to disengage ... stack up to lift it, do not lift by the front of the output expander with the holes in one bin. Installing the printer 9 Use the printer handholds to 650 sheets of the mounting brackets could damage tabletops or fabrics. 1 Unpack the output expander and remove any packing material....

User's Guide
Page 10
Installing an output expander 10 Installing and removing options 5 Attach the printer top cover to the output expander. 6 Attach the output expander paper bail to the top cover.
Installing an output expander 10 Installing and removing options 5 Attach the printer top cover to the output expander. 6 Attach the output expander paper bail to the top cover.
User's Guide
Page 11
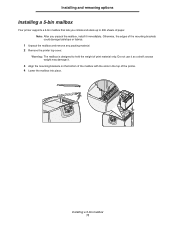
... cover. Installing a 5-bin mailbox 11 Note: After you collate and stack up to hold the weight of the printer. 4 Lower the mailbox into place. excess weight may damage it. 3 Align the mounting brackets on the bottom of the mailbox with the slots in the ...top of print material only. Installing and removing options Installing a 5-bin mailbox Your printer supports a 5-bin mailbox that lets you unpack the mailbox, install it immediately. Otherwise, the edges of paper. Do not use it as a shelf...
... cover. Installing a 5-bin mailbox 11 Note: After you collate and stack up to hold the weight of the printer. 4 Lower the mailbox into place. excess weight may damage it. 3 Align the mounting brackets on the bottom of the mailbox with the slots in the ...top of print material only. Installing and removing options Installing a 5-bin mailbox Your printer supports a 5-bin mailbox that lets you unpack the mailbox, install it immediately. Otherwise, the edges of paper. Do not use it as a shelf...

User's Guide
Page 12
Installing and removing options 5 Attach the printer top cover to the mailbox. 6 Attach the mailbox paper bail to the top cover. Installing a StapleSmart finisher Your printer supports a StapleSmart finisher. Installing a StapleSmart finisher 12 See the information sheet included with the finisher for detailed installation instructions.
Installing and removing options 5 Attach the printer top cover to the mailbox. 6 Attach the mailbox paper bail to the top cover. Installing a StapleSmart finisher Your printer supports a StapleSmart finisher. Installing a StapleSmart finisher 12 See the information sheet included with the finisher for detailed installation instructions.
User's Guide
Page 13
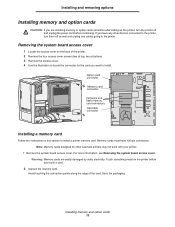
...connectors Hard disk connector Installing a memory card Follow the instructions in this section to the printer, turn the printer off as well and unplug any other Lexmark printers may not work with your printer. 1 Remove the system board access cover. Warning: Memory cards are installing memory or ...option cards sometime after setting up the printer, turn them off and unplug the power cord before you are ...
...connectors Hard disk connector Installing a memory card Follow the instructions in this section to the printer, turn the printer off as well and unplug any other Lexmark printers may not work with your printer. 1 Remove the system board access cover. Warning: Memory cards are installing memory or ...option cards sometime after setting up the printer, turn them off and unplug the power cord before you are ...

User's Guide
Page 14
... an optional firmware or flash memory card. The entire length of the connector snap into place. Note: Firmware and flash memory cards offered for other Lexmark printers cannot be used with the holes on the system board. 4 Push the card firmly into place. Be careful not to fully seat the card. 6 Make... access cover. 2 Unpack the card. Save the packaging. 3 Holding the card by static electricity. Only one of each latch fits over the notch on the printer before you touch a card. 1 Remove the system board access cover. Avoid touching the metal pins on the card with your...
... an optional firmware or flash memory card. The entire length of the connector snap into place. Note: Firmware and flash memory cards offered for other Lexmark printers cannot be used with the holes on the system board. 4 Push the card firmly into place. Be careful not to fully seat the card. 6 Make... access cover. 2 Unpack the card. Save the packaging. 3 Holding the card by static electricity. Only one of each latch fits over the notch on the printer before you touch a card. 1 Remove the system board access cover. Avoid touching the metal pins on the card with your...

User's Guide
Page 15
... the hard disk with the connector pins on the hard disk. 4 Attach the ribbon cable to the hard disk. 5 Align the screw holes on the printer before installing the hard disk. 1 Remove the system board access cover.
... the hard disk with the connector pins on the hard disk. 4 Attach the ribbon cable to the hard disk. 5 Align the screw holes on the printer before installing the hard disk. 1 Remove the system board access cover.

User's Guide
Page 16
...system board. Save the screw. Warning: Option cards are easily damaged by static electricity. The cable connectors on the printer before you can connect your printer to install these options. 1 Remove the system board access cover. Installing memory and option cards 16 The following ...table describes their function. Installing an option card Your printer has one expansion card slot that covers the connector slot, and then lift the plate off. For more information, see Removing the...
...system board. Save the screw. Warning: Option cards are easily damaged by static electricity. The cable connectors on the printer before you can connect your printer to install these options. 1 Remove the system board access cover. Installing memory and option cards 16 The following ...table describes their function. Installing an option card Your printer has one expansion card slot that covers the connector slot, and then lift the plate off. For more information, see Removing the...

