
Setup Sheet
Page 1
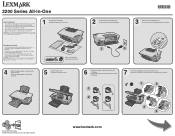
... user documentation, to a professional service person. Retirez l'autocollant et la bande protectrice des cartouches. 7 Insert the cartridge(s) and snap the lid(s) closed. www.lexmark.com 2200 Series All-In-One Safety information • Use only the power supply provided with this product or ...cordon d'alimentation, téléphone, etc.) en cas d'orage. Soulevez l'unité du scanner. 6 Remove the sticker and tape from the print cartridge(s). CAUTION: Do not use the fax feature during a lightning storm. 1 Unpack your All-In-One. Consignes de sécurité • ...
... user documentation, to a professional service person. Retirez l'autocollant et la bande protectrice des cartouches. 7 Insert the cartridge(s) and snap the lid(s) closed. www.lexmark.com 2200 Series All-In-One Safety information • Use only the power supply provided with this product or ...cordon d'alimentation, téléphone, etc.) en cas d'orage. Soulevez l'unité du scanner. 6 Remove the sticker and tape from the print cartridge(s). CAUTION: Do not use the fax feature during a lightning storm. 1 Unpack your All-In-One. Consignes de sécurité • ...
Setup Solutions
Page 3
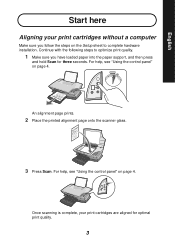
... sheet to optimize print quality. 1 Make sure you follow the steps on page 4. English Start here Aligning your print cartridges are aligned for three seconds. Once scanning is complete, your print cartridges without a computer Make sure you have loaded paper into the paper support, and then press and hold Scan for optimal...
... sheet to optimize print quality. 1 Make sure you follow the steps on page 4. English Start here Aligning your print cartridges are aligned for three seconds. Once scanning is complete, your print cartridges without a computer Make sure you have loaded paper into the paper support, and then press and hold Scan for optimal...
Setup Solutions
Page 4
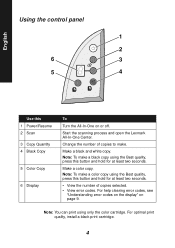
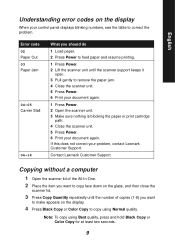
... the Best quality, press this button and hold for at least two seconds. • View the number of copies to make a color copy using only the color cartridge. Note: To make . For help clearing error codes, see "Understanding error codes on the display" on or off. For optimal ... print cartridge. 4 Change the number of copies selected. • View error codes. Note: You can print using the Best quality, press this button and hold for at least two seconds. Start the scanning process and open the Lexmark All-In-One Center. Make a black and white copy. Make a color copy....
... the Best quality, press this button and hold for at least two seconds. • View the number of copies to make a color copy using only the color cartridge. Note: To make . For help clearing error codes, see "Understanding error codes on the display" on or off. For optimal ... print cartridge. 4 Change the number of copies selected. • View error codes. Note: You can print using the Best quality, press this button and hold for at least two seconds. Start the scanning process and open the Lexmark All-In-One Center. Make a black and white copy. Make a color copy....
Setup Solutions
Page 5
... the All-In-One software. If it does not appear on page 9. • You installed the software. For help, see if there is on. If Lexmark 2200 Series does not appear in the right carrier. • The paper is on the All-In-One display. Note: If your All-In-One... is on, the Power button is lit. • The computer is loaded correctly. The color print cartridge is secure in the left carrier and the black print cartridge is securely attached to your computer and to see "Understanding error codes on the display" on your desktop, install the...
... the All-In-One software. If it does not appear on page 9. • You installed the software. For help, see if there is on. If Lexmark 2200 Series does not appear in the right carrier. • The paper is on the All-In-One display. Note: If your All-In-One... is on, the Power button is lit. • The computer is loaded correctly. The color print cartridge is secure in the left carrier and the black print cartridge is securely attached to your computer and to see "Understanding error codes on the display" on your desktop, install the...
Setup Solutions
Page 6
... XP). 2 Right-click the Lexmark 2200 Series and make sure that Set as your default printer. Alignment page does not print 1 Make sure you remove the sticker and transparent tape from both print cartridges. 2 Make sure the color print cartridge is secure in the left carrier... and the black print cartridge is displayed. 2 Select Lexmark 2200 Series. 3 Click Make Default. For help, see "Aligning your print cartridges. Windows: 1 Click Start Æ Settings Æ...
... XP). 2 Right-click the Lexmark 2200 Series and make sure that Set as your default printer. Alignment page does not print 1 Make sure you remove the sticker and transparent tape from both print cartridges. 2 Make sure the color print cartridge is secure in the left carrier... and the black print cartridge is displayed. 2 Select Lexmark 2200 Series. 3 Click Make Default. For help, see "Aligning your print cartridges. Windows: 1 Click Start Æ Settings Æ...
Setup Solutions
Page 9
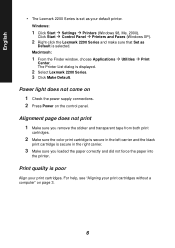
If this does not correct your document again. Contact Lexmark Customer Support. Error code 02 Paper Out 03 Paper Jam 04-05 Carrier Stall 06-14 What you want to copy face down on the ... Power. 6 Print your document again. 1 Press Power. 2 Open the scanner unit. 3 Make sure nothing is blocking the paper or print cartridge path. 4 Close the scanner unit. 5 Press Power. 6 Print your problem, contact Lexmark Customer Support. Note: To copy using Normal quality. English Understanding error codes on the display. 4 Press Black Copy or...
If this does not correct your document again. Contact Lexmark Customer Support. Error code 02 Paper Out 03 Paper Jam 04-05 Carrier Stall 06-14 What you want to copy face down on the ... Power. 6 Print your document again. 1 Press Power. 2 Open the scanner unit. 3 Make sure nothing is blocking the paper or print cartridge path. 4 Close the scanner unit. 5 Press Power. 6 Print your problem, contact Lexmark Customer Support. Note: To copy using Normal quality. English Understanding error codes on the display. 4 Press Black Copy or...

