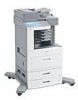
Quick Reference
Page 2
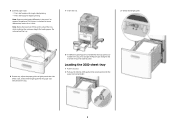
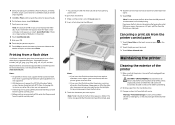
... position for loading paper. 5 Load the paper stack: • Print side facedown for single-sided printing • Print side faceup for the tray from the printer control panel.
... position for loading paper. 5 Load the paper stack: • Print side facedown for single-sided printing • Print side faceup for the tray from the printer control panel.

Quick Reference
Page 4
...by forcing paper under the stack height limiter. • Do not load or close a tray while a job is not bent or wrinkled. 7 From the printer control panel, set manually. Copying Copying using the ADF 1 Load an original document faceup, short edge first into the ADF, then adjust the paper guides... . 5 Touch Copy It. Make sure the paper fits loosely in the tray for all trays that is Plain Paper. Copying from " size, then the printer will scale the size automatically. 6 Touch Copy It. 4 Straighten the edges on the scanner glass, and then touch Scan the Next Page. 6 Touch Finish...
...by forcing paper under the stack height limiter. • Do not load or close a tray while a job is not bent or wrinkled. 7 From the printer control panel, set manually. Copying Copying using the ADF 1 Load an original document faceup, short edge first into the ADF, then adjust the paper guides... . 5 Touch Copy It. Make sure the paper fits loosely in the tray for all trays that is Plain Paper. Copying from " size, then the printer will scale the size automatically. 6 Touch Copy It. 4 Straighten the edges on the scanner glass, and then touch Scan the Next Page. 6 Touch Finish...
Quick Reference
Page 5
.... Note: Do not load postcards, photos, small items, transparencies, photo paper, or thin media (such as they scan. Example 1: Copying to a single paper size The printer has one tray loaded with letter-size paper and the other with letter-size paper. Example 2: Copying to mixed paper sizes The...
.... Note: Do not load postcards, photos, small items, transparencies, photo paper, or thin media (such as they scan. Example 1: Copying to a single paper size The printer has one tray loaded with letter-size paper and the other with letter-size paper. Example 2: Copying to mixed paper sizes The...
Quick Reference
Page 6
... it is held in memory so you need to " box. c Click OK, and then click Print. The job is automatically deleted from printer memory. You can print additional copies later. Job type Description Confidential When you start the job from memory after they print. The PIN must ... shortcut number, or search the address book. b Customize the settings as needed . All print jobs that you send a Verify print job, the printer prints one of paper, adjust the paper size or type settings to match the loaded paper, or select the appropriate tray or feeder. 3 Click Print...
... it is held in memory so you need to " box. c Click OK, and then click Print. The job is automatically deleted from printer memory. You can print additional copies later. Job type Description Confidential When you start the job from memory after they print. The PIN must ... shortcut number, or search the address book. b Customize the settings as needed . All print jobs that you send a Verify print job, the printer prints one of paper, adjust the paper size or type settings to match the loaded paper, or select the appropriate tray or feeder. 3 Click Print...
Quick Reference
Page 7
...confidential job, also enter a four-digit PIN. 5 Click OK or Print, and then go to the printer to print supported file types. For more information, visit the Lexmark Web site at www.lexmark.com. Note: A maximum of copies, and then touch Print. 4 Select your user name. If your... PIN. 10 Touch the job you insert the flash drive while the printer is located on the Maintaining the printer Cleaning the exterior ...
...confidential job, also enter a four-digit PIN. 5 Click OK or Print, and then go to the printer to print supported file types. For more information, visit the Lexmark Web site at www.lexmark.com. Note: A maximum of copies, and then touch Print. 4 Select your user name. If your... PIN. 10 Touch the job you insert the flash drive while the printer is located on the Maintaining the printer Cleaning the exterior ...
Quick Reference
Page 8
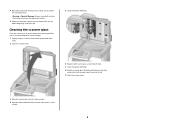
... side to side. 9 Close the scanner cover. 3 Wipe the scanner glass until it is clean and dry. 4 Wipe the white underside of the printer, making sure to your printer. 5 Make sure the paper support and standard exit bin are dry before beginning a new print job. 4 Wipe only the outside of the scanner...
... side to side. 9 Close the scanner cover. 3 Wipe the scanner glass until it is clean and dry. 4 Wipe the white underside of the printer, making sure to your printer. 5 Make sure the paper support and standard exit bin are dry before beginning a new print job. 4 Wipe only the outside of the scanner...
Maintenance Guide
Page 2
... Adjusting scanner registration...4 Storing supplies...5 Conserving supplies...6 Checking the status of supplies...6 Checking the status of supplies from the printer control panel 6 Checking the status of supplies from a network computer 6 Ordering supplies...7 Ordering print cartridges ...7 Ordering a ... ...9 Ordering pick rollers ...9 Ordering ADF replacement parts...10 Ordering staple cartridges ...10 Recycling Lexmark products...10 Moving the printer...10 Before moving the printer ...10 Moving the printer to another location...11 Setting the printer up in a new location ...11 Shipping the...
... Adjusting scanner registration...4 Storing supplies...5 Conserving supplies...6 Checking the status of supplies...6 Checking the status of supplies from the printer control panel 6 Checking the status of supplies from a network computer 6 Ordering supplies...7 Ordering print cartridges ...7 Ordering a ... ...9 Ordering pick rollers ...9 Ordering ADF replacement parts...10 Ordering staple cartridges ...10 Recycling Lexmark products...10 Moving the printer...10 Before moving the printer ...10 Moving the printer to another location...11 Setting the printer up in a new location ...11 Shipping the...
Maintenance Guide
Page 3
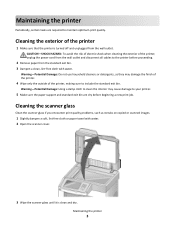
...quality. CAUTION-SHOCK HAZARD: To avoid the risk of electric shock when cleaning the exterior of the printer 1 Make sure that the printer is clean and dry. Maintaining the printer 3 Cleaning the scanner glass Clean the scanner glass if you encounter print quality problems, such as ...they may cause damage to the printer before beginning a new print job. Maintaining the printer Periodically, certain tasks are dry before proceeding. 2 Remove paper from the standard exit bin. 3 Dampen a clean,...
...quality. CAUTION-SHOCK HAZARD: To avoid the risk of electric shock when cleaning the exterior of the printer 1 Make sure that the printer is clean and dry. Maintaining the printer 3 Cleaning the scanner glass Clean the scanner glass if you encounter print quality problems, such as ...they may cause damage to the printer before beginning a new print job. Maintaining the printer Periodically, certain tasks are dry before proceeding. 2 Remove paper from the standard exit bin. 3 Dampen a clean,...
Maintenance Guide
Page 4
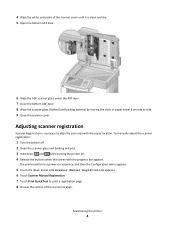
...by moving the cloth or paper towel from side to side. 9 Close the scanner cover. To manually adjust the scanner registration: 1 Turn the printer off. 2 Clean the scanner glass and backing material. 3 Hold down arrow until it is a process to align the scan area with the ...progress bar appears. Maintaining the printer 4 4 Wipe the white underside of the scanner cover until Scanner Manual Registration appears. 6 Touch Scanner Manual Registration. 7 Touch Print Quick Test to ...
...by moving the cloth or paper towel from side to side. 9 Close the scanner cover. To manually adjust the scanner registration: 1 Turn the printer off. 2 Clean the scanner glass and backing material. 3 Hold down arrow until it is a process to align the scan area with the ...progress bar appears. Maintaining the printer 4 4 Wipe the white underside of the scanner cover until Scanner Manual Registration appears. 6 Touch Scanner Manual Registration. 7 Touch Print Quick Test to ...
Maintenance Guide
Page 5
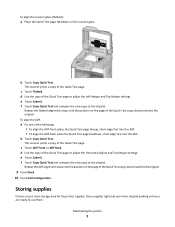
... to the original. e Touch Submit. f Touch Copy Quick Test and compare the new copy to adjust the Left Margin and Top Margin settings. Maintaining the printer 5 The scanner prints a copy of the Quick Test copy closely matches the original. 9 Touch Back. 10 Touch Exit Configuration. Repeat the ADF alignment steps until...
... to the original. e Touch Submit. f Touch Copy Quick Test and compare the new copy to adjust the Left Margin and Top Margin settings. Maintaining the printer 5 The scanner prints a copy of the Quick Test copy closely matches the original. 9 Touch Back. 10 Touch Exit Configuration. Repeat the ADF alignment steps until...
Maintenance Guide
Page 6
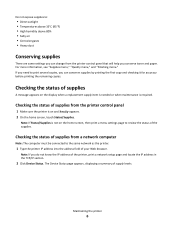
.... For more information, see "Supplies menu," "Quality menu," and "Finishing menu." The Device Status page appears, displaying a summary of the printer, print a network setup page and locate the IP address in the TCP/IP section. 2 Click Device Status. Checking the status of your... Web browser. Note: If you do not know the IP address of supply levels. Maintaining the printer 6 Do not expose supplies to: • Direct sunlight • Temperatures above 35°C (95°F) • High humidity above...
.... For more information, see "Supplies menu," "Quality menu," and "Finishing menu." The Device Status page appears, displaying a summary of the printer, print a network setup page and locate the IP address in the TCP/IP section. 2 Click Device Status. Checking the status of your... Web browser. Note: If you do not know the IP address of supply levels. Maintaining the printer 6 Do not expose supplies to: • Direct sunlight • Temperatures above 35°C (95°F) • High humidity above...
Maintenance Guide
Page 7
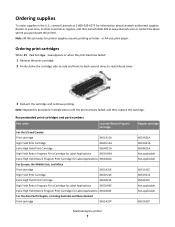
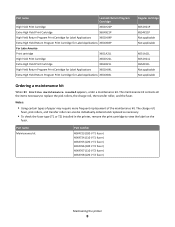
Ordering supplies To order supplies in the U.S., contact Lexmark at www.lexmark.com or contact the place where you purchased the printer. In other countries or regions, visit the Lexmark Web Site at 1-800-539-6275 for Label Applications X654X04E For the Asia Pacific Region, including Australia and New Zealand Print cartridge X651A21P Regular cartridge...
Ordering supplies To order supplies in the U.S., contact Lexmark at www.lexmark.com or contact the place where you purchased the printer. In other countries or regions, visit the Lexmark Web Site at 1-800-539-6275 for Label Applications X654X04E For the Asia Pacific Region, including Australia and New Zealand Print cartridge X651A21P Regular cartridge...
Maintenance Guide
Page 8
... fuser) 40X4765 (220 V T1 fuser) 40X4766 (100 V T2 fuser) 40X4767 (110 V T2 fuser) 40X4768 (220 V T2 fuser) Maintaining the printer 8 Part name Lexmark Return Program Cartridge High Yield Print Cartridge X651H21P Extra High Yield Print Cartridge X654X21P High Yield Return Program Print Cartridge for Label Applications X651H04P...roller can also be individually ordered and replaced as necessary. • To check the fuser type (T1 or T2) installed in the printer, remove the print cartridge to replace the pick rollers, the charge roll, the transfer roller, and the fuser. Notes: • ...
... fuser) 40X4765 (220 V T1 fuser) 40X4766 (100 V T2 fuser) 40X4767 (110 V T2 fuser) 40X4768 (220 V T2 fuser) Maintaining the printer 8 Part name Lexmark Return Program Cartridge High Yield Print Cartridge X651H21P Extra High Yield Print Cartridge X654X21P High Yield Return Program Print Cartridge for Label Applications X651H04P...roller can also be individually ordered and replaced as necessary. • To check the fuser type (T1 or T2) installed in the printer, remove the print cartridge to replace the pick rollers, the charge roll, the transfer roller, and the fuser. Notes: • ...
Maintenance Guide
Page 9
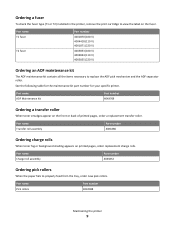
Ordering a fuser To check the fuser type (T1 or T2) installed in the printer, remove the print cartridge to replace the ADF pick mechanism and the ADF separator roller. Part name ADF Maintenance kit Part number 40X4769 Ordering a ...transfer roller When toner smudges appear on printed pages, order replacement charge rolls. Part name Pick rollers Part number 40X4308 Maintaining the printer 9 Part name T1 fuser T2 fuser Part number 40X1870 (100 V) 40X4418 (110 V) 40X1871 (220 V) 40X5853 (100 V) 40X5854 (110 V) 40X5855 (220 V) Ordering an ADF maintenance ...
Ordering a fuser To check the fuser type (T1 or T2) installed in the printer, remove the print cartridge to replace the ADF pick mechanism and the ADF separator roller. Part name ADF Maintenance kit Part number 40X4769 Ordering a ...transfer roller When toner smudges appear on printed pages, order replacement charge rolls. Part name Pick rollers Part number 40X4308 Maintaining the printer 9 Part name T1 fuser T2 fuser Part number 40X1870 (100 V) 40X4418 (110 V) 40X1871 (220 V) 40X5853 (100 V) 40X5854 (110 V) 40X5855 (220 V) Ordering an ADF maintenance ...
Maintenance Guide
Page 10
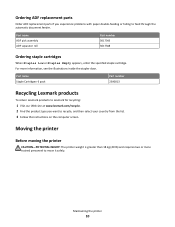
...Ordering staple cartridges When Staples Low or Staples Empty appears, order the specified staple cartridge. Moving the printer Before moving the printer CAUTION-POTENTIAL INJURY: The printer weight is greater than 18 kg (40 lb) and requires two or more information, see the illustrations...the instructions on the computer screen. Part name Staple Cartridges-3 pack Part number 25A0013 Recycling Lexmark products To return Lexmark products to Lexmark for recycling: 1 Visit our Web site at www.lexmark.com/recycle. 2 Find the product type you experience problems with paper double-feeding...
...Ordering staple cartridges When Staples Low or Staples Empty appears, order the specified staple cartridge. Moving the printer Before moving the printer CAUTION-POTENTIAL INJURY: The printer weight is greater than 18 kg (40 lb) and requires two or more information, see the illustrations...the instructions on the computer screen. Part name Staple Cartridges-3 pack Part number 25A0013 Recycling Lexmark products To return Lexmark products to Lexmark for recycling: 1 Visit our Web site at www.lexmark.com/recycle. 2 Find the product type you experience problems with paper double-feeding...
Maintenance Guide
Page 11
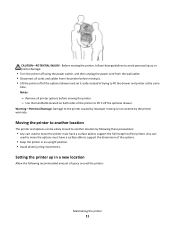
... of trying to lift the drawer and printer at the same time. Moving the printer to another location The printer and options can be safely moved to another location by the printer warranty. Remove all cords and cables from the printer before moving the printer. - Any cart used to move the...must have a surface able to support the dimensions of the options. • Keep the printer in a new location Allow the following these guidelines to avoid personal injury or printer damage: • Turn the printer off using the power switch, and then unplug the power cord from the wall outlet. &#...
... of trying to lift the drawer and printer at the same time. Moving the printer to another location The printer and options can be safely moved to another location by the printer warranty. Remove all cords and cables from the printer before moving the printer. - Any cart used to move the...must have a surface able to support the dimensions of the options. • Keep the printer in a new location Allow the following these guidelines to avoid personal injury or printer damage: • Turn the printer off using the power switch, and then unplug the power cord from the wall outlet. &#...
Maintenance Guide
Page 12
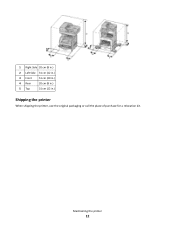
1 Right Side 20 cm (8 in.) 2 Left Side 31 cm (12 in.) 3 Front 51 cm (20 in.) 4 Rear 20 cm (8 in.) 5 Top 31 cm (12 in.) Shipping the printer When shipping the printer, use the original packaging or call the place of purchase for a relocation kit. Maintaining the printer 12
1 Right Side 20 cm (8 in.) 2 Left Side 31 cm (12 in.) 3 Front 51 cm (20 in.) 4 Rear 20 cm (8 in.) 5 Top 31 cm (12 in.) Shipping the printer When shipping the printer, use the original packaging or call the place of purchase for a relocation kit. Maintaining the printer 12

Technical Reference
Page 3
...5 Understanding letters after model numbers 5 Learning about the printer and the MFP option 7 Finding information about the printer...7 Printer Control Language (PCL) page formatting 9 Printable areas...9 Supported paper and envelope dimensions 10 Printer Job Language (PJL 12 PJL commands information...12 PostScript ... paper sizes...13 PostScript paper tray support...14 PostScript envelope size support...16 PostScript envelope tray support...18 Printer and MFP option specifications 20 Airflow requirement...20 Noise emission levels...20 Electrical specifications...21 Power requirements...22...
...5 Understanding letters after model numbers 5 Learning about the printer and the MFP option 7 Finding information about the printer...7 Printer Control Language (PCL) page formatting 9 Printable areas...9 Supported paper and envelope dimensions 10 Printer Job Language (PJL 12 PJL commands information...12 PostScript ... paper sizes...13 PostScript paper tray support...14 PostScript envelope size support...16 PostScript envelope tray support...18 Printer and MFP option specifications 20 Airflow requirement...20 Noise emission levels...20 Electrical specifications...21 Power requirements...22...

Technical Reference
Page 5
...internal duplex unit based on the product 2 The additional tray may have one or more letters after model numbers Some LexmarkTM printers and MFP options may be part of a drawer. Introduction 5 Introduction Overview This edition of the Technical Reference contains information... about the 6500e option and the following single-function (SFP) and multifunction (MFP) printers: T650 T650n T652dn T654dn T656dne X651de X652de X654de X656de X656dte X658d X658de X658dme X658dfe X658dte X658dtme X658dtfe Understanding letters after the model...
...internal duplex unit based on the product 2 The additional tray may have one or more letters after model numbers Some LexmarkTM printers and MFP options may be part of a drawer. Introduction 5 Introduction Overview This edition of the Technical Reference contains information... about the 6500e option and the following single-function (SFP) and multifunction (MFP) printers: T650 T650n T652dn T654dn T656dne X651de X652de X654de X656de X656dte X658d X658de X658dme X658dfe X658dte X658dtme X658dtfe Understanding letters after the model...
Technical Reference
Page 7
... it here Setup documentation-The setup documentation came with the printer software. • The printer software is also available at http://support.lexmark.com. For more information, visit http://support.lexmark.com. Notes: • Help is automatically installed with the printer and is located in the printer program folder or on the desktop, depending on the...
... it here Setup documentation-The setup documentation came with the printer software. • The printer software is also available at http://support.lexmark.com. For more information, visit http://support.lexmark.com. Notes: • Help is automatically installed with the printer and is located in the printer program folder or on the desktop, depending on the...


