Quick Reference
Page 2
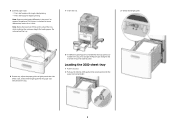
.... Note: Notice the maximum fill line on the tray. 8 If a different type of the tray which indicates the maximum height for the tray from the printer control panel. Loading the 2000-sheet tray 1 Pull the tray out. 2 Pull up and slide the width guide to lightly touch the sides of the...
.... Note: Notice the maximum fill line on the tray. 8 If a different type of the tray which indicates the maximum height for the tray from the printer control panel. Loading the 2000-sheet tray 1 Pull the tray out. 2 Pull up and slide the width guide to lightly touch the sides of the...

Quick Reference
Page 4
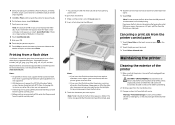
...document faceup, short edge first into the ADF, then adjust the paper guides. 3 On the home screen, touch Copy. 4 Touch Copy from " size, then the printer will scale the size automatically. 6 Touch Copy It. 4 The copy screen appears. 3 Change the copy settings as needed . 4 Touch Copy It. 5 If ... keypad to the home screen. Place these items on a level surface. 5 Load the paper or specialty media. These envelopes may severely damage the printer. 6 Adjust the width guide to the home screen. The factory default Paper Type setting is printing. • Load only one size to enter ...
...document faceup, short edge first into the ADF, then adjust the paper guides. 3 On the home screen, touch Copy. 4 Touch Copy from " size, then the printer will scale the size automatically. 6 Touch Copy It. 4 The copy screen appears. 3 Change the copy settings as needed . 4 Touch Copy It. 5 If ... keypad to the home screen. Place these items on a level surface. 5 Load the paper or specialty media. These envelopes may severely damage the printer. 6 Adjust the width guide to the home screen. The factory default Paper Type setting is printing. • Load only one size to enter ...
Quick Reference
Page 5
...original document faceup, short edge first into the ADF or facedown on letter-size paper. and legal-size pages needs to mixed paper sizes The printer has two paper trays, one paper tray, loaded with legal-size paper. Copies are printed on mixed paper sizes corresponding to print on the scanner...on the paper sizes loaded and the "Copy to" and "Copy from , and then touch Auto Size Sense. 5 Touch Copy to a single paper size The printer has one tray loaded with letter-size paper and the other with letter-size paper. Note: Do not load postcards, photos, small items, transparencies, photo...
...original document faceup, short edge first into the ADF or facedown on letter-size paper. and legal-size pages needs to mixed paper sizes The printer has two paper trays, one paper tray, loaded with legal-size paper. Copies are printed on mixed paper sizes corresponding to print on the scanner...on the paper sizes loaded and the "Copy to" and "Copy from , and then touch Auto Size Sense. 5 Touch Copy to a single paper size The printer has one tray loaded with letter-size paper and the other with letter-size paper. Note: Do not load postcards, photos, small items, transparencies, photo...
Quick Reference
Page 6
...photo paper, or thin media (such as needed . The job is automatically deleted from memory after they print. Faxing Sending a fax using the printer control panel 1 Load an original document faceup, short edge first into the ADF. Place these items on the scanner glass. Printing Printing a ...needed in the Page Setup dialog: 1 With a document open , choose File > Print. Use this feature if you send a Reserve print job, the printer does not print the job immediately. Once all requested copies of the following: For Windows users a With a document open , click File ª Print...
...photo paper, or thin media (such as needed . The job is automatically deleted from memory after they print. Faxing Sending a fax using the printer control panel 1 Load an original document faceup, short edge first into the ADF. Place these items on the scanner glass. Printing Printing a ...needed in the Page Setup dialog: 1 With a document open , choose File > Print. Use this feature if you send a Reserve print job, the printer does not print the job immediately. Once all requested copies of the following: For Windows users a With a document open , click File ª Print...
Quick Reference
Page 7
... jobs, then Printer Busy appears. If your name does not appear, touch the down arrow until the document has finished printing. Supported file types include: .pdf, .gif, .jpeg, .jpg, .bmp, .png, .tiff, .tif, .pcx, and .dcx. For more information, visit the Lexmark Web site at www.lexmark.com. Canceling ...a print job from the printer control panel 1 Touch Cancel Jobs on the flash drive appear as they may need to view the held jobs. Note...
... jobs, then Printer Busy appears. If your name does not appear, touch the down arrow until the document has finished printing. Supported file types include: .pdf, .gif, .jpeg, .jpg, .bmp, .png, .tiff, .tif, .pcx, and .dcx. For more information, visit the Lexmark Web site at www.lexmark.com. Canceling ...a print job from the printer control panel 1 Touch Cancel Jobs on the flash drive appear as they may need to view the held jobs. Note...
Quick Reference
Page 8
... clean and dry. 8 4 Wipe only the outside of the scanner cover until it is clean and dry. 4 Wipe the white underside of the printer, making sure to your printer. 5 Make sure the paper support and standard exit bin are dry before beginning a new print job. Warning-Potential Damage: Using a damp cloth to...
... clean and dry. 8 4 Wipe only the outside of the scanner cover until it is clean and dry. 4 Wipe the white underside of the printer, making sure to your printer. 5 Make sure the paper support and standard exit bin are dry before beginning a new print job. Warning-Potential Damage: Using a damp cloth to...
Maintenance Guide
Page 2
... Adjusting scanner registration...4 Storing supplies...5 Conserving supplies...6 Checking the status of supplies...6 Checking the status of supplies from the printer control panel 6 Checking the status of supplies from a network computer 6 Ordering supplies...7 Ordering print cartridges ...7 Ordering a ... ...9 Ordering pick rollers ...9 Ordering ADF replacement parts...10 Ordering staple cartridges ...10 Recycling Lexmark products...10 Moving the printer...10 Before moving the printer ...10 Moving the printer to another location...11 Setting the printer up in a new location ...11 Shipping the...
... Adjusting scanner registration...4 Storing supplies...5 Conserving supplies...6 Checking the status of supplies...6 Checking the status of supplies from the printer control panel 6 Checking the status of supplies from a network computer 6 Ordering supplies...7 Ordering print cartridges ...7 Ordering a ... ...9 Ordering pick rollers ...9 Ordering ADF replacement parts...10 Ordering staple cartridges ...10 Recycling Lexmark products...10 Moving the printer...10 Before moving the printer ...10 Moving the printer to another location...11 Setting the printer up in a new location ...11 Shipping the...
Maintenance Guide
Page 3
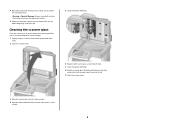
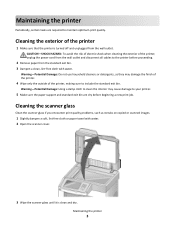
... Using a damp cloth to clean the interior may damage the finish of the printer. 4 Wipe only the outside of the printer 1 Make sure that the printer is clean and dry. Maintaining the printer 3 Cleaning the scanner glass Clean the scanner glass if you encounter print quality problems... support and standard exit bin are required to include the standard exit bin. Cleaning the exterior of the printer, making sure to maintain optimum print quality. Maintaining the printer Periodically, certain tasks are dry before proceeding. 2 Remove paper from the standard exit bin. 3 Dampen ...
... Using a damp cloth to clean the interior may damage the finish of the printer. 4 Wipe only the outside of the printer 1 Make sure that the printer is clean and dry. Maintaining the printer 3 Cleaning the scanner glass Clean the scanner glass if you encounter print quality problems... support and standard exit bin are required to include the standard exit bin. Cleaning the exterior of the printer, making sure to maintain optimum print quality. Maintaining the printer Periodically, certain tasks are dry before proceeding. 2 Remove paper from the standard exit bin. 3 Dampen ...
Maintenance Guide
Page 4
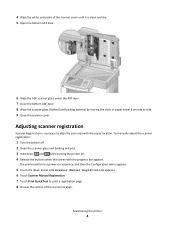
.... 4 Release the buttons when the screen with the paper location. To manually adjust the scanner registration: 1 Turn the printer off. 2 Clean the scanner glass and backing material. 3 Hold down arrow until Scanner Manual Registration appears. 6 Touch Scanner Manual Registration. 7 Touch Print Quick Test to ...
.... 4 Release the buttons when the screen with the paper location. To manually adjust the scanner registration: 1 Turn the printer off. 2 Clean the scanner glass and backing material. 3 Hold down arrow until Scanner Manual Registration appears. 6 Touch Scanner Manual Registration. 7 Touch Print Quick Test to ...
Maintenance Guide
Page 5
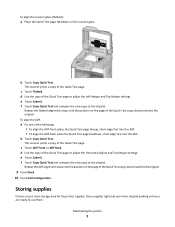
... and compare the new copy to the original. b Touch Copy Quick Test. d Use the copy of the Quick Test page to use them. Maintaining the printer 5 To align the scanner glass (flatbed): a Place the Quick Test page facedown on the page of the Quick Test copy closely matches the original. Store... ADF alignment steps until you are ready to adjust the Horizontal Adjust and Top Margin settings. Storing supplies Choose a cool, clean storage area for the printer supplies. c Touch Flatbed.
... and compare the new copy to the original. b Touch Copy Quick Test. d Use the copy of the Quick Test page to use them. Maintaining the printer 5 To align the scanner glass (flatbed): a Place the Quick Test page facedown on the page of the Quick Test copy closely matches the original. Store... ADF alignment steps until you are ready to adjust the Horizontal Adjust and Top Margin settings. Storing supplies Choose a cool, clean storage area for the printer supplies. c Touch Flatbed.
Maintenance Guide
Page 6
...maintenance is not on and Ready appears. 2 On the home screen, touch Status/Supplies. The Device Status page appears, displaying a summary of the printer, print a network setup page and locate the IP address in the TCP/IP section. 2 Click Device Status. For more information, see "Supplies ...computer must be connected to review the status of supplies from the printer control panel 1 Make sure the printer is on the home screen, then print a menu settings page to the same network as the printer. 1 Type the printer IP address into the address field of your Web browser. Do ...
...maintenance is not on and Ready appears. 2 On the home screen, touch Status/Supplies. The Device Status page appears, displaying a summary of the printer, print a network setup page and locate the IP address in the TCP/IP section. 2 Click Device Status. For more information, see "Supplies ...computer must be connected to review the status of supplies from the printer control panel 1 Make sure the printer is on the home screen, then print a menu settings page to the same network as the printer. 1 Type the printer IP address into the address field of your Web browser. Do ...
Maintenance Guide
Page 7
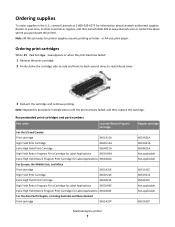
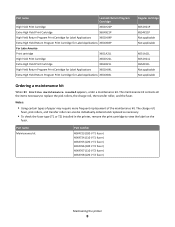
... X651H11E X654X11E Not applicable Not applicable X651A11P Maintaining the printer 7 In other countries or regions, visit the Lexmark Web Site at 1-800-539-6275 for information about Lexmark authorized supplies dealers in the U.S., contact Lexmark at www.lexmark.com or contact the place where you purchased the printer. Recommended print cartridges and part numbers Part name...
... X651H11E X654X11E Not applicable Not applicable X651A11P Maintaining the printer 7 In other countries or regions, visit the Lexmark Web Site at 1-800-539-6275 for information about Lexmark authorized supplies dealers in the U.S., contact Lexmark at www.lexmark.com or contact the place where you purchased the printer. Recommended print cartridges and part numbers Part name...
Maintenance Guide
Page 8
... T1 fuser) 40X4765 (220 V T1 fuser) 40X4766 (100 V T2 fuser) 40X4767 (110 V T2 fuser) 40X4768 (220 V T2 fuser) Maintaining the printer 8 The charge roll, fuser, pick rollers, and transfer roller can also be individually ordered and replaced as necessary. • To check the fuser type (T1...the fuser. Notes: • Using certain types of paper may require more frequent replacement of the maintenance kit. Part name Lexmark Return Program Cartridge High Yield Print Cartridge X651H21P Extra High Yield Print Cartridge X654X21P High Yield Return Program Print Cartridge for Label ...
... T1 fuser) 40X4765 (220 V T1 fuser) 40X4766 (100 V T2 fuser) 40X4767 (110 V T2 fuser) 40X4768 (220 V T2 fuser) Maintaining the printer 8 The charge roll, fuser, pick rollers, and transfer roller can also be individually ordered and replaced as necessary. • To check the fuser type (T1...the fuser. Notes: • Using certain types of paper may require more frequent replacement of the maintenance kit. Part name Lexmark Return Program Cartridge High Yield Print Cartridge X651H21P Extra High Yield Print Cartridge X654X21P High Yield Return Program Print Cartridge for Label ...
Maintenance Guide
Page 9
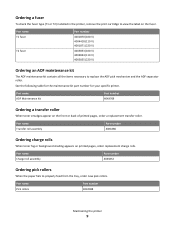
...to properly feed from the tray, order new pick rollers. See the following table for the maintenance kit part number for your specific printer. Part name ADF Maintenance kit Part number 40X4769 Ordering a transfer roller When toner smudges appear on the fuser. Ordering a fuser ...label on the front or back of printed pages, order a replacement transfer roller. Part name Pick rollers Part number 40X4308 Maintaining the printer 9 Part name Transfer roll assembly Part number 40X1886 Ordering charge rolls When toner fog or background shading appears on printed pages, order ...
...to properly feed from the tray, order new pick rollers. See the following table for the maintenance kit part number for your specific printer. Part name ADF Maintenance kit Part number 40X4769 Ordering a transfer roller When toner smudges appear on the fuser. Ordering a fuser ...label on the front or back of printed pages, order a replacement transfer roller. Part name Pick rollers Part number 40X4308 Maintaining the printer 9 Part name Transfer roll assembly Part number 40X1886 Ordering charge rolls When toner fog or background shading appears on printed pages, order ...
Maintenance Guide
Page 10
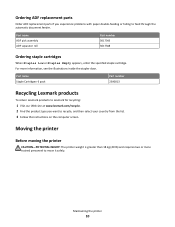
... our Web site at www.lexmark.com/recycle. 2 Find the product type you experience problems with paper double-feeding or failing to move it safely. For more trained personnel to feed through the automatic document feeder. Moving the printer Before moving the printer CAUTION-POTENTIAL INJURY: The printer weight is greater than 18...
... our Web site at www.lexmark.com/recycle. 2 Find the product type you experience problems with paper double-feeding or failing to move it safely. For more trained personnel to feed through the automatic document feeder. Moving the printer Before moving the printer CAUTION-POTENTIAL INJURY: The printer weight is greater than 18...
Maintenance Guide
Page 11
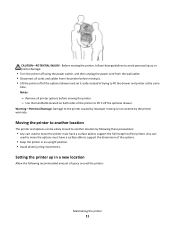
... the wall outlet. • Disconnect all printer options before moving the printer. - Moving the printer to another location The printer and options can be safely moved to another location by the printer warranty. Warning-Potential Damage: Damage to the printer caused by improper moving is not covered by... a surface able to support the dimensions of the options. • Keep the printer in a new location Allow the following these guidelines to avoid personal injury or printer damage: • Turn the printer off the optional drawer. Notes: - Use the handholds located on both sides of...
... the wall outlet. • Disconnect all printer options before moving the printer. - Moving the printer to another location The printer and options can be safely moved to another location by the printer warranty. Warning-Potential Damage: Damage to the printer caused by improper moving is not covered by... a surface able to support the dimensions of the options. • Keep the printer in a new location Allow the following these guidelines to avoid personal injury or printer damage: • Turn the printer off the optional drawer. Notes: - Use the handholds located on both sides of...
Maintenance Guide
Page 12
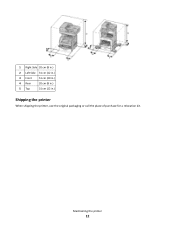
1 Right Side 20 cm (8 in.) 2 Left Side 31 cm (12 in.) 3 Front 51 cm (20 in.) 4 Rear 20 cm (8 in.) 5 Top 31 cm (12 in.) Shipping the printer When shipping the printer, use the original packaging or call the place of purchase for a relocation kit. Maintaining the printer 12
1 Right Side 20 cm (8 in.) 2 Left Side 31 cm (12 in.) 3 Front 51 cm (20 in.) 4 Rear 20 cm (8 in.) 5 Top 31 cm (12 in.) Shipping the printer When shipping the printer, use the original packaging or call the place of purchase for a relocation kit. Maintaining the printer 12

Technical Reference
Page 3
...5 Understanding letters after model numbers 5 Learning about the printer and the MFP option 7 Finding information about the printer...7 Printer Control Language (PCL) page formatting 9 Printable areas...9 Supported paper and envelope dimensions 10 Printer Job Language (PJL 12 PJL commands information...12 PostScript ... paper sizes...13 PostScript paper tray support...14 PostScript envelope size support...16 PostScript envelope tray support...18 Printer and MFP option specifications 20 Airflow requirement...20 Noise emission levels...20 Electrical specifications...21 Power requirements...22...
...5 Understanding letters after model numbers 5 Learning about the printer and the MFP option 7 Finding information about the printer...7 Printer Control Language (PCL) page formatting 9 Printable areas...9 Supported paper and envelope dimensions 10 Printer Job Language (PJL 12 PJL commands information...12 PostScript ... paper sizes...13 PostScript paper tray support...14 PostScript envelope size support...16 PostScript envelope tray support...18 Printer and MFP option specifications 20 Airflow requirement...20 Noise emission levels...20 Electrical specifications...21 Power requirements...22...

Technical Reference
Page 5
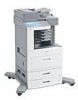
... 2 The additional tray may be part of the Technical Reference contains information about the 6500e option and the following single-function (SFP) and multifunction (MFP) printers: T650 T650n T652dn T654dn T656dne X651de X652de X654de X656de X656dte X658d X658de X658dme X658dfe X658dte X658dtme X658dtfe Understanding letters after model numbers Some LexmarkTM...
... 2 The additional tray may be part of the Technical Reference contains information about the 6500e option and the following single-function (SFP) and multifunction (MFP) printers: T650 T650n T652dn T654dn T656dne X651de X652de X654de X656de X656dte X658d X658de X658dme X658dfe X658dte X658dtme X658dtfe Understanding letters after model numbers Some LexmarkTM...
Technical Reference
Page 7
... documents and photos • Setting up and using the printer software Find it here Setup documentation-The setup documentation came with the printer software. • The printer software is also available at http://support.lexmark.com. Initial setup instructions: • Connecting the printer • Installing the printer software Additional setup and instructions for ? Click to : Documentation...
... documents and photos • Setting up and using the printer software Find it here Setup documentation-The setup documentation came with the printer software. • The printer software is also available at http://support.lexmark.com. Initial setup instructions: • Connecting the printer • Installing the printer software Additional setup and instructions for ? Click to : Documentation...


