User's Guide
Page 21
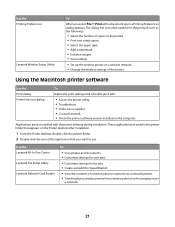
...you want to use. Use the Printing Preferences Lexmark Wireless Setup Utility To When you select File Œ Print with the printer software during installation. Use the Lexmark All-In-One Center Lexmark Fax Setup Utility Lexmark Network Card Reader To • Scan photos and...the To Print dialog Adjust the print settings and schedule print jobs. Printer Services dialog • Access the printer utility. • Troubleshoot. • Order ink or supplies. • Contact Lexmark. • Check the printer software version installed on a wireless network. • Change the wireless...
...you want to use. Use the Printing Preferences Lexmark Wireless Setup Utility To When you select File Œ Print with the printer software during installation. Use the Lexmark All-In-One Center Lexmark Fax Setup Utility Lexmark Network Card Reader To • Scan photos and...the To Print dialog Adjust the print settings and schedule print jobs. Printer Services dialog • Access the printer utility. • Troubleshoot. • Order ink or supplies. • Contact Lexmark. • Check the printer software version installed on a wireless network. • Change the wireless...
User's Guide
Page 22
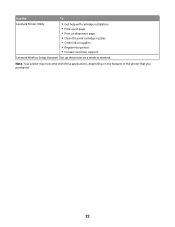
Lexmark Wireless Setup Assistant Set up the printer on the features of the printer that you purchased. 22 Use the To Lexmark Printer Utility • Get help with these applications, depending on a wireless network. Note: Your printer may not come with cartridge installation. • Print a test page. • Print an alignment page. • Clean the print cartridge nozzles. • Order ink or supplies. • Register the printer. • Contact customer support.
Lexmark Wireless Setup Assistant Set up the printer on the features of the printer that you purchased. 22 Use the To Lexmark Printer Utility • Get help with these applications, depending on a wireless network. Note: Your printer may not come with cartridge installation. • Print a test page. • Print an alignment page. • Clean the print cartridge nozzles. • Order ink or supplies. • Register the printer. • Contact customer support.
User's Guide
Page 23
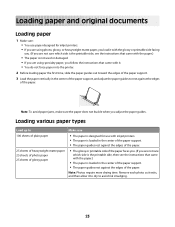
...toward the edges of the paper support. 3 Load the paper vertically in the center of the paper support, and adjust the paper guides to avoid ink smudging. 23 Note: To avoid paper jams, make sure the paper does not buckle when you adjust the paper guides. Note: Photos require more ...to rest against the edges of the paper. Loading paper and original documents Loading paper 1 Make sure: • You use paper designed for use with inkjet printers. • The paper is loaded in the center of the paper support. • The paper guides rest against the edges of the paper. 25 sheets...
...toward the edges of the paper support. 3 Load the paper vertically in the center of the paper support, and adjust the paper guides to avoid ink smudging. 23 Note: To avoid paper jams, make sure the paper does not buckle when you adjust the paper guides. Note: Photos require more ...to rest against the edges of the paper. Loading paper and original documents Loading paper 1 Make sure: • You use paper designed for use with inkjet printers. • The paper is loaded in the center of the paper support. • The paper guides rest against the edges of the paper. 25 sheets...
User's Guide
Page 24
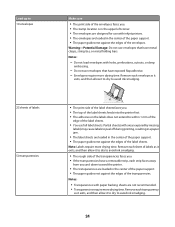
...side of the envelopes faces you. • The stamp location is in the upper left corner. • The envelopes are designed for use with inkjet printers. • The envelopes are not recommended. • Transparencies require more drying time. Remove each sheet of labels as it exits, and then ...allow it to dry to avoid ink smudging. • The rough side of the transparencies faces you. • If the transparencies have a removable strip, each transparency as it exits,...
...side of the envelopes faces you. • The stamp location is in the upper left corner. • The envelopes are designed for use with inkjet printers. • The envelopes are not recommended. • Transparencies require more drying time. Remove each sheet of labels as it exits, and then ...allow it to dry to avoid ink smudging. • The rough side of the transparencies faces you. • If the transparencies have a removable strip, each transparency as it exits,...
User's Guide
Page 33
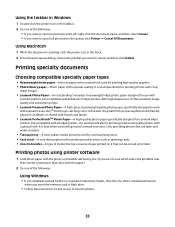
...job, right-click the document name, and then select Cancel. • If you want to work with Lexmark's evercolorTM inks for use with Lexmark printers, but compatible with the glossy or printable side facing you. (If you want to transfer photos. 33...printer icon in an album, or shared with friends and family. • Lexmark PerfectFinishTM Photo Paper-A high-quality photo paper specifically designed for Lexmark inkjet printers, but compatible with crisp, sharp images. • Lexmark Photo Paper-An outstanding "everyday" heavyweight inkjet photo paper designed for eye-catching, color...
...job, right-click the document name, and then select Cancel. • If you want to work with Lexmark's evercolorTM inks for use with Lexmark printers, but compatible with the glossy or printable side facing you. (If you want to transfer photos. 33...printer icon in an album, or shared with friends and family. • Lexmark PerfectFinishTM Photo Paper-A high-quality photo paper specifically designed for Lexmark inkjet printers, but compatible with crisp, sharp images. • Lexmark Photo Paper-An outstanding "everyday" heavyweight inkjet photo paper designed for eye-catching, color...
User's Guide
Page 36
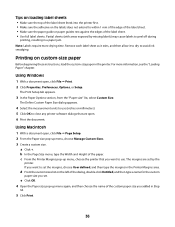
...a document open, click File ΠPage Setup. 2 From the Paper size pop-up menu, choose the printer that are set by missing labels) may cause labels to avoid ink smudging. d From the custom sizes list on custom-size paper Before beginning these instructions, load the custom-size paper... in the printer. The Define Custom Paper Size dialog appears. 4 Select the measurement units to close any printer software dialogs that you added...
...a document open, click File ΠPage Setup. 2 From the Paper size pop-up menu, choose the printer that are set by missing labels) may cause labels to avoid ink smudging. d From the custom sizes list on custom-size paper Before beginning these instructions, load the custom-size paper... in the printer. The Define Custom Paper Size dialog appears. 4 Select the measurement units to close any printer software dialogs that you added...
User's Guide
Page 46
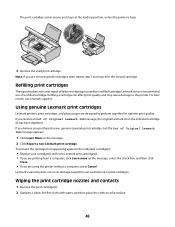
... genuine Lexmark print cartridges Lexmark printers, print cartridges, and photo paper are removing both cartridges, then repeat step 3 and step 4 for the indicated cartridge(s): • Replace your cartridge(s) with water, and then place the cloth on a flat surface. 46 Refilling print cartridges The warranty does not cover repair of Original Lexmark Ink message, the original Lexmark ink...
... genuine Lexmark print cartridges Lexmark printers, print cartridges, and photo paper are removing both cartridges, then repeat step 3 and step 4 for the indicated cartridge(s): • Replace your cartridge(s) with water, and then place the cloth on a flat surface. 46 Refilling print cartridges The warranty does not cover repair of Original Lexmark Ink message, the original Lexmark ink...
User's Guide
Page 47
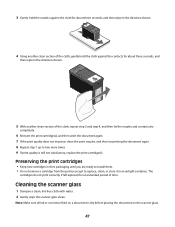
...print cartridges • Keep new cartridges in their packaging until you are ready to install them. • Do not remove a cartridge from the printer except to two more times. 9 If print quality is dry before placing the document on the scanner glass. 47 Cleaning the scanner glass 1 ...Repeat step 7 up to replace, clean, or store it in the direction shown. 5 With another clean section of time. Note: Make sure all ink or corrective fluid on a document is still not satisfactory, replace the print cartridge(s). 3 Gently hold the nozzles against the cloth for about three seconds...
...print cartridges • Keep new cartridges in their packaging until you are ready to install them. • Do not remove a cartridge from the printer except to two more times. 9 If print quality is dry before placing the document on the scanner glass. 47 Cleaning the scanner glass 1 ...Repeat step 7 up to replace, clean, or store it in the direction shown. 5 With another clean section of time. Note: Make sure all ink or corrective fluid on a document is still not satisfactory, replace the print cartridge(s). 3 Gently hold the nozzles against the cloth for about three seconds...
User's Guide
Page 48
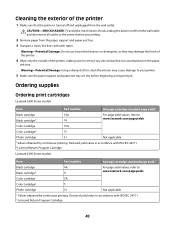
...To avoid the risk of electric shock, unplug the power cord from the wall outlet and disconnect all cables to www.lexmark.com/pageyields. Color cartridge 15A Color cartridge2 15 Photo cartridge 31 Not applicable 1Values obtained by continuous printing. Warning-Potential Damage: Using a damp cloth to ... the printer. 4 Wipe only the outside of the printer, making sure to remove any ink residue that the printer is turned off and unplugged from the paper support and paper exit tray. 3 Dampen a clean, lint-free cloth with ISO/IEC 24711 2Licensed Return Program Cartridge Lexmark 2690 ...
...To avoid the risk of electric shock, unplug the power cord from the wall outlet and disconnect all cables to www.lexmark.com/pageyields. Color cartridge 15A Color cartridge2 15 Photo cartridge 31 Not applicable 1Values obtained by continuous printing. Warning-Potential Damage: Using a damp cloth to ... the printer. 4 Wipe only the outside of the printer, making sure to remove any ink residue that the printer is turned off and unplugged from the paper support and paper exit tray. 3 Dampen a clean, lint-free cloth with ISO/IEC 24711 2Licensed Return Program Cartridge Lexmark 2690 ...
User's Guide
Page 52
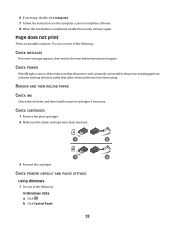
...Windows 1 Do one or more of the following : CHECK MESSAGES If an error message appears, then resolve the error before trying to the printer and plugged into a known working electrical outlet that the power cord is completed, enable the security software again. CHECK POWER If the light ... the instructions on , then make sure that other electrical devices have been removed. 1 2 1 2 3 Reinsert the cartridges. REMOVE AND THEN RELOAD PAPER CHECK INK Check the ink levels, and then install new print cartridges if necessary. Try one of the following : In Windows Vista a Click .
...Windows 1 Do one or more of the following : CHECK MESSAGES If an error message appears, then resolve the error before trying to the printer and plugged into a known working electrical outlet that the power cord is completed, enable the security software again. CHECK POWER If the light ... the instructions on , then make sure that other electrical devices have been removed. 1 2 1 2 3 Reinsert the cartridges. REMOVE AND THEN RELOAD PAPER CHECK INK Check the ink levels, and then install new print cartridges if necessary. Try one of the following : In Windows Vista a Click .

