User's Guide
Page 4
... Receiving a fax using the control panel 42 Receiving a fax automatically using the control panel 42 Setting a fax manual answer code using the control panel 43 Receiving a fax manually...43 Using Caller ID from the control panel...43 Receiving a fax with an answering machine using the control panel...Sending a fax using the software...53 Receiving a fax using the computer 53 Receiving a fax automatically using the computer 53 Setting a fax manual answer code using the computer 54 Using Caller ID from the software...54 Receiving a fax with an answering machine using the computer 54 ...
... Receiving a fax using the control panel 42 Receiving a fax automatically using the control panel 42 Setting a fax manual answer code using the control panel 43 Receiving a fax manually...43 Using Caller ID from the control panel...43 Receiving a fax with an answering machine using the control panel...Sending a fax using the software...53 Receiving a fax using the computer 53 Receiving a fax automatically using the computer 53 Setting a fax manual answer code using the computer 54 Using Caller ID from the software...54 Receiving a fax with an answering machine using the computer 54 ...
User's Guide
Page 41
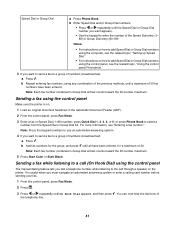
...Dial entries counts toward the 30-number maximum. 5 Press Start Color or Start Black. press Quick Dial 1, 2, 3, 4, or 5; You can now hear the dial tone of numbers (broadcast fax): a Press . Sending a fax while listening to a call through a speaker on the printer. Notes: • For instructions on how to the call ...3 Enter a fax or Speed Dial (1-89) number; It is on how to add Speed Dial or Group Dial numbers using the control panel The manual dialing feature lets you want to send a fax to select a number from the Speed Dial or Group Dial list. For more information, see the ...
...Dial entries counts toward the 30-number maximum. 5 Press Start Color or Start Black. press Quick Dial 1, 2, 3, 4, or 5; You can now hear the dial tone of numbers (broadcast fax): a Press . Sending a fax while listening to a call through a speaker on the printer. Notes: • For instructions on how to the call ...3 Enter a fax or Speed Dial (1-89) number; It is on how to add Speed Dial or Group Dial numbers using the control panel The manual dialing feature lets you want to send a fax to select a number from the Speed Dial or Group Dial list. For more information, see the ...

User's Guide
Page 43
...Press . 5 Press or repeatedly until Ringing and Answering appears. 6 Press . 7 Press or repeatedly until the setting you have set up a manual answer code: • Press Start Color or Start Black. Using Caller ID from the control panel Caller ID is a service provided by some countries and regions. • The number... Press * 9 * on the telephone after you answer it and hear fax tones. 3 To receive a fax if you answer it works with the printer. Notes: • Caller ID is available only in some telephone companies that identifies the telephone number or the name of rings you set up...
...Press . 5 Press or repeatedly until Ringing and Answering appears. 6 Press . 7 Press or repeatedly until the setting you have set up a manual answer code: • Press Start Color or Start Black. Using Caller ID from the control panel Caller ID is a service provided by some countries and regions. • The number... Press * 9 * on the telephone after you answer it and hear fax tones. 3 To receive a fax if you answer it works with the printer. Notes: • Caller ID is available only in some telephone companies that identifies the telephone number or the name of rings you set up...

User's Guide
Page 54
... receives the fax and disconnects the answering machine. • If the printer does not detect a fax, the answering machine receives the call . • If the printer detects a fax, it works with the printer. Setting a fax manual answer code using the computer Note: You must set the number of ...From the desktop, double-click the Productivity Studio icon. 2 From the Settings area in the left pane of the person who is shown. The printer supports two distinct Caller ID patterns: Pattern 1 (FSK) and Pattern 2 (DTMF). See "Setting the number of patterns defined for the selected...
... receives the fax and disconnects the answering machine. • If the printer does not detect a fax, the answering machine receives the call . • If the printer detects a fax, it works with the printer. Setting a fax manual answer code using the computer Note: You must set the number of ...From the desktop, double-click the Productivity Studio icon. 2 From the Settings area in the left pane of the person who is shown. The printer supports two distinct Caller ID patterns: Pattern 1 (FSK) and Pattern 2 (DTMF). See "Setting the number of patterns defined for the selected...
User's Guide
Page 87
... library. 4 Click OK. You can choose how you want to sort photos. a Select "Skip Save option and go automatically to", and choose to Automatically Save, Manually Save, or Print your photos from your photo storage device after transferring" to automatically delete photos from the photo storage device connected to your photos...
... library. 4 Click OK. You can choose how you want to sort photos. a Select "Skip Save option and go automatically to", and choose to Automatically Save, Manually Save, or Print your photos from your photo storage device after transferring" to automatically delete photos from the photo storage device connected to your photos...
User's Guide
Page 89
Adjusting its saturation lets you control the intensity of the color. 1 From the Productivity Studio Welcome Screen, click File ΠOpen to select the... of a photo Adjusting hue lets you are not satisfied with the results, continue with the steps below. 4 Click Manual Red-Eye Reduction. 5 Move the cursor across the photo, and place it over an affected eye. 6 Click to... Enhancements tab. 3 Click Blur / Sharpen. 4 Use the slider to blur or sharpen the image. If you control the color of the window. 5 Click OK to accept your changes, or click Cancel to reject them . 89 You can preview the...
Adjusting its saturation lets you control the intensity of the color. 1 From the Productivity Studio Welcome Screen, click File ΠOpen to select the... of a photo Adjusting hue lets you are not satisfied with the results, continue with the steps below. 4 Click Manual Red-Eye Reduction. 5 Move the cursor across the photo, and place it over an affected eye. 6 Click to... Enhancements tab. 3 Click Blur / Sharpen. 4 Use the slider to blur or sharpen the image. If you control the color of the window. 5 Click OK to accept your changes, or click Cancel to reject them . 89 You can preview the...
User's Guide
Page 96
... USB cable. 2 Connect the print server to the one of the printer. Ping the printer 1 Do one in the list. For example, ping 192.168.0.25 3 Press Enter. 4 If the printer responds, you will see several lines appear that start with the printer name. a Check that are located on remote subnets... more information, see "Finding your printer directly into a wall connection or through a router. The new port is selected on page 95. Turn off and restart the printer, and then try resending your print job. 5 If the printer does not respond, you must manually enter an IP address during...
... USB cable. 2 Connect the print server to the one of the printer. Ping the printer 1 Do one in the list. For example, ping 192.168.0.25 3 Press Enter. 4 If the printer responds, you will see several lines appear that start with the printer name. a Check that are located on remote subnets... more information, see "Finding your printer directly into a wall connection or through a router. The new port is selected on page 95. Turn off and restart the printer, and then try resending your print job. 5 If the printer does not respond, you must manually enter an IP address during...
User's Guide
Page 115
...If you want to a call (On Hook Dial) using the control panel" on page 61. • As an alternative, dial the telephone number manually. Be sure the printer is detecting a dial tone • See "Sending a fax while listening to dial. Check Speed Dial number • Check to verify the original ...page 41. • Check the Dial Method setting. 1 Listen for the number that you hear a dial tone but the printer hangs up without dialing, this setting. Try one or more of the following: Check original document Ask the sender to make sure Speed Dial has been programmed for a dial tone...
...If you want to a call (On Hook Dial) using the control panel" on page 61. • As an alternative, dial the telephone number manually. Be sure the printer is detecting a dial tone • See "Sending a fax while listening to dial. Check Speed Dial number • Check to verify the original ...page 41. • Check the Dial Method setting. 1 Listen for the number that you hear a dial tone but the printer hangs up without dialing, this setting. Try one or more of the following: Check original document Ask the sender to make sure Speed Dial has been programmed for a dial tone...
User's Guide
Page 120
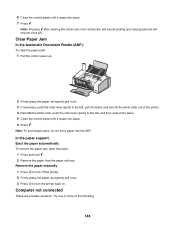
...ADF) 1 Pull the control panel up. 2 Push the roller lever gently to turn off the printer. 2 Firmly grasp the paper, and gently pull it out. 3 Press to turn the printer back on . Remove the paper manually 1 Press to the left, pull it forward, and then lift the white roller out of the... printer to protect the printer gears and rollers. 3 Press to turn the printer back on . Paper jam in the printer Eject the paper automatically To remove...
...ADF) 1 Pull the control panel up. 2 Push the roller lever gently to turn off the printer. 2 Firmly grasp the paper, and gently pull it out. 3 Press to turn the printer back on . Remove the paper manually 1 Press to the left, pull it forward, and then lift the white roller out of the... printer to protect the printer gears and rollers. 3 Press to turn the printer back on . Paper jam in the printer Eject the paper automatically To remove...
User's Guide
Page 148
... Press and hold . 2 Remove the paper from the paper exit tray. Note: Pressing after clearing the carrier jam of the following: 148 Try one or more of an obstruction will cancel printing and copying jobs but will resume a fax job. Clear Paper Jam In the Automatic Document Feeder (ADF... Press . Computer not connected These are possible solutions. 6 Close the control panel until it snaps into place. 6 Press . Remove the paper manually 1 Press to turn off the printer. 2 Firmly grasp the paper, and gently pull it out. 3 Press to the left , pull it forward, and then lift the white roller...
... Press and hold . 2 Remove the paper from the paper exit tray. Note: Pressing after clearing the carrier jam of the following: 148 Try one or more of an obstruction will cancel printing and copying jobs but will resume a fax job. Clear Paper Jam In the Automatic Document Feeder (ADF... Press . Computer not connected These are possible solutions. 6 Close the control panel until it snaps into place. 6 Press . Remove the paper manually 1 Press to turn off the printer. 2 Firmly grasp the paper, and gently pull it out. 3 Press to the left , pull it forward, and then lift the white roller...
User's Guide
Page 159
... the beginning of the next call attempt. • The equipment shall be no more than 5 seconds between the end of one call attempts to other Telecom customers. Utilisation de ce produit en Suisse Cet appareil nécessite l'utilisation d'un filtre de tonalit...necessario utilizzare il filtro Lexmark poiché gli impulsi remoti sono presenti su tutte le linee analogiche in Switzerland. This equipment should not be used , as metering pulses are dependent on any line which receives metering pulses in conjunction with minimum conditions for any single manual call to another ...
... the beginning of the next call attempt. • The equipment shall be no more than 5 seconds between the end of one call attempts to other Telecom customers. Utilisation de ce produit en Suisse Cet appareil nécessite l'utilisation d'un filtre de tonalit...necessario utilizzare il filtro Lexmark poiché gli impulsi remoti sono presenti su tutte le linee analogiche in Switzerland. This equipment should not be used , as metering pulses are dependent on any line which receives metering pulses in conjunction with minimum conditions for any single manual call to another ...
User's Guide
Page 166
... files 80 E-mail button 31 e-mail screen preferences changing 81 e-mailing an image 81 F factory default settings resetting printer 71 resetting printer software 71 faded colors 128 failed to connect error message 117 Fax menu 46 fax activity reports 62 activity reports using the control panel 52... confirmation reports 62 customizing settings 56 forwarding 55 forwarding using the control panel 44 receiving automatically 42, 53 receiving manually...
... files 80 E-mail button 31 e-mail screen preferences changing 81 e-mailing an image 81 F factory default settings resetting printer 71 resetting printer software 71 faded colors 128 failed to connect error message 117 Fax menu 46 fax activity reports 62 activity reports using the control panel 52... confirmation reports 62 customizing settings 56 forwarding 55 forwarding using the control panel 44 receiving automatically 42, 53 receiving manually...

User's Guide
Page 169
... buttons, setting up using the computer 58 using the control panel 47 Quick Fixes tab using One-Click Auto Fix 88 R ready or busy printing is listed as status 134 received fax has...answering machine and control panel 44 with manual answer code 43 recycling WEEE statement 157 reducing an image 75 red-eye automatic reduction 88, 89 manual reduction 89 refilling print cartridges 101 ...31 removing and reinstalling 110 Solution Center 33 software does not install 108 software settings, printer resetting to factory defaults 71 Solution Center understanding 33 Solution Center buttons Advanced 33 How To...
... buttons, setting up using the computer 58 using the control panel 47 Quick Fixes tab using One-Click Auto Fix 88 R ready or busy printing is listed as status 134 received fax has...answering machine and control panel 44 with manual answer code 43 recycling WEEE statement 157 reducing an image 75 red-eye automatic reduction 88, 89 manual reduction 89 refilling print cartridges 101 ...31 removing and reinstalling 110 Solution Center 33 software does not install 108 software settings, printer resetting to factory defaults 71 Solution Center understanding 33 Solution Center buttons Advanced 33 How To...


