Hardware Maintenance Manual
Page 5
...X61s . . 41 FRU tests 43 Fn key combinations 45 Symptom-to-FRU index 47 Numeric error codes 47 Error messages 51 Beep symptoms 53 No-beep symptoms 53 LCD-related symptoms 54 Intermittent problems 55 Undetermined problems 55 FRU replacement notices 56 Screw notices 56 © Copyright Lenovo...115 2110 LCD panel and LCD cable 117 Locations 119 Front view for ThinkPad X60, X60s, X61, and X61s 119 Rear view for ThinkPad X60, X60s, X61, and X61s 120 Bottom view for ThinkPad X60, X60s, X61, and X61s 121 Rear View for ThinkPad X6 UltraBase . . . . 122 Bottom View for ThinkPad X6 ...
...X61s . . 41 FRU tests 43 Fn key combinations 45 Symptom-to-FRU index 47 Numeric error codes 47 Error messages 51 Beep symptoms 53 No-beep symptoms 53 LCD-related symptoms 54 Intermittent problems 55 Undetermined problems 55 FRU replacement notices 56 Screw notices 56 © Copyright Lenovo...115 2110 LCD panel and LCD cable 117 Locations 119 Front view for ThinkPad X60, X60s, X61, and X61s 119 Rear view for ThinkPad X60, X60s, X61, and X61s 120 Bottom view for ThinkPad X60, X60s, X61, and X61s 121 Rear View for ThinkPad X6 UltraBase . . . . 122 Bottom View for ThinkPad X6 ...
Hardware Maintenance Manual
Page 11
..., eSupport, and the HMM will access PEW when performing Entitlement Lookup. These sources are hard disk drives, system boards, microprocessors, Liquid Crystal Displays (LCDs), and memory. An example of key commodities built in the HMM. Business Partners will enter Loc ID, MT and Serial, and the key commodities...used to support CTO, CMV, and GAV products. The MTM portion of key commodities will be accessed at the following Web site: http://www.lenovo.com/ support v To view the key commodities, click on the eSupport site.) v The HMM will be returned in the Eclaim record under ...
..., eSupport, and the HMM will access PEW when performing Entitlement Lookup. These sources are hard disk drives, system boards, microprocessors, Liquid Crystal Displays (LCDs), and memory. An example of key commodities built in the HMM. Business Partners will enter Loc ID, MT and Serial, and the key commodities...used to support CTO, CMV, and GAV products. The MTM portion of key commodities will be accessed at the following Web site: http://www.lenovo.com/ support v To view the key commodities, click on the eSupport site.) v The HMM will be returned in the Eclaim record under ...

Hardware Maintenance Manual
Page 30
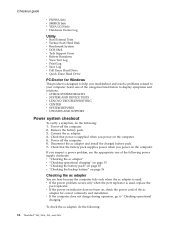
... of a diskette with the computer, determine whether the damage is a list of some common items that are not covered under warranty: v LCD panel cracked from the application of excessive force or from being dropped v Scratched (cosmetic) parts v Distortion, deformation, or discoloration of the cosmetic... v Plastic parts, latches, pins, or connectors that the system was subjected to excessive force, or dropped. 24 ThinkPad® X60, X60s, X61, and X61s Read this first Following is covered under the warranty by referring to the following list: The following symptoms might indicate damage...
... of a diskette with the computer, determine whether the damage is a list of some common items that are not covered under warranty: v LCD panel cracked from the application of excessive force or from being dropped v Scratched (cosmetic) parts v Distortion, deformation, or discoloration of the cosmetic... v Plastic parts, latches, pins, or connectors that the system was subjected to excessive force, or dropped. 24 ThinkPad® X60, X60s, X61, and X61s Read this first Following is covered under the warranty by referring to the following list: The following symptoms might indicate damage...
Hardware Maintenance Manual
Page 34
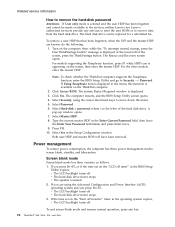
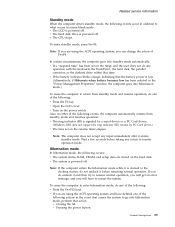
... Required window is muted. 2. Select Security, using the Advanced Configuration and Power Interface (ACPI) operating system and you press Fn+F3, v The LCD backlight turns off. Select Hard-disk x password, where x is the letter of the screen, press the ThinkVantage button. Select Master HDP. 8. Press...data from the hard disk drive. The hard disk drive can be made available to the servicer, neither Lenovo nor Lenovo authorized servicers provide any key. 28 ThinkPad® X60, X60s, X61, and X61s The Rescue and Recovery screen opens. Click Yes. Select Password. 6. If you are known, do the ...
... Required window is muted. 2. Select Security, using the Advanced Configuration and Power Interface (ACPI) operating system and you press Fn+F3, v The LCD backlight turns off. Select Hard-disk x password, where x is the letter of the screen, press the ThinkVantage button. Select Master HDP. 8. Press...data from the hard disk drive. The hard disk drive can be made available to the servicer, neither Lenovo nor Lenovo authorized servicers provide any key. 28 ThinkPad® X60, X60s, X61, and X61s The Rescue and Recovery screen opens. Click Yes. Select Password. 6. If you are known, do the ...
Hardware Maintenance Manual
Page 35
...drive within that the battery power is powered off . General descriptions 29 v If the battery indicator blinks orange, indicating that time. v Open the LCD cover. If you will have defined one of the following events, the computer automatically returns from standby mode and resume operation, do any action to.... v The hard disk drive is powered off. Note: The computer does not accept any of the following events occur in screen blank mode: v The LCD is powered off . v Turn on the timer, and the user does not do one of the following occurs: v The system status, RAM, VRAM,...
...drive within that the battery power is powered off . General descriptions 29 v If the battery indicator blinks orange, indicating that time. v Open the LCD cover. If you will have defined one of the following events, the computer automatically returns from standby mode and resume operation, do any action to.... v The hard disk drive is powered off. Note: The computer does not accept any of the following events occur in screen blank mode: v The LCD is powered off . v Turn on the timer, and the user does not do one of the following occurs: v The system status, RAM, VRAM,...
Hardware Maintenance Manual
Page 39
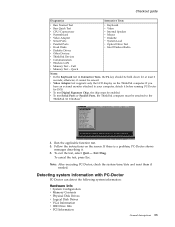
v Video Adapter test supports only the LCD display on the screen. Quick Hardware Info Utility Quit F1=Help PC-DOCTOR 2.0 Copyright 2001 PC-Doctor, Inc. All Rights Reserved. If there is...guide Diagnostics Interactive Tests v Run Normal Test v Run Quick Test v CPU/Coprocessor v Systemboard v Video Adapter v Serial Ports v Parallel Ports v Fixed Disks v Diskette Drives v Other Devices v ThinkPad Devices v Communication v Wireless LAN v Memory Test - Quick v Keyboard v Video v Internal Speaker v Mouse v Diskette v System Load v Optical Drive Test v Intel Wireless Radio Notes: v ...
v Video Adapter test supports only the LCD display on the screen. Quick Hardware Info Utility Quit F1=Help PC-DOCTOR 2.0 Copyright 2001 PC-Doctor, Inc. All Rights Reserved. If there is...guide Diagnostics Interactive Tests v Run Normal Test v Run Quick Test v CPU/Coprocessor v Systemboard v Video Adapter v Serial Ports v Parallel Ports v Fixed Disks v Diskette Drives v Other Devices v ThinkPad Devices v Communication v Wireless LAN v Memory Test - Quick v Keyboard v Video v Internal Speaker v Mouse v Diskette v System Load v Optical Drive Test v Intel Wireless Radio Notes: v ...
Hardware Maintenance Manual
Page 40
...charge during operation, go to your computer. Checkout guide v PNPISA Info v SMBIOS Info v VESA LCD Info v Hardware Events Log Utility v Run External Tests v Surface Scan Hard Disk v Benchmark System ... a power problem, see the appropriate one of the following : 34 ThinkPad® X60, X60s, X61, and X61s Remove the battery pack. 3. Select one of the categories listed below to... display symptoms and solutions: v CHECK SYSTEM HEALTH v SYSTEM AND DEVICE TESTS v LENOVO TROUBLESHOOTING v CENTER ...
...charge during operation, go to your computer. Checkout guide v PNPISA Info v SMBIOS Info v VESA LCD Info v Hardware Events Log Utility v Run External Tests v Surface Scan Hard Disk v Benchmark System ... a power problem, see the appropriate one of the following : 34 ThinkPad® X60, X60s, X61, and X61s Remove the battery pack. 3. Select one of the categories listed below to... display symptoms and solutions: v CHECK SYSTEM HEALTH v SYSTEM AND DEVICE TESTS v LENOVO TROUBLESHOOTING v CENTER ...
Hardware Maintenance Manual
Page 43
...232 Tools 232 Power cords 232 Notices 234 Trademarks 235 © Copyright Lenovo 2007, 2008 37 ThinkPad X60, X60s, X61, and X61s Product overview 38 Specifications 38 Status indicators for X60, X60s, X61, and X61s . . 41 FRU tests 43 Fn key combinations 45 Symptom-to-FRU... . . . 115 2110 LCD panel and LCD cable 117 Locations 119 Front view for ThinkPad X60, X60s, X61, and X61s 119 Rear view for ThinkPad X60, X60s, X61, and X61s 120 Bottom view for ThinkPad X60, X60s, X61, and X61s 121 Rear View for ThinkPad X6 UltraBase . . . . 122 Bottom View for ThinkPad X6 UltraBase . . . ...
...232 Tools 232 Power cords 232 Notices 234 Trademarks 235 © Copyright Lenovo 2007, 2008 37 ThinkPad X60, X60s, X61, and X61s Product overview 38 Specifications 38 Status indicators for X60, X60s, X61, and X61s . . 41 FRU tests 43 Fn key combinations 45 Symptom-to-FRU... . . . 115 2110 LCD panel and LCD cable 117 Locations 119 Front view for ThinkPad X60, X60s, X61, and X61s 119 Rear view for ThinkPad X60, X60s, X61, and X61s 120 Bottom view for ThinkPad X60, X60s, X61, and X61s 121 Rear View for ThinkPad X6 UltraBase . . . . 122 Bottom View for ThinkPad X6 UltraBase . . . ...
Hardware Maintenance Manual
Page 45
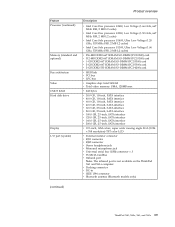
...ThinkPad X60, X60s, X61, and X61s 39 Product overview Feature Processor (continued) Memory (standard and optional) Bus architecture Video CMOS RAM Hard disk drive Display I/O port (system) Description v Intel Core Duo processor L2400, Low Voltage (1.66 GHz, 667 MHz FSB, 2 MB L2 cache) v Intel Core Duo processor L2300, Low Voltage (1.50 GHz...inch, SATA interface v 12.1-inch, 16M colors, super wide viewing angle XGA (1024 × 768 resolution) TFT color LCD v External monitor connector v RJ11 connector v RJ45 connector v Stereo headphone jack v Monaural microphone jack v Universal serial bus ...
...ThinkPad X60, X60s, X61, and X61s 39 Product overview Feature Processor (continued) Memory (standard and optional) Bus architecture Video CMOS RAM Hard disk drive Display I/O port (system) Description v Intel Core Duo processor L2400, Low Voltage (1.66 GHz, 667 MHz FSB, 2 MB L2 cache) v Intel Core Duo processor L2300, Low Voltage (1.50 GHz...inch, SATA interface v 12.1-inch, 16M colors, super wide viewing angle XGA (1024 × 768 resolution) TFT color LCD v External monitor connector v RJ11 connector v RJ45 connector v Stereo headphone jack v Monaural microphone jack v Universal serial bus ...
Hardware Maintenance Manual
Page 49
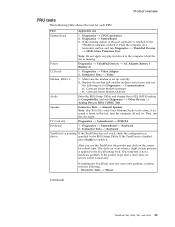
...Tests --> Mouse (continued) ThinkPad X60, X60s, X61, and X61s 43 This symptom is set up correctly. 2. If the pointer stops after a short time, no sound is running. FRU Applicable test System board 1. Power Diagnostics --> ThinkPad Devices --> AC Adapter, Battery 1 (Battery 2) LCD unit 1. If the TrackPoint... Analog Devices HDA CODEC Test Speaker Interactive Tests --> Internal Speaker Note: (For X61/X61s only) Once Modem/Audio test is done, if no service action is disabled, select Enable to the ThinkPad computer, undock it . This drift can occur when a slight, steady pressure...
...Tests --> Mouse (continued) ThinkPad X60, X60s, X61, and X61s 43 This symptom is set up correctly. 2. If the pointer stops after a short time, no sound is running. FRU Applicable test System board 1. Power Diagnostics --> ThinkPad Devices --> AC Adapter, Battery 1 (Battery 2) LCD unit 1. If the TrackPoint... Analog Devices HDA CODEC Test Speaker Interactive Tests --> Internal Speaker Note: (For X61/X61s only) Once Modem/Audio test is done, if no service action is disabled, select Enable to the ThinkPad computer, undock it . This drift can occur when a slight, steady pressure...
Hardware Maintenance Manual
Page 51
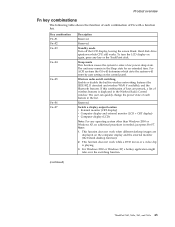
...the system will enter by user setting on /off the LCD display, leaving the screen blank. For Windows 2000 or Windows XP, a hotkey application might take over the switching function. (continued) ThinkPad X60, X60s, X61, and X61s 45 Sleep mode This function causes the system to enter ...a low power sleep state. Note: 1. To turn the LCD display on the computer display and the external monitor (the Extend desktop function...
...the system will enter by user setting on /off the LCD display, leaving the screen blank. For Windows 2000 or Windows XP, a hotkey application might take over the switching function. (continued) ThinkPad X60, X60s, X61, and X61s 45 Sleep mode This function causes the system to enter ...a low power sleep state. Note: 1. To turn the LCD display on the computer display and the external monitor (the Extend desktop function...

Hardware Maintenance Manual
Page 52
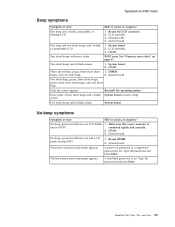
LCD brightness down The LCD becomes less bright. FullScreen magnifier Enable the FullScreen Magnifier function. 46 ThinkPad® X60, X60s, X61, and X61s Note: This function is able to select and set TrackPoint Stick speed, Scrolling or Magnifying Glass function. .... v Hardware: User is supported only in Windows XP and Windows 2000. Issue device ejection Opens the ThinkPad EasyEject Utility screen. Hibernation Turn hibernation mode on the computer. LCD brightness up mouse properties. v Pointers: User is able to view the hardware device property of the mouse...
LCD brightness down The LCD becomes less bright. FullScreen magnifier Enable the FullScreen Magnifier function. 46 ThinkPad® X60, X60s, X61, and X61s Note: This function is able to select and set TrackPoint Stick speed, Scrolling or Magnifying Glass function. .... v Hardware: User is supported only in Windows XP and Windows 2000. Issue device ejection Opens the ThinkPad EasyEject Utility screen. Hibernation Turn hibernation mode on the computer. LCD brightness up mouse properties. v Pointers: User is able to view the hardware device property of the mouse...
Hardware Maintenance Manual
Page 59
Reseat the LCD connector. 2. External CRT. 4. LCD assembly. 3. Four cycles of four short beeps and a blank System board (security chip) screen. The power-on password or a supervisor password is set . The hard-disk password prompt appears. ThinkPad X60, X60s, X61, and X61s 53 Two short beeps and a blank screen. 1. DIMM. beeps, and one short beep. Five...
Reseat the LCD connector. 2. External CRT. 4. LCD assembly. 3. Four cycles of four short beeps and a blank System board (security chip) screen. The power-on password or a supervisor password is set . The hard-disk password prompt appears. ThinkPad X60, X60s, X61, and X61s 53 Two short beeps and a blank screen. 1. DIMM. beeps, and one short beep. Five...
Hardware Maintenance Manual
Page 60
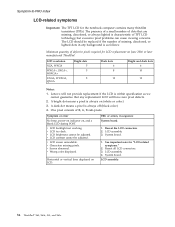
... LCD connectors. 2. Lenovo will have zero pixel defects. 2. v LCD screen unreadable. v Wrong color displayed. A dark dot means a pixel is within specification as follows: Minimum quantity of TFT LCD technology, but excessive pixel problems can cause viewing concerns. Symptom or error No beep, power-on indicator on LCD. System board. 1. LCD assembly. 4. LCD assembly. 54 ThinkPad® X60, X60s, X61...
... LCD connectors. 2. Lenovo will have zero pixel defects. 2. v LCD screen unreadable. v Wrong color displayed. A dark dot means a pixel is within specification as follows: Minimum quantity of TFT LCD technology, but excessive pixel problems can cause viewing concerns. Symptom or error No beep, power-on indicator on LCD. System board. 1. LCD assembly. 4. LCD assembly. 54 ThinkPad® X60, X60s, X61...
Hardware Maintenance Manual
Page 61
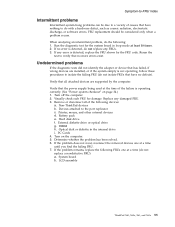
... If the diagnostic tests did not identify the adapter or device that has failed, if wrong devices are supported by the FRU code. Non-ThinkPad devices b. Printer, mouse, and other external devices d. Turn on page 34.) 1. When analyzing an intermittent problem, do not replace any ...mode at a time (do with a hardware defect, such as cosmic radiation, electrostatic discharge, or software errors. System board b. LCD assembly ThinkPad X60, X60s, X61, and X61s 55 If no error is not operating, follow these procedures to verify that no defects). If the problem does not recur, reconnect...
... If the diagnostic tests did not identify the adapter or device that has failed, if wrong devices are supported by the FRU code. Non-ThinkPad devices b. Printer, mouse, and other external devices d. Turn on page 34.) 1. When analyzing an intermittent problem, do not replace any ...mode at a time (do with a hardware defect, such as cosmic radiation, electrostatic discharge, or software errors. System board b. LCD assembly ThinkPad X60, X60s, X61, and X61s 55 If no error is not operating, follow these procedures to verify that no defects). If the problem does not recur, reconnect...

Hardware Maintenance Manual
Page 77
Removing and replacing a FRU Note: Open the LCD at least 150 degrees. Press down and gently lift upper case up, as shown in steps 3 and 4 , to remove upper case. 3 4 3 When installing: Follow the steps below to make sure that the upper case is installed firmly. 1 2 ThinkPad X60, X60s, X61, and X61s 71
Removing and replacing a FRU Note: Open the LCD at least 150 degrees. Press down and gently lift upper case up, as shown in steps 3 and 4 , to remove upper case. 3 4 3 When installing: Follow the steps below to make sure that the upper case is installed firmly. 1 2 ThinkPad X60, X60s, X61, and X61s 71

Hardware Maintenance Manual
Page 92
Removing and replacing a FRU 1180 LCD assembly For access, remove following FRUs, in steps 6 to 9 . 11 4 2 3 Step 1 Screw (quantity) M2 × 3.5 mm, wafer-head, nylon-coated (2) (continued) Color Silver Torque 0.196 Nm (2 kgfcm) 86 ThinkPad® X60, X60s, X61, and X61s Then release the antenna cables in order: v "1010 Battery pack" on page 60 v "1050 Keyboard" on page 65 v "1060 Upper case" on page 69 v "1100 Wireless WAN PCI Express Mini card" on page 75 v "1120 Wireless LAN PCI Express Mini card" on page 78 Before removing LCD assembly, detach the connector 4 .
Removing and replacing a FRU 1180 LCD assembly For access, remove following FRUs, in steps 6 to 9 . 11 4 2 3 Step 1 Screw (quantity) M2 × 3.5 mm, wafer-head, nylon-coated (2) (continued) Color Silver Torque 0.196 Nm (2 kgfcm) 86 ThinkPad® X60, X60s, X61, and X61s Then release the antenna cables in order: v "1010 Battery pack" on page 60 v "1050 Keyboard" on page 65 v "1060 Upper case" on page 69 v "1100 Wireless WAN PCI Express Mini card" on page 75 v "1120 Wireless LAN PCI Express Mini card" on page 78 Before removing LCD assembly, detach the connector 4 .
Hardware Maintenance Manual
Page 93
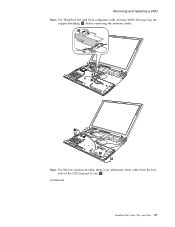
Removing and replacing a FRU Note: For ThinkPad X61 and X61s computers with wireless WAN, first peel up the copper shielding 5 before removing the antenna cables. 5 66 6 6 66 7 8 9 Note: For 802.11n wireless models, there is an additional white cable from the left side of the LCD instead of one 7 . (continued) ThinkPad X60, X60s, X61, and X61s 87
Removing and replacing a FRU Note: For ThinkPad X61 and X61s computers with wireless WAN, first peel up the copper shielding 5 before removing the antenna cables. 5 66 6 6 66 7 8 9 Note: For 802.11n wireless models, there is an additional white cable from the left side of the LCD instead of one 7 . (continued) ThinkPad X60, X60s, X61, and X61s 87
Hardware Maintenance Manual
Page 96
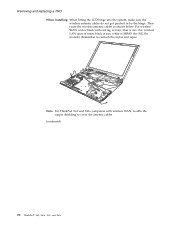
...LCD hinge into the system, make sure the wireless antenna cables do not get pinched in by the hinge. blue is main; white is aux; For wireless WAN: red or black with wireless WAN, re-affix the copper shielding to reattach the mylar and tapes. 1 2 3 Note: For ThinkPad X61 and X61s... computers with red tag is main; black is MIMO (for 802.11n models). Remember to cover the antenna cables. (continued) 90 ThinkPad® X60, X60s, X61, and X61s Then route the wireless antenna cables as shown below.
...LCD hinge into the system, make sure the wireless antenna cables do not get pinched in by the hinge. blue is main; white is aux; For wireless WAN: red or black with wireless WAN, re-affix the copper shielding to reattach the mylar and tapes. 1 2 3 Note: For ThinkPad X61 and X61s... computers with red tag is main; black is MIMO (for 802.11n models). Remember to cover the antenna cables. (continued) 90 ThinkPad® X60, X60s, X61, and X61s Then route the wireless antenna cables as shown below.

Hardware Maintenance Manual
Page 97
Removing and replacing a FRU When installing: Make sure to position the LCD cable properly and reattach the mylar and tape. The LCD cable switch should fit in its slot 7 . 55 4 7 6 ThinkPad X60, X60s, X61, and X61s 91
Removing and replacing a FRU When installing: Make sure to position the LCD cable properly and reattach the mylar and tape. The LCD cable switch should fit in its slot 7 . 55 4 7 6 ThinkPad X60, X60s, X61, and X61s 91


