
Hardware Maintenance Manual
Page 5
...Lenovo 2008 No-beep symptoms 44 LCD-related symptoms 45 Intermittent problems 46 Undetermined problems 46 ThinkPad X300 47 Specifications 47 Status indicators 49 FRU tests 51 Fn key combinations 53 FRU replacement notices 55 Screw notices 55 Retaining serial numbers 56 Removing and replacing a FRU 59 Before servicing ThinkPad X300 60 1010 Battery... pack 61 1020 Optical drive or second battery or travel cover ...
...Lenovo 2008 No-beep symptoms 44 LCD-related symptoms 45 Intermittent problems 46 Undetermined problems 46 ThinkPad X300 47 Specifications 47 Status indicators 49 FRU tests 51 Fn key combinations 53 FRU replacement notices 55 Screw notices 55 Retaining serial numbers 56 Removing and replacing a FRU 59 Before servicing ThinkPad X300 60 1010 Battery... pack 61 1020 Optical drive or second battery or travel cover ...

Hardware Maintenance Manual
Page 37
...install the charged battery pack. 7. If you suspect a power problem, see the appropriate one of the AC adapter may different from the one you are here because the computer fails only when the AC adapter is used , replace the port replicator. v If the problem persists, go to "ThinkPad X300" on , ...check the power cord of the AC adapter cable. Check that the battery pack supplies power when you turn on the computer. Check that power is...
...install the charged battery pack. 7. If you suspect a power problem, see the appropriate one of the AC adapter may different from the one you are here because the computer fails only when the AC adapter is used , replace the port replicator. v If the problem persists, go to "ThinkPad X300" on , ...check the power cord of the AC adapter cable. Check that the battery pack supplies power when you turn on the computer. Check that power is...

Hardware Maintenance Manual
Page 38
... to the Power Meter icon in the computer. If the voltage is correct, replace the system board. 30 ThinkPad X300 Hardware Maintenance Manual If the battery status indicator or icon does not turn on . Then reinstall the battery pack. Checking the battery pack Battery charging does not start until the Power Meter shows that has less than...
... to the Power Meter icon in the computer. If the voltage is correct, replace the system board. 30 ThinkPad X300 Hardware Maintenance Manual If the battery status indicator or icon does not turn on . Then reinstall the battery pack. Checking the battery pack Battery charging does not start until the Power Meter shows that has less than...

Hardware Maintenance Manual
Page 39
... v If the voltage is not correct, replace the backup battery. See the following : 1. General checkout 31 Remove the battery pack (see "1080 Backup battery" on page 61). 4. Measure the voltage of the backup battery. v If the voltage is correct, replace the system board. v If the backup battery discharges quickly after replacement, replace the system board. Turn the computer upside...
... v If the voltage is not correct, replace the backup battery. See the following : 1. General checkout 31 Remove the battery pack (see "1080 Backup battery" on page 61). 4. Measure the voltage of the backup battery. v If the voltage is correct, replace the system board. v If the backup battery discharges quickly after replacement, replace the system board. Turn the computer upside...

Hardware Maintenance Manual
Page 43
... the menu, this function is selected and the user HDP has been forgotten and cannot be replaced for a scheduled fee. Type the current SVP in the Setup confirmation window, select Yes ... Password field. The hard disk drive can be made available to the servicer, neither Lenovo nor Lenovo authorized servicers provide any services to reset the user HDPs or to recover data from .... For how to remove the battery pack, see "1080 Backup battery" on the screen; Reinstall the backup battery and the battery pack. (B) If an SVP has been set : 1. When the ThinkPad logo comes up , immediately press...
... the menu, this function is selected and the user HDP has been forgotten and cannot be replaced for a scheduled fee. Type the current SVP in the Setup confirmation window, select Yes ... Password field. The hard disk drive can be made available to the servicer, neither Lenovo nor Lenovo authorized servicers provide any services to reset the user HDPs or to recover data from .... For how to remove the battery pack, see "1080 Backup battery" on the screen; Reinstall the backup battery and the battery pack. (B) If an SVP has been set : 1. When the ThinkPad logo comes up , immediately press...

Hardware Maintenance Manual
Page 48
... Setup Defaults in sequence 0187 EAIA data access error-The access to reset the time and date. 40 ThinkPad X300 Hardware Maintenance Manual at offset nnnn. Remove the Ethernet device that you installed; Replace the backup battery and run BIOS Setup Utility to EEPROM is dead. 1. Remove the wireless LAN device that you installed...
... Setup Defaults in sequence 0187 EAIA data access error-The access to reset the time and date. 40 ThinkPad X300 Hardware Maintenance Manual at offset nnnn. Remove the Ethernet device that you installed; Replace the backup battery and run BIOS Setup Utility to EEPROM is dead. 1. Remove the wireless LAN device that you installed...
Hardware Maintenance Manual
Page 49
... BIOS Setup Utility. 2. Charge the backup battery for more than 8 hours by connecting the ac adapter. 2. Charge the backup battery for more than 8 hours by connecting the ac adapter. 2. Default configuration used . 1. Replace the backup battery. 3. System board. 1803 1. Remove the... daughter card. 2. System board. 02F4 EISA CMOS not writable. 1. DIMM. 2. Replace the backup battery and run BIOS Setup Utility to reset the time and date. 3. Replace the backup battery and run BIOS Setup Utility to reset the time and date. 3. System board. Table...
... BIOS Setup Utility. 2. Charge the backup battery for more than 8 hours by connecting the ac adapter. 2. Charge the backup battery for more than 8 hours by connecting the ac adapter. 2. Default configuration used . 1. Replace the backup battery. 3. System board. 1803 1. Remove the... daughter card. 2. System board. 02F4 EISA CMOS not writable. 1. DIMM. 2. Replace the backup battery and run BIOS Setup Utility to reset the time and date. 3. Replace the backup battery and run BIOS Setup Utility to reset the time and date. 3. System board. Table...

Hardware Maintenance Manual
Page 54
... checkout" on the computer. 5. Printer, mouse, and other external devices d. DIMM h. If the problem remains, replace the following : 1. Verify that all of the following devices: a. Battery pack e. Determine whether the problem has been solved. 6. LCD assembly 46 ThinkPad X300 Hardware Maintenance Manual PC Cards 4. If the problem does not recur, reconnect the removed devices...
... checkout" on the computer. 5. Printer, mouse, and other external devices d. DIMM h. If the problem remains, replace the following : 1. Verify that all of the following devices: a. Battery pack e. Determine whether the problem has been solved. 6. LCD assembly 46 ThinkPad X300 Hardware Maintenance Manual PC Cards 4. If the problem does not recur, reconnect the removed devices...

Hardware Maintenance Manual
Page 67
...point with one hand or by using an electrostatic discharge (ESD) strap (P/N 6405959). ThinkPad X300 59 Do not try to replacement. Any such FRUs are listed at the top of damaging parts. 2. Attention: After replacing a FRU, do not turn off the computer, unplug all screws, springs, and ... any notes that pertain to service any FRUs that all power cords from electrical outlets, remove the battery pack, and then disconnect any interconnecting cables. DANGER Before removing any FRU, review "FRU replacement notices" on page 113. 8. Before touching it in square callouts. 5.
...point with one hand or by using an electrostatic discharge (ESD) strap (P/N 6405959). ThinkPad X300 59 Do not try to replacement. Any such FRUs are listed at the top of damaging parts. 2. Attention: After replacing a FRU, do not turn off the computer, unplug all screws, springs, and ... any notes that pertain to service any FRUs that all power cords from electrical outlets, remove the battery pack, and then disconnect any interconnecting cables. DANGER Before removing any FRU, review "FRU replacement notices" on page 113. 8. Before touching it in square callouts. 5.

Hardware Maintenance Manual
Page 87
..., small-head, nylon-coated (1) Color Black Torque 0.167 Nm (1.7 kgfcm) ThinkPad X300 79 Table 21. If the fingerprint reader has any defects, you can replace it by the procedures given in order: v "1010 Battery pack" on page 61 v "1020 Optical drive or second battery or travel cover" on page 62 v "1070 Keyboard" on page 72...
..., small-head, nylon-coated (1) Color Black Torque 0.167 Nm (1.7 kgfcm) ThinkPad X300 79 Table 21. If the fingerprint reader has any defects, you can replace it by the procedures given in order: v "1010 Battery pack" on page 61 v "1020 Optical drive or second battery or travel cover" on page 62 v "1070 Keyboard" on page 72...
Hardware Maintenance Manual
Page 102
... or palm rest with fingerprint reader" on page 79 v "1120 Keyboard bezel" on page 83 v "1150 LCD assembly" on page 89 94 ThinkPad X300 Hardware Maintenance Manual Place the computer on a padded surface such as metal, wood, or composite. v Avoid rough handling of shock. Attention:: Do ... is as 6,000 G's of any reject report, and replace the system board. Run Diagnostics --> ThinkPad Devices --> HDD Active Protection Test. For access, remove these FRUs, in order: v "1010 Battery pack" on page 61 v "1020 Optical drive or second battery or travel cover" on page 62 v "1050 PCI ...
... or palm rest with fingerprint reader" on page 79 v "1120 Keyboard bezel" on page 83 v "1150 LCD assembly" on page 89 94 ThinkPad X300 Hardware Maintenance Manual Place the computer on a padded surface such as metal, wood, or composite. v Avoid rough handling of shock. Attention:: Do ... is as 6,000 G's of any reject report, and replace the system board. Run Diagnostics --> ThinkPad Devices --> HDD Active Protection Test. For access, remove these FRUs, in order: v "1010 Battery pack" on page 61 v "1020 Optical drive or second battery or travel cover" on page 62 v "1050 PCI ...
Hardware Maintenance Manual
Page 123
... CRUs have a latch to help you to remove and replace the part. v A CRU (customer replaceable unit) is not a RoHS compliant FRU. ThinkPad computers contain the following types of a country designator) should...keyboard and parts beneath the palm rest. v A RoHS compliant FRU is specified. ThinkPad X300 115 External CRUs with OP are available as 3Dx (where 3D is an example of..., a USB device, and an external bay device adapter. Examples of these types of CRUs include a battery pack, an Ultrabay device such as xxU (where U is an example of a unique configuration) should be...
... CRUs have a latch to help you to remove and replace the part. v A CRU (customer replaceable unit) is not a RoHS compliant FRU. ThinkPad computers contain the following types of a country designator) should...keyboard and parts beneath the palm rest. v A RoHS compliant FRU is specified. ThinkPad X300 115 External CRUs with OP are available as 3Dx (where 3D is an example of..., a USB device, and an external bay device adapter. Examples of these types of CRUs include a battery pack, an Ultrabay device such as xxU (where U is an example of a unique configuration) should be...
Service Guide
Page 5
...your ThinkPad computer 3 Important tips 3 Be careful about where and how you work 3 Be gentle with the ThinkVantage button 2 Chapter 2. Customer Replaceable Units... and replacing devices 35 Replacing the battery 35 Upgrading the hard disk drive or solid state drive 38 Replacing memory 40 Replacing the second battery 43 ...state drive (SSD) problems 27 Optical drive problems 28 Fingerprint reader problems . . . . . 28 Startup problems 28 © Copyright Lenovo 2007 Chapter 4. Finding information . . . . . 1 This guide and other publications . . . . . 1 Finding information with...
...your ThinkPad computer 3 Important tips 3 Be careful about where and how you work 3 Be gentle with the ThinkVantage button 2 Chapter 2. Customer Replaceable Units... and replacing devices 35 Replacing the battery 35 Upgrading the hard disk drive or solid state drive 38 Replacing memory 40 Replacing the second battery 43 ...state drive (SSD) problems 27 Optical drive problems 28 Fingerprint reader problems . . . . . 28 Startup problems 28 © Copyright Lenovo 2007 Chapter 4. Finding information . . . . . 1 This guide and other publications . . . . . 1 Finding information with...

Service Guide
Page 19
...F9 and then Enter to enter the BIOS Setup Utility. Press F1 to restart the system. 0190: Critical low-battery error The computer turned off because the battery is displayed if you enter a wrong supervisor password more than one Remove one of the startup sequence setting in the...of them . Remove one Your ThinkPad computer has a built-in the Startup menu. Enter BIOS Setup and load Setup defaults. Press F9 and then Enter to restart the system. 0185: Bad startup sequence settings. Press to the computer and charge the battery, or replace the battery with a fully charged one ...
...F9 and then Enter to enter the BIOS Setup Utility. Press F1 to restart the system. 0190: Critical low-battery error The computer turned off because the battery is displayed if you enter a wrong supervisor password more than one Remove one of the startup sequence setting in the...of them . Remove one Your ThinkPad computer has a built-in the Startup menu. Enter BIOS Setup and load Setup defaults. Press F9 and then Enter to restart the system. 0185: Bad startup sequence settings. Press to the computer and charge the battery, or replace the battery with a fully charged one ...

Service Guide
Page 20
.... v Make sure that the external keyboard is used to reconfigure the settings. Then test the memory with PC-Doctor. Replace the battery and run the BIOS Setup Utility to the correct connector. then turn on , reinstall it. Make sure that the built...battery, which is connected to verify the configuration. If you added a memory module just before turning the computer on the keyboard, or if you still have a problem, have the computer serviced. 0251: System CMOS checksum bad The system CMOS might have been corrupted by using the BIOS Setup Utility. 12 ThinkPad® X300...
.... v Make sure that the external keyboard is used to reconfigure the settings. Then test the memory with PC-Doctor. Replace the battery and run the BIOS Setup Utility to the correct connector. then turn on , reinstall it. Make sure that the built...battery, which is connected to verify the configuration. If you added a memory module just before turning the computer on the keyboard, or if you still have a problem, have the computer serviced. 0251: System CMOS checksum bad The system CMOS might have been corrupted by using the BIOS Setup Utility. 12 ThinkPad® X300...

Service Guide
Page 29
... three times in three seconds. 3. Do either of the following: v Turn on the external monitor to the computer and plug it . v Replace the battery with a fully charged one. Chapter 3. Check whether an external monitor was in the following : v Connect the AC adapter to display the image... an electrical outlet. Solution: 1. v Press Fn+F7 to return from sleep (standby) mode, the computer display remains blank. Solution: The battery power is displayed, and the computer immediately turns off while the computer was turned off . Do either of the following Problem. Problem: The ...
... three times in three seconds. 3. Do either of the following: v Turn on the external monitor to the computer and plug it . v Replace the battery with a fully charged one. Chapter 3. Check whether an external monitor was in the following : v Connect the AC adapter to display the image... an electrical outlet. Solution: 1. v Press Fn+F7 to return from sleep (standby) mode, the computer display remains blank. Solution: The battery power is displayed, and the computer immediately turns off while the computer was turned off . Do either of the following Problem. Problem: The ...

Service Guide
Page 43
Chapter 5. Upgrading and replacing devices Replacing the battery Important: Read Safety and Warranty Guide before replacing the battery. Turn off the computer, or enter hibernation mode. Then disconnect the AC adapter and all cables from the computer. 2. Standard battery © Copyright Lenovo 2007 35 If you replace the standard battery, slide the battery lock to the unlocked position. If you replace the large battery, skip this step. Close the computer display, and turn the computer over. 3. To replace the battery 1.
Chapter 5. Upgrading and replacing devices Replacing the battery Important: Read Safety and Warranty Guide before replacing the battery. Turn off the computer, or enter hibernation mode. Then disconnect the AC adapter and all cables from the computer. 2. Standard battery © Copyright Lenovo 2007 35 If you replace the standard battery, slide the battery lock to the unlocked position. If you replace the large battery, skip this step. Close the computer display, and turn the computer over. 3. To replace the battery 1.

Service Guide
Page 45
Upgrading and replacing devices 37 Connect the AC adapter and the cables to the computer. Chapter 5. Turn the computer over again. Standard battery Large battery 7.
Upgrading and replacing devices 37 Connect the AC adapter and the cables to the computer. Chapter 5. Turn the computer over again. Standard battery Large battery 7.
Service Guide
Page 46
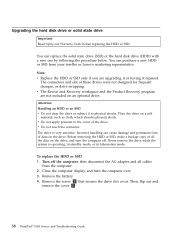
... then disconnect the AC adapter and all the data on an optional drive. Remove the battery. 4. Before removing the HDD or SSD, make a backup copy of the drive. ...it or having it to the cover of all cables from your reseller or Lenovo marketing representative. Attention: Handling an HDD or an SSD v Do not drop...replace the solid state drive (SSD) or the hard disk drive (HDD) with a new one by following the procedure below. To replace the HDD or SSD 1. Close the computer display, and turn the computer off the computer; Then, flip out and remove the cover 2 . 38 ThinkPad® X300...
... then disconnect the AC adapter and all the data on an optional drive. Remove the battery. 4. Before removing the HDD or SSD, make a backup copy of the drive. ...it or having it to the cover of all cables from your reseller or Lenovo marketing representative. Attention: Handling an HDD or an SSD v Do not drop...replace the solid state drive (SSD) or the hard disk drive (HDD) with a new one by following the procedure below. To replace the HDD or SSD 1. Close the computer display, and turn the computer off the computer; Then, flip out and remove the cover 2 . 38 ThinkPad® X300...
Service Guide
Page 83
...© Copyright Lenovo 2007 fingerprint reader caring for 5 troubleshooting 28 frequently asked questions 7 H hard disk drive diagnosing 9 troubleshooting 27 upgrading 38 help and service 47 hibernation mode troubleshooting 20 I important instructions v important tips 3 K keyboard cleaning 6 troubleshooting 19 M memory replacing 40 troubleshooting 18... 31 Rescue and Recovery workspace 10 restoring the factory contents 32 S Safety and Warranty Guide 1 second battery replacing 43 service and help 47 service partition diagnosing the system 10 restoring the factory contents 32 Setup Instructions ...
...© Copyright Lenovo 2007 fingerprint reader caring for 5 troubleshooting 28 frequently asked questions 7 H hard disk drive diagnosing 9 troubleshooting 27 upgrading 38 help and service 47 hibernation mode troubleshooting 20 I important instructions v important tips 3 K keyboard cleaning 6 troubleshooting 19 M memory replacing 40 troubleshooting 18... 31 Rescue and Recovery workspace 10 restoring the factory contents 32 S Safety and Warranty Guide 1 second battery replacing 43 service and help 47 service partition diagnosing the system 10 restoring the factory contents 32 Setup Instructions ...


