
Hardware Maintenance Manual
Page 5
... . . . . 35 Power management 37 Screen blank mode 37 Standby mode 37 Hibernation mode 38 Symptom-to-FRU index 39 Numeric error codes 39 Error messages 43 Beep symptoms 44 © Copyright Lenovo 2008 No-beep symptoms 44 LCD-related symptoms 45 Intermittent problems 46 Undetermined problems 46 ThinkPad X200 and X200s 47 Specifications 48 Status...
... . . . . 35 Power management 37 Screen blank mode 37 Standby mode 37 Hibernation mode 38 Symptom-to-FRU index 39 Numeric error codes 39 Error messages 43 Beep symptoms 44 © Copyright Lenovo 2008 No-beep symptoms 44 LCD-related symptoms 45 Intermittent problems 46 Undetermined problems 46 ThinkPad X200 and X200s 47 Specifications 48 Status...

Hardware Maintenance Manual
Page 25
"Strategy for replacing a hard disk drive" on the screen. 3. Customers in this manual. Important service information This chapter presents following strategy to prevent unnecessary expense for replacing and servicing FRUs: © Copyright Lenovo 2008 17 To download software fixes, drivers, and BIOS, do as... to the system board before replacing any software fixes, drivers, and BIOS downloads. After a system board is loaded to http://www.lenovo.com/support 2. "Important notice for assistance or download information. "FRU identification for CTO, CMV, and GAV" on page 19 ...
"Strategy for replacing a hard disk drive" on the screen. 3. Customers in this manual. Important service information This chapter presents following strategy to prevent unnecessary expense for replacing and servicing FRUs: © Copyright Lenovo 2008 17 To download software fixes, drivers, and BIOS, do as... to the system board before replacing any software fixes, drivers, and BIOS downloads. After a system board is loaded to http://www.lenovo.com/support 2. "Important notice for assistance or download information. "FRU identification for CTO, CMV, and GAV" on page 19 ...
Hardware Maintenance Manual
Page 26
...one FRU, any of any excessive force to use error message Use the error codes displayed on a system board are servicing. 18 ThinkPad X200 and X200s Hardware Maintenance Manual Running Automatic Configuration may also cause false error codes. Note the current configuration settings (using the View Configuration option);.... Attention: The drive startup sequence in the Symptom-to-FRU Index for replacing a system board Some components mounted on the screen to be overwritten. Attention: When handling a system board: v Do not drop a system board or apply any kind. If more than one ....
...one FRU, any of any excessive force to use error message Use the error codes displayed on a system board are servicing. 18 ThinkPad X200 and X200s Hardware Maintenance Manual Running Automatic Configuration may also cause false error codes. Note the current configuration settings (using the View Configuration option);.... Attention: The drive startup sequence in the Symptom-to-FRU Index for replacing a system board Some components mounted on the screen to be overwritten. Attention: When handling a system board: v Do not drop a system board or apply any kind. If more than one ....

Hardware Maintenance Manual
Page 34
...code appears, go to enable it by the supervisor password. On the first screen, select the model and press Enter. Note: PC-Doctor for DOS. When the ThinkPad logo comes up, immediately press F1 to "ThinkPad X200 and X200s" on page 47. The utility is available on the Web site. Follow...diagnostic diskette, follow the instruction on the following Web site: http://www.lenovo.com/support Testing the computer To run the test, do as the serial port. then power on the model.) 26 ThinkPad X200 and X200s Hardware Maintenance Manual The main panel of the procedure. For some devices ...
...code appears, go to enable it by the supervisor password. On the first screen, select the model and press Enter. Note: PC-Doctor for DOS. When the ThinkPad logo comes up, immediately press F1 to "ThinkPad X200 and X200s" on page 47. The utility is available on the Web site. Follow...diagnostic diskette, follow the instruction on the following Web site: http://www.lenovo.com/support Testing the computer To run the test, do as the serial port. then power on the model.) 26 ThinkPad X200 and X200s Hardware Maintenance Manual The main panel of the procedure. For some devices ...
Hardware Maintenance Manual
Page 35
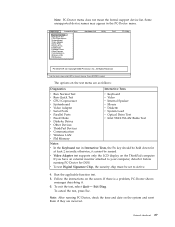
... Tests v Run Normal Test v Run Quick Test v CPU/Coprocessor v Systemboard v Video Adapter v Serial Ports v Parallel Ports v Fixed Disks v Diskette Drives v Other Devices v ThinkPad Devices v Communication v Wireless LAN v PM Memory v Keyboard v Video v Internal Speaker v Mouse v Diskette v System Load v Optical Drive Test v Intel 5XXX WLAN Radio Test ... Fn key should be held down for DOS. To exit the test, select Quit - All Rights Reserved. The options on the screen. If you have an external monitor attached to move in the PC-Doctor menu. To cancel the test, press Esc. General checkout...
... Tests v Run Normal Test v Run Quick Test v CPU/Coprocessor v Systemboard v Video Adapter v Serial Ports v Parallel Ports v Fixed Disks v Diskette Drives v Other Devices v ThinkPad Devices v Communication v Wireless LAN v PM Memory v Keyboard v Video v Internal Speaker v Mouse v Diskette v System Load v Optical Drive Test v Intel 5XXX WLAN Radio Test ... Fn key should be held down for DOS. To exit the test, select Quit - All Rights Reserved. The options on the screen. If you have an external monitor attached to move in the PC-Doctor menu. To cancel the test, press Esc. General checkout...
Hardware Maintenance Manual
Page 36
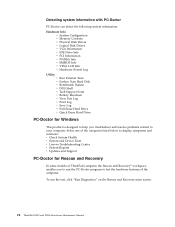
Select one of the categories listed below to display symptoms and solutions: v Check System Health v System and Device Tests v Lenovo Troubleshooting Center v System Reports v Updates and Support PC-Doctor for Windows This product is designed to help you to your computer. Detecting system ... Drive PC-Doctor for Rescue and Recovery In some models of the computer. To run the PC-Doctor program to test the hardware features of ThinkPad computer, the Rescue and Recovery® workspace enables you troubleshoot and resolve problems related to run the test, click "Run Diagnostics" on the ...
Select one of the categories listed below to display symptoms and solutions: v Check System Health v System and Device Tests v Lenovo Troubleshooting Center v System Reports v Updates and Support PC-Doctor for Windows This product is designed to help you to your computer. Detecting system ... Drive PC-Doctor for Rescue and Recovery In some models of the computer. To run the PC-Doctor program to test the hardware features of ThinkPad computer, the Rescue and Recovery® workspace enables you troubleshoot and resolve problems related to run the test, click "Run Diagnostics" on the ...

Hardware Maintenance Manual
Page 41
...To install the factory contents by using Product Recovery discs, do not have a Supplemental Recovery Disc, insert it will be posted on http://www.lenovo.com/spm Restoring the factory contents by using Product Recovery discs When the hard disk drive (HDD) or solid state drive (SSD) is replaced... because of time depends on the screen for the computer. The length of a failure, no Product Recovery program is required by using Product Recovery discs" v "Passwords" on page 34 v "...
...To install the factory contents by using Product Recovery discs, do not have a Supplemental Recovery Disc, insert it will be posted on http://www.lenovo.com/spm Restoring the factory contents by using Product Recovery discs When the hard disk drive (HDD) or solid state drive (SSD) is replaced... because of time depends on the screen for the computer. The length of a failure, no Product Recovery program is required by using Product Recovery discs" v "Passwords" on page 34 v "...
Hardware Maintenance Manual
Page 42
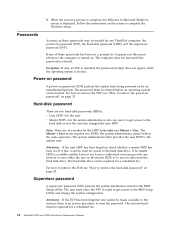
Passwords As many as three passwords may be used for a scheduled fee. 34 ThinkPad X200 and X200s Hardware Maintenance Manual The computer does not start until the password is booted. Power-on password A power-on password (POP) protects the ...instructions on page 35. the system administrator enters both in the BIOS Setup Utility. If it has, it appears on the screen whenever the computer is available, neither Lenovo nor Lenovo authorized servicers provide any of these passwords has been set . Supervisor password A supervisor password (SVP) protects the system information stored...
Passwords As many as three passwords may be used for a scheduled fee. 34 ThinkPad X200 and X200s Hardware Maintenance Manual The computer does not start until the password is booted. Power-on password A power-on password (POP) protects the ...instructions on page 35. the system administrator enters both in the BIOS Setup Utility. If it has, it appears on the screen whenever the computer is available, neither Lenovo nor Lenovo authorized servicers provide any of these passwords has been set . Supervisor password A supervisor password (SVP) protects the system information stored...

Hardware Maintenance Manual
Page 43
...select Yes . The hard disk drive can be made available to the servicer, neither Lenovo nor Lenovo authorized servicers provide any services to reset the user HDPs or to move down the menu. 4. When the ThinkPad logo comes up , immediately press F1 to enterBIOS Setup Utility. Select Power-On ... the POST ends. Related service information 35 For how to remove the backup battery, see "1010 Battery pack" on the screen; Note: To check whether the ThinkPad computer supports the Passphrase function, enter the BIOS Setup Utility and go to Security --> Password. Turn on page 77. 4....
...select Yes . The hard disk drive can be made available to the servicer, neither Lenovo nor Lenovo authorized servicers provide any services to reset the user HDPs or to move down the menu. 4. When the ThinkPad logo comes up , immediately press F1 to enterBIOS Setup Utility. Select Power-On ... the POST ends. Related service information 35 For how to remove the backup battery, see "1010 Battery pack" on the screen; Note: To check whether the ThinkPad computer supports the Passphrase function, enter the BIOS Setup Utility and go to Security --> Password. Turn on page 77. 4....
Hardware Maintenance Manual
Page 45
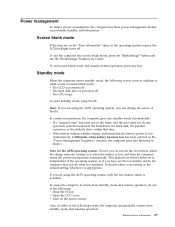
...alarm, the computer may not do not set on the "Turn off monitor" timer in the "Power Management Properties" window, the computer goes into screen blank mode, press the ThinkVantage® button and use the ThinkVantage Productivity Center. If you specified. v Open the LCD cover. v Turn on ... To enter standby mode, press Fn+F4. Power management To reduce power consumption, the computer has three power management modes: screen blank, standby, and hibernation. Screen blank mode If the time set the low-battery alarm, the charge indicator notifies you can change the action of the following...
...alarm, the computer may not do not set on the "Turn off monitor" timer in the "Power Management Properties" window, the computer goes into screen blank mode, press the ThinkVantage® button and use the ThinkVantage Productivity Center. If you specified. v Open the LCD cover. v Turn on ... To enter standby mode, press Fn+F4. Power management To reduce power consumption, the computer has three power management modes: screen blank, standby, and hibernation. Screen blank mode If the time set the low-battery alarm, the charge indicator notifies you can change the action of the following...
Hardware Maintenance Manual
Page 52
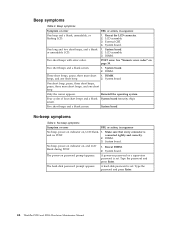
...on, LCD blank, 1. External CRT. 4. System board. 2. DIMM. 3. System board. Type the password and press Enter. 44 ThinkPad X200 and X200s Hardware Maintenance Manual System board No-beep symptoms Table 4. beeps, and one short beep. No-beep symptoms Symptom or error FRU or ... password is and no POST. The hard-disk password prompt appears. System board. POST error. DIMM. Five short beeps and a blank screen. Reseat the LCD connector. 2. Make sure that every connector is set . A power-on password prompt appears. LCD assembly. 3. Two...
...on, LCD blank, 1. External CRT. 4. System board. 2. DIMM. 3. System board. Type the password and press Enter. 44 ThinkPad X200 and X200s Hardware Maintenance Manual System board No-beep symptoms Table 4. beeps, and one short beep. No-beep symptoms Symptom or error FRU or ... password is and no POST. The hard-disk password prompt appears. System board. POST error. DIMM. Five short beeps and a blank screen. Reseat the LCD connector. 2. Make sure that every connector is set . A power-on password prompt appears. LCD assembly. 3. Two...
Hardware Maintenance Manual
Page 53
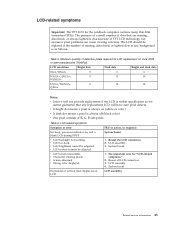
... a pixel is always on June 2006 or later manufactured ThinkPad LCD resolution Bright dots Dark dots Bright and dark dots XGA, WXGA 5 6 6 WXGA+, SXGA+, 5 WSXGA+ 8 10 UXGA, WUXGA, 5 13 13 QXGA Notes: v Lenovo will have zero pixel defects. v LCD too dark. v Screen abnormal. LCD assembly. 3. v LCD screen unreadable. FRU or action, in any background is within...
... a pixel is always on June 2006 or later manufactured ThinkPad LCD resolution Bright dots Dark dots Bright and dark dots XGA, WXGA 5 6 6 WXGA+, SXGA+, 5 WSXGA+ 8 10 UXGA, WUXGA, 5 13 13 QXGA Notes: v Lenovo will have zero pixel defects. v LCD too dark. v Screen abnormal. LCD assembly. 3. v LCD screen unreadable. FRU or action, in any background is within...
Hardware Maintenance Manual
Page 61
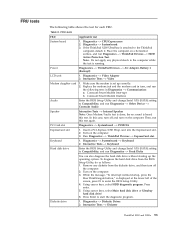
...--> Fixed Disks You can also diagnose the hard disk drive without starting up correctly. 2. Press enter. 5. Interactive Tests --> Diskette ThinkPad X200 and X200s 53 Note: Do not apply any diskette from the BIOS Setup Utility, do as follows: 1. Interactive Tests --> Video Modem daughter card... system. Diagnostics --> Systemboard 3. Make sure the modem is displayed at the lower left of the screen, press F1 to Compatibility, and run Diagnostics --> ThinkPad Devices --> HDD Active Protection Test. FRU tests FRU Applicable test System board 1. Conexant Smart Modem Dialtone...
...--> Fixed Disks You can also diagnose the hard disk drive without starting up correctly. 2. Press enter. 5. Interactive Tests --> Diskette ThinkPad X200 and X200s 53 Note: Do not apply any diskette from the BIOS Setup Utility, do as follows: 1. Interactive Tests --> Video Modem daughter card... system. Diagnostics --> Systemboard 3. Make sure the modem is displayed at the lower left of the screen, press F1 to Compatibility, and run Diagnostics --> ThinkPad Devices --> HDD Active Protection Test. FRU tests FRU Applicable test System board 1. Conexant Smart Modem Dialtone...
Hardware Maintenance Manual
Page 62
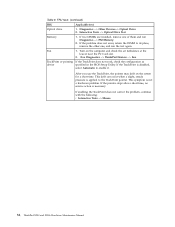
If two DIMMs are installed, remove one , and run Diagnostics --> PM Memory. 2. Run Diagnostics --> ThinkPad Devices --> Fan. This drift can occur when a slight, steady pressure is disabled, select Automatic to the...Utility. If enabling the TrackPoint does not correct the problem, continue with the following: v Interactive Tests --> Mouse 54 ThinkPad X200 and X200s Hardware Maintenance Manual After you use the TrackPoint, the pointer may drift on the computer and check the air turbulence ..., remove the other one of them and run the test again. Turn on the screen for a short time.
If two DIMMs are installed, remove one , and run Diagnostics --> PM Memory. 2. Run Diagnostics --> ThinkPad Devices --> Fan. This drift can occur when a slight, steady pressure is disabled, select Automatic to the...Utility. If enabling the TrackPoint does not correct the problem, continue with the following: v Interactive Tests --> Mouse 54 ThinkPad X200 and X200s Hardware Maintenance Manual After you use the TrackPoint, the pointer may drift on the computer and check the air turbulence ..., remove the other one of them and run the test again. Turn on the screen for a short time.
Hardware Maintenance Manual
Page 64
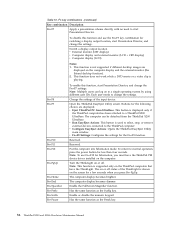
...not supported if different desktop images are displayed on the ThinkPad computers that have the ThinkPad PM device driver installed on the screen for the following choices are displayed: v Eject ThinkPad PC from the ThinkPad X200 UltraBase. Reserved. Enable the FullScreen Magnifier function. Enable .... The computer display becomes dimmer. Turn the ThinkLight on to change the settings. Open the ThinkPad EasyEject Utility screen. v Configure EasyEject Actions: Opens the ThinkPad EasyEject Utility main window. Has the same function as the SysRq key. Note: Multiple users can...
...not supported if different desktop images are displayed on the ThinkPad computers that have the ThinkPad PM device driver installed on the screen for the following choices are displayed: v Eject ThinkPad PC from the ThinkPad X200 UltraBase. Reserved. Enable the FullScreen Magnifier function. Enable .... The computer display becomes dimmer. Turn the ThinkLight on to change the settings. Open the ThinkPad EasyEject Utility screen. v Configure EasyEject Actions: Opens the ThinkPad EasyEject Utility main window. Has the same function as the SysRq key. Note: Multiple users can...
Hardware Maintenance Manual
Page 67
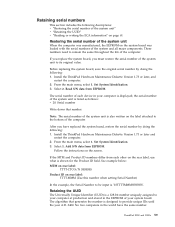
...system board, save the original serial number by doing the following: 1. Install the ThinkPad Hardware Maintenance Diskette Version 1.73 or later and restart the computer. 2. Set System ..., restore the serial number by doing the following: 1. Add S/N data from EEPROM. ThinkPad X200 and X200s 59 Retaining serial numbers This section includes the following descriptions: v "Restoring the serial number... numbers need to remain the same throughout the life of the computer. Install the ThinkPad Hardware Maintenance Diskette Version 1.73 or later, and restart the computer. 2. From the...
...system board, save the original serial number by doing the following: 1. Install the ThinkPad Hardware Maintenance Diskette Version 1.73 or later and restart the computer. 2. Set System ..., restore the serial number by doing the following: 1. Add S/N data from EEPROM. ThinkPad X200 and X200s 59 Retaining serial numbers This section includes the following descriptions: v "Restoring the serial number... numbers need to remain the same throughout the life of the computer. Install the ThinkPad Hardware Maintenance Diskette Version 1.73 or later, and restart the computer. 2. From the...
Hardware Maintenance Manual
Page 69
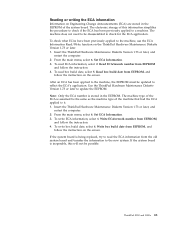
...to the new system. Write box build date from EEPROM, and follow the instruction on the screen. If the system board is stored in the EEPROM of the machine that had the ECA ...later, and restart the computer. 2. Read box build date from EEPROM, and follow the instruction on the screen. Set ECA Information. 3. To write ECA information, select 1. To write box build date, select 4. ...machine type of this will not be the same as the machine type of the system board. ThinkPad X200 and X200s 61 After an ECA has been applied to the machine, the EEPROM must be disassembled to it....
...to the new system. Write box build date from EEPROM, and follow the instruction on the screen. If the system board is stored in the EEPROM of the machine that had the ECA ...later, and restart the computer. 2. Read box build date from EEPROM, and follow the instruction on the screen. Set ECA Information. 3. To write ECA information, select 1. To write box build date, select 4. ...machine type of this will not be the same as the machine type of the system board. ThinkPad X200 and X200s 61 After an ECA has been applied to the machine, the EEPROM must be disassembled to it....


