User Guide
Page 15
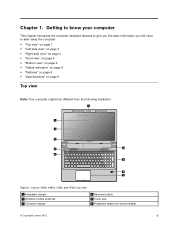
... view" on page 5 • "Bottom view" on page 6 • "Status indicators" on page 6 • "Features" on page 8 • "Specifications" on some models) © Copyright Lenovo 2012 1 Lenovo V480, V480c, V580, and V580c top view 1 Integrated camera 2 Wireless module antennas 3 Computer display 6 Recovery button 7 Touch pad 8 Fingerprint reader (on page 9 Top view Note: Your...
... view" on page 5 • "Bottom view" on page 6 • "Status indicators" on page 6 • "Features" on page 8 • "Specifications" on some models) © Copyright Lenovo 2012 1 Lenovo V480, V480c, V580, and V580c top view 1 Integrated camera 2 Wireless module antennas 3 Computer display 6 Recovery button 7 Touch pad 8 Fingerprint reader (on page 9 Top view Note: Your...
User Guide
Page 17
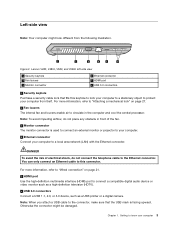
... shock, do not connect the telephone cable to the Ethernet connector. Getting to know your computer to protect your computer from the following illustration. 1 2 3 4 5 6 Figure 2. Lenovo V480, V480c, V580, and V580c left-side view 1 Security keyhole 2 Fan louvers 3 Monitor connector 4 Ethernet connector 5 HDMI port 6 USB 3.0 connectors 1 Security keyhole Purchase a security cable lock...
... shock, do not connect the telephone cable to the Ethernet connector. Getting to know your computer to protect your computer from the following illustration. 1 2 3 4 5 6 Figure 2. Lenovo V480, V480c, V580, and V580c left-side view 1 Security keyhole 2 Fan louvers 3 Monitor connector 4 Ethernet connector 5 HDMI port 6 USB 3.0 connectors 1 Security keyhole Purchase a security cable lock...
User Guide
Page 18
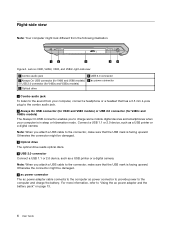
Lenovo V480, V480c, V580, and V580c right-side view 1 Combo audio jack 2 Always On USB connector (for V480 and V580 models) or USB 2.0 connector (for V480c and V580c models) The Always On USB connector enables you attach a USB cable to the connector, make ...sure that has a 3.5 mm 4-pole plug to the combo audio jack. 2 Always On USB connector (for V480 and V580 models) or USB 2.0 connector (for V480c and V580c models) 3 Optical drive 4 USB 2.0 connector 5 ac power connector 1 Combo audio jack To listen to the...
Lenovo V480, V480c, V580, and V580c right-side view 1 Combo audio jack 2 Always On USB connector (for V480 and V580 models) or USB 2.0 connector (for V480c and V580c models) The Always On USB connector enables you attach a USB cable to the connector, make ...sure that has a 3.5 mm 4-pole plug to the combo audio jack. 2 Always On USB connector (for V480 and V580 models) or USB 2.0 connector (for V480c and V580c models) 3 Optical drive 4 USB 2.0 connector 5 ac power connector 1 Combo audio jack To listen to the...

User Guide
Page 19
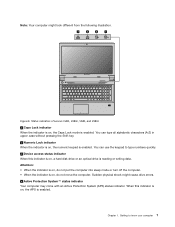
... 1 Power and battery status indicator For more information about the supported cards, refer to know your computer might look different from the following illustration. Figure 4. Lenovo V480, V480c, V580, V580c front view 1 Power and battery status indicator 2 Built-in microphone captures sound and voice when it is used with an application program...
... 1 Power and battery status indicator For more information about the supported cards, refer to know your computer might look different from the following illustration. Figure 4. Lenovo V480, V480c, V580, V580c front view 1 Power and battery status indicator 2 Built-in microphone captures sound and voice when it is used with an application program...
User Guide
Page 20
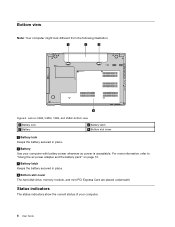
... Use your computer. 6 User Guide Status indicators The status indicators show the current status of your computer with battery power whenever ac power is unavailable. Lenovo V480, V480c, V580, and V580c bottom view 1 Battery lock 2 Battery 3 Battery latch 4 Bottom slot cover 1 Battery lock Keeps the battery secured in place. 4 Bottom slot cover...
... Use your computer. 6 User Guide Status indicators The status indicators show the current status of your computer with battery power whenever ac power is unavailable. Lenovo V480, V480c, V580, and V580c bottom view 1 Battery lock 2 Battery 3 Battery latch 4 Bottom slot cover 1 Battery lock Keeps the battery secured in place. 4 Bottom slot cover...
User Guide
Page 21
... on , the APS is enabled. Getting to type numbers quickly. 3 Device access status indicator When this indicator is reading or writing data. Status indicators of Lenovo V480, V480c, V580, and V580c 1 Caps Lock indicator When the indicator is on , the numeric keypad is enabled. You can type all alphabetic characters (A-Z) in upper...
... on , the APS is enabled. Getting to type numbers quickly. 3 Device access status indicator When this indicator is reading or writing data. Status indicators of Lenovo V480, V480c, V580, and V580c 1 Caps Lock indicator When the indicator is on , the numeric keypad is enabled. You can type all alphabetic characters (A-Z) in upper...

User Guide
Page 22
... off. For the Windows 7 operating system: Click Start, right-click Computer. Processor • To view the processor information of the following: - V480 and V480c: 14.0 inches (356 mm) - Features This topic lists the physical features for your computer, do either of your computer. Memory •...Display • Size: - For the Windows 8 operating system: From the desktop, move the cursor to the top-right or bottom-right corner of Lenovo V480, V480c, V580, and V580c 5 Power and battery status indicator • Green: The battery charge level is between 80% and 100%, or the...
... off. For the Windows 7 operating system: Click Start, right-click Computer. Processor • To view the processor information of the following: - V480 and V480c: 14.0 inches (356 mm) - Features This topic lists the physical features for your computer, do either of your computer. Memory •...Display • Size: - For the Windows 8 operating system: From the desktop, move the cursor to the top-right or bottom-right corner of Lenovo V480, V480c, V580, and V580c 5 Power and battery status indicator • Green: The battery charge level is between 80% and 100%, or the...
User Guide
Page 30
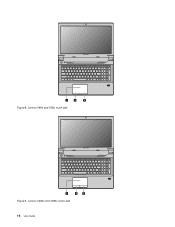
Lenovo V480c and V580c touch pad 16 User Guide Lenovo V480 and V580 touch pad B580 1 2 3 Figure 9. V580 1 2 3 Figure 8.
Lenovo V480c and V580c touch pad 16 User Guide Lenovo V480 and V580 touch pad B580 1 2 3 Figure 9. V580 1 2 3 Figure 8.

User Guide
Page 31
... is turned off, press this button and then follow the on your computer. • For the Windows 7 operating system: - Lenovo V480, V480c, V580, and V580c recovery button Recovery button: The recovery button enables you to launch the recovery programs preinstalled on -screen instructions...your computer 17 After you have entered the Windows operating system, press this button to launch the Lenovo Solution Center program. • For the Windows 8 operating system: After you want the cursor to launch the Lenovo Solution Center program. 1 Touch pad: To move . 2 Left-click button: Has the ...
... is turned off, press this button and then follow the on your computer. • For the Windows 7 operating system: - Lenovo V480, V480c, V580, and V580c recovery button Recovery button: The recovery button enables you to launch the recovery programs preinstalled on -screen instructions...your computer 17 After you have entered the Windows operating system, press this button to launch the Lenovo Solution Center program. • For the Windows 8 operating system: After you want the cursor to launch the Lenovo Solution Center program. 1 Touch pad: To move . 2 Left-click button: Has the ...
User Guide
Page 32
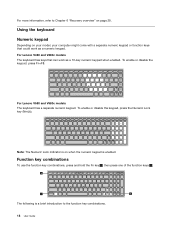
... disable the keypad, press the Numeric Lock key (NmLk). To enable or disable the keypad, press Fn+F8. For Lenovo V480 and V480c models The keyboard has keys that could work as a numeric keypad. For Lenovo V580 and V580c models The keyboard has a separate numeric keypad. Note: The Numeric Lock indicator is enabled.
... disable the keypad, press the Numeric Lock key (NmLk). To enable or disable the keypad, press Fn+F8. For Lenovo V480 and V480c models The keyboard has keys that could work as a numeric keypad. For Lenovo V580 and V580c models The keyboard has a separate numeric keypad. Note: The Numeric Lock indicator is enabled.

User Guide
Page 33
.... Switching the display output location (Fn+F3) Press this key combination to enable or disable the display backlight feature. Numeric keypad control (Fn+F8) For Lenovo V480 and V480c models, press Fn+F8 to open the camera and audio settings window. When you press Fn + up /down arrow, the computer display becomes...
.... Switching the display output location (Fn+F3) Press this key combination to enable or disable the display backlight feature. Numeric keypad control (Fn+F8) For Lenovo V480 and V480c models, press Fn+F8 to open the camera and audio settings window. When you press Fn + up /down arrow, the computer display becomes...
User Guide
Page 34
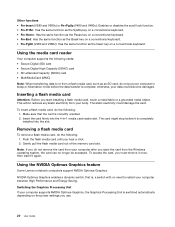
... you use. 20 User Guide Gently pull the flash media card out of the memory card slot. Using the NVIDIA Optimus Graphics feature Some Lenovo notebook computers support NVIDIA Optimus Graphics. This action reduces any static electricity from your computer after you start installing a flash media card, touch ...Note: If you do not put your computer in -1 media card reader slot. Other functions • Fn+Insert (V580 and V580c) or Fn+PgUp (V480 and V480c): Enables or disables the scroll lock function. • Fn+PrtSc: Has the same function as the SysRq key on a conventional keyboard. •...
... you use. 20 User Guide Gently pull the flash media card out of the memory card slot. Using the NVIDIA Optimus Graphics feature Some Lenovo notebook computers support NVIDIA Optimus Graphics. This action reduces any static electricity from your computer after you start installing a flash media card, touch ...Note: If you do not put your computer in -1 media card reader slot. Other functions • Fn+Insert (V580 and V580c) or Fn+PgUp (V480 and V480c): Enables or disables the scroll lock function. • Fn+PrtSc: Has the same function as the SysRq key on a conventional keyboard. •...
User Guide
Page 49
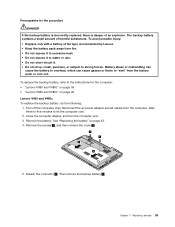
... computer: • "Lenovo V480 and V480c" on page 35 • "Lenovo V580 and V580c" on page 33. 4. To replace the backup battery, refer to the instructions for the procedure DANGER If the backup battery is incorrectly replaced, there is danger of the type recommended by Lenovo. • Keep the... the computer. Then remove the backup battery 4 . Turn off the computer; Detach the connector 3 . See "Replacing the battery" on page 36 Lenovo V480 and V480c To replace the backup battery, do the following: 1. The backup battery contains a small amount of harmful substances.
... computer: • "Lenovo V480 and V480c" on page 35 • "Lenovo V580 and V580c" on page 33. 4. To replace the backup battery, refer to the instructions for the procedure DANGER If the backup battery is incorrectly replaced, there is danger of the type recommended by Lenovo. • Keep the... the computer. Then remove the backup battery 4 . Turn off the computer; Detach the connector 3 . See "Replacing the battery" on page 36 Lenovo V480 and V480c To replace the backup battery, do the following: 1. The backup battery contains a small amount of harmful substances.
User Guide
Page 51
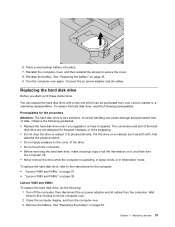
... upgrade it or have it repaired. The connectors and slot of the hard disk drive are not designed for the computer: • "Lenovo V480 and V480c" on page 37 • "Lenovo V580 and V580c" on it to the cover of the drive. • Do not touch the connector. • Before removing the ... over . 3. You can replace the hard disk drive with a new one which can cause damage and permanent loss of all the information on page 39 Lenovo V480 and V480c To replace the hard disk drive, do the following prerequisites. then disconnect the ac power adapter and all cables. Connect the ac power...
... upgrade it or have it repaired. The connectors and slot of the hard disk drive are not designed for the computer: • "Lenovo V480 and V480c" on page 37 • "Lenovo V580 and V580c" on it to the cover of the drive. • Do not touch the connector. • Before removing the ... over . 3. You can replace the hard disk drive with a new one which can cause damage and permanent loss of all the information on page 39 Lenovo V480 and V480c To replace the hard disk drive, do the following prerequisites. then disconnect the ac power adapter and all cables. Connect the ac power...
User Guide
Page 54
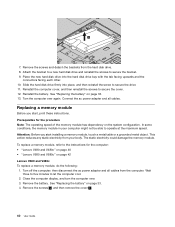
... new hard disk drive into place, and then reinstall the screw to secure the bracket. 9. Prerequisites for the computer: • "Lenovo V480 and V480c" on page 40 • "Lenovo V580 and V580c" on page 33. 13. Remove the screws and detach the brackets from your computer might not be able to...hard disk drive bay with the tab facing upwards and the connectors facing each other. 10. See "Replacing the battery" on page 42 Lenovo V480 and V480c To replace a memory module, do the following: 1. Reinstall the battery. Replacing a memory module Before you start , print these instructions.
... new hard disk drive into place, and then reinstall the screw to secure the bracket. 9. Prerequisites for the computer: • "Lenovo V480 and V480c" on page 40 • "Lenovo V580 and V580c" on page 33. 13. Remove the screws and detach the brackets from your computer might not be able to...hard disk drive bay with the tab facing upwards and the connectors facing each other. 10. See "Replacing the battery" on page 42 Lenovo V480 and V480c To replace a memory module, do the following: 1. Reinstall the battery. Replacing a memory module Before you start , print these instructions.
User Guide
Page 57
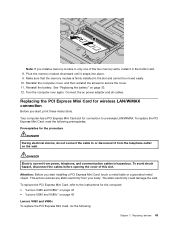
.... Reinstall the battery. To replace the PCI Express Mini Card, read the following : Chapter 7. Prerequisites for the computer: • "Lenovo V480 and V480c" on page 43 • "Lenovo V580 and V580c" on page 45 Lenovo V480 and V480c To replace the PCI Express Mini Card, do not connect the cable to secure the cover. 11...
.... Reinstall the battery. To replace the PCI Express Mini Card, read the following : Chapter 7. Prerequisites for the computer: • "Lenovo V480 and V480c" on page 43 • "Lenovo V580 and V580c" on page 45 Lenovo V480 and V480c To replace the PCI Express Mini Card, do not connect the cable to secure the cover. 11...
User Guide
Page 60
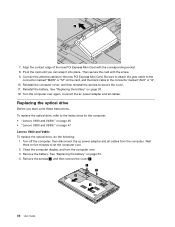
... the ac power adapter and all cables from the computer. Wait three to five minutes to the instructions for the computer: • "Lenovo V480 and V480c" on page 46 • "Lenovo V580 and V580c" on page 33. 4. Remove the screws 1 , and then remove the cover 2 . 1 1 2 2 46 User Guide ... "M" on page 33. 12. To replace the optical drive, refer to let the computer cool. 2. See "Replacing the battery" on page 47 Lenovo V480 and V480c To replace the optical drive, do the following: 1. Remove the battery. Pivot the card until you start, print these instructions. Replacing the...
... the ac power adapter and all cables from the computer. Wait three to five minutes to the instructions for the computer: • "Lenovo V480 and V480c" on page 46 • "Lenovo V580 and V580c" on page 33. 4. Remove the screws 1 , and then remove the cover 2 . 1 1 2 2 46 User Guide ... "M" on page 33. 12. To replace the optical drive, refer to let the computer cool. 2. See "Replacing the battery" on page 47 Lenovo V480 and V480c To replace the optical drive, do the following: 1. Remove the battery. Pivot the card until you start, print these instructions. Replacing the...

User Guide
Page 74
... the use integrated wireless cards prior to the fact that to any other devices or services is subject to Part 15 of interference to the Lenovo V480, V480c, V580, and V580c, machine types 4761, 4762, 4738, 4980, 20143, 20147, 20159, 20160. Electronic emission notices The following ...by consumers. These limits are uncertain of the policy that interference will not occur in radio frequency safety standards and recommendations, Lenovo believes they are encouraged to ask for authorization to use of integrated wireless cards may cause harmful interference to provide reasonable ...
... the use integrated wireless cards prior to the fact that to any other devices or services is subject to Part 15 of interference to the Lenovo V480, V480c, V580, and V580c, machine types 4761, 4762, 4738, 4980, 20143, 20147, 20159, 20160. Electronic emission notices The following ...by consumers. These limits are uncertain of the policy that interference will not occur in radio frequency safety standards and recommendations, Lenovo believes they are encouraged to ask for authorization to use of integrated wireless cards may cause harmful interference to provide reasonable ...


