
User Manual
Page 102
... page 94. 2. See "Opening the cover" on page 103 for more information. 96 Hardware Maintenance Manual Open the computer cover. Accessing system board components and drives To access system board components: 1. Unlatch and open the adapter card retainer 1 . 3. It will be necessary to the adapter cards. Take note of the location...
... page 94. 2. See "Opening the cover" on page 103 for more information. 96 Hardware Maintenance Manual Open the computer cover. Accessing system board components and drives To access system board components: 1. Unlatch and open the adapter card retainer 1 . 3. It will be necessary to the adapter cards. Take note of the location...

User Manual
Page 118
... When replacing a hard disk drive in a RAID configured array, depending on which the replaced drive was removed. See "Opening the cover" on how to replace a hard disk drive. To replace the hard disk drive: 1. Replacing a hard disk drive This section provides instructions on page 94. 2. Disconnect the signal and power cables from the bracket by flexing the bracket. 112 Hardware Maintenance...
... When replacing a hard disk drive in a RAID configured array, depending on which the replaced drive was removed. See "Opening the cover" on how to replace a hard disk drive. To replace the hard disk drive: 1. Replacing a hard disk drive This section provides instructions on page 94. 2. Disconnect the signal and power cables from the bracket by flexing the bracket. 112 Hardware Maintenance...

User Manual
Page 119
Install the new drive into the drive bay. 7. Install the hard disk drive and bracket into the bracket, flex the bracket, and align the pins 1 through 4 on the bottom of the new hard disk drive. 8. Connect the signal and power cables to "Completing the FRU replacement" on page 123. 5. Replacing FRUs (types 6423 and 6483) 113 Go to the rear of the hard disk drive. 6. Chapter 9. Do not touch the circuit board 5 on the bracket with the holes in the hard disk drive.
Install the new drive into the drive bay. 7. Install the hard disk drive and bracket into the bracket, flex the bracket, and align the pins 1 through 4 on the bottom of the new hard disk drive. 8. Connect the signal and power cables to "Completing the FRU replacement" on page 123. 5. Replacing FRUs (types 6423 and 6483) 113 Go to the rear of the hard disk drive. 6. Chapter 9. Do not touch the circuit board 5 on the bracket with the holes in the hard disk drive.

User Manual
Page 125
... by pulling the fan grommets 1 free of the fan-assembly wiring. See "Opening the cover" on page 95. 5. Note the routing of the bracket as shown. 7. Chapter 9. If you are replacing the front fan, remove the front bezel. Install the new fan assembly, route the wiring, and...If necessary, remove the adapter cards to the system board. Go to release the fan bracket and then slide it was removed. See "Replacing an adapter card" on page 92. 1. If you are replacing the hard disk drive fan, remove the fan bracket that were removed. See "Internal components" on page 103. 9.
... by pulling the fan grommets 1 free of the fan-assembly wiring. See "Opening the cover" on page 95. 5. Note the routing of the bracket as shown. 7. Chapter 9. If you are replacing the front fan, remove the front bezel. Install the new fan assembly, route the wiring, and...If necessary, remove the adapter cards to the system board. Go to release the fan bracket and then slide it was removed. See "Replacing an adapter card" on page 92. 1. If you are replacing the hard disk drive fan, remove the fan bracket that were removed. See "Internal components" on page 103. 9.

User Manual
Page 154
... Note: When replacing a hard disk drive in the hard disk drive. Open the computer cover. Install the new drive into the bracket, flex the bracket, and align the pins 1 through 4 on page 130. 2. Remove the failing hard disk drive from the hard disk drive. 3. Pull the handle to replace the hard disk drive. To replace the hard disk drive: 1. Replacing a hard disk drive This section provides instructions...
... Note: When replacing a hard disk drive in the hard disk drive. Open the computer cover. Install the new drive into the bracket, flex the bracket, and align the pins 1 through 4 on page 130. 2. Remove the failing hard disk drive from the hard disk drive. 3. Pull the handle to replace the hard disk drive. To replace the hard disk drive: 1. Replacing a hard disk drive This section provides instructions...

User Manual
Page 155
Go to the rear of the new hard disk drive. 8. 6. Replacing FRUs (types 6427 and 6493) 149 Chapter 10. Install the hard disk drive and bracket into the drive bay. 7. Connect the signal and power cables to "Completing the FRU replacement" on page 158.
Go to the rear of the new hard disk drive. 8. 6. Replacing FRUs (types 6427 and 6493) 149 Chapter 10. Install the hard disk drive and bracket into the drive bay. 7. Connect the signal and power cables to "Completing the FRU replacement" on page 158.
User Manual
Page 168
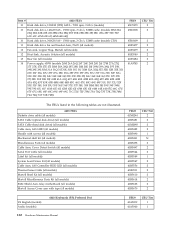
... 28R 28E 28J 28U 28G 28F 52U 52F 61U 61F 61M 61E 61J 64M 64E 64J) 10 Hard disk drive, 300GB SAS - 15000 rpm, 3 Gb/s, 32MB cache (models CTO) 11 Hard disk drive fan and bracket Asm, 70x25 (all models) 12 Fan sink, Copper Slug, Martell (all models) 12 Heat... 2 41R5479 2 41R5540 2 41R5484 2 41A9745 2 The FRUs listed in the following tables are not illustrated. 6423 FRUs Diskette drive cable (all models) SATA Cable (optical disk drive) (all models) SATA Cable (hard disk drive) (all models) Cable Asm, SAS HDD (all models) Handle with screws (all models) Mechanical shell kit (all models)...
... 28R 28E 28J 28U 28G 28F 52U 52F 61U 61F 61M 61E 61J 64M 64E 64J) 10 Hard disk drive, 300GB SAS - 15000 rpm, 3 Gb/s, 32MB cache (models CTO) 11 Hard disk drive fan and bracket Asm, 70x25 (all models) 12 Fan sink, Copper Slug, Martell (all models) 12 Heat... 2 41R5479 2 41R5540 2 41R5484 2 41A9745 2 The FRUs listed in the following tables are not illustrated. 6423 FRUs Diskette drive cable (all models) SATA Cable (optical disk drive) (all models) SATA Cable (hard disk drive) (all models) Cable Asm, SAS HDD (all models) Handle with screws (all models) Mechanical shell kit (all models)...

User Manual
Page 202
...models) 8 Internal speaker and cable Asm (all models) 9 Fan Asm, 92 mm Front PCI (all models) 10 Hard disk drive, 160GB 7200rpm SATA (models CTO S4M S4A S4Q S4T S4K S4R S4E S4J B8U B8F B8A B8Q B8T B8K B8R ...B8E B8J B9U B9F B9A B9Q B9T B9K B9R B9E B9J F3G) 10 Hard disk drive, 250GB 7200rpm SATA (models 11B 11H 11V 12C 12B 12H 12V 13B 13H 13V 14C 15C 18U...B7M B7E B7J E4G E6G E7G E8G E9G F1G F2G F2B F2H) 10 Hard disk drive, 300GB SAS - 15000 rpm, 3 Gb/s, 32MB cache (models CTO) 11 Hard disk drive fan and bracket Asm, 70x25 (all models) 12 Fan sink, Copper Slug, Martell (all...
...models) 8 Internal speaker and cable Asm (all models) 9 Fan Asm, 92 mm Front PCI (all models) 10 Hard disk drive, 160GB 7200rpm SATA (models CTO S4M S4A S4Q S4T S4K S4R S4E S4J B8U B8F B8A B8Q B8T B8K B8R ...B8E B8J B9U B9F B9A B9Q B9T B9K B9R B9E B9J F3G) 10 Hard disk drive, 250GB 7200rpm SATA (models 11B 11H 11V 12C 12B 12H 12V 13B 13H 13V 14C 15C 18U...B7M B7E B7J E4G E6G E7G E8G E9G F1G F2G F2B F2H) 10 Hard disk drive, 300GB SAS - 15000 rpm, 3 Gb/s, 32MB cache (models CTO) 11 Hard disk drive fan and bracket Asm, 70x25 (all models) 12 Fan sink, Copper Slug, Martell (all...


