(English) Rescue and Recovery 4.3 Deployment Guide
Page 5
... Configuring the Opera browser 41 Changing the video resolution 47 Startup applications 47 Passwords 48 Password access 48 Log files 49 Create Rescue Media 49 Chapter 4. User tasks 83 Windows 7 83 Create rescue media 83 Rescue and Recovery user interface switching . . . 84 Appendix C. Best practices 51 Scenario 1 - New rollouts 51 Preparing the hard disk drive 51 Installing 51 Updating 53 Enabling the Rescue and Recovery desktop . . . 53 Scenario 2 - Administrative tools . . . 61 Command line support...
... Configuring the Opera browser 41 Changing the video resolution 47 Startup applications 47 Passwords 48 Password access 48 Log files 49 Create Rescue Media 49 Chapter 4. User tasks 83 Windows 7 83 Create rescue media 83 Rescue and Recovery user interface switching . . . 84 Appendix C. Best practices 51 Scenario 1 - New rollouts 51 Preparing the hard disk drive 51 Installing 51 Updating 53 Enabling the Rescue and Recovery desktop . . . 53 Scenario 2 - Administrative tools . . . 61 Command line support...
(English) Rescue and Recovery 4.3 Deployment Guide
Page 30
... files for backups The mapping network drive function relies on the registry settings located at HKLM\Software\Lenovo\MND. To complete a merge operation, MOVE permissions exist for mapping a network drive: UNC=\\server\share NetPath=\\9.88.77.66\share User=11622606415119207723014918505422010521006401209203708202015... Perform an administrative installation: :: Extract the WWW EXE to attach. To install the setup files using MSIEXE: 22 Rescue and Recovery 4.3 Deployment Guide The Universal Naming Convention...
... files for backups The mapping network drive function relies on the registry settings located at HKLM\Software\Lenovo\MND. To complete a merge operation, MOVE permissions exist for mapping a network drive: UNC=\\server\share NetPath=\\9.88.77.66\share User=11622606415119207723014918505422010521006401209203708202015... Perform an administrative installation: :: Extract the WWW EXE to attach. To install the setup files using MSIEXE: 22 Rescue and Recovery 4.3 Deployment Guide The Universal Naming Convention...
(English) Rescue and Recovery 4.3 Deployment Guide
Page 36
... key settings: HKLM\SOFTWARE\Lenovo\Rescue and Recovery\Settings\OSAppsList The OSAppsList setting will be displayed each time the Rescue and Recovery program is started unless the setting is disabled. The Diagnostics tool available in the Predesktop Area of the Rescue and Recovery program aids in problem determination. x=?:\Documents and Settings\*\Local Settings\History\* X=?:\Documents and Settings\*\Local Settings\Temp\* x=?:\Documents and Settings\*\Local Settings\Temporary Internet Files\* x=?:\Documents and Settings\*\Desktop\* x=?:\Documents and Settings...
... key settings: HKLM\SOFTWARE\Lenovo\Rescue and Recovery\Settings\OSAppsList The OSAppsList setting will be displayed each time the Rescue and Recovery program is started unless the setting is disabled. The Diagnostics tool available in the Predesktop Area of the Rescue and Recovery program aids in problem determination. x=?:\Documents and Settings\*\Local Settings\History\* X=?:\Documents and Settings\*\Local Settings\Temp\* x=?:\Documents and Settings\*\Local Settings\Temporary Internet Files\* x=?:\Documents and Settings\*\Desktop\* x=?:\Documents and Settings...

(English) Rescue and Recovery 4.3 Deployment Guide
Page 59
... second hard disk drives, USB hard disk drives, USB memory keys and PC Card Memory from the donor system, except the primary hard disk that the installation file is located in the process is the build ID) to the C:\SWTOOLS\APPS\rnr directory: :: This package will reduce the installation time on . Manually creating the Service Partition of the C drive, create a file EXE_EXTRACT.cmd, which will extract the file z902zisXXXXus00.exe for Windows...
... second hard disk drives, USB hard disk drives, USB memory keys and PC Card Memory from the donor system, except the primary hard disk that the installation file is located in the process is the build ID) to the C:\SWTOOLS\APPS\rnr directory: :: This package will reduce the installation time on . Manually creating the Service Partition of the C drive, create a file EXE_EXTRACT.cmd, which will extract the file z902zisXXXXus00.exe for Windows...
(English) Rescue and Recovery 4.3 Deployment Guide
Page 76
... 8 free sectors). /INFOP Display hard disk drive information (checks for 16 free sectors). /M0 The Rescue and Recovery environment is located in the service partition. /M1 The Rescue and Recovery environment is located in the service partition with DOS (dual boot Windows PE and DOS; See "RRCMD command-line interface" on the keyboard to set a variable that represent 8 bytes of the Rescue and Recovery program. /Patchn Used for the F11 (default) key press...
... 8 free sectors). /INFOP Display hard disk drive information (checks for 16 free sectors). /M0 The Rescue and Recovery environment is located in the service partition. /M1 The Rescue and Recovery environment is located in the service partition with DOS (dual boot Windows PE and DOS; See "RRCMD command-line interface" on the keyboard to set a variable that represent 8 bytes of the Rescue and Recovery program. /Patchn Used for the F11 (default) key press...
Hardware Maintenance Manual - ThinkStation C20/C20x
Page 5
... Installing SATA hard disk drives 41 Configuring the system BIOS to enable SATA RAID functionality 41 Creating RAID volumes 42 Deleting RAID volumes 42 Configuring RAID for DOS 34 Creating a diagnostic disc 34 Running the diagnostic program from the diagnostic disc 34 Navigating through the diagnostics programs 34 Running tests 34 Chapter 6. General information . . . . 29 Lenovo ThinkVantage Tools 29 Lenovo Solution Center 29 SimpleTap 29 Lenovo Welcome 29 Additional information resources 30 Specifications 30 Chapter 4. Contents Chapter 1. Using the Setup Utility...
... Installing SATA hard disk drives 41 Configuring the system BIOS to enable SATA RAID functionality 41 Creating RAID volumes 42 Deleting RAID volumes 42 Configuring RAID for DOS 34 Creating a diagnostic disc 34 Running the diagnostic program from the diagnostic disc 34 Navigating through the diagnostics programs 34 Running tests 34 Chapter 6. General information . . . . 29 Lenovo ThinkVantage Tools 29 Lenovo Solution Center 29 SimpleTap 29 Lenovo Welcome 29 Additional information resources 30 Specifications 30 Chapter 4. Contents Chapter 1. Using the Setup Utility...
Hardware Maintenance Manual - ThinkStation C20/C20x
Page 36
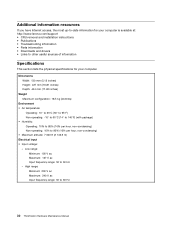
... other useful sources of information Specifications This section lists the physical specifications for your computer. Additional information resources If you have Internet access, the most up-to-date information for your computer is available at: http://www.lenovo.com/support • CRU removal and installation instructions • Publications • Troubleshooting information • Parts information • Downloads and drivers • Links to 60 Hz 30 ThinkStation Hardware Maintenance Manual Dimensions...
... other useful sources of information Specifications This section lists the physical specifications for your computer. Additional information resources If you have Internet access, the most up-to-date information for your computer is available at: http://www.lenovo.com/support • CRU removal and installation instructions • Publications • Troubleshooting information • Parts information • Downloads and drivers • Links to 60 Hz 30 ThinkStation Hardware Maintenance Manual Dimensions...
Hardware Maintenance Manual - ThinkStation C20/C20x
Page 37
... to "Diagnostic error codes" on page 31. 7. Be extremely careful during POST, go to "Beep symptoms" on page 63. • If the computer displays a POST error, go to assist you cannot continue, replace the last device tested. Check all external devices. 5. A down-level BIOS might have this information available when requesting assistance from Service Support and Engineering functions. • Machine type and model • Processor or hard disk drive upgrades • Failure symptom...
... to "Diagnostic error codes" on page 31. 7. Be extremely careful during POST, go to "Beep symptoms" on page 63. • If the computer displays a POST error, go to assist you cannot continue, replace the last device tested. Check all external devices. 5. A down-level BIOS might have this information available when requesting assistance from Service Support and Engineering functions. • Machine type and model • Processor or hard disk drive upgrades • Failure symptom...
Hardware Maintenance Manual - ThinkStation C20/C20x
Page 53
... 6 "Using the Setup Utility program" on page 37. 2. See "Updating (flashing) the BIOS" on page 229. 3. See "Updating (flashing) the BIOS" on page 229. 2. Run memory test. 4. See "Updating (flashing) the BIOS" on page 67. 1. Reboot the system. 2. System board No action System board System board System board 1. Flash the system. Flash the system. System board 1. System board 1. Make sure the component that is called out is connected and/or enabled. Replace the component under function test. 1. System board 1. Replace component...
... 6 "Using the Setup Utility program" on page 37. 2. See "Updating (flashing) the BIOS" on page 229. 3. See "Updating (flashing) the BIOS" on page 229. 2. Run memory test. 4. See "Updating (flashing) the BIOS" on page 67. 1. Reboot the system. 2. System board No action System board System board System board 1. Flash the system. Flash the system. System board 1. System board 1. Make sure the component that is called out is connected and/or enabled. Replace the component under function test. 1. System board 1. Replace component...
Hardware Maintenance Manual - ThinkStation C20/C20x
Page 71
...Power Switch 2. Riser card, if installed. Ensure that network adapter is active. System Board Diskette drive in-use light remains on or does not light when drive is enabled for flashing cursor. 1. Blank screen except for RPL. 3. Run the Memory tests. 2. System Board Chapter 8. See "Hard disk drive boot error" on page 45. 1. Check power supply and signal cable connections to -FRU Index 65 Ensure network administrator is in Setup/Configuration (see "Starting the Setup Utility program" on LAN. 3. See "Hard disk drive boot error" on page 45. 1. Diskette Drive...
...Power Switch 2. Riser card, if installed. Ensure that network adapter is active. System Board Diskette drive in-use light remains on or does not light when drive is enabled for flashing cursor. 1. Blank screen except for RPL. 3. Run the Memory tests. 2. System Board Chapter 8. See "Hard disk drive boot error" on page 45. 1. Check power supply and signal cable connections to -FRU Index 65 Ensure network administrator is in Setup/Configuration (see "Starting the Setup Utility program" on LAN. 3. See "Hard disk drive boot error" on page 45. 1. Diskette Drive...
Hardware Maintenance Manual - ThinkStation C20/C20x
Page 84
... or 48 GB of the ThinkStation Safety and Warranty Guide, go to: http://www.lenovo.com/support This section provides instructions on your model, your computer has six or 12 slots for your computer. Depending on how to a maximum of 96 GB or 192 GB of system memory. 78 ThinkStation Hardware Maintenance Manual See "Locating parts and connectors on the system board" on page 71. Figure...
... or 48 GB of the ThinkStation Safety and Warranty Guide, go to: http://www.lenovo.com/support This section provides instructions on your model, your computer has six or 12 slots for your computer. Depending on how to a maximum of 96 GB or 192 GB of system memory. 78 ThinkStation Hardware Maintenance Manual See "Locating parts and connectors on the system board" on page 71. Figure...
Hardware Maintenance Manual - ThinkStation C20/C20x
Page 96
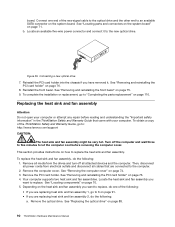
... attached devices and the computer. Remove the computer cover. Remove the PCI card holder. Depending on the heat sink and fan assembly you want to : http://www.lenovo.com/support CAUTION: The heat sink and fan assembly might be very hot. Locate an available five-wire power connector and connect it . Figure 26. Replacing the heat sink and fan assembly Attention Do not open your computer. See "Replacing the optical drive...
... attached devices and the computer. Remove the computer cover. Remove the PCI card holder. Depending on the heat sink and fan assembly you want to : http://www.lenovo.com/support CAUTION: The heat sink and fan assembly might be very hot. Locate an available five-wire power connector and connect it . Figure 26. Replacing the heat sink and fan assembly Attention Do not open your computer. See "Replacing the optical drive...

Hardware Maintenance Manual - ThinkStation C20/C20x
Page 101
... the PCI card holder into the chassis. To complete the replacement, go to: http://www.lenovo.com/support This section provides instructions on how to replace the system board. See "Removing the computer cover" on page 90. 9. Place the computer on its side to gain easier access to "Completing the parts replacement" on the system board and disconnect all media from the failing system board. Remove the optical drive...
... the PCI card holder into the chassis. To complete the replacement, go to: http://www.lenovo.com/support This section provides instructions on how to replace the system board. See "Removing the computer cover" on page 90. 9. Place the computer on its side to gain easier access to "Completing the parts replacement" on the system board and disconnect all media from the failing system board. Remove the optical drive...
Hardware Maintenance Manual - ThinkStation C20/C20x
Page 236
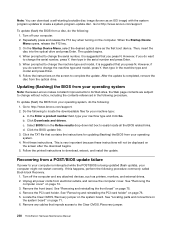
... N. When prompted to change the machine type and model, it is completed, remove the disc from electrical outlets, and remove the computer cover. Updating (flashing) the BIOS from a POST/BIOS update failure If power to the Clear CMOS /Recovery jumper. 230 ThinkStation Hardware Maintenance Manual Go to download, extract, and install the update. Follow the printed instructions to http://www.lenovo.com/support. 2. See "Locating parts and connectors on the system board" on the system board. Turn off the computer and any cables that you do...
... N. When prompted to change the machine type and model, it is completed, remove the disc from electrical outlets, and remove the computer cover. Updating (flashing) the BIOS from a POST/BIOS update failure If power to the Clear CMOS /Recovery jumper. 230 ThinkStation Hardware Maintenance Manual Go to download, extract, and install the update. Follow the printed instructions to http://www.lenovo.com/support. 2. See "Locating parts and connectors on the system board" on the system board. Turn off the computer and any cables that you do...
Hardware Maintenance Manual - ThinkStation C20/C20x
Page 237
... the supported system memory speed for Advanced Power Management (APM) BIOS mode is remote network management software, you to enable and disable features that have been removed or disconnected. 15. Move the Clear CMOS /Recovery jumper back to "Completing the parts replacement" on automatically. Refer to the standard position (pin 1 and pin 2). 14. Reinstall the computer cover and reconnect any cables that turn on the computer automatically. • Serial Port A Ring Detect: With this feature set to Enabled, the...
... the supported system memory speed for Advanced Power Management (APM) BIOS mode is remote network management software, you to enable and disable features that have been removed or disconnected. 15. Move the Clear CMOS /Recovery jumper back to "Completing the parts replacement" on automatically. Refer to the standard position (pin 1 and pin 2). 14. Reinstall the computer cover and reconnect any cables that turn on the computer automatically. • Serial Port A Ring Detect: With this feature set to Enabled, the...
(English) User Guide
Page 3
... memory module . . . 17 Installing or replacing a PCI card 21 Installing a new hard disk drive 23 Replacing a hard disk drive 26 Replacing the optical drive 27 Replacing the heat sink and fan assembly . . 29 Replacing the front fan assembly . . . . . 32 Replacing the rear fan assembly 34 Replacing the keyboard or mouse . . . . . 36 Completing the parts replacement . . . . . 37 Obtaining device drivers 38 Basic security features 38 Locking devices 39 Password protection 40 Chapter 3. Using the Setup Utility program 49 Starting the Setup Utility program 49 Viewing or changing settings...
... memory module . . . 17 Installing or replacing a PCI card 21 Installing a new hard disk drive 23 Replacing a hard disk drive 26 Replacing the optical drive 27 Replacing the heat sink and fan assembly . . 29 Replacing the front fan assembly . . . . . 32 Replacing the rear fan assembly 34 Replacing the keyboard or mouse . . . . . 36 Completing the parts replacement . . . . . 37 Obtaining device drivers 38 Basic security features 38 Locking devices 39 Password protection 40 Chapter 3. Using the Setup Utility program 49 Starting the Setup Utility program 49 Viewing or changing settings...
(English) User Guide
Page 7
.... Internal drives • One Serial Advanced Technology Attachment (SATA) optical drive • Three SATA hard disk drives or Serial Attached SCSI (SAS) hard disk drives Video subsystem • Two Peripheral Component Interconnect (PCI) Express x16 card slots on the system board for your computer. • "Software overview" on page 4: This section provides information about your specific model, use the Setup Utility program. Microprocessor Your computer comes with one of this ThinkStation™ computer feature an integrated memory controller...
.... Internal drives • One Serial Advanced Technology Attachment (SATA) optical drive • Three SATA hard disk drives or Serial Attached SCSI (SAS) hard disk drives Video subsystem • Two Peripheral Component Interconnect (PCI) Express x16 card slots on the system board for your computer. • "Software overview" on page 4: This section provides information about your specific model, use the Setup Utility program. Microprocessor Your computer comes with one of this ThinkStation™ computer feature an integrated memory controller...
(English) User Guide
Page 23
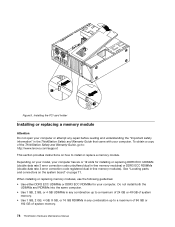
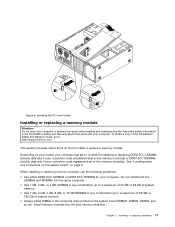
... GB of system memory. • Always install DIMMs in the ThinkStation Safety and Warranty Guide that came with your computer. Chapter 2. Installing or replacing hardware 17 See "Locating parts and connectors on the system board" on how to : http://support.lenovo.com This section provides instructions on page 9. Do not install both the UDIMMs and RDIMMs into the blue memory slots first. Installing the PCI card holder Installing or replacing a memory module Attention...
... GB of system memory. • Always install DIMMs in the ThinkStation Safety and Warranty Guide that came with your computer. Chapter 2. Installing or replacing hardware 17 See "Locating parts and connectors on the system board" on how to : http://support.lenovo.com This section provides instructions on page 9. Do not install both the UDIMMs and RDIMMs into the blue memory slots first. Installing the PCI card holder Installing or replacing a memory module Attention...
(English) User Guide
Page 52
... information about how to access the Rescue and Recovery workspace or the Windows environment from the Rescue and Recovery workspace. Device drivers for factory-installed devices are also available at http://support.lenovo.com. Turn on page 51. This file might not have the rescue device (an internal hard disk drive, a disc, a USB hard disk drive, or other methods of the following : • Use a rescue medium to start the Rescue and Recovery workspace. You must...
... information about how to access the Rescue and Recovery workspace or the Windows environment from the Rescue and Recovery workspace. Device drivers for factory-installed devices are also available at http://support.lenovo.com. Turn on page 51. This file might not have the rescue device (an internal hard disk drive, a disc, a USB hard disk drive, or other methods of the following : • Use a rescue medium to start the Rescue and Recovery workspace. You must...
(English) User Guide
Page 88
... additional services 68 R rear fan assembly, replacing 34 recovering from a POST/BIOS update failure 58 software 41 recovery boot-block 58 operations, backup and 42 problems, solving 46 recovery media, creating and using 41 reinstalling device drivers 46 removing computer cover 13 replacing heat sink and fan assembly 29 Rescue and Recovery 41 workspace, Rescue and Recovery 44 Rescue and Recovery workspace 44 resources, information 65 82 ThinkStation User Guide S safety iii safety information 66 security enabling or disabling...
... additional services 68 R rear fan assembly, replacing 34 recovering from a POST/BIOS update failure 58 software 41 recovery boot-block 58 operations, backup and 42 problems, solving 46 recovery media, creating and using 41 reinstalling device drivers 46 removing computer cover 13 replacing heat sink and fan assembly 29 Rescue and Recovery 41 workspace, Rescue and Recovery 44 Rescue and Recovery workspace 44 resources, information 65 82 ThinkStation User Guide S safety iii safety information 66 security enabling or disabling...


