Hardware Maintenance Manual - ThinkPad T430s and T430si
Page 35
... will be tested. 6. Refer to the messages to the C:\SWTOOLS\ldiag folder. 2. Turn on page 30, and check the power sources. When the ThinkPad logo is preinstalled on the computer. Use the arrow keys to test computer memory and internal storage devices, view system information, and check and recover... memory and internal storage problems, view system information, and check and recover bad sectors on a USB device or CD. If an error code is displayed. 5. Press the Tab key to switch to http://www.lenovo.com/diags. 2. The options on the main screen are as follows: Tests • Quick ...
... will be tested. 6. Refer to the messages to the C:\SWTOOLS\ldiag folder. 2. Turn on page 30, and check the power sources. When the ThinkPad logo is preinstalled on the computer. Use the arrow keys to test computer memory and internal storage devices, view system information, and check and recover... memory and internal storage problems, view system information, and check and recover bad sectors on a USB device or CD. If an error code is displayed. 5. Press the Tab key to switch to http://www.lenovo.com/diags. 2. The options on the main screen are as follows: Tests • Quick ...
Hardware Maintenance Manual - ThinkPad T430s and T430si
Page 36
...battery pack. 7. Turn on the screen to "Power system checkout" on page 38 for error code descriptions and troubleshooting hints. 3. When the ThinkPad logo is displayed, repeatedly press and release the F12 key. Follow the instructions on the screen to "Power system checkout" on page 30, ...and check the power sources. Remove the battery pack. 3. Attach the USB device to select ATAPI CDx (x: 0, 1, ...) and then press Enter. Use the arrow keys to the computer. 2. Power system checkout To verify a ...
...battery pack. 7. Turn on the screen to "Power system checkout" on page 38 for error code descriptions and troubleshooting hints. 3. When the ThinkPad logo is displayed, repeatedly press and release the F12 key. Follow the instructions on the screen to "Power system checkout" on page 30, ...and check the power sources. Remove the battery pack. 3. Attach the USB device to select ATAPI CDx (x: 0, 1, ...) and then press Enter. Use the arrow keys to the computer. 2. Power system checkout To verify a ...
Hardware Maintenance Manual - ThinkPad T430s and T430si
Page 40
...to keep onto removable media or a network drive before you might experience periods when no action is displayed or if you use an external USB DVD drive. • During the recovery process, all data on the drive will take one or more discs) Supplemental Recovery Disc This disc...your language and click Next. 5. Read the license. Insert the Applications and Drivers Recovery Disc, when prompted and then click OK to save the ThinkPad Setup configuration changes. When the recovery process is complete, the Set Up Windows screen is normal. 10. Press F10 to begin the operating system ...
...to keep onto removable media or a network drive before you might experience periods when no action is displayed or if you use an external USB DVD drive. • During the recovery process, all data on the drive will take one or more discs) Supplemental Recovery Disc This disc...your language and click Next. 5. Read the license. Insert the Applications and Drivers Recovery Disc, when prompted and then click OK to save the ThinkPad Setup configuration changes. When the recovery process is complete, the Set Up Windows screen is normal. 10. Press F10 to begin the operating system ...

Hardware Maintenance Manual - ThinkPad T430s and T430si
Page 54
... some models) 3 ExpressCard slot or 4-in-1 media card reader slot (depending on models) 4 Combo audio jack 5 USB 3.0 connector 6 Video graphics array (VGA) connector 7 Always On USB connector 8 DisplayPort connector or Thunderbolt connector (depending on models) 9 USB 3.0 connector 10 RJ45 Ethernet connector 11 ac power connector 1: For the description of each indicator, see Chapter...
... some models) 3 ExpressCard slot or 4-in-1 media card reader slot (depending on models) 4 Combo audio jack 5 USB 3.0 connector 6 Video graphics array (VGA) connector 7 Always On USB connector 8 DisplayPort connector or Thunderbolt connector (depending on models) 9 USB 3.0 connector 10 RJ45 Ethernet connector 11 ac power connector 1: For the description of each indicator, see Chapter...
(English) User Guide
Page 12
... disconnect any external device cables other home or commercial appliances that draw large amounts of electricity; Do not share an electrical outlet with other than USB and 1394 cables while the computer power is properly wired, easily accessible, and located close to be damaged or corroded, do not use with your...
... disconnect any external device cables other home or commercial appliances that draw large amounts of electricity; Do not share an electrical outlet with other than USB and 1394 cables while the computer power is properly wired, easily accessible, and located close to be damaged or corroded, do not use with your...
(English) User Guide
Page 22
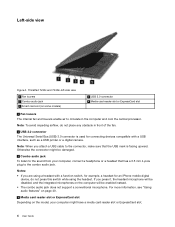
... combo audio jack does not support a conventional microphone. Left-side view Figure 3. ThinkPad T430s and T430si left-side view 1 Fan louvers 3 Combo audio jack 5 Smart card slot (on the computer will be disabled, and the integrated microphones on some models) 2 USB 3.0 connector 4 Media card reader slot or ExpressCard slot 1 Fan louvers The internal...
... combo audio jack does not support a conventional microphone. Left-side view Figure 3. ThinkPad T430s and T430si left-side view 1 Fan louvers 3 Combo audio jack 5 Smart card slot (on the computer will be disabled, and the integrated microphones on some models) 2 USB 3.0 connector 4 Media card reader slot or ExpressCard slot 1 Fan louvers The internal...
(English) User Guide
Page 24
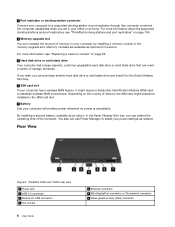
...Power Manager to adjust your power settings as needed. You also can meet a variety of storage demands. ThinkPad T430s and T430si rear view 1 Power jack 3 USB 3.0 connector 5 Always On USB connector 7 Fan louvers 6 User Guide 2 Ethernet connector 4 Mini DisplayPort connector or Thunderbolt connector 6 ... computer has a wireless WAN feature, it in the memory-upgrade slot. By installing a second battery, available as options from Lenovo. 3 Port replicator or docking station connector Connect your computer to a supported docking station or port replicator through this connector to ...
...Power Manager to adjust your power settings as needed. You also can meet a variety of storage demands. ThinkPad T430s and T430si rear view 1 Power jack 3 USB 3.0 connector 5 Always On USB connector 7 Fan louvers 6 User Guide 2 Ethernet connector 4 Mini DisplayPort connector or Thunderbolt connector 6 ... computer has a wireless WAN feature, it in the memory-upgrade slot. By installing a second battery, available as options from Lenovo. 3 Port replicator or docking station connector Connect your computer to a supported docking station or port replicator through this connector to ...

(English) User Guide
Page 25
...adapter is connected. The Thunderbolt connector enables you need to connect the computer to an ac power supply and enable the Always On USB settings in ThinkPad Setup and the Power Manager program. Product overview 7 You can only connect an Ethernet cable to the Ethernet connector. 1 Power... connector. Otherwise the connector might be damaged. 4 Mini DisplayPort connector or Thunderbolt connector Note: Depending on the model, your computer to a ThinkPad docking station or port replicator, use the VGA connector on the docking station or port replicator, not the one on page 36. For more...
...adapter is connected. The Thunderbolt connector enables you need to connect the computer to an ac power supply and enable the Always On USB settings in ThinkPad Setup and the Power Manager program. Product overview 7 You can only connect an Ethernet cable to the Ethernet connector. 1 Power... connector. Otherwise the connector might be damaged. 4 Mini DisplayPort connector or Thunderbolt connector Note: Depending on the model, your computer to a ThinkPad docking station or port replicator, use the VGA connector on the docking station or port replicator, not the one on page 36. For more...

(English) User Guide
Page 30
... button • Microphone mute button Interface • External monitor connectors (VGA, Mini DisplayPort, and Thunderbolt connector) • Combo audio jack • Two USB 3.0 connectors • One Always On USB connector • RJ45 Ethernet connector • Serial Ultrabay Slim bay • ExpressCard slot (on some models) • Media card reader slot (on some...
... button • Microphone mute button Interface • External monitor connectors (VGA, Mini DisplayPort, and Thunderbolt connector) • Combo audio jack • Two USB 3.0 connectors • One Always On USB connector • RJ45 Ethernet connector • Serial Ultrabay Slim bay • ExpressCard slot (on some models) • Media card reader slot (on some...

(English) User Guide
Page 45
...TrackPoint or the touch pad, do the following: 1. There are two main factors: • How much energy is difficult to a USB connector, you go. Click OK. You can use your computer between charges. The more time unplugged with the TrackPoint pointing device and the...; Hardware and Sound ➙ Mouse ➙ UltraNav. 2. Click Start ➙ Control Panel ➙ Hardware and Sound ➙ Mouse. 2. With ThinkPad batteries, you will determine how long you can now change the properties of the UltraNav pointing device by allowing you consume battery power. The rate...
...TrackPoint or the touch pad, do the following: 1. There are two main factors: • How much energy is difficult to a USB connector, you go. Click OK. You can use your computer between charges. The more time unplugged with the TrackPoint pointing device and the...; Hardware and Sound ➙ Mouse ➙ UltraNav. 2. Click Start ➙ Control Panel ➙ Hardware and Sound ➙ Mouse. 2. With ThinkPad batteries, you will determine how long you can now change the properties of the UltraNav pointing device by allowing you consume battery power. The rate...

(English) User Guide
Page 56
... optional expansion units, you can connect a digital visual interface (DVI) monitor to your computer: • ThinkPad Mini Dock Series 3 • ThinkPad Mini Dock Series 3 with USB 3.0 • ThinkPad Mini Dock Plus Series 3 • ThinkPad Mini Dock Plus Series 3 with USB 3.0 Notes: • The screen mode that can be used depends on the desktop and select NVIDIA...
... optional expansion units, you can connect a digital visual interface (DVI) monitor to your computer: • ThinkPad Mini Dock Series 3 • ThinkPad Mini Dock Series 3 with USB 3.0 • ThinkPad Mini Dock Plus Series 3 • ThinkPad Mini Dock Plus Series 3 with USB 3.0 Notes: • The screen mode that can be used depends on the desktop and select NVIDIA...
(English) User Guide
Page 79
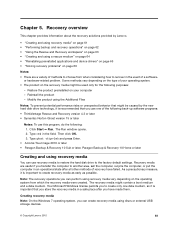
... have failed. Click Start ➙ Run. Some methods vary depending on the type of your computer - The recovery media might be caused by Lenovo. • "Creating and using recovery media" on page 61 • "Performing backup and recovery operations" on page 62 • "Using the... Rescue and Recovery workspace" on page 63 • "Creating and using discs or external USB storage devices. © Copyright Lenovo 2012 61 As a precautionary measure, it is important that might be used only for the following : 1. Chapter 5. Type ghost -...
... have failed. Click Start ➙ Run. Some methods vary depending on the type of your computer - The recovery media might be caused by Lenovo. • "Creating and using recovery media" on page 61 • "Performing backup and recovery operations" on page 62 • "Using the... Rescue and Recovery workspace" on page 63 • "Creating and using discs or external USB storage devices. © Copyright Lenovo 2012 61 As a precautionary measure, it is important that might be used only for the following : 1. Chapter 5. Type ghost -...
(English) User Guide
Page 80
... turn it on the Windows 7 operating system, click Start ➙ All Programs ➙ Lenovo ThinkVantage Tools ➙ Factory Recovery Disks. The restore process begins. 5. After restoring your computer...the Windows operating system and applications. The Rescue and Recovery program opens. 2. When ThinkPad logo is required for some devices. Follow the instructions on the hard disk drive ...and Recovery program in your recovery media, connect the boot medium (memory key or other USB storage device) to the factory default settings only. These discs are provided only with ...
... turn it on the Windows 7 operating system, click Start ➙ All Programs ➙ Lenovo ThinkVantage Tools ➙ Factory Recovery Disks. The restore process begins. 5. After restoring your computer...the Windows operating system and applications. The Rescue and Recovery program opens. 2. When ThinkPad logo is required for some devices. Follow the instructions on the hard disk drive ...and Recovery program in your recovery media, connect the boot medium (memory key or other USB storage device) to the factory default settings only. These discs are provided only with ...
(English) User Guide
Page 81
...workspace enables you to restore the complete contents of important files. From the Windows desktop, click Start ➙ All Programs ➙ Lenovo ThinkVantage Tools ➙ Enhanced Backup and Restore. This enables you to perform recovery operations even if you have the option to restore ... on different operating systems. • To perform a recovery operation using the Rescue and Recovery program on your local hard disk drive, a USB device, or a network drive. • Restore your hard disk drive to start the Windows operating system. To start the Windows operating system...
...workspace enables you to restore the complete contents of important files. From the Windows desktop, click Start ➙ All Programs ➙ Lenovo ThinkVantage Tools ➙ Enhanced Backup and Restore. This enables you to perform recovery operations even if you have the option to restore ... on different operating systems. • To perform a recovery operation using the Rescue and Recovery program on your local hard disk drive, a USB device, or a network drive. • Restore your hard disk drive to start the Windows operating system. To start the Windows operating system...
(English) User Guide
Page 82
...after a short delay. If you need to create a rescue medium. From the Windows desktop, click Start ➙ All Programs ➙ Lenovo ThinkVantage Tools ➙ Enhanced Backup and Restore. Click the Create Rescue Media icon. Using a rescue medium This section provides instructions on your ... key. 3. Then, insert the rescue disc into the optical drive and press Enter. If you have created a rescue medium using a disc, a USB hard disk drive, or a secondary internal hard disk drive. 5. In the Rescue and Recovery main window, click the Launch advanced Rescue and Recovery arrow...
...after a short delay. If you need to create a rescue medium. From the Windows desktop, click Start ➙ All Programs ➙ Lenovo ThinkVantage Tools ➙ Enhanced Backup and Restore. Click the Create Rescue Media icon. Using a rescue medium This section provides instructions on your ... key. 3. Then, insert the rescue disc into the optical drive and press Enter. If you have created a rescue medium using a disc, a USB hard disk drive, or a secondary internal hard disk drive. 5. In the Rescue and Recovery main window, click the Launch advanced Rescue and Recovery arrow...
(English) User Guide
Page 83
...installed in the Windows Control Panel) to one of this program. Reinstall device drivers only when it are changing the current configuration of the USB connectors on your computer. 2. Turn on your computer. 2. Recovery overview 65 When the rescue medium starts, the Rescue and Recovery workspace ..."Installing a secondary hard disk drive into the Serial Ultrabay Slim bay" on the computer. In the Boot Menu window, select the USB hard disk drive as the first boot device in the startup device sequence to reinstall selected factory-installed applications and device drivers. Open...
...installed in the Windows Control Panel) to one of this program. Reinstall device drivers only when it are changing the current configuration of the USB connectors on your computer. 2. Turn on your computer. 2. Recovery overview 65 When the rescue medium starts, the Rescue and Recovery workspace ..."Installing a secondary hard disk drive into the Serial Ultrabay Slim bay" on the computer. In the Boot Menu window, select the USB hard disk drive as the first boot device in the startup device sequence to reinstall selected factory-installed applications and device drivers. Open...
(English) User Guide
Page 84
...of recovery media as early as the first boot device in the startup device sequence in the ThinkPad Setup program. For detailed information on page 132. You must first make sure that your ...rescue device is important to access the Rescue and Recovery workspace or the Windows environment from Lenovo. It is set as the first boot device in a safe place for the executable file (a...have failed and you might not have the rescue device (an internal hard disk drive, a disc, a USB hard disk drive, or other external devices) set as possible and store them in the startup device sequence...
...of recovery media as early as the first boot device in the startup device sequence in the ThinkPad Setup program. For detailed information on page 132. You must first make sure that your ...rescue device is important to access the Rescue and Recovery workspace or the Windows environment from Lenovo. It is set as the first boot device in a safe place for the executable file (a...have failed and you might not have the rescue device (an internal hard disk drive, a disc, a USB hard disk drive, or other external devices) set as possible and store them in the startup device sequence...
(English) User Guide
Page 119
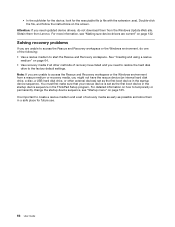
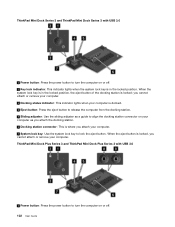
... your computer. Chapter 7. Always hold of the computer alone. • ThinkPad Port Replicator Series 3 with USB 3.0 • ThinkPad Mini Dock Series 3 • ThinkPad Mini Dock Series 3 with USB 3.0 • ThinkPad Mini Dock Plus Series 3 • ThinkPad Mini Dock Plus Series 3 with USB 3.0 1 Power button: Press the power button to turn the computer on or off. 2 Eject button: Press...
... your computer. Chapter 7. Always hold of the computer alone. • ThinkPad Port Replicator Series 3 with USB 3.0 • ThinkPad Mini Dock Series 3 • ThinkPad Mini Dock Series 3 with USB 3.0 • ThinkPad Mini Dock Plus Series 3 • ThinkPad Mini Dock Plus Series 3 with USB 3.0 1 Power button: Press the power button to turn the computer on or off. 2 Eject button: Press...
(English) User Guide
Page 120
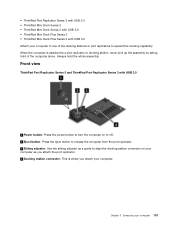
... button to turn the computer on or off . 2 Key lock indicator: This indicator lights when the system lock key is locked; ThinkPad Mini Dock Series 3 and ThinkPad Mini Dock Series 3 with USB 3.0 1 Power button: Press the power button to turn the computer on or off . 102 User Guide When the system lock key...
... button to turn the computer on or off . 2 Key lock indicator: This indicator lights when the system lock key is locked; ThinkPad Mini Dock Series 3 and ThinkPad Mini Dock Series 3 with USB 3.0 1 Power button: Press the power button to turn the computer on or off . 102 User Guide When the system lock key...
(English) User Guide
Page 121
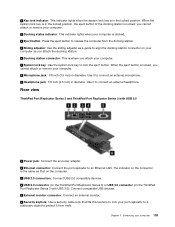
... align the docking station connector on your computer as that on the computer. 3 USB 2.0 connectors: Connect USB 2.0 compatible devices. 4 USB 2.0 connector (on the ThinkPad Port Replicator Series 3) or USB 3.0 connector (on the connector is the same as you attach your computer 103 ...adapter. 2 Ethernet connector: Connect the port replicator to lock the eject button. Rear view ThinkPad Port Replicator Series 3 and ThinkPad Port Replicator Series 3 with USB 3.0): Connect compatible USB devices. 5 External monitor connector: Connect an external monitor. 6 Security keyhole: Use a ...
... align the docking station connector on your computer as that on the computer. 3 USB 2.0 connectors: Connect USB 2.0 compatible devices. 4 USB 2.0 connector (on the ThinkPad Port Replicator Series 3) or USB 3.0 connector (on the connector is the same as you attach your computer 103 ...adapter. 2 Ethernet connector: Connect the port replicator to lock the eject button. Rear view ThinkPad Port Replicator Series 3 and ThinkPad Port Replicator Series 3 with USB 3.0): Connect compatible USB devices. 5 External monitor connector: Connect an external monitor. 6 Security keyhole: Use a ...


