User Guide (English)
Page 3
...information...21 Disassembling your monitor ...21 Monitor specifications ...26 Troubleshooting...27 Manual image setup ...28 Manually installing the monitor driver ...29 Service information ...32 Appendix A ...Service and support ...33 Registering your option ...33 Online technical support ...33 Telephone technical support ...33 Worldwide telephone list ...33 Appendix B Notices ...37 Recycling information ...38 Collecting and recycling a disused Lenovo computer or monitor 38 Disposing of Lenovo...
...information...21 Disassembling your monitor ...21 Monitor specifications ...26 Troubleshooting...27 Manual image setup ...28 Manually installing the monitor driver ...29 Service information ...32 Appendix A ...Service and support ...33 Registering your option ...33 Online technical support ...33 Telephone technical support ...33 Worldwide telephone list ...33 Appendix B Notices ...37 Recycling information ...38 Collecting and recycling a disused Lenovo computer or monitor 38 Disposing of Lenovo...

User Guide (English)
Page 12
Pull out the optical drive cable, and then locate the connector in the holder as shown. Then, pull the decorative cover 2 to open the optical drive bay cover. Chapter 1 Getting started 7 Note: Keep the decorative cover 2 for future use. 2. Carefully align and manually insert the optical drive cable into the USB connector on some models. 1. Note: The optical drive is available only on the Tiny as shown. 3. Part 4: Install the optical drive. Carefully pivot the optical drive bay cover 1 to the right to remove it.
Pull out the optical drive cable, and then locate the connector in the holder as shown. Then, pull the decorative cover 2 to open the optical drive bay cover. Chapter 1 Getting started 7 Note: Keep the decorative cover 2 for future use. 2. Carefully align and manually insert the optical drive cable into the USB connector on some models. 1. Note: The optical drive is available only on the Tiny as shown. 3. Part 4: Install the optical drive. Carefully pivot the optical drive bay cover 1 to the right to remove it.
User Guide (English)
Page 18
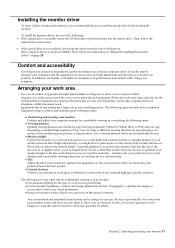
...available, download the driver from overhead lighting or nearby windows. Then, follow the instructions in "Manually installing the monitor driver" on eye fatigue or visual discomfort, consult a vision care specialist ... 2 Adjusting and using the monitor. Then, follow the instructions on the screen from the Lenovo Web site at or slightly below your eye-height when you are comfortably seated. The following... play a large role in your working posture. To install the monitor driver, do one of the following are some other sturdy objects under the base of appropriate height and available...
...available, download the driver from overhead lighting or nearby windows. Then, follow the instructions in "Manually installing the monitor driver" on eye fatigue or visual discomfort, consult a vision care specialist ... 2 Adjusting and using the monitor. Then, follow the instructions on the screen from the Lenovo Web site at or slightly below your eye-height when you are comfortably seated. The following... play a large role in your working posture. To install the monitor driver, do one of the following are some other sturdy objects under the base of appropriate height and available...
User Guide (English)
Page 26
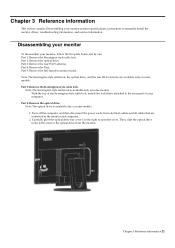
... section contains Disassembling your monitor, follow the five parts below one by one: Part 1: Remove the Kensington-style cable lock. Disassembling your monitor To disassemble your monitor,monitor specifications, instructions to manually install the monitor driver, troubleshooting information, and service information. Part 4: Remove the Tiny. Part 1: Remove the Kensington-style cable lock. Part 2: Remove...
... section contains Disassembling your monitor, follow the five parts below one by one: Part 1: Remove the Kensington-style cable lock. Disassembling your monitor To disassemble your monitor,monitor specifications, instructions to manually install the monitor driver, troubleshooting information, and service information. Part 4: Remove the Tiny. Part 1: Remove the Kensington-style cable lock. Part 2: Remove...
User Guide (English)
Page 33
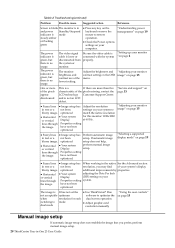
... loose or connected with the system disconnected from properly. optimized setup does not help, ● Horizontal ● Your system perform manual image or vertical Display setup. have not been optimized. Adjust the brightness and "Adjusting your system to match the native resolution for... setup has When working in the native See the Advanced section in text or a not been resolution, you prefer, perform manual image setup. 28 ThinkCentre Tiny-in-One 23 User Guide "Selecting a supported display mode" on page 19 The power indicator is green, but there is no image. ...
... loose or connected with the system disconnected from properly. optimized setup does not help, ● Horizontal ● Your system perform manual image or vertical Display setup. have not been optimized. Adjust the brightness and "Adjusting your system to match the native resolution for... setup has When working in the native See the Advanced section in text or a not been resolution, you prefer, perform manual image setup. 28 ThinkCentre Tiny-in-One 23 User Guide "Selecting a supported display mode" on page 19 The power indicator is green, but there is no image. ...
User Guide (English)
Page 34
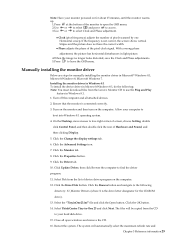
...Windows 8.1 To install the device driver in Windows 8.1. 1. Select Pick from the Lenovo Monitor CD to select Clock and Phase adjustment. ● Clock (pixel frequency) adjusts the number of pixels scanned by one Horizontal sweep. Select ThinkCentre Tiny-in Microsoft® Windows 8.1, Microsoft Windows 8, Microsoft Windows 7. Turn off the computer...minutes, until the monitor warms up. 1.Press at the bottom of the monitor to open windows and remove the CD. 16. Manually installing the monitor driver Below are steps for manually installing the monitor driver in -One 23 and click Next.
...Windows 8.1 To install the device driver in Windows 8.1. 1. Select Pick from the Lenovo Monitor CD to select Clock and Phase adjustment. ● Clock (pixel frequency) adjusts the number of pixels scanned by one Horizontal sweep. Select ThinkCentre Tiny-in Microsoft® Windows 8.1, Microsoft Windows 8, Microsoft Windows 7. Turn off the computer...minutes, until the monitor warms up. 1.Press at the bottom of the monitor to open windows and remove the CD. 16. Manually installing the monitor driver Below are steps for manually installing the monitor driver in -One 23 and click Next.

User Guide (English)
Page 38
... as possible: ● Option name ● Option number ● Proof of purchase ● Computer manufacturer, model, serial number, and manual ● Exact wording of the error message (if any) ● Description of the problem ● Hardware and software configuration information for ...a nominal fee. Your technical support representative might be withdrawn or made available for a fee, at your Lenovo Statement of the product. Refer to service at Lenovo's discretion, 90 days after the option has been withdrawn from marketing, Additional support offerings, including step-by...
... as possible: ● Option name ● Option number ● Proof of purchase ● Computer manufacturer, model, serial number, and manual ● Exact wording of the error message (if any) ● Description of the problem ● Hardware and software configuration information for ...a nominal fee. Your technical support representative might be withdrawn or made available for a fee, at your Lenovo Statement of the product. Refer to service at Lenovo's discretion, 90 days after the option has been withdrawn from marketing, Additional support offerings, including step-by...


