Hardware Maintenance Manual for ThinkCentre M90z
Page 5
... drive password 40 Setting, changing, or deleting a password . . 40 Enabling or disabling a device 41 Selecting a startup device 41 © Copyright Lenovo 2010, 2012 Selecting a temporary startup device . . . . 41 Viewing or changing the startup device sequence 41 Exiting the Setup Utility program 42 Chapter...the heat sink 83 Replacing the microprocessor 85 Replacing the WI-FI card 88 Replacing the Bluetooth module 89 Replacing the multi-touch board 90 Replacing the ambient light sensor 91 Replacing the ExpressCard 92 Replacing the internal speakers 93 Replacing the integrated ...
... drive password 40 Setting, changing, or deleting a password . . 40 Enabling or disabling a device 41 Selecting a startup device 41 © Copyright Lenovo 2010, 2012 Selecting a temporary startup device . . . . 41 Viewing or changing the startup device sequence 41 Exiting the Setup Utility program 42 Chapter...the heat sink 83 Replacing the microprocessor 85 Replacing the WI-FI card 88 Replacing the Bluetooth module 89 Replacing the multi-touch board 90 Replacing the ambient light sensor 91 Replacing the ExpressCard 92 Replacing the internal speakers 93 Replacing the integrated ...
Hardware Maintenance Manual for ThinkCentre M90z
Page 76
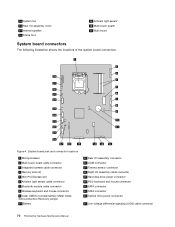
... connector 22 SATA connector 23 Optical drive power connector 24 Low-voltage differential signaling (LVDS) cable connector 70 ThinkCentre Hardware Maintenance Manual System board part and connector locations 1 Microprocessor 2 Multi-touch board cable connector 3 Integrated camera cable connector 4 Memory slots (2) 5 Mini PCI Express slot 6 Ambient... sensor connector 18 Right I /O assembly cover 15 Internal speaker 16 Frame foot 29 Ambient light sensor* 30 Multi-touch board* 31 Wall mount System board connectors The following illustration shows the locations of the system board connectors.
... connector 22 SATA connector 23 Optical drive power connector 24 Low-voltage differential signaling (LVDS) cable connector 70 ThinkCentre Hardware Maintenance Manual System board part and connector locations 1 Microprocessor 2 Multi-touch board cable connector 3 Integrated camera cable connector 4 Memory slots (2) 5 Mini PCI Express slot 6 Ambient... sensor connector 18 Right I /O assembly cover 15 Internal speaker 16 Frame foot 29 Ambient light sensor* 30 Multi-touch board* 31 Wall mount System board connectors The following illustration shows the locations of the system board connectors.
Hardware Maintenance Manual for ThinkCentre M90z
Page 96
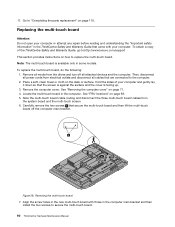
... repair before reading and understanding the "Important safety information" in the ThinkCentre Safety and Warranty Guide that are connected to secure the multi-touch board. 90 ThinkCentre Hardware Maintenance Manual Hold the sides of the ThinkCentre Safety and Warranty Guide, go to:http://www.lenovo.com/support This section provides instructions on how to "Completing the...
... repair before reading and understanding the "Important safety information" in the ThinkCentre Safety and Warranty Guide that are connected to secure the multi-touch board. 90 ThinkCentre Hardware Maintenance Manual Hold the sides of the ThinkCentre Safety and Warranty Guide, go to:http://www.lenovo.com/support This section provides instructions on how to "Completing the...
Hardware Maintenance Manual for ThinkCentre M90z
Page 97
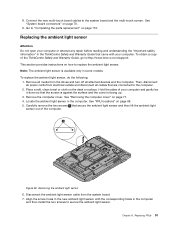
... and Warranty Guide that secure the ambient light sensor and then lift the ambient light sensor out of the ThinkCentre Safety and Warranty Guide, go to:http://www.lenovo.com/support This section provides instructions on page 110. To obtain a copy of the computer. See "System board connectors"... desk or surface. Place a soft, clean towel or cloth on page 71. 4. Hold the sides of your computer. Connect the new multi-touch board cables to replace the ambient light sensor. Remove all attached devices and the computer. Carefully remove the two screws 1 that came with the...
... and Warranty Guide that secure the ambient light sensor and then lift the ambient light sensor out of the ThinkCentre Safety and Warranty Guide, go to:http://www.lenovo.com/support This section provides instructions on page 110. To obtain a copy of the computer. See "System board connectors"... desk or surface. Place a soft, clean towel or cloth on page 71. 4. Hold the sides of your computer. Connect the new multi-touch board cables to replace the ambient light sensor. Remove all attached devices and the computer. Carefully remove the two screws 1 that came with the...
Hardware Maintenance Manual for ThinkCentre M90z
Page 137
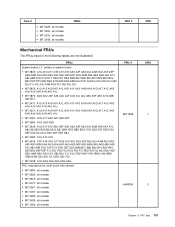
... Y4M Y7M Y8M G1M G2M G3M G4M G5J G6J G7J G8J G9J Y9J • MT 5248: A1G A2G A3G A4G A5G A6G FRU, mechanical kit, multi touch with camera • MT 0800: all models • MT 0852: all models • MT 0870: all models • MT 2471: all models • MT 2557...
... Y4M Y7M Y8M G1M G2M G3M G4M G5J G6J G7J G8J G9J Y9J • MT 5248: A1G A2G A3G A4G A5G A6G FRU, mechanical kit, multi touch with camera • MT 0800: all models • MT 0852: all models • MT 0870: all models • MT 2471: all models • MT 2557...

Hardware Maintenance Manual for ThinkCentre M90z
Page 285
... with microphone, replacing 94 internal speakers, replacing 93 inverter, replacing 101 © Copyright Lenovo 2010, 2012 L LCD panel, replacing 109 Lenovo Solution Center 35 Lenovo ThinkVantage Toolbox 35 M memory module installing 77 system board 77 microprocessor fan assembly, replacing 95 multi-touch board, replacing 90 O optical drive, replacing 81 P parts replacement, completing 110 password Administrator...
... with microphone, replacing 94 internal speakers, replacing 93 inverter, replacing 101 © Copyright Lenovo 2010, 2012 L LCD panel, replacing 109 Lenovo Solution Center 35 Lenovo ThinkVantage Toolbox 35 M memory module installing 77 system board 77 microprocessor fan assembly, replacing 95 multi-touch board, replacing 90 O optical drive, replacing 81 P parts replacement, completing 110 password Administrator...
Hardware Maintenance Manual for ThinkCentre M90z
Page 286
inverter 101 LCD panel 109 microprocessor fan assembly 95 multi-touch board 90 power supply 100 power switch module 103 rear I/O assembly 97 right I/O assembly 99 system board 106 system fan 102 touch panel control board 105 WI-FI card 88 right I/O assembly, replacing 99 S security enabling ... board memory module 77 system board, replacing 106 system fan, replacing 102 T temporary startup device 41 the BIOS, updating (flashing) 273-274 touch panel control board, replacing 105 trademarks 278 U updating (flashing) the BIOS 273 updating (flashing) the BIOS 274 using passwords 39 Setup Utility ...
inverter 101 LCD panel 109 microprocessor fan assembly 95 multi-touch board 90 power supply 100 power switch module 103 rear I/O assembly 97 right I/O assembly 99 system board 106 system fan 102 touch panel control board 105 WI-FI card 88 right I/O assembly, replacing 99 S security enabling ... board memory module 77 system board, replacing 106 system fan, replacing 102 T temporary startup device 41 the BIOS, updating (flashing) 273-274 touch panel control board, replacing 105 trademarks 278 U updating (flashing) the BIOS 273 updating (flashing) the BIOS 274 using passwords 39 Setup Utility ...
(English) User Guide
Page 5
...9 Component locations 10 System board part and connector locations . 12 Chapter 2. Product overview 1 Features 1 Single-touch and multi-touch feature . . . . . 3 Specifications 4 Software overview 5 Software provided with microphone 39 Replacing the microprocessor... fan assembly . 40 Replacing the card reader 42 Replacing the rear I/O assembly 43 Replacing the right I/O assembly. . . . . . 44 Replacing the power supply 45 © Copyright Lenovo...
...9 Component locations 10 System board part and connector locations . 12 Chapter 2. Product overview 1 Features 1 Single-touch and multi-touch feature . . . . . 3 Specifications 4 Software overview 5 Software provided with microphone 39 Replacing the microprocessor... fan assembly . 40 Replacing the card reader 42 Replacing the rear I/O assembly 43 Replacing the right I/O assembly. . . . . . 44 Replacing the power supply 45 © Copyright Lenovo...
(English) User Guide
Page 11
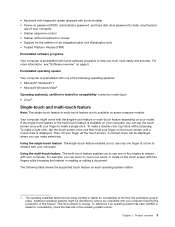
...8226; Support for compatibility1 (varies by Lenovo as compatible with your model. Product overview 3 To make a right-click, tap the touch screen once and then hold your finger to make a single click. If the single-touch feature or the multi-touch feature is available on your computer,... or tested for compatibility, check the Web site of the operating system vendor. For more easily and securely. Using the multi-touch feature: The multi-touch feature enables you work more information, see "Software overview" on each operating system edition. 1. This list is preinstalled with...
...8226; Support for compatibility1 (varies by Lenovo as compatible with your model. Product overview 3 To make a right-click, tap the touch screen once and then hold your finger to make a single click. If the single-touch feature or the multi-touch feature is available on your computer,... or tested for compatibility, check the Web site of the operating system vendor. For more easily and securely. Using the multi-touch feature: The multi-touch feature enables you work more information, see "Software overview" on each operating system edition. 1. This list is preinstalled with...
(English) User Guide
Page 12
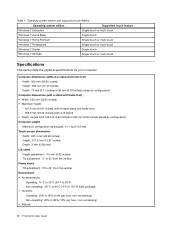
...84 inches) (varies by configuration) Computer weight Maximum configuration as shipped: 14.1 kg (31.09 lbs) Touch screen dimensions Width: 531.4 mm (20.92 inches) Height: 311.6 mm (12.27 inches) Depth...ThinkCentre User Guide Operating system edition and supported touch feature Operating system edition Windows 7 Enterprise Supported touch feature Single-touch or multi-touch Windows 7 Home Basic Single-touch Windows 7 Home Premium Single-touch or multi-touch Windows 7 Professional Single-touch or multi-touch Windows 7 Starter Windows 7 Ultimate Single-touch Single-touch or multi-touch...
...84 inches) (varies by configuration) Computer weight Maximum configuration as shipped: 14.1 kg (31.09 lbs) Touch screen dimensions Width: 531.4 mm (20.92 inches) Height: 311.6 mm (12.27 inches) Depth...ThinkCentre User Guide Operating system edition and supported touch feature Operating system edition Windows 7 Enterprise Supported touch feature Single-touch or multi-touch Windows 7 Home Basic Single-touch Windows 7 Home Premium Single-touch or multi-touch Windows 7 Professional Single-touch or multi-touch Windows 7 Starter Windows 7 Ultimate Single-touch Single-touch or multi-touch...
(English) User Guide
Page 19
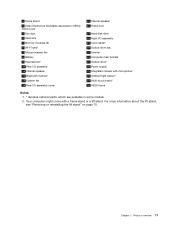
... about the lift stand, see "Removing or reinstalling the lift stand" on page 15. Your computer might come with microphone* 26 Ambient light sensor* 27 Multi-touch board* 28 VESA frame Notes: 1. * denotes optional parts, which are available in some models. 2. 1 Frame stand 2 Video Electronics Standards Association (VESA) frame cover 3 Fan duct...
... about the lift stand, see "Removing or reinstalling the lift stand" on page 15. Your computer might come with microphone* 26 Ambient light sensor* 27 Multi-touch board* 28 VESA frame Notes: 1. * denotes optional parts, which are available in some models. 2. 1 Frame stand 2 Video Electronics Standards Association (VESA) frame cover 3 Fan duct...
(English) User Guide
Page 20
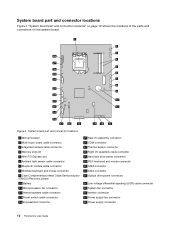
... connector locations" on page 12 shows the locations of the parts and connectors on the system board. Figure 4. System board part and connector locations 1 Microprocessor 2 Multi-touch board cable connector 3 Integrated camera cable connector 4 Memory slots (2) 5 Mini PCI Express slot 6 Ambient light sensor cable connector 7 Bluetooth module cable connector 8 Wireless keyboard and... 24 Low-voltage differential signaling (LVDS) cable connector 25 System fan connector 26 Inverter connector 27 Power supply fan connector 28 Power supply connector 12 ThinkCentre User Guide
... connector locations" on page 12 shows the locations of the parts and connectors on the system board. Figure 4. System board part and connector locations 1 Microprocessor 2 Multi-touch board cable connector 3 Integrated camera cable connector 4 Memory slots (2) 5 Mini PCI Express slot 6 Ambient light sensor cable connector 7 Bluetooth module cable connector 8 Wireless keyboard and... 24 Low-voltage differential signaling (LVDS) cable connector 25 System fan connector 26 Inverter connector 27 Power supply fan connector 28 Power supply connector 12 ThinkCentre User Guide
(English) User Guide
Page 42
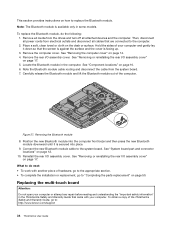
... See "Component locations" on page 17. 5. Connect the new Bluetooth module cable to : http://www.lenovo.com/support 34 ThinkCentre User Guide Hold the sides of the ThinkCentre Safety and Warranty Guide, go to replace the Bluetooth module. See "Removing the computer cover" on how ...the multi-touch board Attention: Do not open your computer. Remove the computer cover. Figure 27. To replace the Bluetooth module, do next: • To work with your computer or attempt any repair before reading and understanding the "Important safety information" in the ThinkCentre Safety...
... See "Component locations" on page 17. 5. Connect the new Bluetooth module cable to : http://www.lenovo.com/support 34 ThinkCentre User Guide Hold the sides of the ThinkCentre Safety and Warranty Guide, go to replace the Bluetooth module. See "Removing the computer cover" on how ...the multi-touch board Attention: Do not open your computer. Remove the computer cover. Figure 27. To replace the Bluetooth module, do next: • To work with your computer or attempt any repair before reading and understanding the "Important safety information" in the ThinkCentre Safety...
(English) User Guide
Page 43
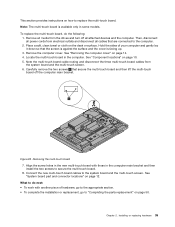
Remove all media from electrical outlets and disconnect all cables that are connected to the computer. 2. Figure 28. Connect the new multi-touch board cables to secure the multi-touch board. 8. What to replace the multi-touch board. Carefully remove the two screws 1 that the screen is against the surface and the cover is available only in...
Remove all media from electrical outlets and disconnect all cables that are connected to the computer. 2. Figure 28. Connect the new multi-touch board cables to secure the multi-touch board. 8. What to replace the multi-touch board. Carefully remove the two screws 1 that the screen is against the surface and the cover is available only in...
(English) User Guide
Page 94
L Lenovo Solution Center 70 Lenovo ThinkVantage Toolbox 71 Lenovo Welcome 5 M media, creating and using recovery media 55 memory module installing 20 system board 20 Microphone connector 9 microprocessor fan assembly, replacing 40 mouse connector 10 mouse, replacing 49 multi-touch board, replacing 34 N notice, television ...protection, password 52 purchasing additional services 76 R rear I/O assembly, replacing 43 recovering a POST/BIOS update failure 66 86 ThinkCentre User Guide software 55 recovery boot-block 66 operations, backup and 56 problems, solving 60 recovery media, creating and using ...
L Lenovo Solution Center 70 Lenovo ThinkVantage Toolbox 71 Lenovo Welcome 5 M media, creating and using recovery media 55 memory module installing 20 system board 20 Microphone connector 9 microprocessor fan assembly, replacing 40 mouse connector 10 mouse, replacing 49 multi-touch board, replacing 34 N notice, television ...protection, password 52 purchasing additional services 76 R rear I/O assembly, replacing 43 recovering a POST/BIOS update failure 66 86 ThinkCentre User Guide software 55 recovery boot-block 66 operations, backup and 56 problems, solving 60 recovery media, creating and using ...
(Greek) User Guide
Page 46
ThinkCentre ThinkCentre http://www.lenovo.com/support multi-touch board 1 2 3 16. 4 12. 5 38 ThinkCentre
ThinkCentre ThinkCentre http://www.lenovo.com/support multi-touch board 1 2 3 16. 4 12. 5 38 ThinkCentre
(Hebrew) User Guide
Page 11
...;או multi-touch single-touch multi-touch single-touch single-touch multi-touch multi-touch Single-touchאו multi-touch Single-touch Single-touchאו multi-touch Single-touchאו multi-touch Single-touch Single-touchאו multi-touch 1 Windows 7 Enterprise Windows 7 Home Basic Windows 7 Home Premium Windows 7 Professional Windows 7 Starter Windows 7 Ultimate .1 Lenovo 1 3
...;או multi-touch single-touch multi-touch single-touch single-touch multi-touch multi-touch Single-touchאו multi-touch Single-touch Single-touchאו multi-touch Single-touchאו multi-touch Single-touch Single-touchאו multi-touch 1 Windows 7 Enterprise Windows 7 Home Basic Windows 7 Home Premium Windows 7 Professional Windows 7 Starter Windows 7 Ultimate .1 Lenovo 1 3
(Hebrew) User Guide
Page 40
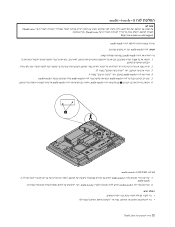
multi-touch- ThinkCentre ThinkCentre http://www.lenovo.com/support multi-touch multi-touch multi-touch 1 2 .3 13 4 multi-touch 9 5 multi-touch multi-touch multi-touch 6 1 multi-tuoch multi-tuoch 28 28 multi-touch 7 multi-touch .multi-touch 8 multi-touch multi-tuoch 10 45 32 ThinkCentre
multi-touch- ThinkCentre ThinkCentre http://www.lenovo.com/support multi-touch multi-touch multi-touch 1 2 .3 13 4 multi-touch 9 5 multi-touch multi-touch multi-touch 6 1 multi-tuoch multi-tuoch 28 28 multi-touch 7 multi-touch .multi-touch 8 multi-touch multi-tuoch 10 45 32 ThinkCentre
(Hebrew) User Guide
Page 81
...1492; 55 55 47 47 69 69 69 34 ExpressCard 25 33 22 30 WI-FI 32 multi-touch 31 Bluetooth 37 39 40 36 21 41 38 35 45 13 4 55 55 2 60 53 60 POST/...; E ,ExpressCard 34 L 62 Lenovo Solution Center 62 Lenovo ThinkVantage Toolbox 5 Lenovo Welcome P 62 PC-Doctor for Rescue and Recovery &#...
...1492; 55 55 47 47 69 69 69 34 ExpressCard 25 33 22 30 WI-FI 32 multi-touch 31 Bluetooth 37 39 40 36 21 41 38 35 45 13 4 55 55 2 60 53 60 POST/...; E ,ExpressCard 34 L 62 Lenovo Solution Center 62 Lenovo ThinkVantage Toolbox 5 Lenovo Welcome P 62 PC-Doctor for Rescue and Recovery &#...
(Arabic) User Guide
Page 41
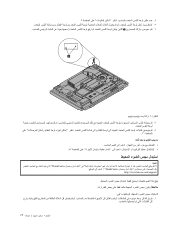
1 multi-touch ThinkCentre ThinkCentre http://www.lenovo.com/support
1 multi-touch ThinkCentre ThinkCentre http://www.lenovo.com/support


