
User Manual
Page 9
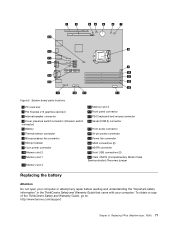
... • Serial Advanced Technology Attachment (SATA) hard disk drive (available in some models) Video subsystem • Integrated graphics card for a Video Graphics Array (VGA) connector and a DisplayPort connector Audio subsystem • Integrated high-definition (HD) audio • Audio...Mbps integrated Ethernet controller • Peripheral Component Interconnect (PCI) Fax modem (available in some models) © Copyright Lenovo 2010 1 Product overview This chapter describes the computer features, specifications, preinstalled software programs, and part and connector locations. ...
... • Serial Advanced Technology Attachment (SATA) hard disk drive (available in some models) Video subsystem • Integrated graphics card for a Video Graphics Array (VGA) connector and a DisplayPort connector Audio subsystem • Integrated high-definition (HD) audio • Audio...Mbps integrated Ethernet controller • Peripheral Component Interconnect (PCI) Fax modem (available in some models) © Copyright Lenovo 2010 1 Product overview This chapter describes the computer features, specifications, preinstalled software programs, and part and connector locations. ...
User Manual
Page 49
...cord is securely connected to a USB connector on the rear of the computer and to the ThinkCentre Safety and Warranty Guide that it is switched on. • The power indicator on the ...; The computer is turned on. • The keyboard is correctly connected to a USB connector on the graphics card. Chapter 6. The keyboard does not work . Verify that : • The computer is turned on. ... keys are set correctly. • The computer voltage matches the voltage available at http://www.lenovo.com/support. Refer to help , and service" on page 44 for additional troubleshooting resources. ...
...cord is securely connected to a USB connector on the rear of the computer and to the ThinkCentre Safety and Warranty Guide that it is switched on. • The power indicator on the ...; The computer is turned on. • The keyboard is correctly connected to a USB connector on the graphics card. Chapter 6. The keyboard does not work . Verify that : • The computer is turned on. ... keys are set correctly. • The computer voltage matches the voltage available at http://www.lenovo.com/support. Refer to help , and service" on page 44 for additional troubleshooting resources. ...
Hardware Maintenance Manual
Page 76
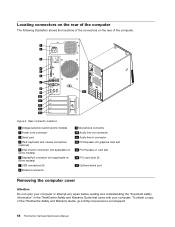
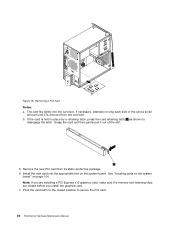
... and Warranty Guide, go to:http://www.lenovo.com/support 68 ThinkCentre Hardware Maintenance Manual Rear connector locations 1 Voltage-selection switch (some models) 2 Power cord connector 3 Serial port 4 PS/2 keyboard and mouse connectors (optional) 5 VGA monitor...in connector 12 PCI Express x16 graphics card slot 13 PCI Express x1 card slot 14 PCI card slots (2) 15 Optional serial port Removing the computer cover Attention Do not open your computer or attempt any repair before reading and understanding the "Important safety information" in the ThinkCentre Safety and Warranty Guide that ...
... and Warranty Guide, go to:http://www.lenovo.com/support 68 ThinkCentre Hardware Maintenance Manual Rear connector locations 1 Voltage-selection switch (some models) 2 Power cord connector 3 Serial port 4 PS/2 keyboard and mouse connectors (optional) 5 VGA monitor...in connector 12 PCI Express x16 graphics card slot 13 PCI Express x1 card slot 14 PCI card slots (2) 15 Optional serial port Removing the computer cover Attention Do not open your computer or attempt any repair before reading and understanding the "Important safety information" in the ThinkCentre Safety and Warranty Guide that ...

Hardware Maintenance Manual
Page 79
...) /Recovery jumper 17 Front USB connectors (2) 18 Serial (COM2) connector 19 Front audio connector 20 Internal speaker connector 21 PCI card slots (2) 22 PCI Express x1 card slot 23 PCI Express x16 graphics card slot 24 System fan connector 25 Cover presence switch connector (Intrusion switch connector) 26 Battery 27 PS/2 keyboard and mouse...
...) /Recovery jumper 17 Front USB connectors (2) 18 Serial (COM2) connector 19 Front audio connector 20 Internal speaker connector 21 PCI card slots (2) 22 PCI Express x1 card slot 23 PCI Express x16 graphics card slot 24 System fan connector 25 Cover presence switch connector (Intrusion switch connector) 26 Battery 27 PS/2 keyboard and mouse...

Hardware Maintenance Manual
Page 81
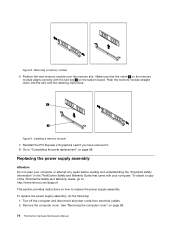
...the PCI Express x16 graphics card for installing or replacing DDR3 DIMMs that provide up to the memory slots. Open the retaining clips. To install or replace a memory module, do the following guidelines: • Use 1 GB, 2 GB, or 4 GB DDR3 DIMMs in the ThinkCentre Safety and Warranty Guide... to a maximum of 16 GB system memory. To obtain a copy of the ThinkCentre Safety and Warranty Guide, go to the memory slots. 5. Your computer has four slots for easier access to : http://www.lenovo.com/support This section provides instructions on page 70. 4. Replacing a memory module ...
...the PCI Express x16 graphics card for installing or replacing DDR3 DIMMs that provide up to the memory slots. Open the retaining clips. To install or replace a memory module, do the following guidelines: • Use 1 GB, 2 GB, or 4 GB DDR3 DIMMs in the ThinkCentre Safety and Warranty Guide... to a maximum of 16 GB system memory. To obtain a copy of the ThinkCentre Safety and Warranty Guide, go to the memory slots. 5. Your computer has four slots for easier access to : http://www.lenovo.com/support This section provides instructions on page 70. 4. Replacing a memory module ...
Hardware Maintenance Manual
Page 82
...a memory module 6. Go to "Completing the parts replacement" on how to : http://www.lenovo.com/support This section provides instructions on page 98. To obtain a copy of the ThinkCentre Safety and Warranty Guide, go to replace the power supply assembly. Make sure that the notch... the slot key 2 on page 68. 74 ThinkCentre Hardware Maintenance Manual Installing a memory module 7. Replacing the power supply assembly Attention Do not open your computer. Remove the computer cover. Figure 9. Reinstall the PCI Express x16 graphics card if you have removed it. 8. Turn off ...
...a memory module 6. Go to "Completing the parts replacement" on how to : http://www.lenovo.com/support This section provides instructions on page 98. To obtain a copy of the ThinkCentre Safety and Warranty Guide, go to replace the power supply assembly. Make sure that the notch... the slot key 2 on page 68. 74 ThinkCentre Hardware Maintenance Manual Installing a memory module 7. Replacing the power supply assembly Attention Do not open your computer. Remove the computer cover. Figure 9. Reinstall the PCI Express x16 graphics card if you have removed it. 8. Turn off ...

Hardware Maintenance Manual
Page 91
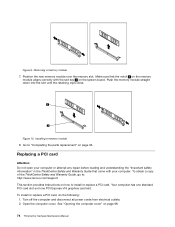
...ThinkCentre Safety and Warranty Guide, go to: http://www.lenovo.com/support This section provides instructions on page 68. 3. If you are replacing an old PCI card, grasp the old card that came with your computer. Your computer has two standard PCI card slots, one PCI Express x1 card slot, and one PCI Express x16 graphics card... slot. Remove the computer cover. Figure 17. To install or replace a PCI card, do the ...
...ThinkCentre Safety and Warranty Guide, go to: http://www.lenovo.com/support This section provides instructions on page 68. 3. If you are replacing an old PCI card, grasp the old card that came with your computer. Your computer has two standard PCI card slots, one PCI Express x1 card slot, and one PCI Express x16 graphics card... slot. Remove the computer cover. Figure 17. To install or replace a PCI card, do the ...
Hardware Maintenance Manual
Page 92
... pull it is held in place by a retaining latch, press the card retaining latch 1 as shown to the closed before you are installing a PCI Express x16 graphics card, make sure the memory slot retaining clips are closed position to secure the PCI card. 84 ThinkCentre Hardware Maintenance Manual Pivot the card latch to disengage the latch.
... pull it is held in place by a retaining latch, press the card retaining latch 1 as shown to the closed before you are installing a PCI Express x16 graphics card, make sure the memory slot retaining clips are closed position to secure the PCI card. 84 ThinkCentre Hardware Maintenance Manual Pivot the card latch to disengage the latch.
Hardware Maintenance Manual
Page 110
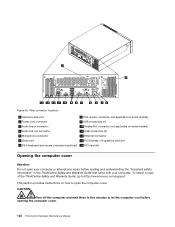
To obtain a copy of the ThinkCentre Safety and Warranty Guide, go to:http://www.lenovo.com/support This section provides instructions on some models) 11 USB connectors (2) 12 Ethernet connector 13 PCI Express x16 graphics card slot 14 PCI card slot Opening the computer cover Attention Do not open your computer. 8 7 6 5 4 3 6 5 8 4 7 3 Figure 39. CAUTION: Turn off...
To obtain a copy of the ThinkCentre Safety and Warranty Guide, go to:http://www.lenovo.com/support This section provides instructions on some models) 11 USB connectors (2) 12 Ethernet connector 13 PCI Express x16 graphics card slot 14 PCI card slot Opening the computer cover Attention Do not open your computer. 8 7 6 5 4 3 6 5 8 4 7 3 Figure 39. CAUTION: Turn off...
Hardware Maintenance Manual
Page 113
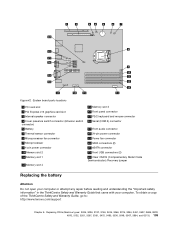
System board parts locations 1 PCI card slot 2 PCI Express x16 graphics card slot 3 Internal speaker connector 4 Cover presence switch connector (Intrusion switch connector) 5 Battery...Do not open your computer or attempt any repair before reading and understanding the "Important safety information" in the ThinkCentre Safety and Warranty Guide that came with your computer. Replacing FRUs (Machine types: 3026, 3039, 3137, 3149..., 5536, 5548, 5567, 5864, and 6213.) 105 To obtain a copy of the ThinkCentre Safety and Warranty Guide, go to: http://www.lenovo.com/support Chapter 9. Figure 42.
System board parts locations 1 PCI card slot 2 PCI Express x16 graphics card slot 3 Internal speaker connector 4 Cover presence switch connector (Intrusion switch connector) 5 Battery...Do not open your computer or attempt any repair before reading and understanding the "Important safety information" in the ThinkCentre Safety and Warranty Guide that came with your computer. Replacing FRUs (Machine types: 3026, 3039, 3137, 3149..., 5536, 5548, 5567, 5864, and 6213.) 105 To obtain a copy of the ThinkCentre Safety and Warranty Guide, go to: http://www.lenovo.com/support Chapter 9. Figure 42.

Hardware Maintenance Manual
Page 116
... close. Installing a memory module 8. To obtain a copy of the ThinkCentre Safety and Warranty Guide, go to: http://www.lenovo.com/support This section provides instructions on page 102. 108 ThinkCentre Hardware Maintenance Manual See "Opening the computer cover" on how to "Completing... Your computer has one standard PCI card slot and one PCI Express x16 graphics card slot. Replacing a PCI card Attention Do not open your computer or attempt any repair before reading and understanding the "Important safety information" in the ThinkCentre Safety and Warranty Guide that the...
... close. Installing a memory module 8. To obtain a copy of the ThinkCentre Safety and Warranty Guide, go to: http://www.lenovo.com/support This section provides instructions on page 102. 108 ThinkCentre Hardware Maintenance Manual See "Opening the computer cover" on how to "Completing... Your computer has one standard PCI card slot and one PCI Express x16 graphics card slot. Replacing a PCI card Attention Do not open your computer or attempt any repair before reading and understanding the "Important safety information" in the ThinkCentre Safety and Warranty Guide that the...
Hardware Maintenance Manual
Page 74
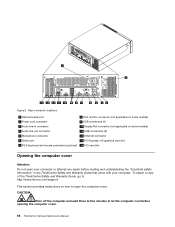
To obtain a copy of the ThinkCentre Safety and Warranty Guide, go to: http://www.lenovo.com/support This section provides instructions on how to let the computer cool before reading and understanding the "Important safety information" in ... x16 graphics card slot 14 PCI card slot Opening the computer cover Attention Do not open the computer cover. CAUTION: Turn off the computer and wait three to five minutes to open your computer. 8 7 6 5 4 3 6 5 8 4 7 3 Figure 2. Rear connector locations 1 Optional serial port 2 Power cord connector 3 Audio line-in the ThinkCentre Safety ...
To obtain a copy of the ThinkCentre Safety and Warranty Guide, go to: http://www.lenovo.com/support This section provides instructions on how to let the computer cool before reading and understanding the "Important safety information" in ... x16 graphics card slot 14 PCI card slot Opening the computer cover Attention Do not open the computer cover. CAUTION: Turn off the computer and wait three to five minutes to open your computer. 8 7 6 5 4 3 6 5 8 4 7 3 Figure 2. Rear connector locations 1 Optional serial port 2 Power cord connector 3 Audio line-in the ThinkCentre Safety ...
Hardware Maintenance Manual
Page 77
Replacing FRUs (Machine type: 7536) 71 Figure 5. To obtain a copy of the ThinkCentre Safety and Warranty Guide, go to: http://www.lenovo.com/support Chapter 8. System board parts locations 1 PCI card slot 2 PCI Express x16 graphics card slot 3 Internal speaker connector 4 Cover presence switch connector (Intrusion switch connector) 5 Battery 6 Thermal sensor connector 7 ...the battery Attention Do not open your computer or attempt any repair before reading and understanding the "Important safety information" in the ThinkCentre Safety and Warranty Guide that came with your computer.
Replacing FRUs (Machine type: 7536) 71 Figure 5. To obtain a copy of the ThinkCentre Safety and Warranty Guide, go to: http://www.lenovo.com/support Chapter 8. System board parts locations 1 PCI card slot 2 PCI Express x16 graphics card slot 3 Internal speaker connector 4 Cover presence switch connector (Intrusion switch connector) 5 Battery 6 Thermal sensor connector 7 ...the battery Attention Do not open your computer or attempt any repair before reading and understanding the "Important safety information" in the ThinkCentre Safety and Warranty Guide that came with your computer.
Hardware Maintenance Manual
Page 80
...the retaining clips close. Go to "Completing the parts replacement" on page 68. 74 ThinkCentre Hardware Maintenance Manual Your computer has one standard PCI card slot and one PCI Express x16 graphics card slot. Turn off the computer and disconnect all power cords from electrical outlets. 2. ...replace a PCI card, do the following: 1. Replacing a PCI card Attention Do not open your computer or attempt any repair before reading and understanding the "Important safety information" in the ThinkCentre Safety and Warranty Guide that the notch 1 on how to : http://www.lenovo.com/support This...
...the retaining clips close. Go to "Completing the parts replacement" on page 68. 74 ThinkCentre Hardware Maintenance Manual Your computer has one standard PCI card slot and one PCI Express x16 graphics card slot. Turn off the computer and disconnect all power cords from electrical outlets. 2. ...replace a PCI card, do the following: 1. Replacing a PCI card Attention Do not open your computer or attempt any repair before reading and understanding the "Important safety information" in the ThinkCentre Safety and Warranty Guide that the notch 1 on how to : http://www.lenovo.com/support This...

Safety and Warranty Guide (English)
Page 26
Connect the keyboard cable to one of the USB connectors on the computer. 4. Note: Some models will have a VGA (Video Graphics Array) standard monitor, connect the cable to one of the USB connectors on the computer. 115 2. Connect the mouse cable to the connector as shown. ... the monitor connector on how to the Access Help information system for instructions on the computer. • If you set up and turn on the graphics card. 18 ThinkCentre Safety and Warranty Guide
Connect the keyboard cable to one of the USB connectors on the computer. 4. Note: Some models will have a VGA (Video Graphics Array) standard monitor, connect the cable to one of the USB connectors on the computer. 115 2. Connect the mouse cable to the connector as shown. ... the monitor connector on how to the Access Help information system for instructions on the computer. • If you set up and turn on the graphics card. 18 ThinkCentre Safety and Warranty Guide
Safety and Warranty Guide (English)
Page 27
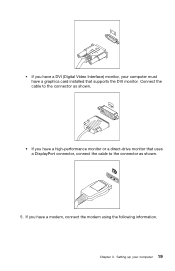
Setting up your computer must have a graphics card installed that uses a DisplayPort connector, connect the cable to the connector as shown. • If you have a modem, connect the modem using the following information. Chapter 3. If you have a high-performance monitor or a direct-drive monitor that supports the DVI monitor. Connect the cable to the connector as shown. 5. • If you have a DVI (Digital Video Interface) monitor, your computer 19
Setting up your computer must have a graphics card installed that uses a DisplayPort connector, connect the cable to the connector as shown. • If you have a modem, connect the modem using the following information. Chapter 3. If you have a high-performance monitor or a direct-drive monitor that supports the DVI monitor. Connect the cable to the connector as shown. 5. • If you have a DVI (Digital Video Interface) monitor, your computer 19

Intel Active Management Technology Configuration Guide
Page 16
... KVM redirection. For more information about KVM user interfaces, see "KVM Configuration" on computers with Intel integrated graphics. KVM redirection ThinkCentre M90p computers built with Intel AMT 6.X support Keyboard-Video-Mouse (KVM) redirection over -LAN (SOL) function can be...ThinkCentre M90p with Intel AMT Configuration Guide KVM redirection has the following advantages: v Work stably v Based on hardware Note: KVM redirection is based on computers that it can work correctly regardless of the operating system state of the managed clients. For computers with discrete graphics cards...
... KVM redirection. For more information about KVM user interfaces, see "KVM Configuration" on computers with Intel integrated graphics. KVM redirection ThinkCentre M90p computers built with Intel AMT 6.X support Keyboard-Video-Mouse (KVM) redirection over -LAN (SOL) function can be...ThinkCentre M90p with Intel AMT Configuration Guide KVM redirection has the following advantages: v Work stably v Based on hardware Note: KVM redirection is based on computers that it can work correctly regardless of the operating system state of the managed clients. For computers with discrete graphics cards...


